음... 뭘 할거냐면...
서버에 유저 기능이 필요한데, 서버 세팅하고, 이것저것 깔고, 또 개발환경 세팅하고... 끝도 안날거 같아서
'먼저 만들고 필요하면 서버 세팅하자!' 는 생각에 AWS Coginoto를 이용해서 만들어 보기로 결정했다.
AWS Cognito ??
Amazon Cognito는 웹 및 모바일 앱에 대한 인증, 권한 부여 및 사용자 관리를 제공합니다. 사용자는 사용자 이름과 암호를 사용하여 직접 로그인하거나 Facebook, Amazon, Google 또는 Apple 같은 타사를 통해 로그인할 수 있습니다.
Amazon Cognito의 두 가지 주요 구성 요소는 사용자 풀과 자격 증명 풀입니다. 사용자 풀은 앱 사용자의 가입 및 로그인 옵션을 제공하는 사용자 디렉터리입니다. 자격 증명 풀을 통해 기타 AWS 서비스에 대한 사용자 액세스 권한을 부여할 수 있습니다. 자격 증명 풀과 사용자 풀을 별도로 또는 함께 사용할 수 있습니다.
출처: Amazon Cognito 개발자 가이드
Cognito 설정
어디로 가냐?

왼쪽에 사용자 풀 관리 버튼을 눌러 유저 풀 대시보드로 이동해서,
우측 상단에 생성 클릭
어찌 만들거냐?
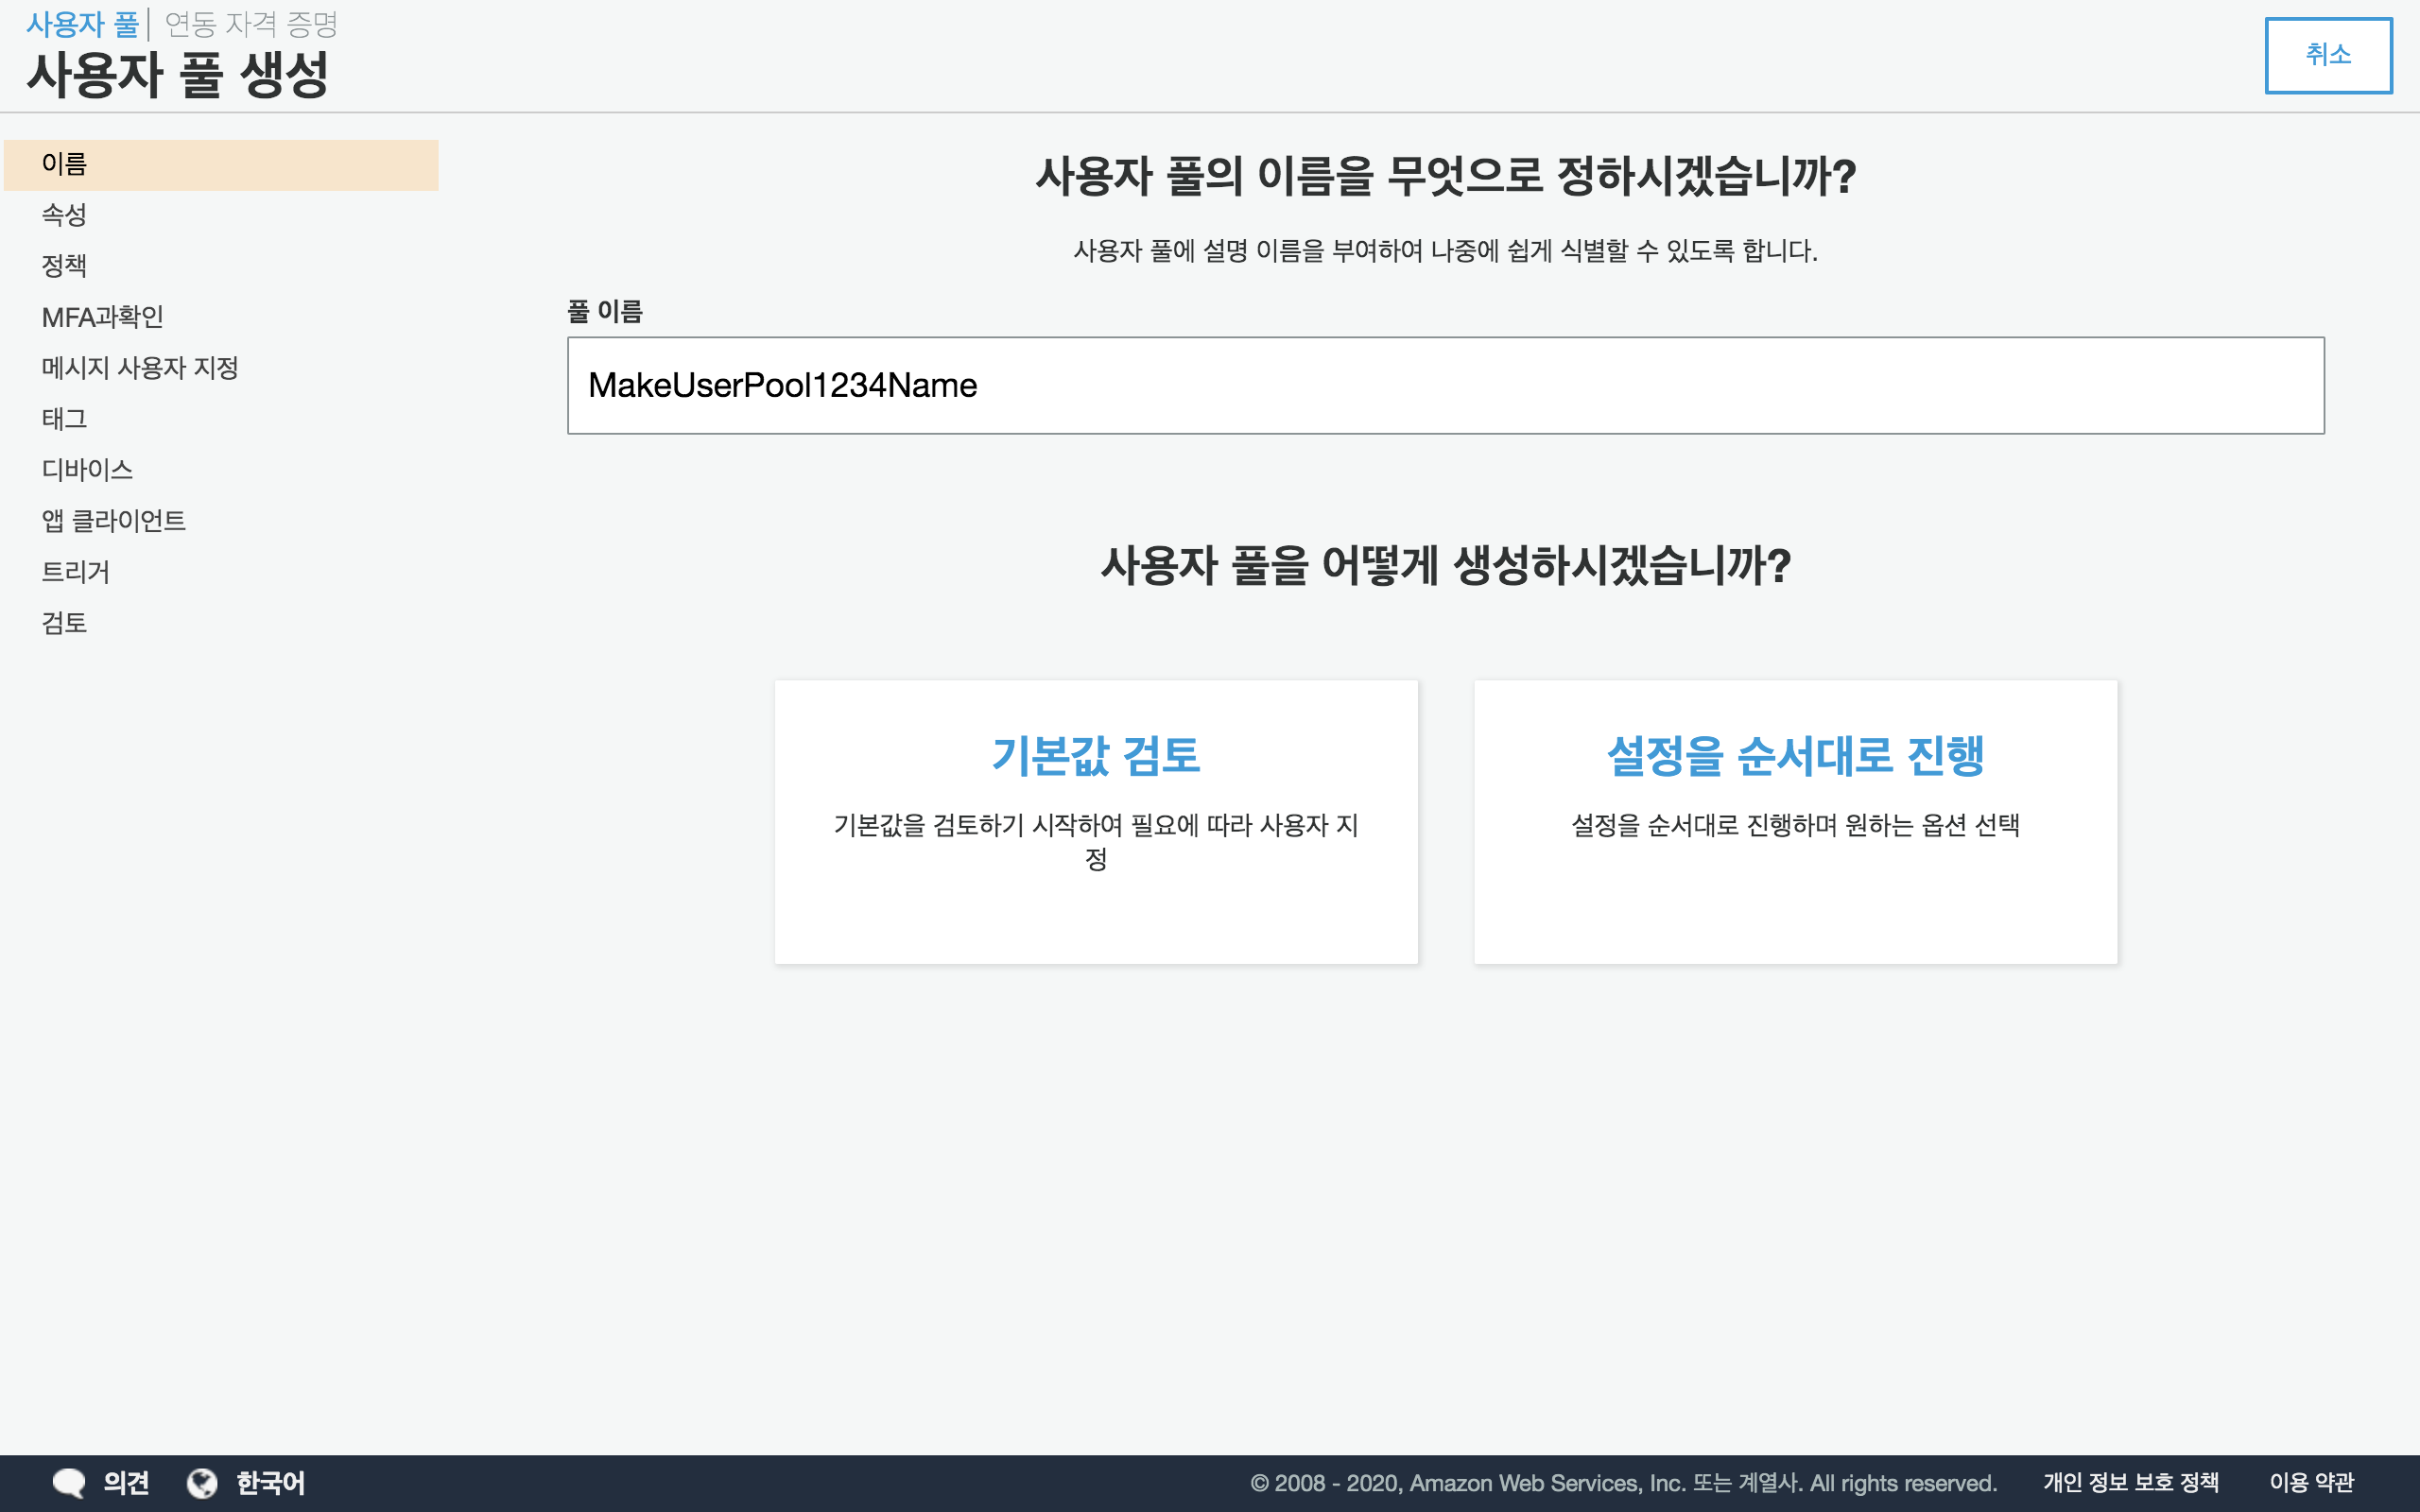
1. 사용자 풀 이름
쉽게 식별되어야 하니 유니크한 이름으로
2. 어떻게 사용자 풀을 생성할지 선택
아래 보이는 기본값 검토와 설정을 순서대로 진행 중 하나를 선택한다.
개인 적으로는
- 기본값 검토: 기본 설정으로 생성 후 설정
- 설정을 순서대로 진행: 한 단계식 설정
그래서 설정을 순서대로 진행으로 진행하기로 결정
뭘로 로그인 할거냐?
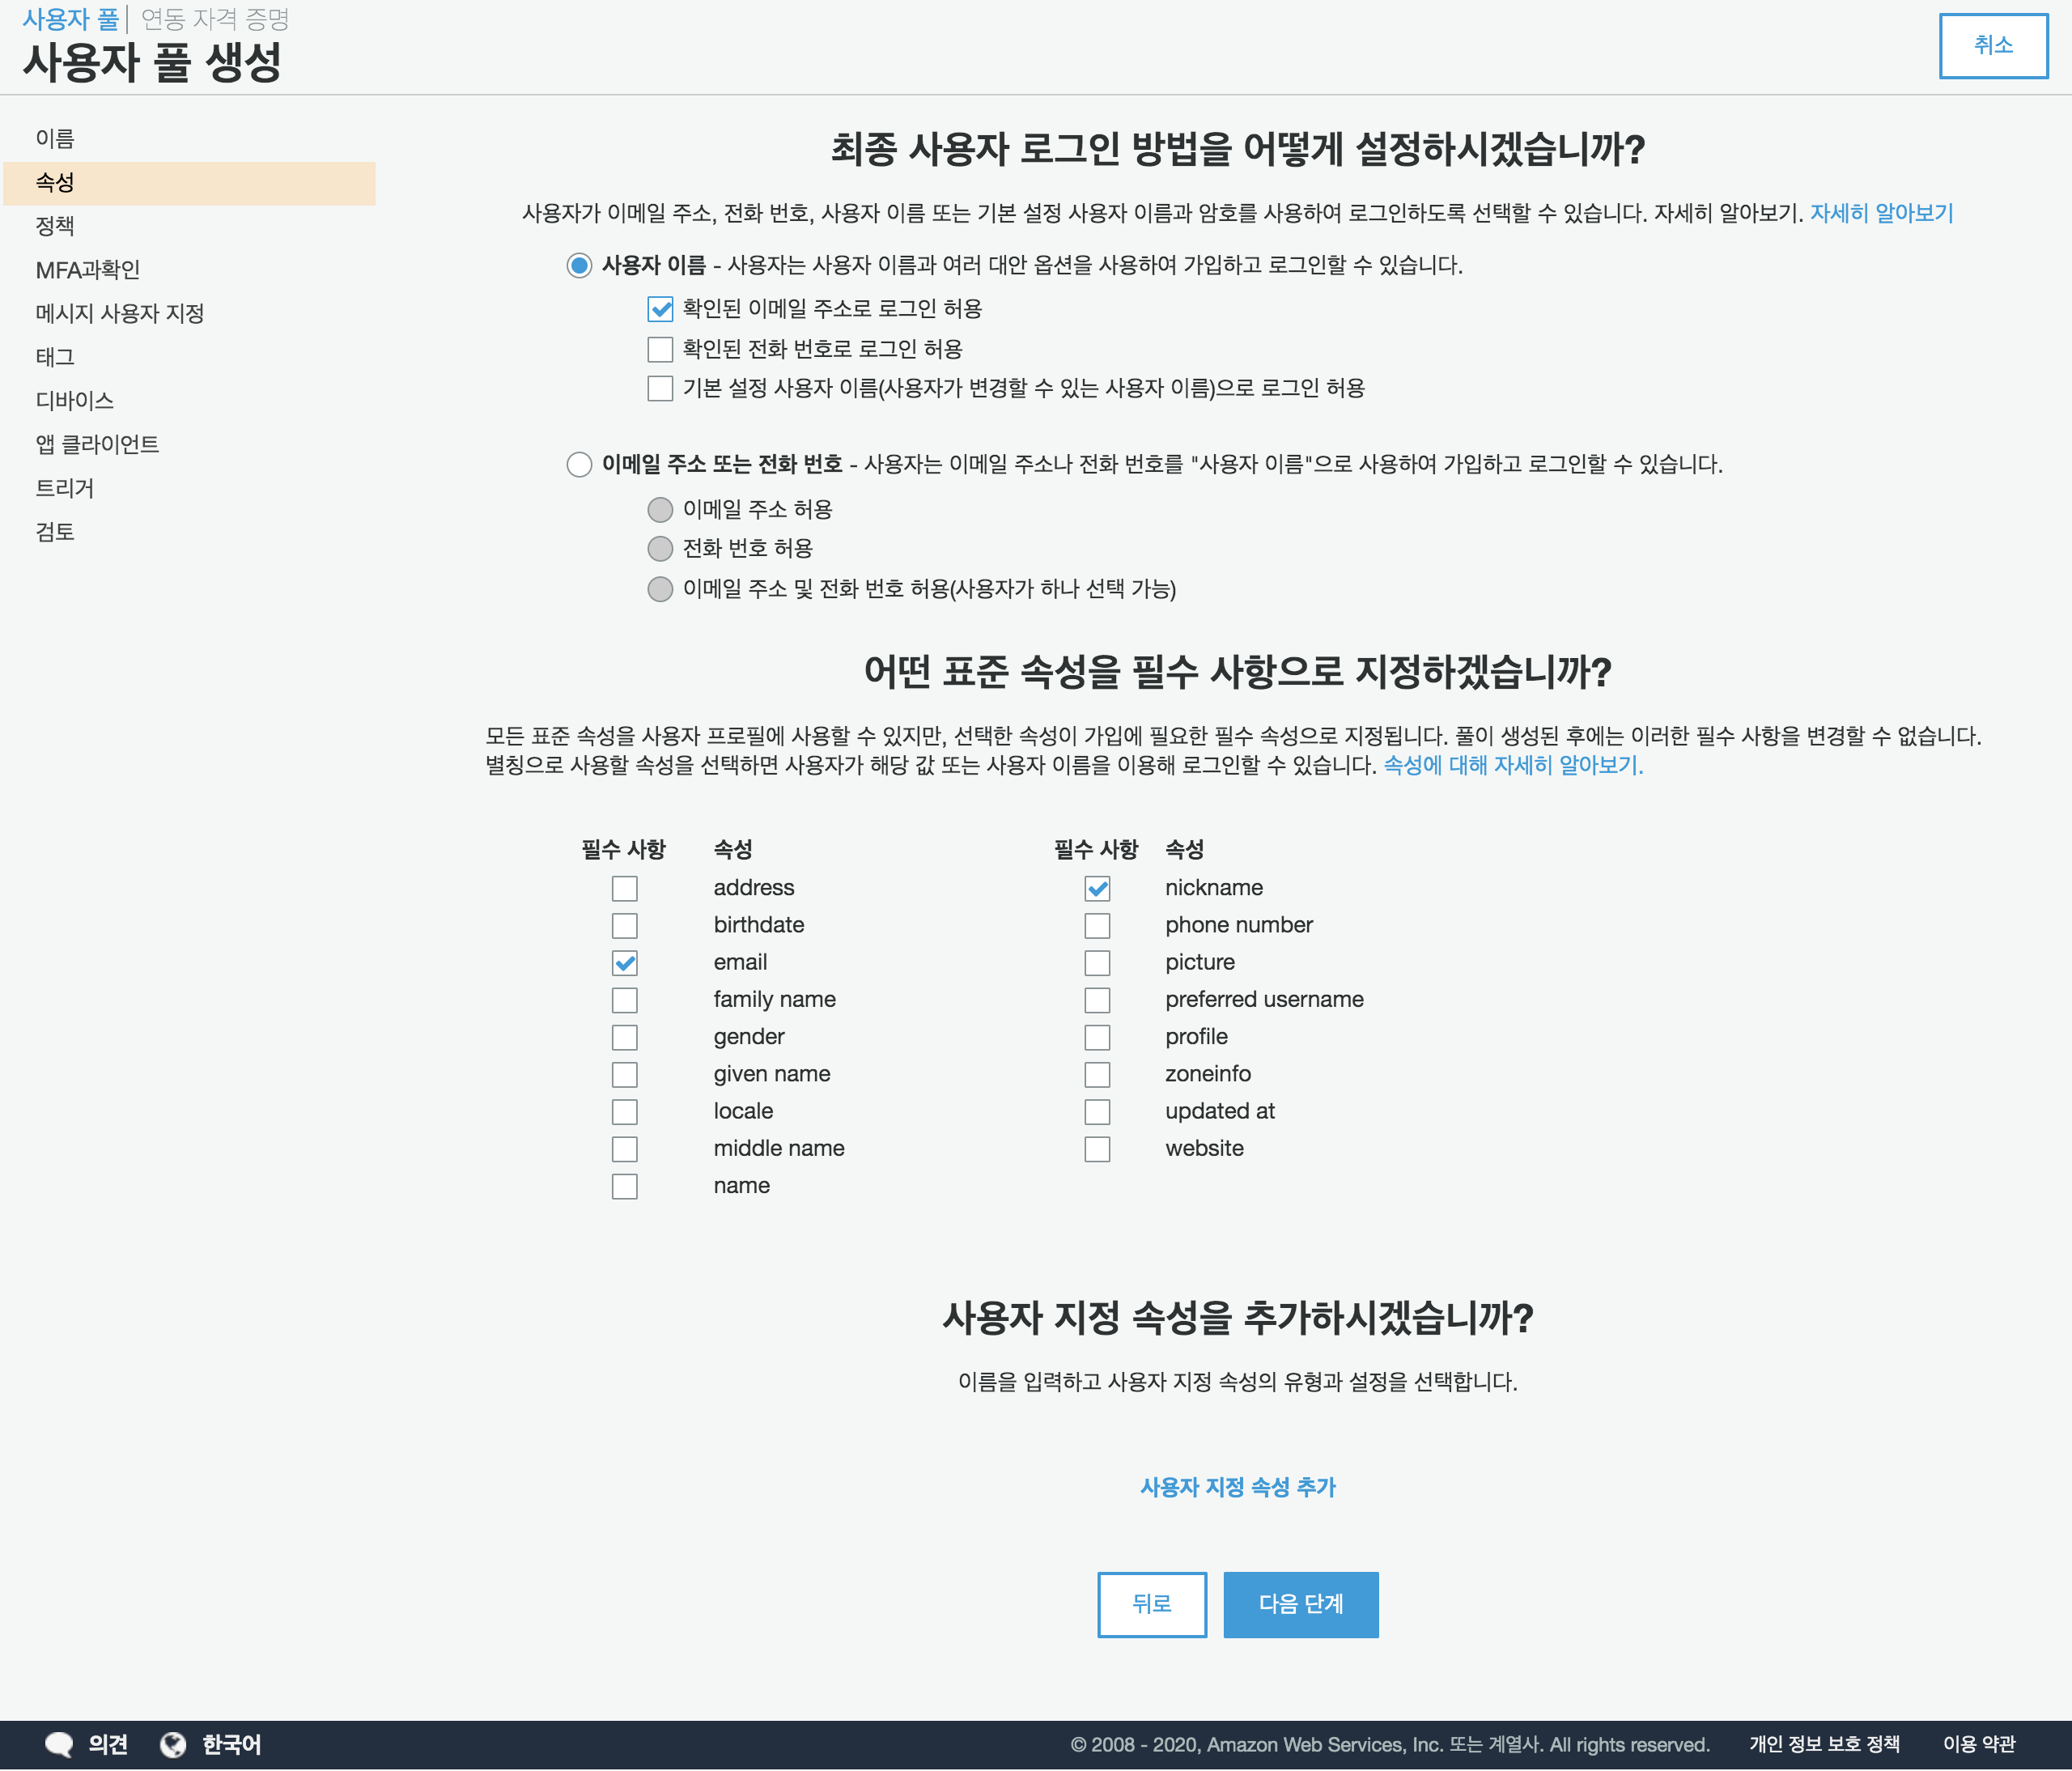
1. 로그인 수단
- 사용자 이름: 우리가 흔히 아는 id
- 이메일 주소 또는 전화번호: 생략ㅋ
사용자 입력 id와 email로 로그인을 지원하기 위해서 사용자이름과
하위 선택 항목으로 확인된 이메일 주소로 로그인 허용에 체크
2. 필수 정보 속성
필수 👉🏼 딴건 다 필요 없어도 이건 있어야 겠다!!👍🏼
- nickname
비밀번호는?
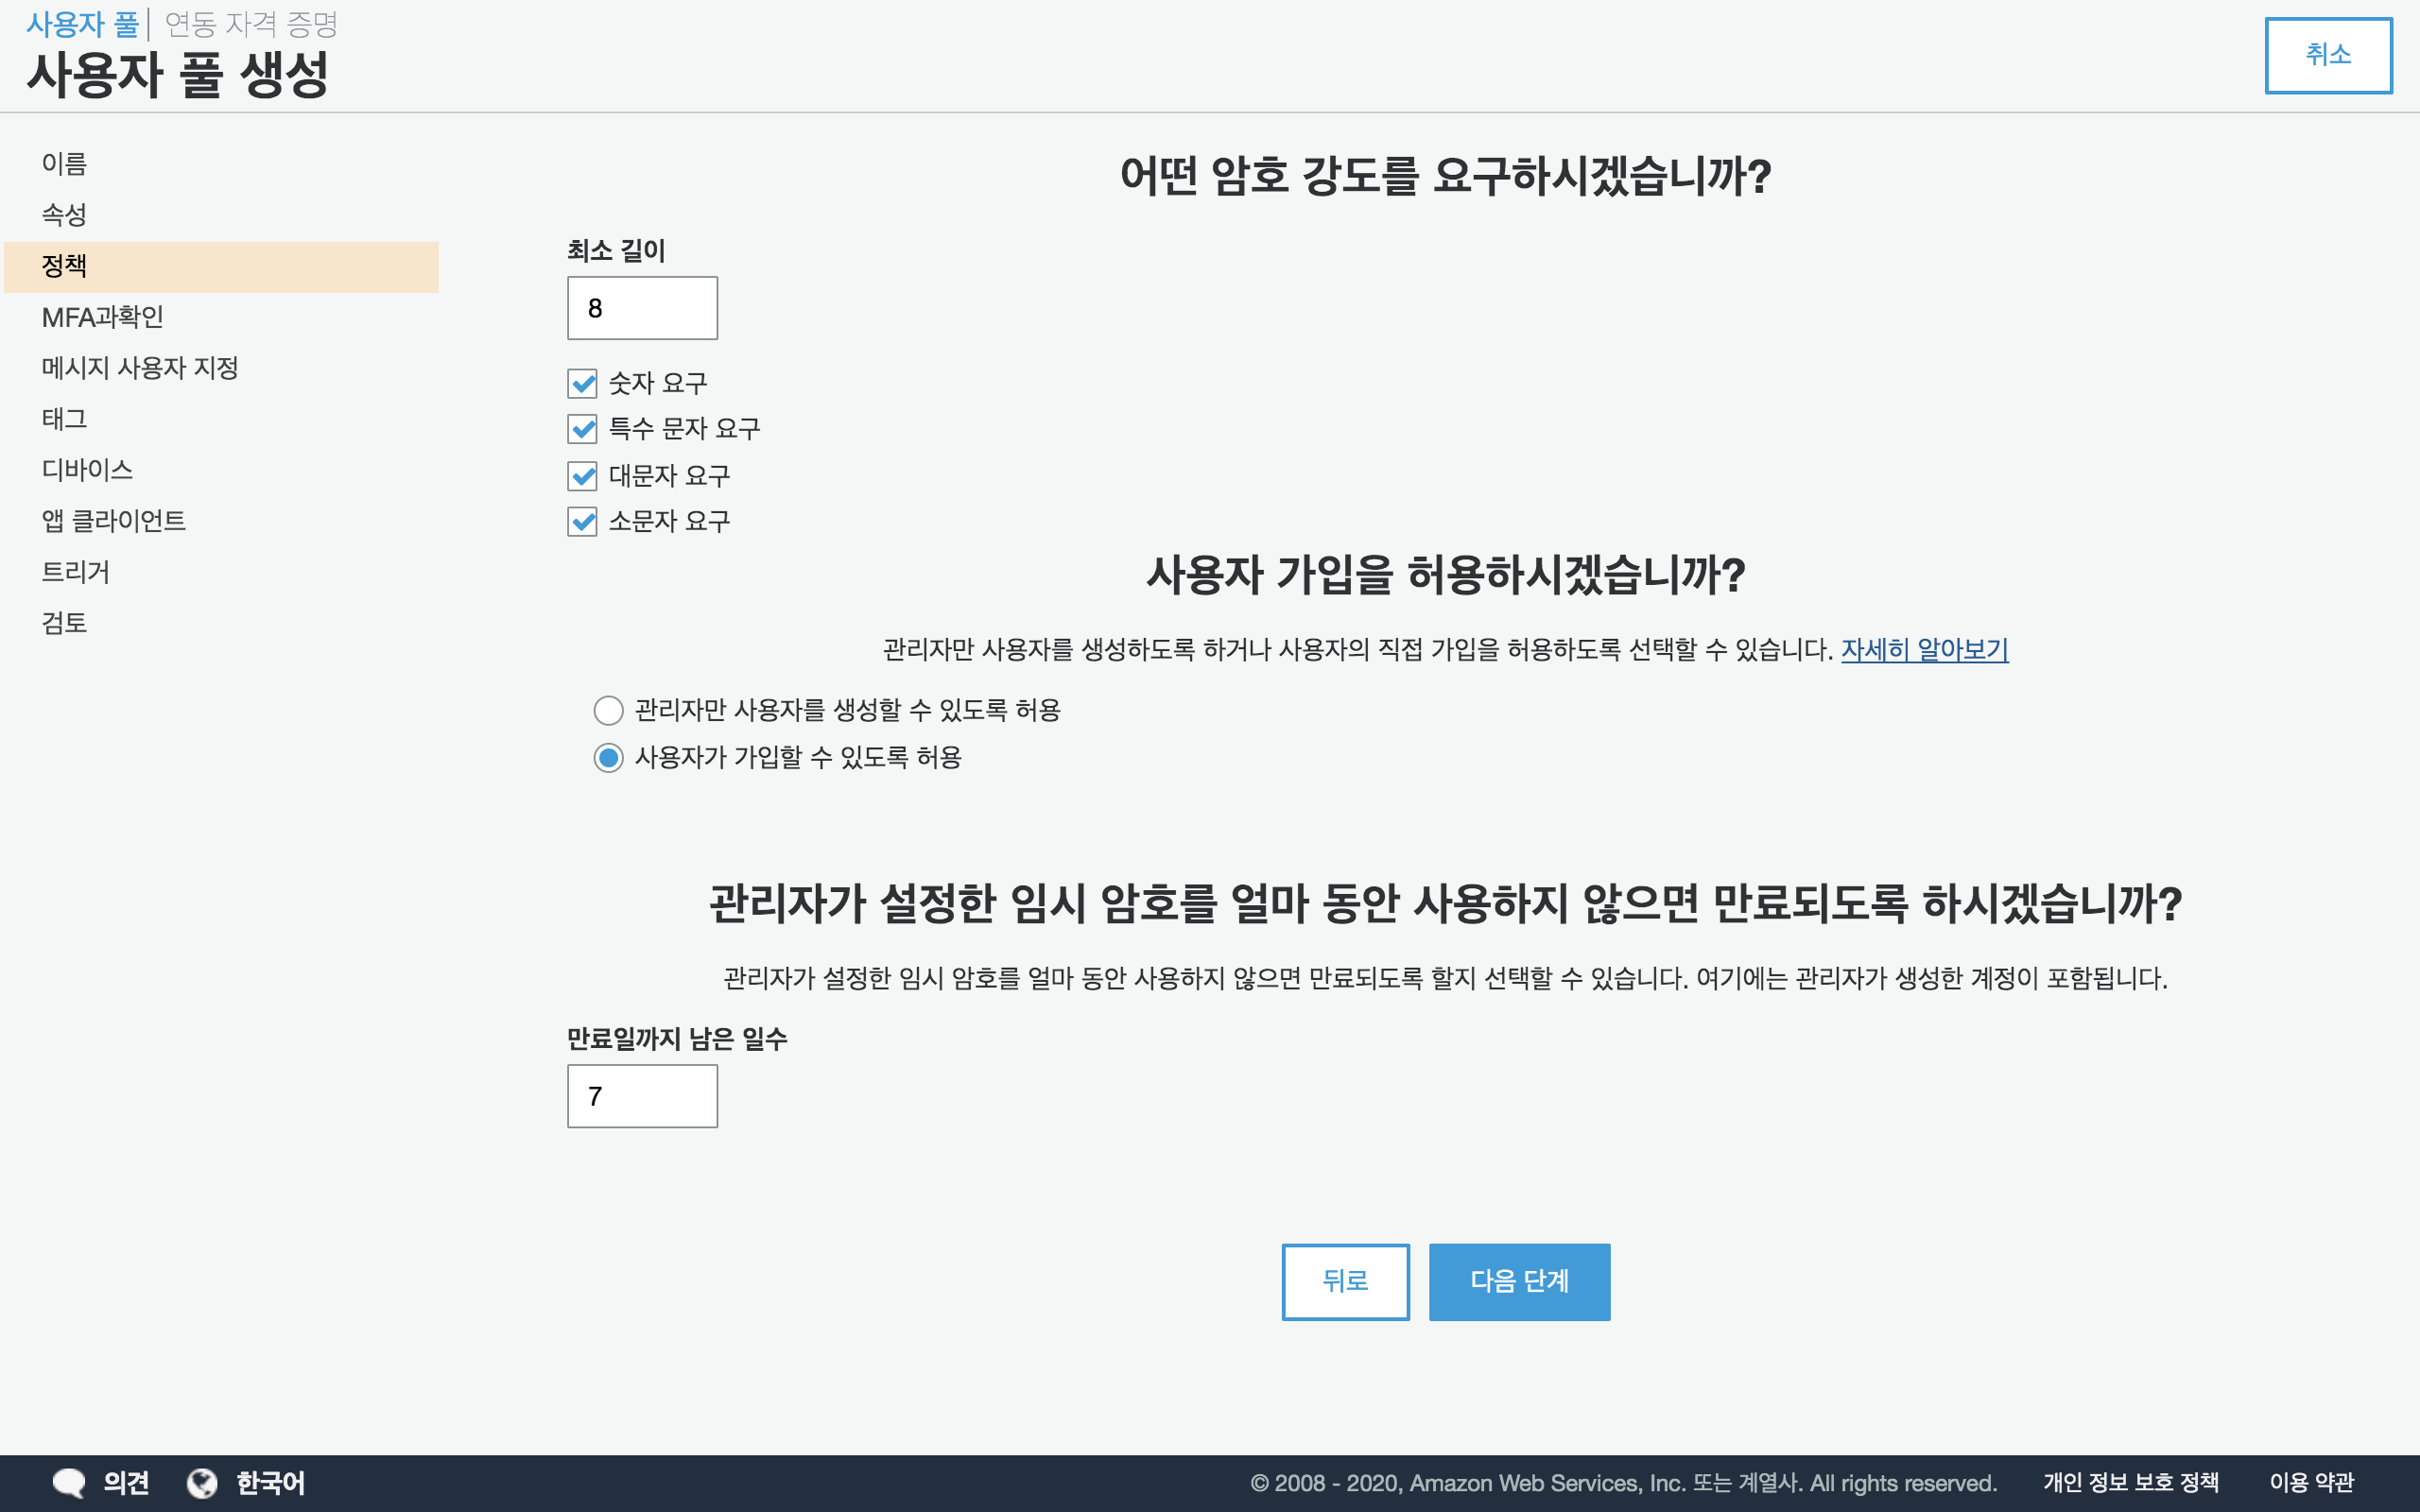
크게 설명할 부분이...
MFA와 계정 찾기
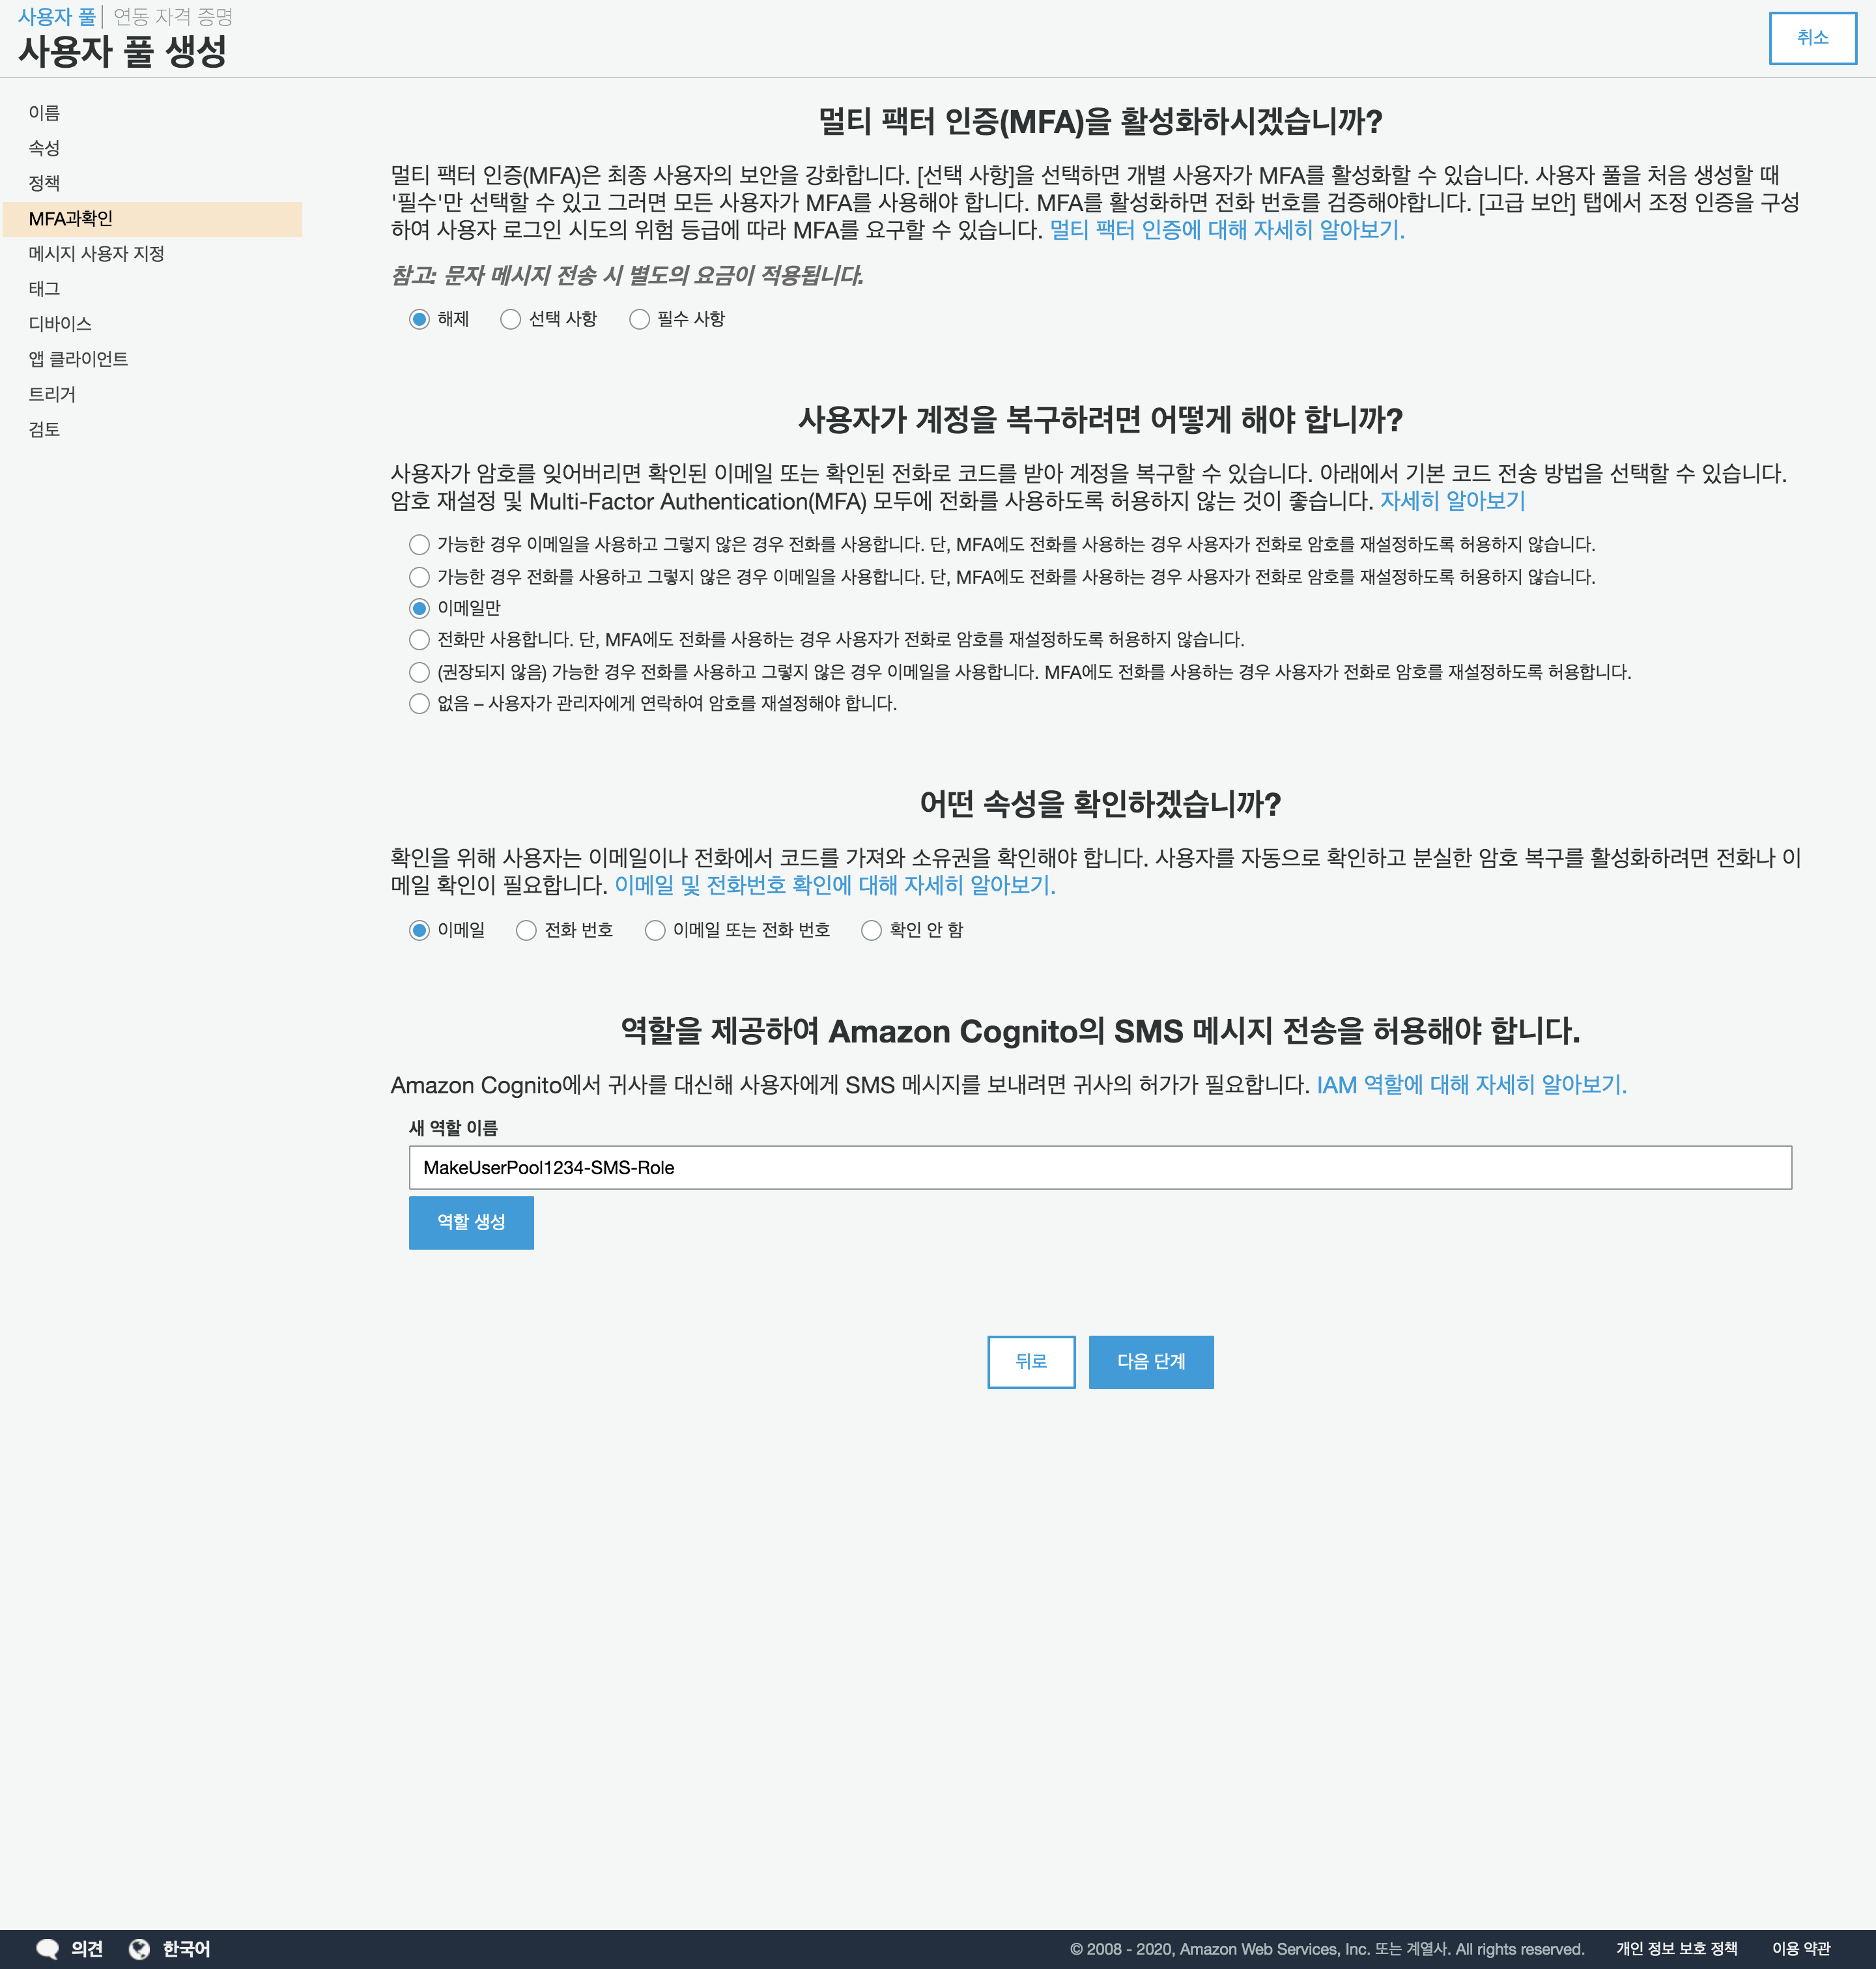
1. 멀티 팩터 인증(MFA)
추가적인 인증 수단으로 인증코드 쓸거냐고 묻는건데,
참고: 문자 메시지 전송 시 별도의 요금이 적용됩니다.
응, 안해^^
2. 계정 복구
비밀 번호 찾을 때 어떻게 할래?
앞에 단계에서 전화번호 없이 이메일만 쓰니, 확인 코드는 이메일로!
이메일만 선택
3. 속성 확인
이 부분은 코드를 받아서 어떤 속성의 계정을 복구할 것인지?
✉️이메일 과 인증 코드로 비밀번호 복구
인증 코드는 어찌...
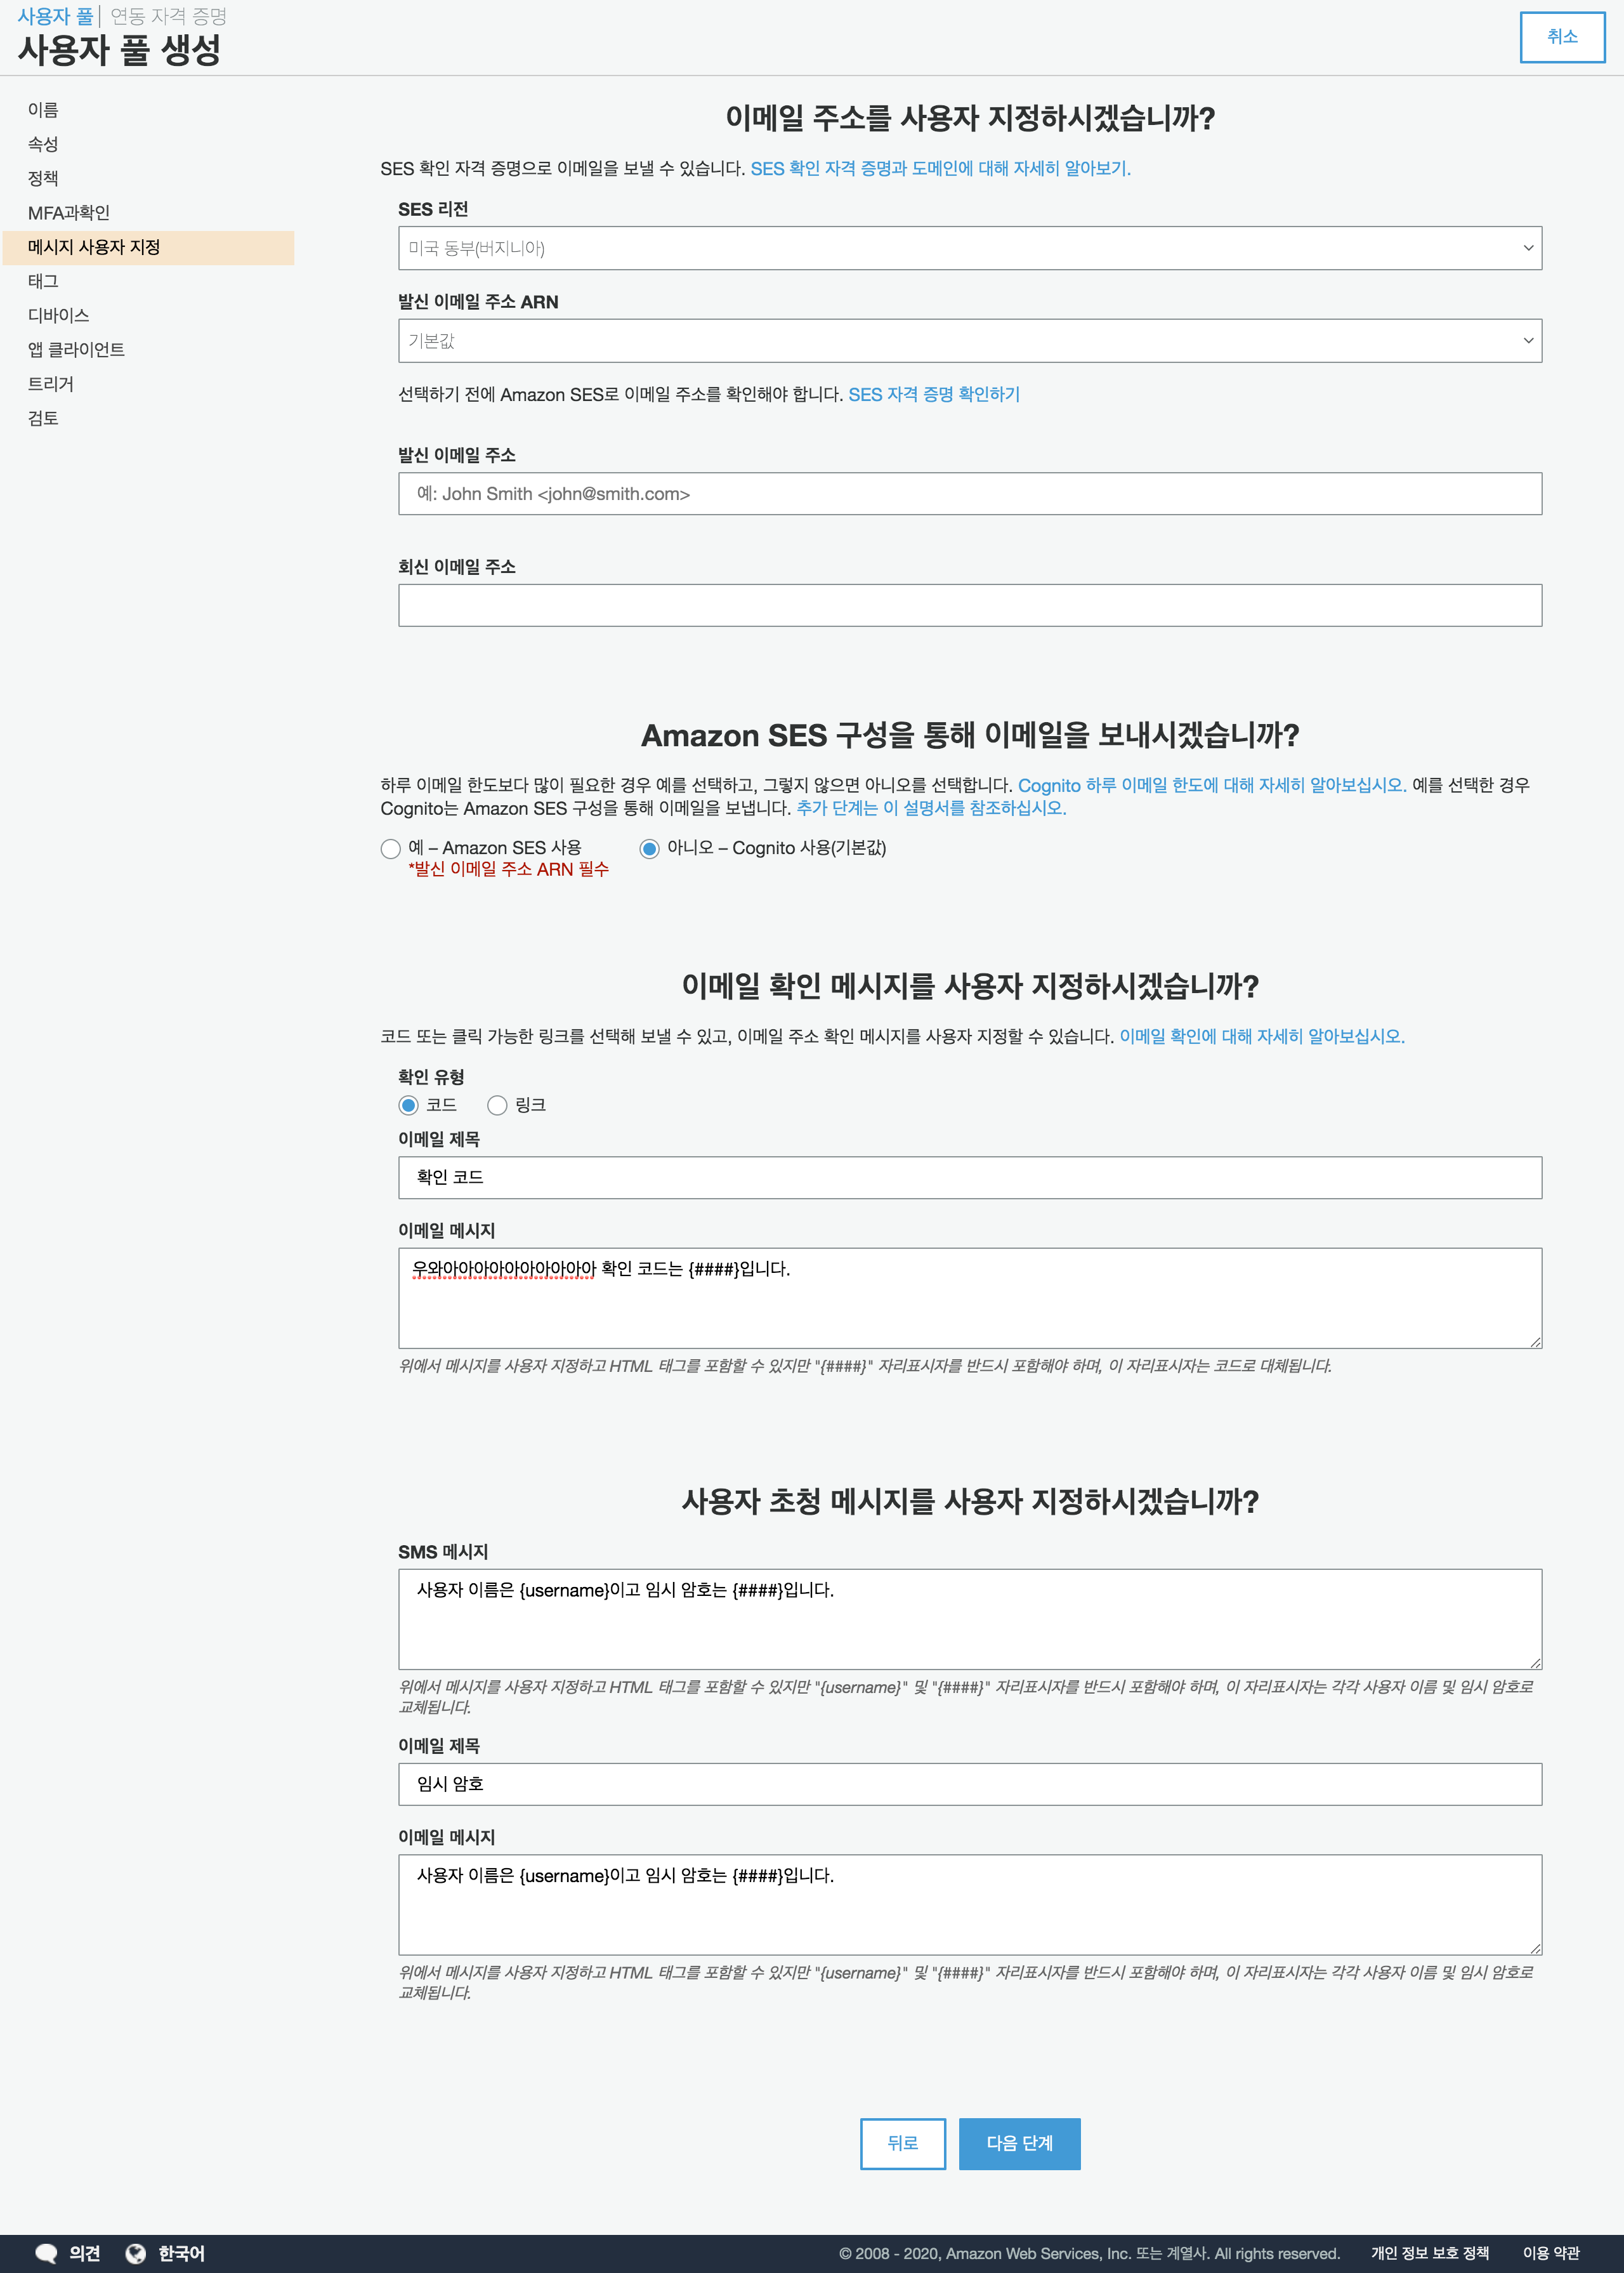
1. 이메일 주소
👉🏼특정 이메일로 보낼래?
지금은 아니니까 그냥 무시
2. Amazon SES 구성
위에 무시했으니 이것도 무시하기 위해
아니오 - Cognito 사용(기본값) 선택해서 인증 코드 전송에 의미를..
3. 이메일 메시지
가입 인증 수단으로 코드와 링크가 있다.
개인적으로 링크 보다 코드 입력 방식을 선호
이메일 제목과 이메일 메시지 작성
🚨"{####}" 자리표시자를 반드시 포함해야 하며 👉🏼이건 꼭 포함시켜야 해요~
4. 사용자 초청 메시지
이건 비밀번호 분실 했을 , 임시 비밀번호 알려주는 메세지 입력하는 부분
🚨"{username}" 및 "{####}" 자리표시자를 반드시 포함해야 하며 👉🏼이건 꼭 포함시켜야 해요~
클라이언트 설정
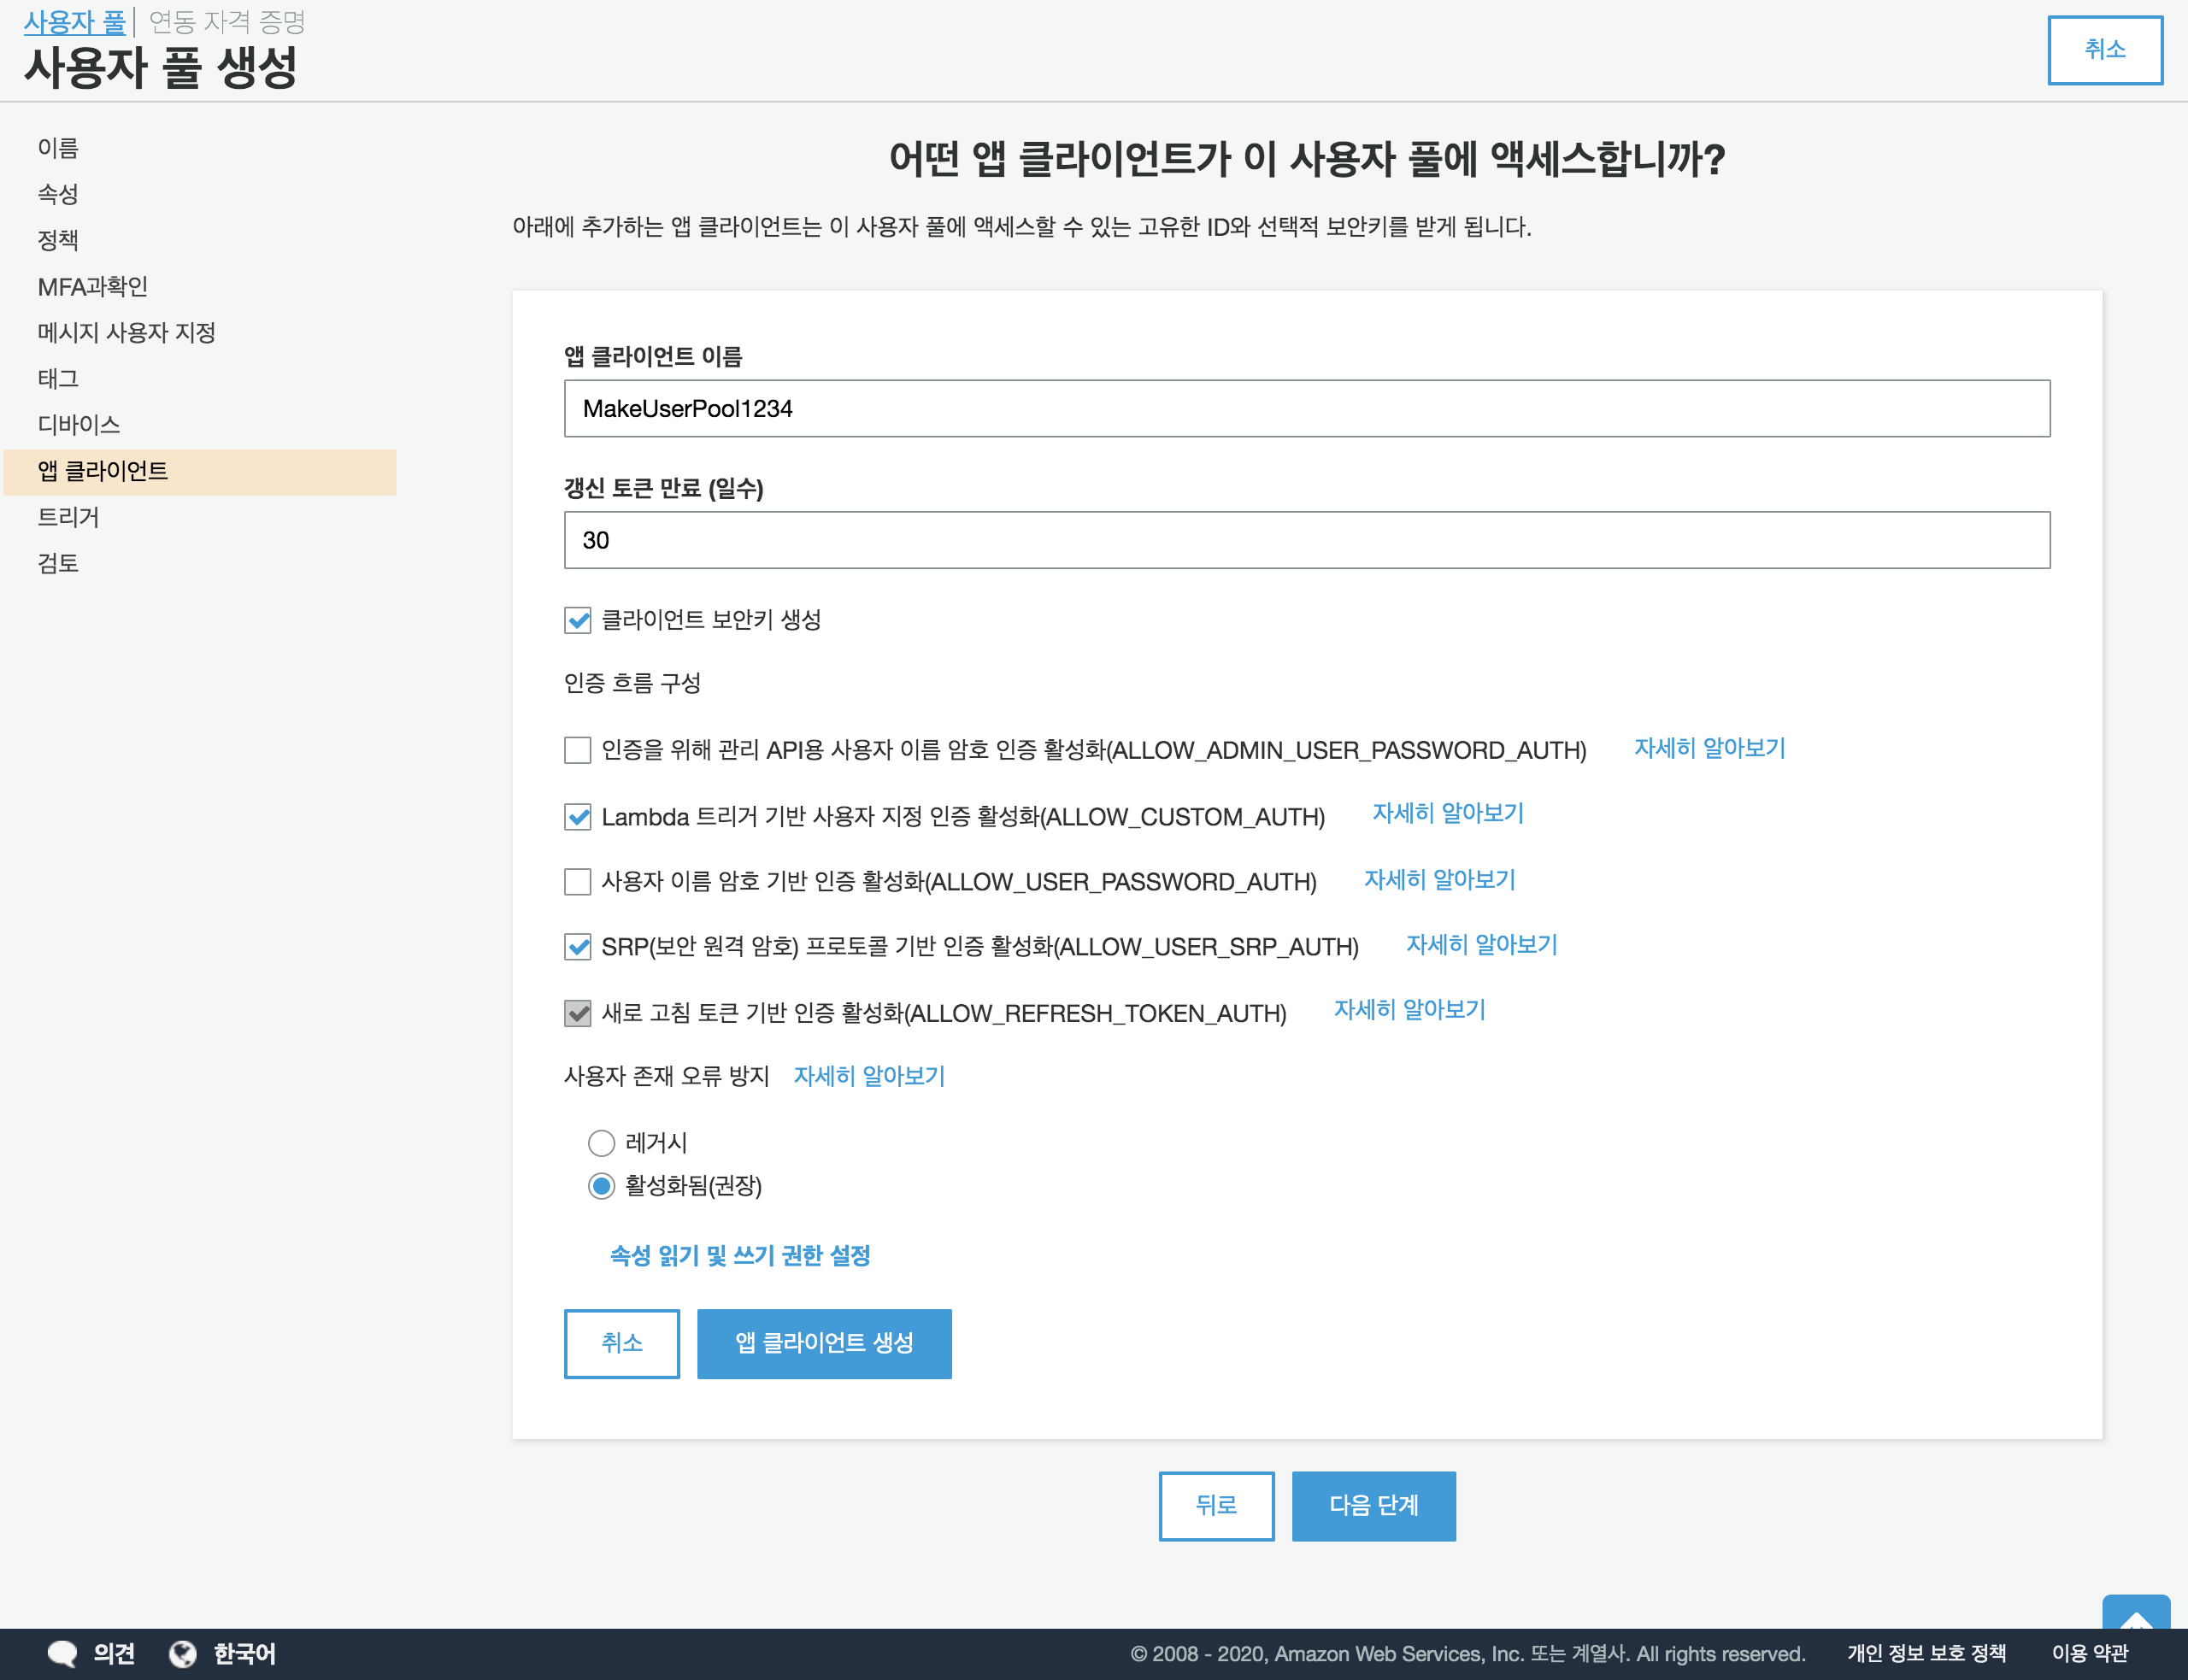
1. 앱 클라이언트 설정
앱 크라이언트 이름을 원하는 이름으로 설정하고,
토큰의 만료 기한을 입력한다.
- 클라이언트 보안키 생성
추후 생성되는 해당 클라이언트의 보안키 생성 옵션이다.
2. 인증 흐름 구성
검토
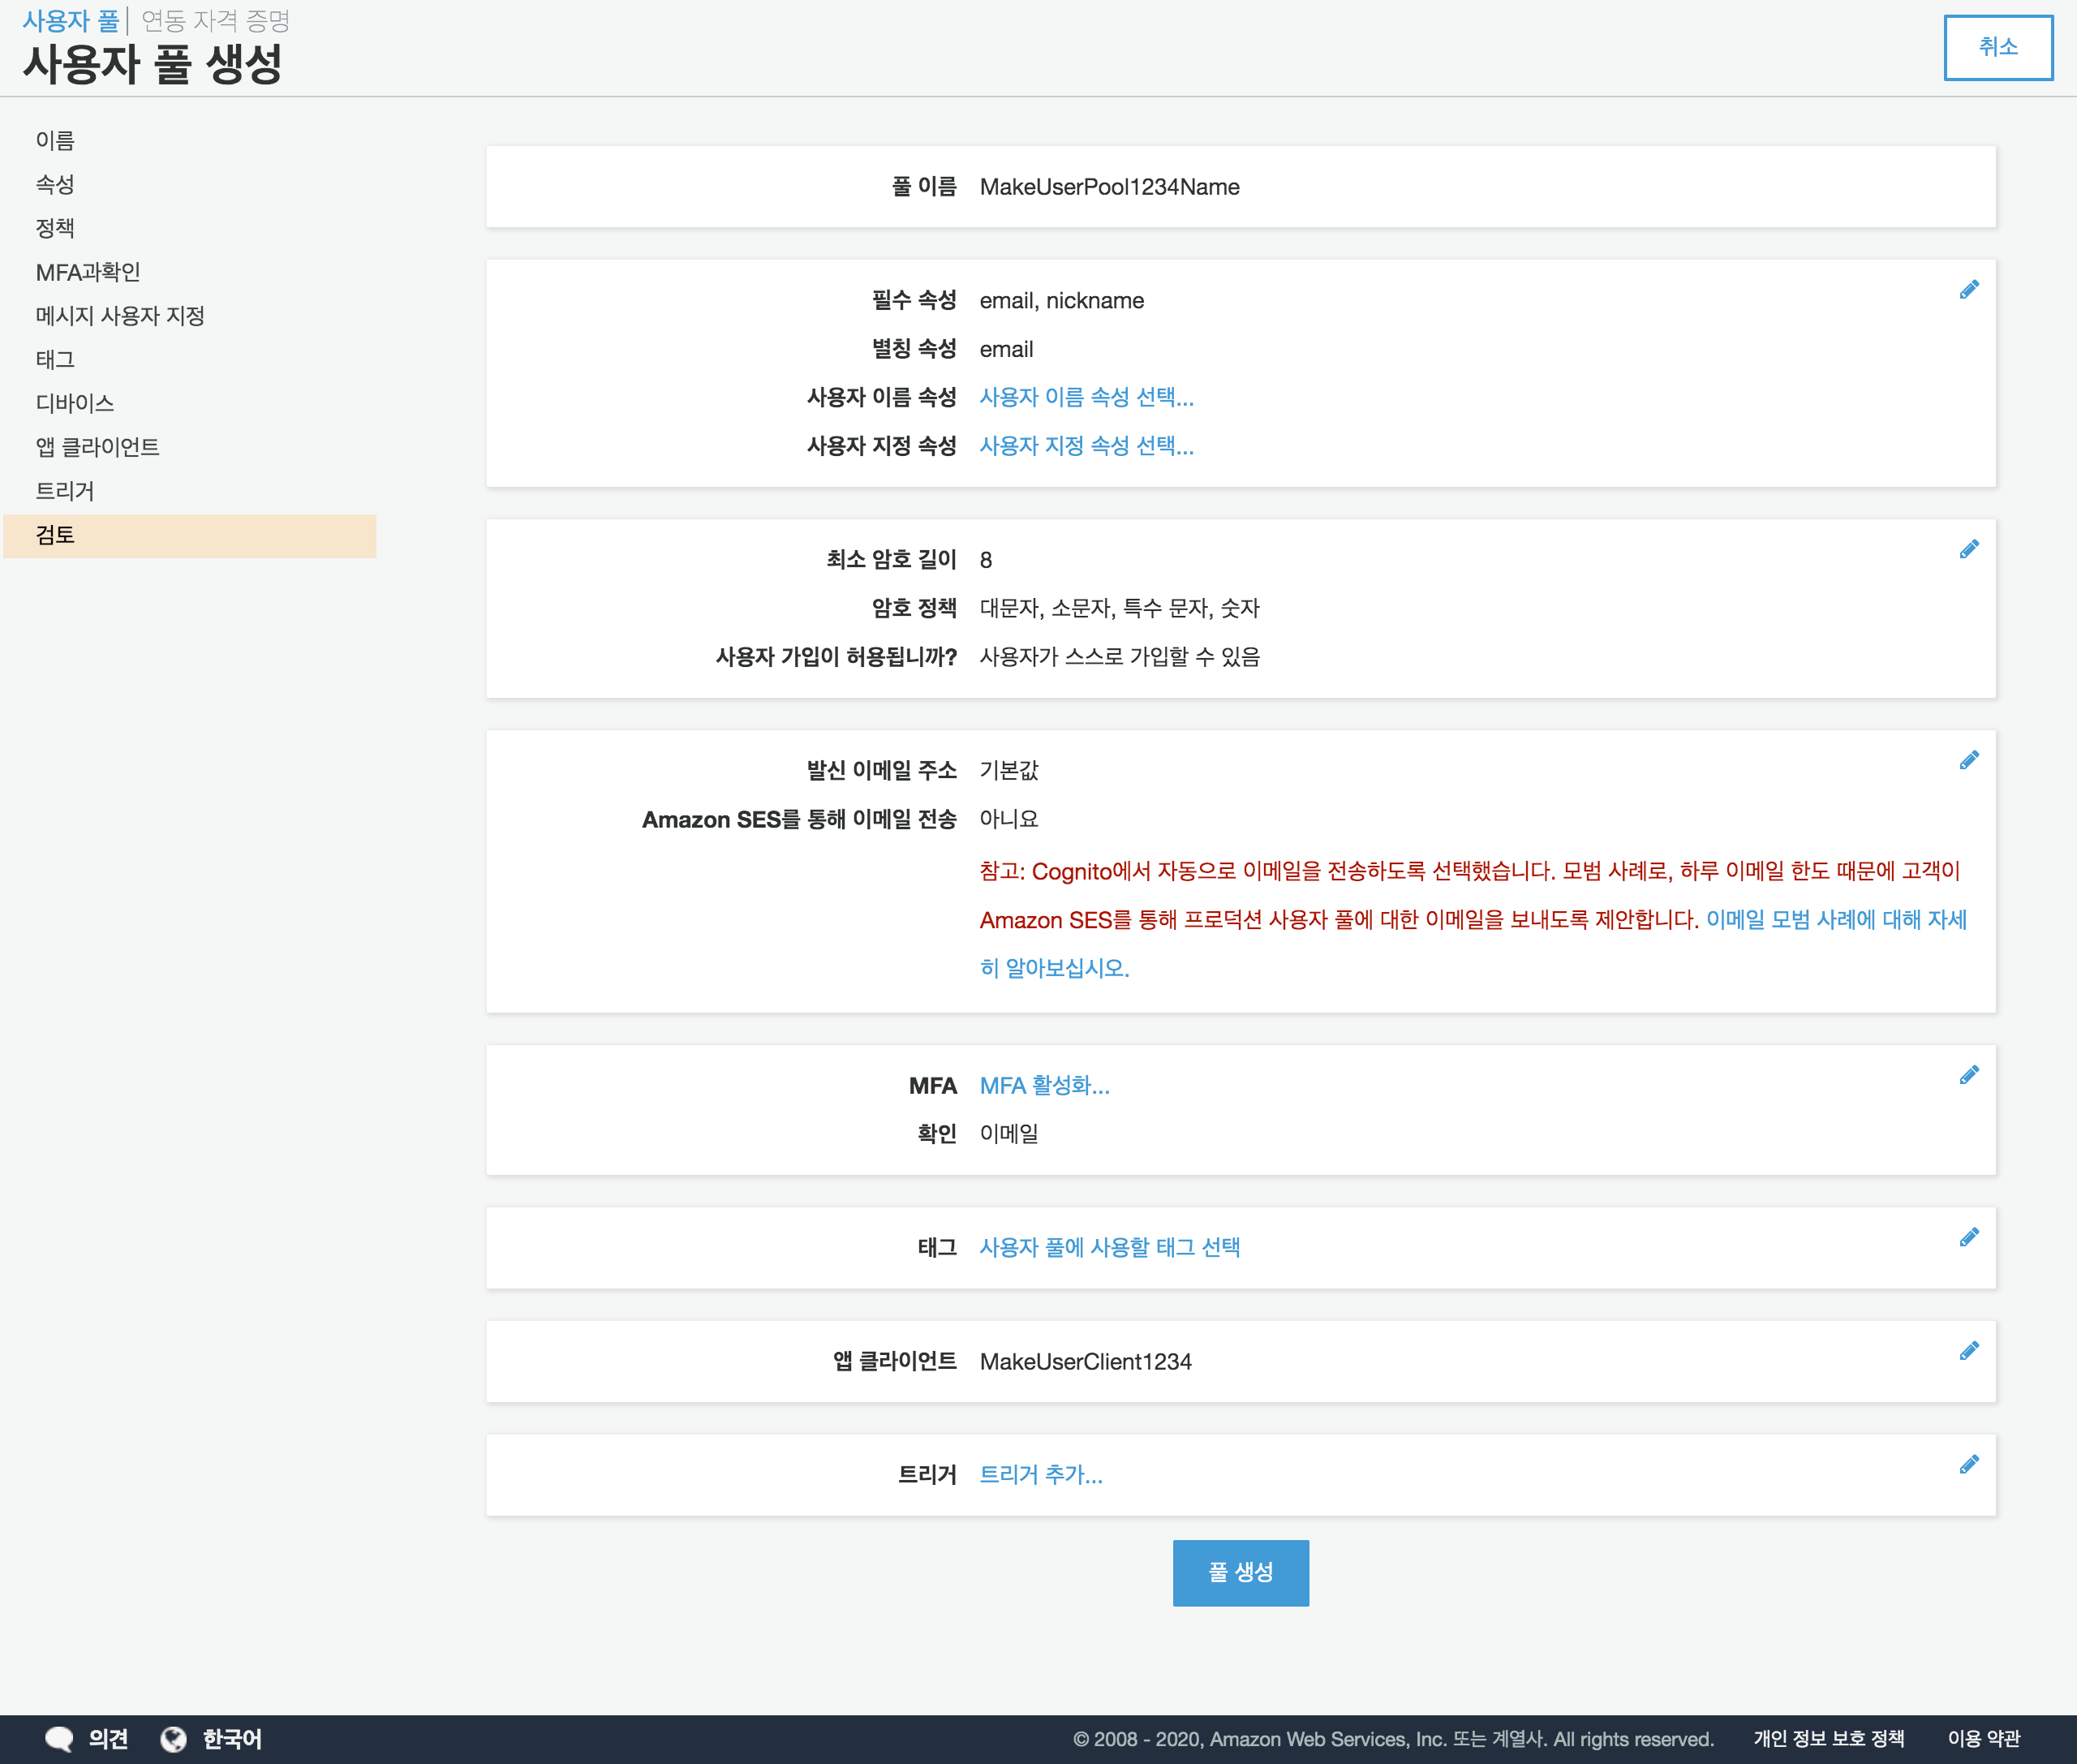
모든 설정 과정이 끝나면 다음과 같은 검토 화면이 보여진다.
설정 내용을 확인하고, 수정할 내용은 각 영역의 오른쪽 위 파란색 연필 버튼을 눌러 수정할 수 있다.
대시보드
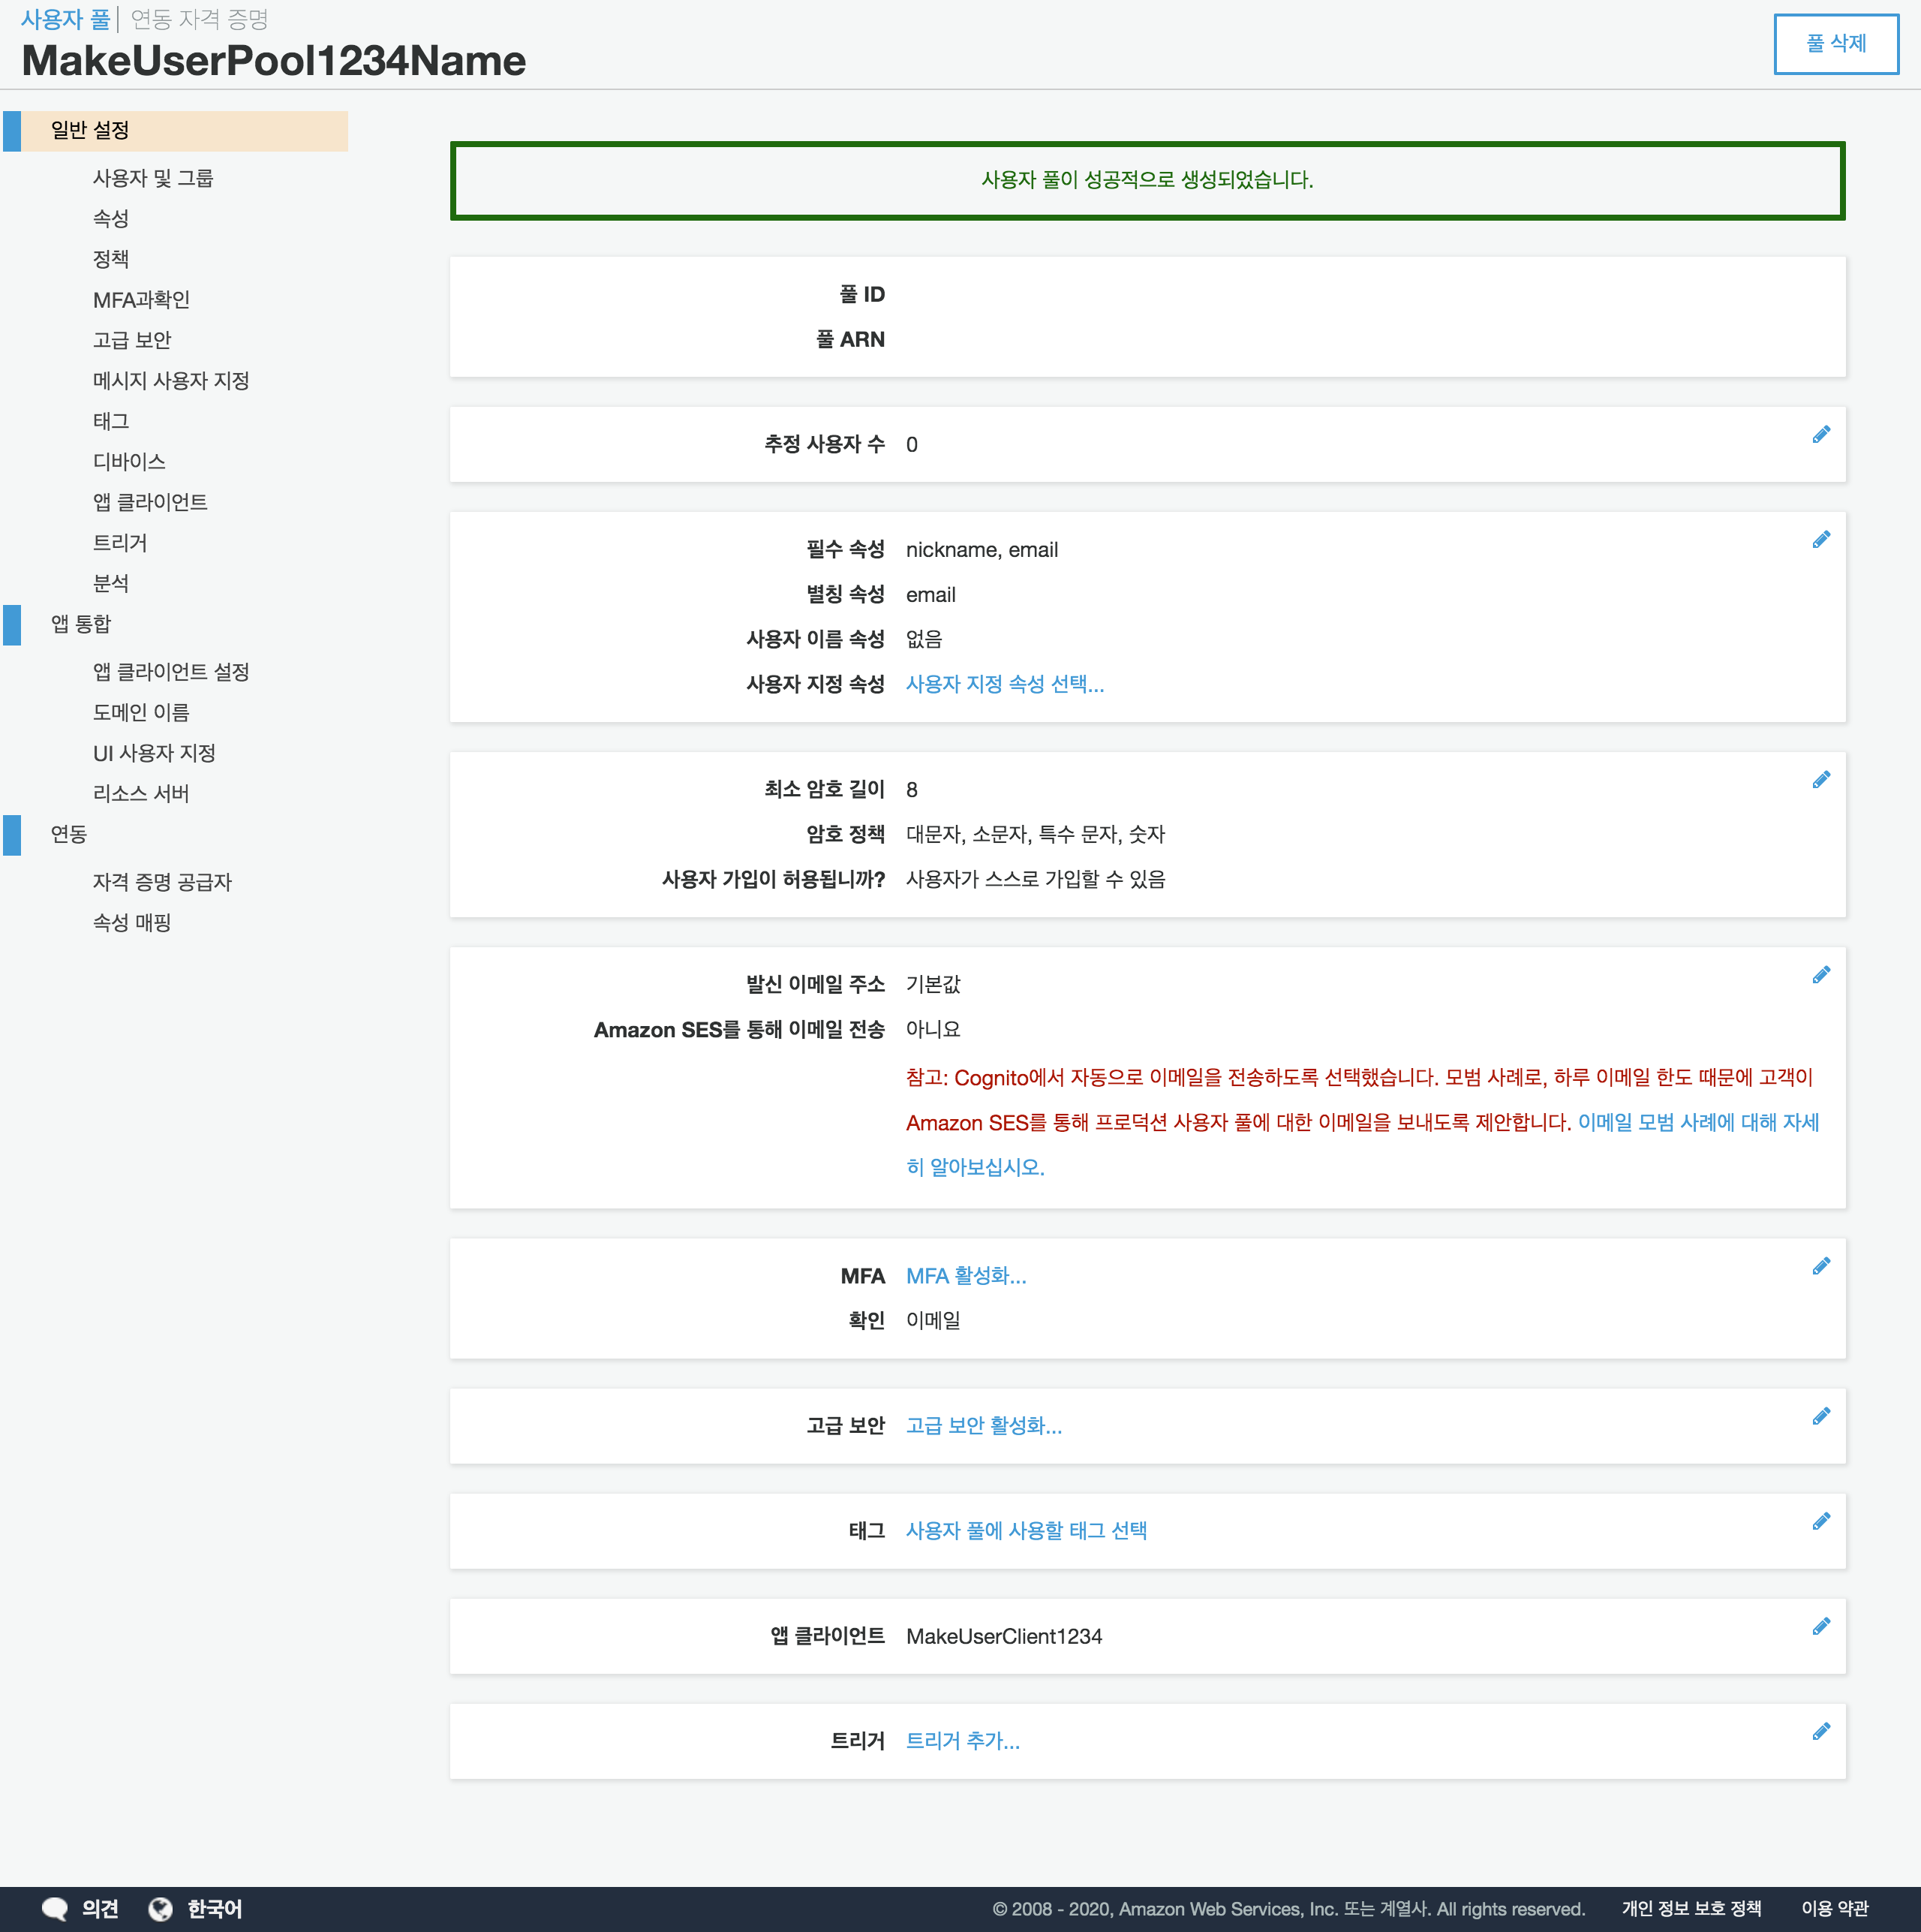
💡 나중에 유저풀에 유저를 추가 및 제거할 때 풀 ID를 이용한다.
왼쪽 목록에서 일반 설정을 클릭하면 확인할 수 있다.
앱 클라이언트 메뉴
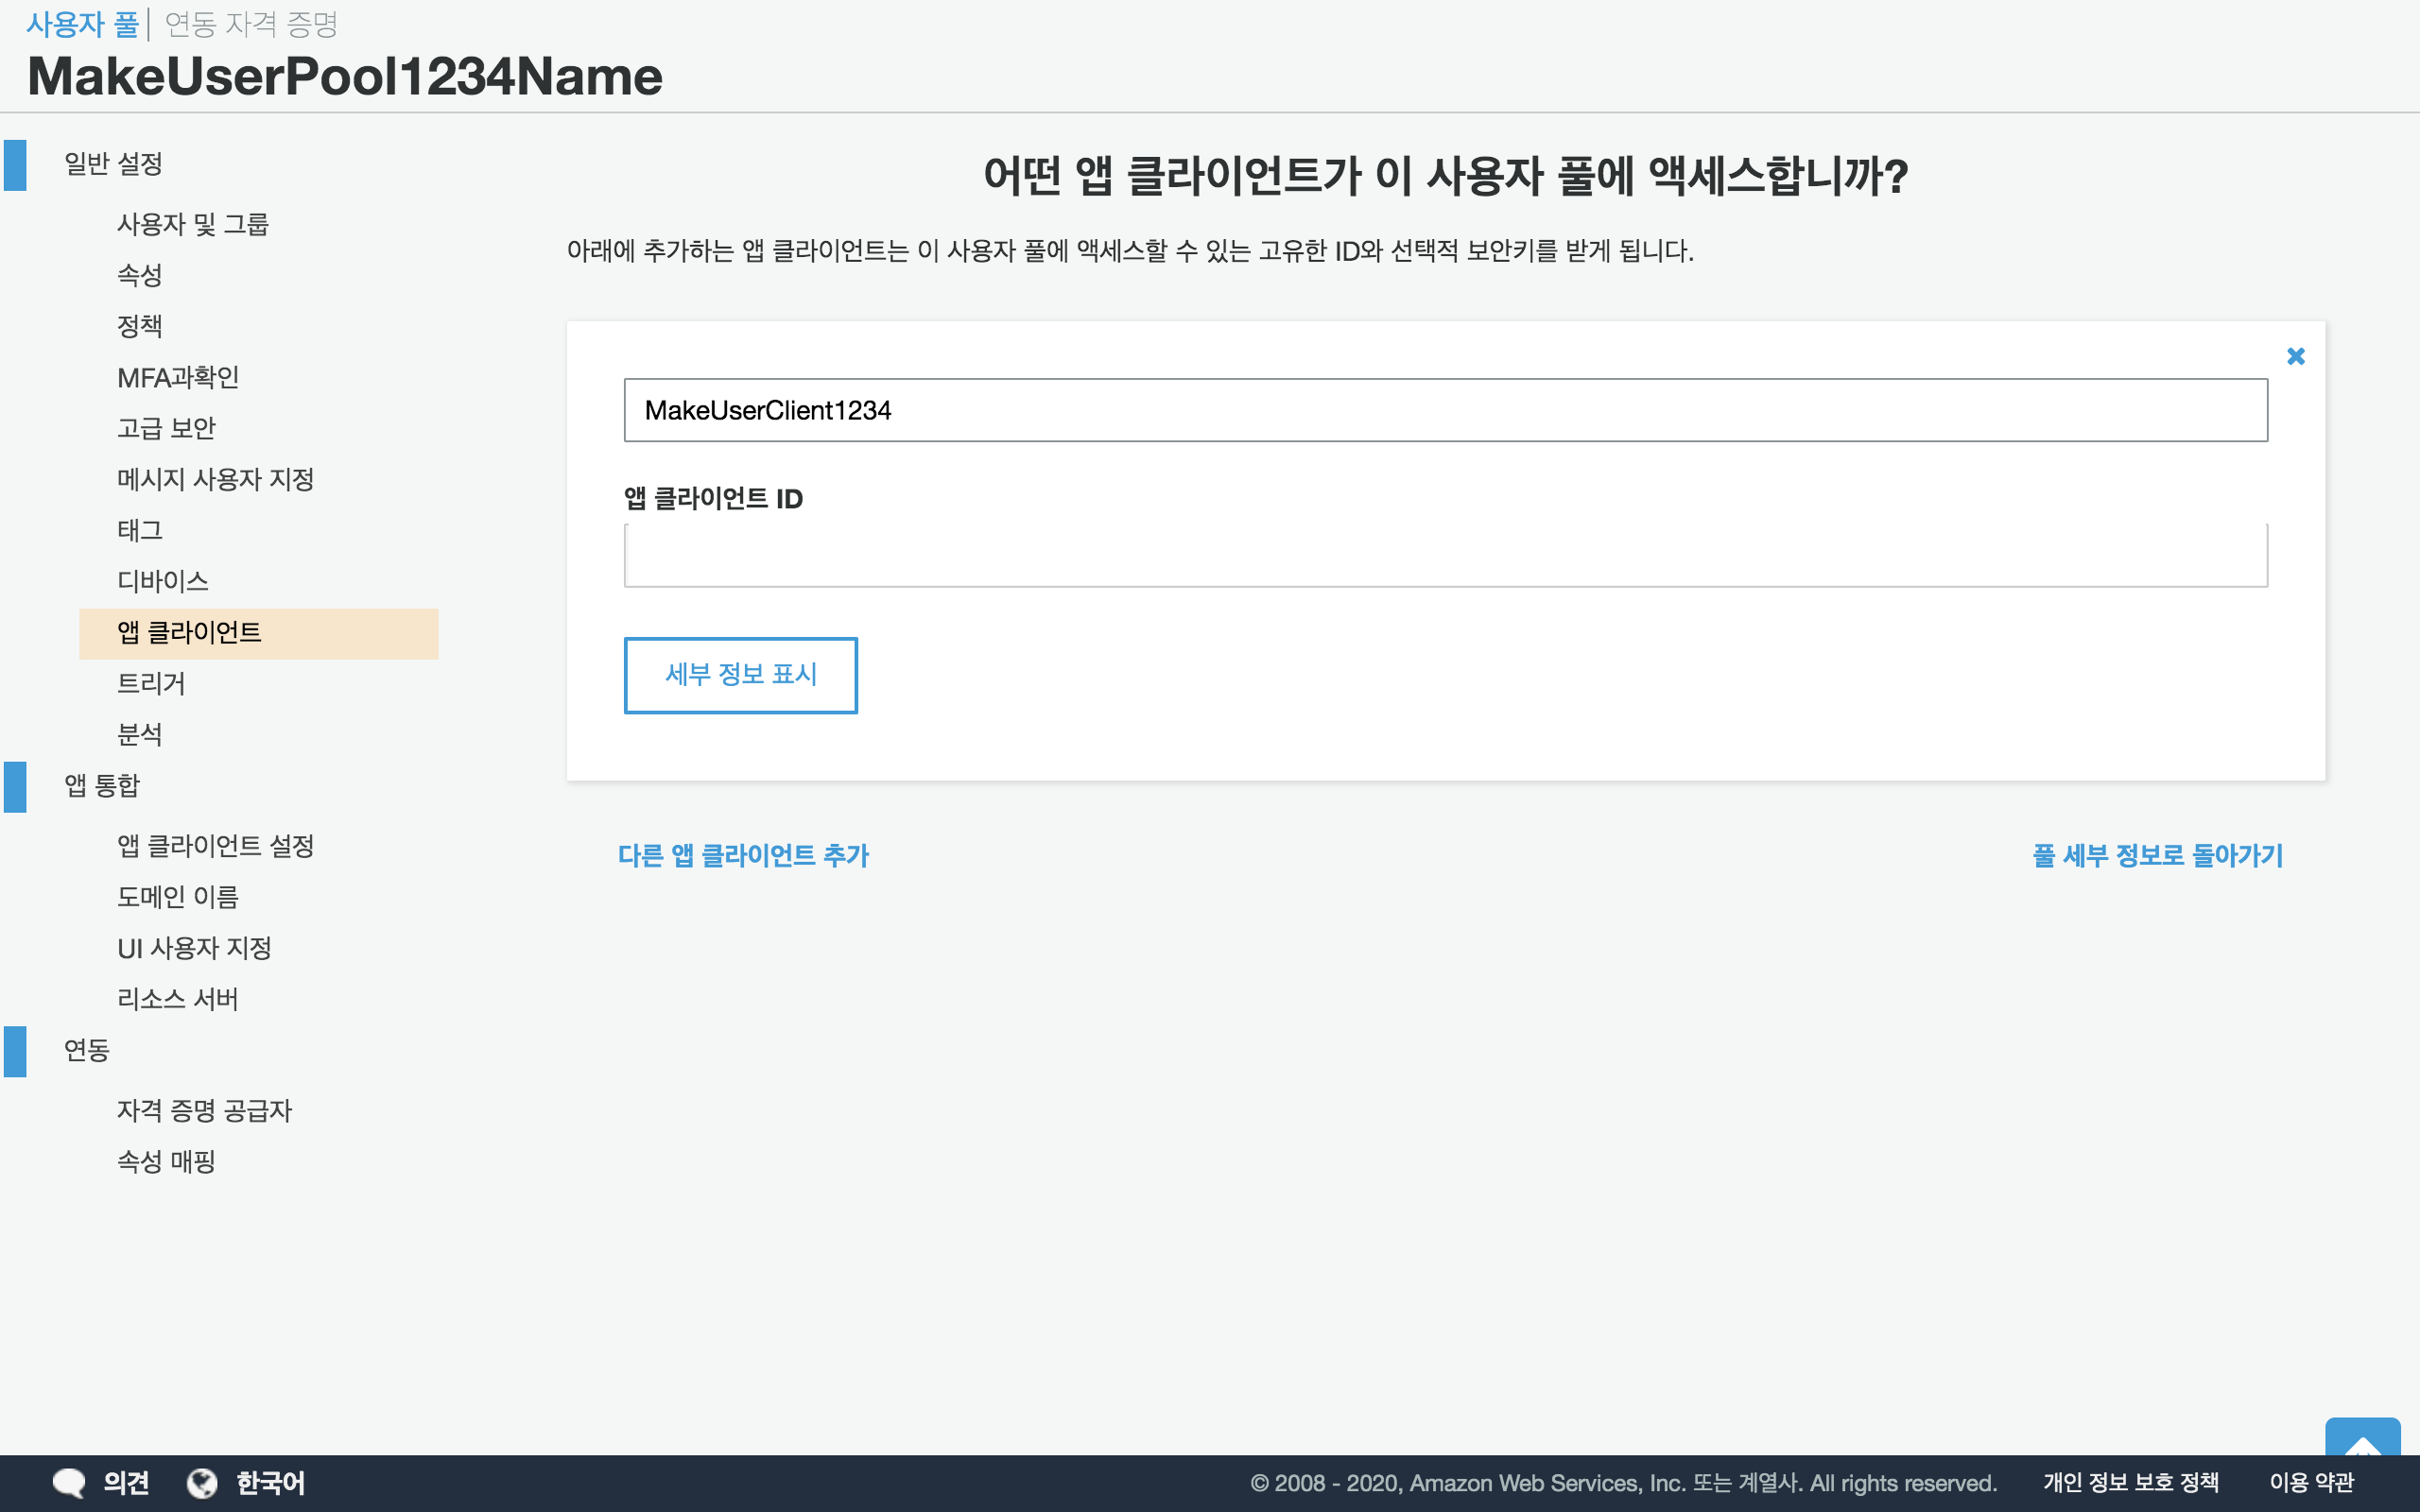
설정하면서 생성된 앱 클라이언트를 볼 수 있는 메뉴다.
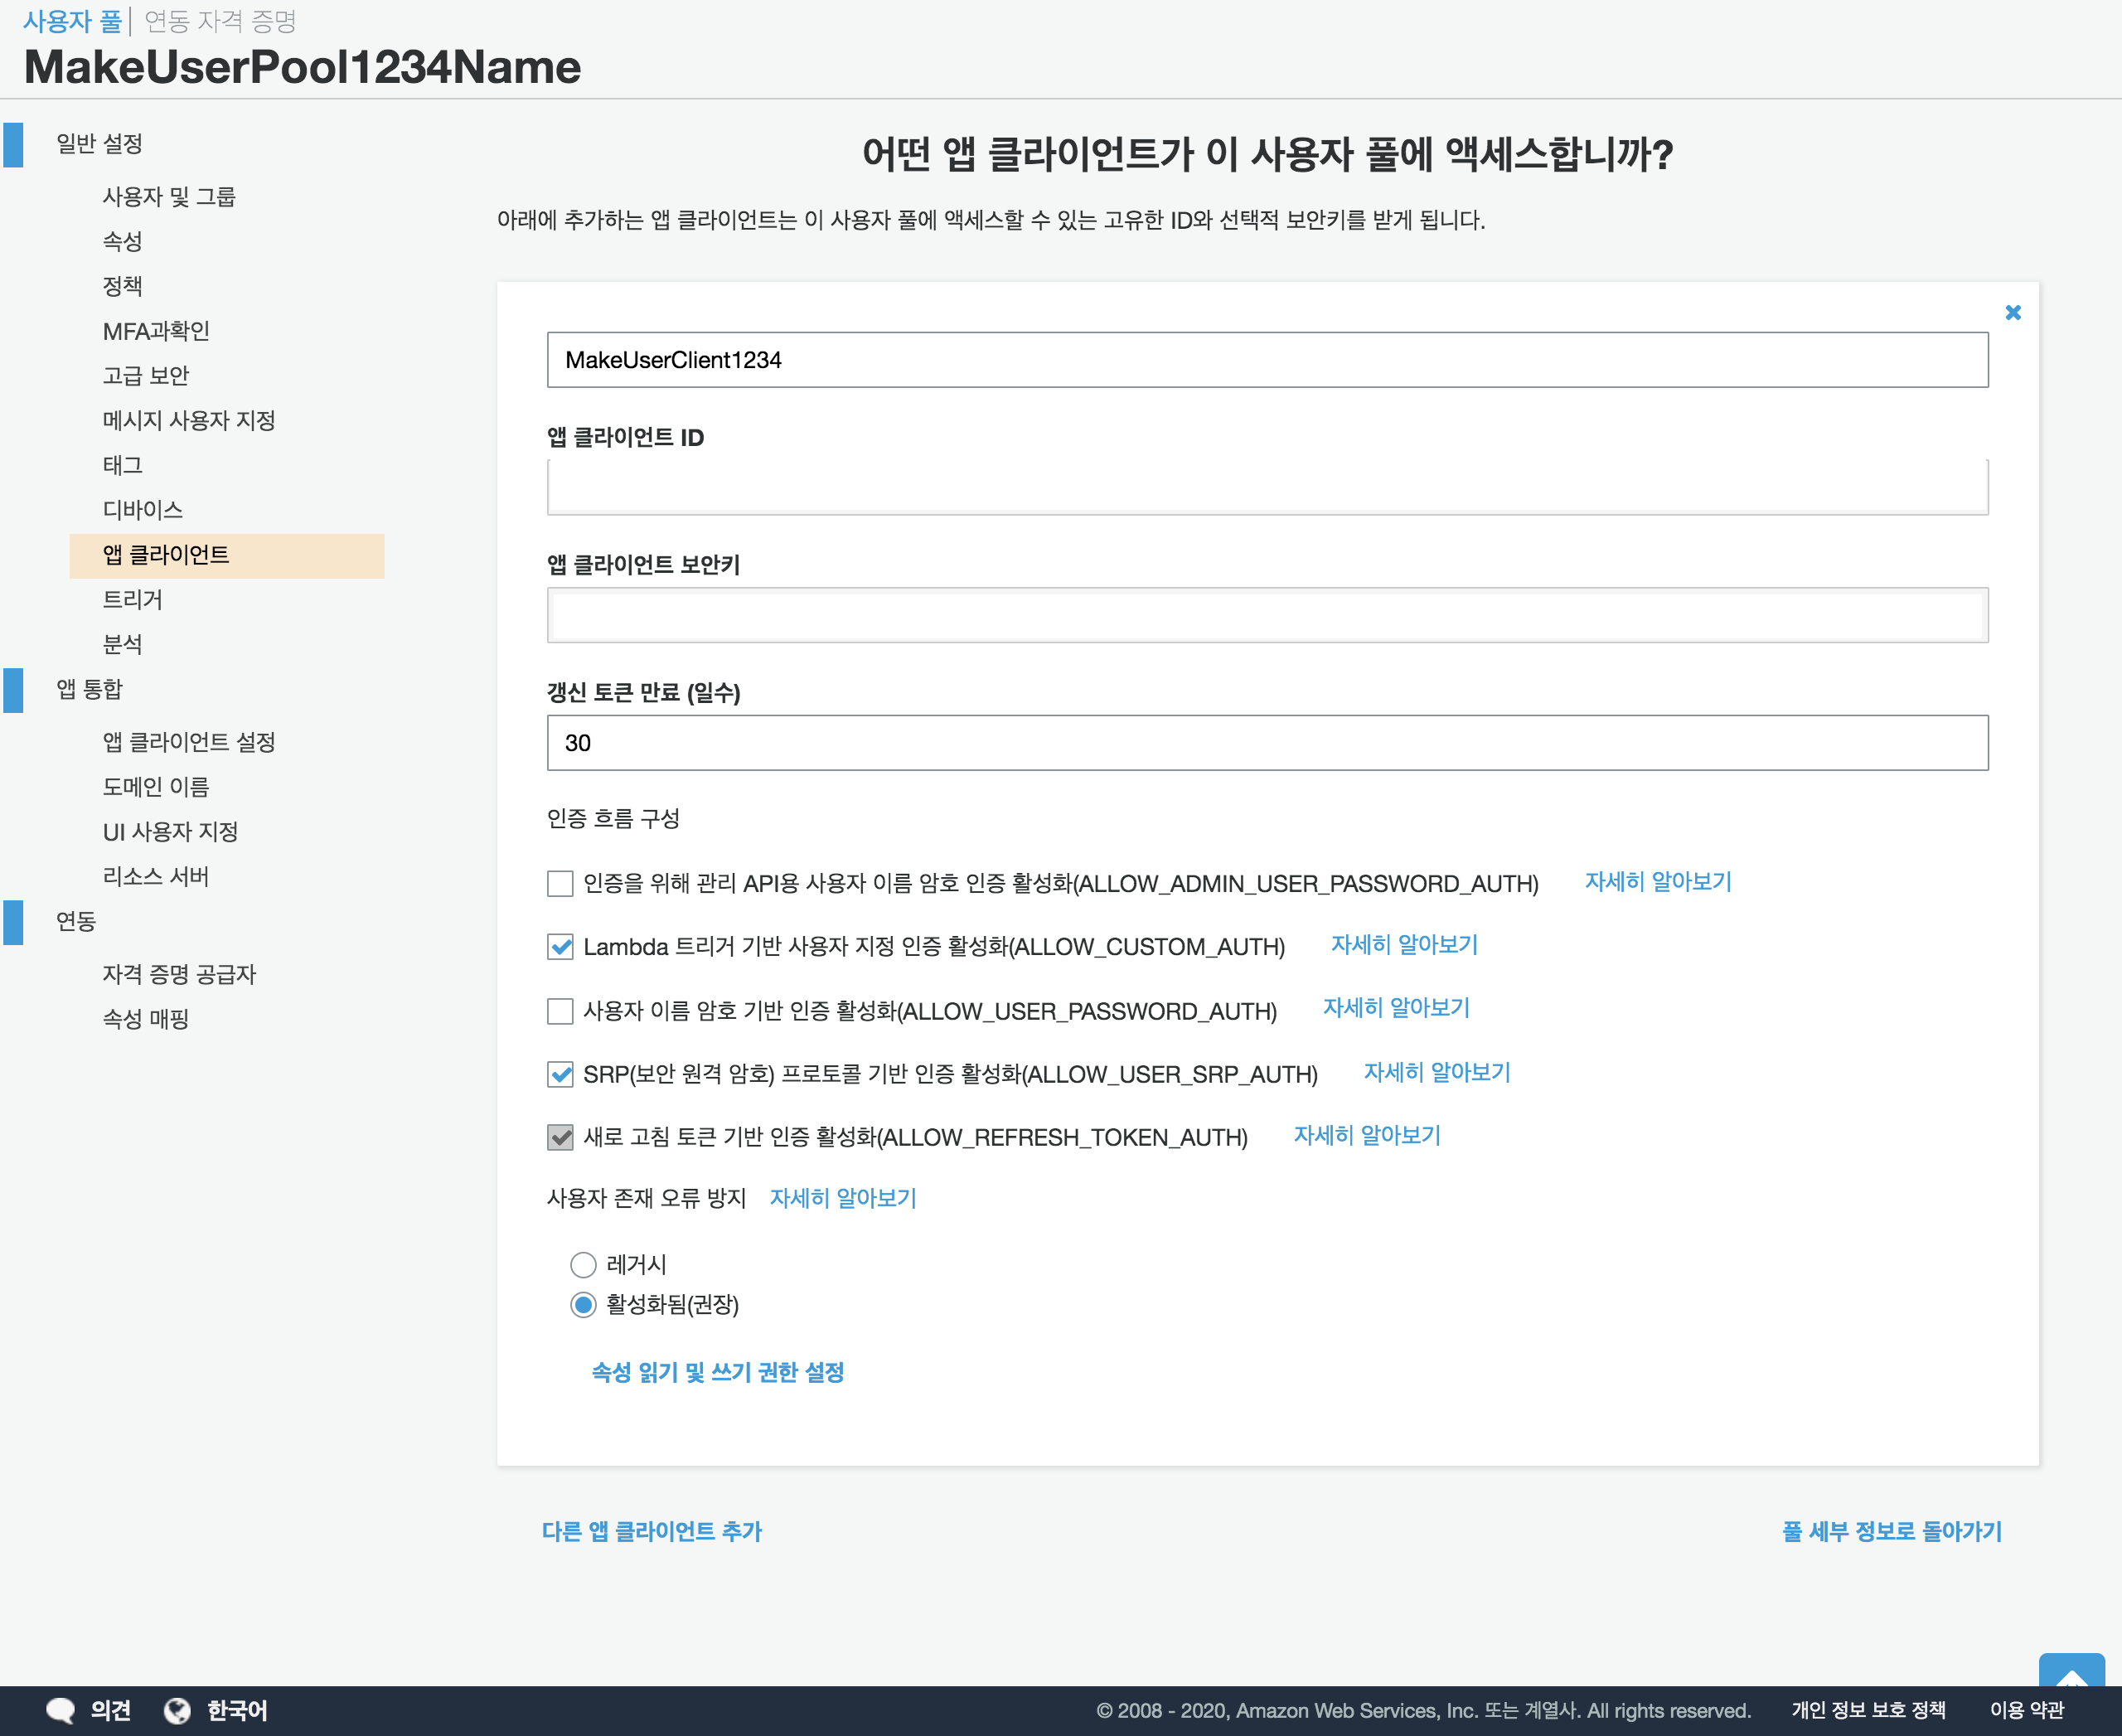
세부 정보 표시를 누르면, 아래와 같이 화면이 확장된다.
앱 클라이언트 ID와 앱 클라이언트 보안키 정보를 확인할 수 있다.
또 인증 권한에 대해서 편집할 수도 있다.
Android
별도의 인증 서버가 없이 AWS Cognito를 이용해 바로 인증 기능을 구현한다.
큰 그림
- 가입
- 확인코드 요청 및 입력
2-1. 확인코드 재요청 - 로그인
3-1. UserNotConfirmedException이 발생하는 경우 - 비밀번호 찾기(분실 및 재설정)
4-1. 재설정 인증번호 요청
4-2. 비민번호 재설정
4-3. ForgotPasswordHandler - 로그아웃
- 탈퇴
프로젝트 설정
build.gradle(app)
apply plugin: 'com.android.application'
android{

}
dependencies{
// 추가
  implementation "com.amazonaws:aws-android-sdk-cognitoidentityprovider:2.16.6"
}
해당 라이브러리에서 이번에 사용할 주요 클래스는 아래와 같다.
CognitoUserPool.java
This represents a user-pool in a Cognito identity provider account.
The user-pools are called as Cognito User Identity Pool or User Identity Pool or User Pool. All of these terms represent the same entity, which is a pool of users in your account.***
ConitoUser.java
Represents a single Cognito User.This class encapsulates all operations possible on a user and all
tokens belonging to the user. The user tokens, as CognitoUserSession, are stored in SharedPreferences. Only the tokens belonging to the last successfully authenticated user are stored.
CognitoUserSession
This wraps all Cognito tokens for a user.
1. 유저풀에 추가(가입)
1. 유저풀 초기화
유저풀은 CognitoUserPool(Context, userPoolId, userClientId, userPoolSecret, Regions)로 초기화 한다.
userPoolId: Cognito 홈페이지 대시보드의일반설정탭의 유저풀 ID 값userClientId: Cognito 홈페이지 대시보드의 `앱 클라이언트' 탭의 값userPoolSecret: Cognito 홈페이지 대시보드의앱 클라이언트' 탭의클라이언트 보안키` 값Regions: Regions 클래스에 해당 리전의 이름으로 선언되어 있는 필드 참조
// Init User Pool
val userPool = CognitoUserPool(Context, userPoolId, userClientId, userPoolSecret, Regions)
2. 유저 속성 값 설정
CognitoUserAttributes 클래스에 필요한 유저 정보 저장
CognitoUserAttributes.addAttribute(key:String, value:String) 메소드로 설정
🚨 유저풀 생성 시 선택한 필수 속성은 반드시 포함되어야 한다
/*
  id, password를 제외한 유저 정보를 저장하는 클래스 객체
*/
val cognitoUserAttributes = CognitoUserAttributes().apply {
  addAttribute("nickname", "UserNickname")
}
3. 유저풀에 추가 요청
유저풀에 추가할 때 파라미터는 같지만, 쓰레드에 따라 호출되는 메소드가 다르다.
메소드
- CognitoUserPool.signUpInBackground
- CognitoUserPool.signUp
파라미터
id: 아이디(이메일 형식으로 지정하면 이메일)password: passwordCognitoUserAttributes: 앞 단계에서 추가한 id, password를 제외한 유저 속성Map<String, String>: Validation key value pairs, these will be passed to pre and post registration lambda functions.SignUpHandler: 유저 추가 요청 응답 핸들러
/*
  email이 아닌 id로 로그인을 한다면, email을 id로 대체하면 된다.
*/
userPool.signUpInBackground("abc@gmail.com","password", cognitoUserAttributes, null,  object:SignUpHandler{

  /*
    유저풀에 유저 추가가 완료 되었을 때 콜백

    user: CognitoUser?: 추가된 유저의 정보를 담은 객체
    signUpResult: SignUpResult?: 코드 확인에 대한 정보를 담은 객체(코드 전송 타입, 코드확인 여부 등)
  */
  override fun onSuccess(user: CognitoUser?, signUpResult: SignUpResult?) {

  }

  /*
   유저풀에 유저 추가가 할 때 오류가 발생 했을 때
   ex)

    필수 항목 누락
    아이디가 이메일로 설정되었는데, 이메일 포맷이 아니거나
    등등
  */
  override fun onFailure(exception: Exception?){

  }
})
2. 확인코드 요청 및 입력
유저풀에 유저 정보를 추가 후 확인코드를 입력하는 과정을 거치면 모든 과정이 끝난다.
확인코드 요청은 아래 두 메소드를 통해서 할 수 있다.
메소드
CognitoUser.confirmSignUpCognitoUser.confirmSignUpInBackground
파라미터
confirmationCode: 유저풀에서 설정되어 있는 수단으로 수신한 확인코드forcedAliacedCreate: 입력한 유저의 정보가 겹칠 경우, 강제적으로 추가할지 여부(false)Generichandler: 결과 핸들러 인터페이스
// 전 단계에서 onSuccess에서 파라미터로 넘겨 받은 CognitoUser를 활용
user.confirmSignUpInBackground("confirmCode", false, object: Generichandler{

  override fun onSuccess() {
    // handle on success
  }

  override fun onFailure(exception: Exception?) {
    // handle on failure
  }
})
2-1. 인증번호 재요청
CognitoUser.resendConfirmationCodeInBackground(VerificationHandler)
로 재요청 후 confirmSignUp[InBackground]를 호출하면 된다.
3. 로그인
로그인은
- 'AuthenticationDeatils(id, password, Map<String,String>)'
Map<String, String>: validation data
CognitoUserPool.getUser(id)CognitoUser.initiateUserAuthentication(AuthenticationDetails, AuthenticationHandler, Boolean)- 'runInBackground': 백그라운드에서 실행 여부
val authenticationDeatils = AuthenticationDeatils(id, password, null)
val user = userPool.getUser(id)

user.initiateUserAuthentication(authenticationDeatils, object: AuthenticationHandler{

  override fun onSuccess(userSession: CognitoUserSession?, newDevice: CognitoDevice?) {
    // handle on success
  }

  override fun onFailure(exception: Exception?) {
    // handler exception on failure
  }

  override fun getAuthenticationDetails(authenticationContinuation: AuthenticationContinuation?, userId: String?) {
    // not use
  }

  override fun authenticationChallenge(continuation: ChallengeContinuation?) {
    // not use
  }

  override fun getMFACode(continuation: MultiFactorAuthenticationContinuation?) {
    // not use
  }
}, true).run()
🚨~initiateUserAuthentication(AuthenticationDetails, AuthenticationHandler, Boolean)~ 보다 getSession(AuthenticationHandler)사용을 권고
Note: Please use getSession(AuthenticationHandler) or getSessionInBackground(AuthenticationHandler) instead.
3-1. UserNotConfirmedException이 발생하는 경우
정보 입력 > 확인 코드 입력 > 완료 과정으로 유저 추가가 마무리 된다.
만일 이 과정에서 확인 코드 입력 단계를 거치지 않고 강제로 로그인을 할 경우, UserNotConfirmedException이 발생한다.
이 경우앞의 단계에서 거쳤던 2-1. 인증번호 재요청 후 2. 확인코드 요청 및 입력 순서로 실행하면 된다.
4. 비밀번호 찾기(분실 및 재설정)
재설정 인증번호 요청 > 비밀번호 재설정
4-1. 재설정 인증번호 요청
CognitoUser.forgotPassword(ForgotPasswordHandler)
호출하여 비민번호 재설정에 필요한 인증번호를 요청
4-2. 비민번호 재설정
CognitoUser.confirmPasswordInBackground(code,newPassword,ForgotPasswordHandler)
호출하여 비밀번호를 재설정
4-3. ForgotPasswordHandler
ForgotPasswordHandler는 비밀번호를 재설정하는 과정에서
forgotPassword, confirmPasswordInBackground 두 메소드의 핸들러로 쓰이며
다음과 같이 선언되어 있으면 총 3개의 메소드를 구현해야 한다.
public interface ForgotPasswordHandler {

    public void onSuccess();

    public void getResetCodeForgotPasswordContinuation continuation);

public void onFailure(Exception exception);- 'onFailure': forgot, confirm 두 메소드의 에러 핸들러로 호출
getResetCode: forgot에서 인증 코드를 발송한 뒤 호출onSuccess: confirm에서 비밀번호 설정 후 호출
🚨 forgotPassword는 코드 발송 후 'getResetCode'를 호출하고,
onSuccess는 호출하지 않는다.
// CognitoUser.forgotPasswordInBackground
public void forgotPasswordInBackground(final ForgotPasswordHandler callback) {
                                ...
  try {
    final ForgotPasswordResult forgotPasswordResult = forgotPasswordInternal();
    final ForgotPasswordContinuation continuation = new ForgotPasswordContinuation(
            cognitoUser,
            new CognitoUserCodeDeliveryDetails(forgotPasswordResult.getCodeDeliveryDetails()),
            ForgotPasswordContinuation.RUN_IN_BACKGROUND, callback);
    returnCallback = new Runnable() {
        @Override
        public void run() {
            // getResetCode 호출
            callback.getResetCode(continuation);
        }
    };
  } catch (final Exception e) {
      returnCallback = new Runnable() {
          @Override
          public void run() {
              // callback
              callback.onFailure(e);
          }
      };
  }
                                ...
}
forgotPasswordInBackground 구현
userPool.getUser(email).forgotPasswordInBackground(object : ForgotPasswordHandler {

  override fun onSuccess() {
    // not use
  }

  override fun getResetCode(continuation: ForgotPasswordContinuation?) {
      // received ForgotPasswordContinuation
  }
  override fun onFailure(exception: Exception?) {
      // handle exception on failure
  }
})
// CognitoUser.confirmPasswordInBackground
public void confirmPasswordInBackground(final String verificationCode,
final String newPassword, final ForgotPasswordHandler callback) {
...
try {
confirmPasswordInternal(verificationCode, newPassword);
returnCallback = new Runnable() {
@Override
public void run() {
// onSuccess 호출
callback.onSuccess();
}
};
} catch (final Exception e) {
returnCallback = new Runnable() {
@Override
public void run() {
// callback
callback.onFailure(e);
}
};
}
...
}confirmPasswordInBackground 구현
userPool.getUser(email).confirmPasswordInBackground(verifiedCode, newPassword, object : ForgotPasswordHandler {
    override fun onSuccess() {
        // succeed to reset password
    }

    override fun onFailure(exception: Exception?) {
        // handle exception on failure
    }

    override fun getResetCode(continuation: ForgotPasswordContinuation?) {
        // not use
    }
})
5. 로그아웃
Cognito는 멀티-디바이스(multi-devices) 인증을 지원하는 서비스
CognitoUser.globalSignOutInBackground(GenericHandler): 계정으로 연결된 모든 디바이스 대상CognitoUser.signOut(): 현재 디바이스 대상(캐시된 토큰을 삭제)
user.signOut()
user.globalSignOutInBackground(object: GenericHandler{
  override fun onSuccess() {
  }

  override fun onFailure(exception: Exception?) {
  }
})
6. 탈퇴
유저풀에서 유저를 삭제(탈퇴)하기 위해서는
- 'CognitoUser.deleteUser(GenericHandler)'
- 'CognitoUser.deleteUserInBackground(GenericHandler)'
차이는 메인쓰레드에서 돌리냐 백그라운드에서 돌리냐
user.deleteUserInBackground(object : GenericHandler {
  override fun onSuccess() {

  }

  override fun onFailure(exception: Exception?) {
  }
})
결론
글로 AWS 접하다가 실제로 해본건 오랜만인데, 잘 짜기보다는 한번 해보기 위한 주제였다. 익숙하지 않은 AWS 문서에 눈이 좀 \@_\@했지만, 연속된 삽질의 끝에 무사히 끝냄.
다음은 API Gateway + Lambda + PostgreSQL 도즈어언~