[Spring] Bean X of type Y is not eligible for getting processed by all BeanPostProcessors...?
Spring Lab

개요
BeanPostProcessor 를 테스트하기 위한 코드 작성 중 이상한 로그가 남는다.
일의 발단은 아래 코드다.
package me.dailycode.appicationcontexttest.config;

import me.dailycode.appicationcontexttest.bean.infra.TestingBeanPostProcessor;
import me.dailycode.appicationcontexttest.bean.normal.Company;
import me.dailycode.appicationcontexttest.bean.normal.Employee;
import org.springframework.beans.factory.config.BeanPostProcessor;
import org.springframework.context.annotation.Bean;
import org.springframework.context.annotation.Configuration;

import java.time.LocalDateTime;

@Configuration
public class TestingConfiguration {


    @Bean
    public Employee employee() {
        return new Employee("myName", "dailyCode");
    }

    @Bean
    public Company company() {
        return new Company("goodCompany", LocalDateTime.now());
    }

    @Bean
    public BeanPostProcessor testingBeanPostProcessor() {
        return new TestingBeanPostProcessor();
    }
}
package me.dailycode.appicationcontexttest.bean.infra;

import org.springframework.beans.BeansException;
import org.springframework.beans.factory.config.BeanPostProcessor;
import org.springframework.stereotype.Component;

public class TestingBeanPostProcessor  implements BeanPostProcessor {

    @Override
    public Object postProcessBeforeInitialization(Object bean, String beanName) throws BeansException {
        System.out.println("TestingBeanPostProcessor.postProcessBeforeInitialization - " + beanName);
        return bean;
    }

    @Override
    public Object postProcessAfterInitialization(Object bean, String beanName) throws BeansException {
        System.out.println("TestingBeanPostProcessor.postProcessAfterInitialization - " + beanName);
        return bean;
    }

}
package me.dailycode.appicationcontexttest.config;
import me.dailycode.appicationcontexttest.bean.normal.Employee;
import org.junit.jupiter.api.Test;
import org.springframework.context.annotation.AnnotationConfigApplicationContext;
class TestingConfigurationTest {
@Test
public void contextApplicationContextTest() {
AnnotationConfigApplicationContext context
= new AnnotationConfigApplicationContext(TestingConfiguration.class);
Employee bean = context.getBean(Employee.class);
System.out.println("bean = " + bean);
}
}TestingConfiguration 설정 클래스를 통해서 AnnotationConfigApplicationContext를 생성하고, 생성 과정 중에 BeanPostProcessor 가 남겨주는 로그를 확인하기 위한 간단한 테스트이다. 그런데 TestingConfigurationTest 클래스의 테스트를 돌리면 아래와 같은 경고 문구가 남는다.
Bean 'testingConfiguration' of type
[...config.TestingConfiguration$$EnhancerBySpringCGLIB$$422457f6]is not eligible for getting processed by all BeanPostProcessors (for example: not eligible for auto-proxying)
일단 경고 문구의 내용을 직역하면 아래와 같다.
'testingConfiguration'은(는) 일부 BeanPostProcessor에서 처리할 수 없습니다.
대체 왜 처리를 못한다는 걸까?
원인 파악
스프링 공식 문서, baeldung 사이트를 보면서 이유와 해결법을 알았다.
비록 baeldung 에서의 예제와 같은 상황은 아니지만, 사이트에서 아래 문구를 보고 깨달았다.
Classes that implement the BeanPostProcessor interface are instantiated on startup, as part of the special startup phase of the ApplicationContext, before any other beans.
BeanPostProcessor bean은 다른 일반 bean들 보다 무조건 먼저 생성되어야 하고,
이렇게 먼저 생성된 BeanPostProcessor bean은 이후로 생성되는 일반 bean 들에 대한 처리를 해준다.
이런 인스턴스 생성 및 작업 순서는 모두 Application Context가 제어한다.
그리고 작위적으로 이 흐름을 뒤바꾸면 원치 않는 결과가 발생할 수 있다!
다시 작성한 코드를 보자.
@Configuration
public class TestingConfiguration {

    @Bean
    public Employee employee() {
        return new Employee("wow", "devToroko");
    }

    @Bean
    public Company company() {
        return new Company("somewhere", LocalDateTime.now());
    }

    // **!!
    @Bean
    public BeanPostProcessor testingBeanPostProcessor() {
        return new TestingBeanPostProcessor();
    }
}
현재 코드는 TestingConfiguration bean 생성된 후에 TestingBeanPostProcessor bean이 생성된다. 즉 BeanPostProcessor의 생성 시점이 일반 bean에 의해 결정되버린다.
이러면 인스턴스 생성 순서가 TestingConfiguration bean -> TestingBeanPostProcessor 가 되기 때문에 TestingConfiguration bean은 TestingBeanPostProcessor의 처리를 못 받게 된다.
그래서 에러 문구도 'testingConfiguration'은(는) 일부 BeanPostProcessor에서 처리할 수 없습니다. 처럼 나오는 것이다.
해결법
Application Context의한 기본 BeanPostProcessor bean 생성 흐름에 내가 작성한 TestingBeanPostProcessor bean도 추가되도록 하면된다.
그러기 위해서 component-scan 이나 xml 설정 파일 등을 사용해서 TestingBeanPostProcessor bean을 등록하면 된다.
1. Configuration class 에 @ComponentScan 작성
@Configuration
@ComponentScan("me.dailycode.appicationcontexttest.bean.infra")
// @ImportResource("classpath:testConfig.xml") // XML 설정 파일도 사용 가능하다.
public class TestingConfiguration {


    @Bean
    public Employee employee() {
        return new Employee("wow", "devToroko");
    }

    @Bean
    public Company company() {
        return new Company("somewhere", LocalDateTime.now());
    }

//    @Bean // Bean Post Processor 의 생성 시점을 강제하는 코드를 주석처리
//    public BeanPostProcessor testingBeanPostProcessor() {
//        return new TestingBeanPostProcessor();
//    }
}
2. @ComponentScan 의 대상이 되도록 @Component 애노테이션 추가
@Component // 컴포넌트 스캐닝 되도록 애노테이션 추가
public class TestingBeanPostProcessor  implements BeanPostProcessor {...}
참고:
@ComponentScan대신@ImportResource("classpath:testConfig.xml")를 쓸 경우 xml 내용<?xml version="1.0" encoding="UTF-8"?> <beans xmlns="http://www.springframework.org/schema/beans" xmlns:xsi="http://www.w3.org/2001/XMLSchema-instance" xsi:schemaLocation="http://www.springframework.org/schema/beans http://www.springframework.org/schema/beans/spring-beans.xsd"> <bean class="me.dailycode.appicationcontexttest.bean.infra.TestingBeanPostProcessor"></bean> </beans>
@Configuration 클래스 위에 @ComponentScan 덧붙이면 아래와 같은 과정이 진행된다.
-
Application Context가 기본으로 제공하는
internalConfigurationAnnotationProcessor은@Configuration을 처리해주는 BeanPostProcessor이고, 해당 클래스 위에@ComponentScan또는@ImportResource같은 추가적인 애노테이션이 있다면 이에 대한 처리를 해준다.
지금 코드에서는@ComponentScan에 대한 처리를 해준다. -
@ComponentScan에서 지정한 패키지에서@Component표기한TestingBeanPostProcessor을 찾아내고 이것이BeanPostProcessor를 구현한 클래스라는 것을Application Context가 인지하게 된다. -
Application Context은 기본 동작대로 어떤 빈들이 생성되기 이전에BeanPostProcessor들을 생성한다. 이 과정에서 내가 만든BeanPostProcessor도 생성된다. -
결과적으로 이후에 생기는
TestingConfiguration,Employee,Company타입의 빈 모두TestingBeanPostProcessor의 처리를 한 번 거치게 된다.
로그를 보면서 위의 내용을 눈으로 확인해보자. (너무 길어서 필요없는 부분은 지웠다)
==> Application Context Refreshing 을 시작한다.
AnnotationConfigApplicationContext - Refreshing org.springframework.context.annotation.AnnotationConfigApplicationContext@6574a52c


 ==> @ComponentScan 을 처리하는 internalConfigurationAnnotationProcessor 덕분에 ApplicationContext TestingBeanPostProcessor를 인지한다.
DefaultListableBeanFactory - Creating shared instance of singleton bean 'org.springframework.context.annotation.internalConfigurationAnnotationProcessor'
  annotation.ClassPathBeanDefinitionScanner - Identified candidate component class: file [...\TestingBeanPostProcessor.class]


==> 기본 BeanPostProcessor 가 모두 생긴 이후에...
DefaultListableBeanFactory - Creating shared instance of singleton bean 'org.springframework.context.event.internalEventListenerProcessor'
DefaultListableBeanFactory - Creating shared instance of singleton bean 'org.springframework.context.event.internalEventListenerFactory'
DefaultListableBeanFactory - Creating shared instance of singleton bean 'org.springframework.context.annotation.internalAutowiredAnnotationProcessor'
DefaultListableBeanFactory - Creating shared instance of singleton bean 'org.springframework.context.annotation.internalCommonAnnotationProcessor'
DefaultListableBeanFactory - Creating shared instance of singleton bean 'org.springframework.context.annotation.internalPersistenceAnnotationProcessor'


==> 내가 만든 testingBeanPostProcessor bean이 생성된다! 일반 bean 들이 본격적으로 생성되기 이전이라는 점을 주목하자.
DefaultListableBeanFactory - Creating shared instance of singleton bean 'testingBeanPostProcessor'


===> 아래부터는 모든 빈 객체들이 정상적으로 testingBeanPostProcessor 가 적용되는 것을 확인할 수 있다.

DefaultListableBeanFactory - Creating shared instance of singleton bean 'testingConfiguration'
TestingBeanPostProcessor.postProcessBeforeInitialization - testingConfiguration
TestingBeanPostProcessor.postProcessAfterInitialization - testingConfiguration

13:09:28.829 [main] DEBUG org.springframework.beans.factory.support.DefaultListableBeanFactory - Creating shared instance of singleton bean 'employee'
TestingBeanPostProcessor.postProcessBeforeInitialization - employee
TestingBeanPostProcessor.postProcessAfterInitialization - employee

13:09:28.848 [main] DEBUG org.springframework.beans.factory.support.DefaultListableBeanFactory - Creating shared instance of singleton bean 'company'
TestingBeanPostProcessor.postProcessBeforeInitialization - company
TestingBeanPostProcessor.postProcessAfterInitialization - company

bean = Employee(name=myName, id=dailyCode)
이해하느라 한참 걸렸지만 오늘도 하나 배웠다 ^^
보충
그런데 빈이 등록된 순간에 어떻게 알고 에러 문구를 남기는 걸까?
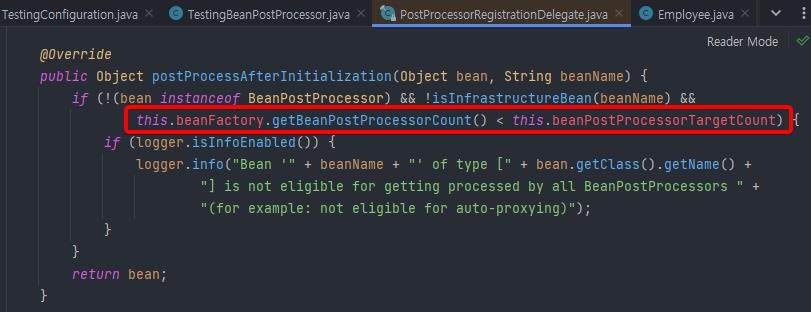
그건 BeanPostProcessorChecker 덕분이다.
이 클래스도 BeanPostProcessor를 구현한다.
그리고 이 클래스의 postProcessAfterInitialization 메소드에서 에러 문구가 나오기 위한 조건문을 보면 상황이 이해된다.

이건 Application Context(=beanFactory)가 초반에 만든 BeanPostProcessor 개수와
현재 빈이 등록되는 순간 본 BeanPostProcessor 의 개수가 달라서 에러 문구를 남기는 것이다.
보충2
baeldung 사이트에서는 BeanPostProcessor 내부에 @Autowired를 해서 이런 문제가 생겼다.
이때는 또 어떤 문제인 걸까?
일단은 @Autowired의 기본 동작을 좀 알아야 한다.
@Autowired 되는, 즉 DI가 되는 대상인 Bean 객체는 자기 자신에게도 어떤 외부 의존성이 있다면 해당 의존성을 모두 갖추고, 이미 생성된 BeanPostProcessor 처리를 모두 끝내고 나서 자기 자신을 @Autowired 로 DI 받고자 하는 객체 내에 DI 된다.
그런데 BeanPostProcessor 가 생성되는 시점에서 @Autowired에 의해서 DI되는 bean은 아직 BeanPostProcessor가 생성되기 이전이기 때문에 현재 생성하는 BeanPostProcessor의 처리를 못받는다.
이러한 이유 때문에 스프링 공식 문서에서는 BeanPostProcessor 내에서는 bean의 래퍼런스를 갖지 않도록 하라는 주의말이 있다.

좋은 내용 잘 보고 갑니다!
감사합니다!