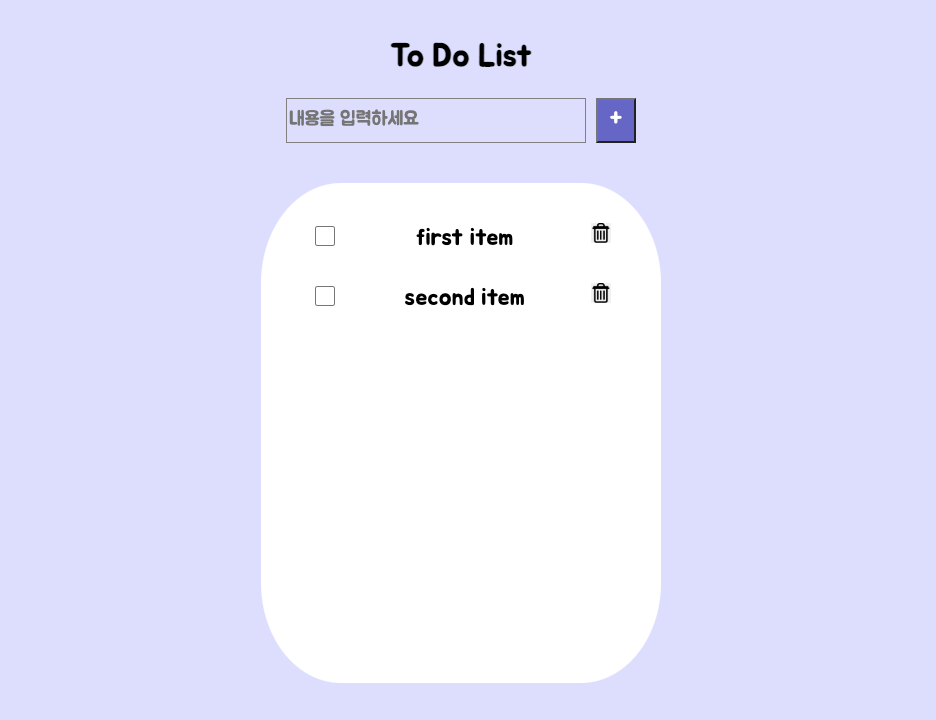
쉽고 간단해 보이지만 나에겐 큰 도전이었던 to-do-list만들기!
코드스테이츠에서 배웠던 내용들을 적용시켜서 만들어 보기
실행시켜 보고 싶다면 들어가보세요 👉 https://dakyungoh.github.io/to-do-list/
- html로 구조 표현하기
<!DOCTYPE html>
<html lang="en">
  <head>
    <meta charset="UTF-8" />
    <link rel="favicon icon" type="image/x-icon" href="favicon.ico" />
    <title>To Do List</title>
    <link rel="stylesheet" href="style.css" />
    <link
      href="https://fonts.googleapis.com/css2?family=Jua&display=swap"
      rel="stylesheet"
    />
  </head>
  <body>
    <header>
      <h1>To Do List</h1>
      <div class="input-wrapper">
        <input type="text" id="input-box" placeholder="내용을 입력하세요" /
       >
        <input
          type="button"
          id="input-button"
          value="+"
          onclick="onClickInputButton(this)"
        />
      </div>
    </header>
    <main>
      <ul class="to-do-list">
        <li>
          <input
            type="checkbox"
            class="checkbox"
            onclick="onClickCheckbox(this)"
          />
          <span>first item</span>
          <img
            src="trashcan.png"
            width="20"
            height="20"
            alt="my image"
            onclick="onClickDeleteButton(this)"
          />
        </li>
        <li>
          <input
            type="checkbox"
            class="checkbox"
            onclick="onClickCheckbox(this)"
          />
          <span>second item</span>
          <img
            src="trashcan.png"
            width="20"
            height="20"
            alt="my image"
            onclick="onClickDeleteButton(this)"
          />
        </li>
      </ul>
    </main>
  </body>
  <script relscript type="text/javascript" src="index.js"></script>
</html>
html로 구현한 내용
- header와 main으로 나누어 표현하기
- 폰트와 휴지통 이미지 삽입해보기
- id, class 목적에 맞게 사용하기
- onclick 사용하여 Dom구현하기
- css로 스타일 표현하기
* {
  background-color: #ddf;
  box-sizing: border-box;
  font-family: "Jua";
}

header {
  padding-top: 50px;
  text-align: center;
}

.input-wrapper {
  display: flex;
  justify-content: space-between;
  width: 350px;
  margin: auto;
}

#input-box {
  width: 300px;
  height: 45px;
  border: 1px solid gray;
  font-size: larger;
}

#input-button {
  height: 45px;
  width: 40px;
  font-size: 1.5em;
  background-color: #6864cc;
  color: white;
}

.to-do-list {
  box-sizing: border-box;
  background-color: white;
  border: 10px solid white;
  border-radius: 20%;
  width: 400px;
  height: 500px;
  margin: 0 auto;
  margin-top: 40px;
  padding: 0 40px;
}

li {
  background-color: white;
  margin-top: 10%;
  list-style: none;
  display: flex;
  justify-content: space-between;
}

.checkbox {
  width: 20px;
  height: 20px;
  border-radius: 30%;
}
>
li > span {
  background-color: white;
  font-size: 1.5em;
}

li > image {
  background-color: white;
}
- javascript로 상호작용하기
javascript에서 내가 구현하고 싶은 기능
1. 빈칸에 값을 입력하고 +버튼을 누르면 값이 아래에 추가된다.
2. enter를 눌러도 값이 추가된다.
3. 체크박스를 누르면 값에 취소선이 그어진다.
4. 휴지통 그림을 누르면 값이 지워진다.
function onClickInputButton(elem) {
  const inputBoxElem = document.querySelector("#input-box");
  const inputBoxValue = inputBoxElem.value;
  document.querySelector(".to-do-list").innerHTML += `
  <li>
  <input
    type="checkbox"
    class="checkbox"

  />
  <span>${inputBoxValue}</span>
  <img
    src="trashcan.png"
    width="20"
    height="20"
    alt="my image"

  />
</li>
  `;
  inputBoxElem.value = "";
}

function enterKey() {
  if (window.event.keyCode == 13) {
    onClickInputButton();
  }
}

function onClickDeleteButton(deleteElem) {
  deleteElem.parentElement.remove();
}

function onClickCheckbox(checkboxElem) {
  const liElem = checkboxElem.parentElement;
  const spanElem = liElem.querySelector("span");
  if (checkboxElem.checked) {
    spanElem.innerHTML = `<s>${spanElem.innerText}</s>`;
  } else {
    spanElem.innerHTML = `${spanElem.innerText}`;
  }
}
✍ 새롭게 알게 된 내용 1
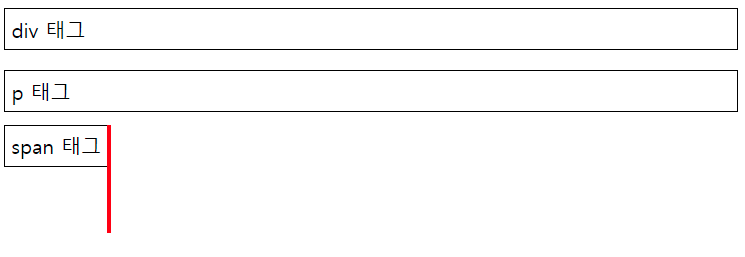
div와 p, span태그의 차이점 알아보기
<div> div태그는 한 줄을 차지한다 </div>
<p> p태그는 한 줄을 차지한다 </p>
<span> span태그는 컨텐츠 크기만큼 공간을 차지한다 </span>
✍ 새롭게 알게 된 내용 2
자바스크립트에서 HTML 문서를 기반으로 만들어진 화면 속 요소를 선택하는 방법
1. 아이디 이름을 이용하여 선택하는 방법
HTML 문서가 있다고 가정했을때, button-submit이라는 아이디를 가진 요소를 선택하는 방법.console.log(document.("button-submit"));2. 클래스 이름을 이용하여 선택하는 방법
HTML 문서가 있다고 가정했을때, message라는 특정 클래스 이름을 가진 요소들을 선택하여 사용하는 방법.console.log(document.getElementsByClassName("message"));3. 태그 이름을 이용하여 선택하는 방법
HTML 문서가 있다고 가정했을때, input이라는 특정 태그를 사용한 요소들을 선택하여 사용하는 방법.console.log(document.getElementsByTagName("input"));4. CSS 선택자를 이용하여 선택하는 방법
console.log(document.querySelector("#button-submit"));
- 추가로 구현해보고 싶은 내용
- 한국어 입력 시 값이 두번 추가 되는 부분 변경하기
- 새로고침을 해도 기존 입력 값이 날아가지 않고 유지되게 만들기
- 느낀점
to-do-list를 만들어보면서 그동안 내가 배운 내용들을 활용해볼 수도 있었고, 아예 처음 보는 개념도 많았다.
책과 유튜브를 보면서 공부하는 것도 중요하지만 직접 UI를 구축해보면서 지금 나에게 필요한 부분이 무엇인지를 알게 된것같다.
- css-flex속성 및 사용법 익히기
- JS-함수 선언과 호출에 익숙해지기
새로 알게 된 개념들을 다시 한번 응용해보고 추가로 구현해보고 싶은 내용을 추가해봐야겠다.
아자좌~٩( ᐛ )و