📔설명
RDS와 PHP를 연동하는 방법을 알아보자.
여기서 php 실습환경 구축을 한 후 시작하자!
저기서 Composer를 설치하는 것과
sdk를 설치하고, credentials 까지 진행해주자.
📦PHP를 위한 RDS
👓개발준비

먼저 새로운 데이터베이스 인스턴스를 생성해보자.
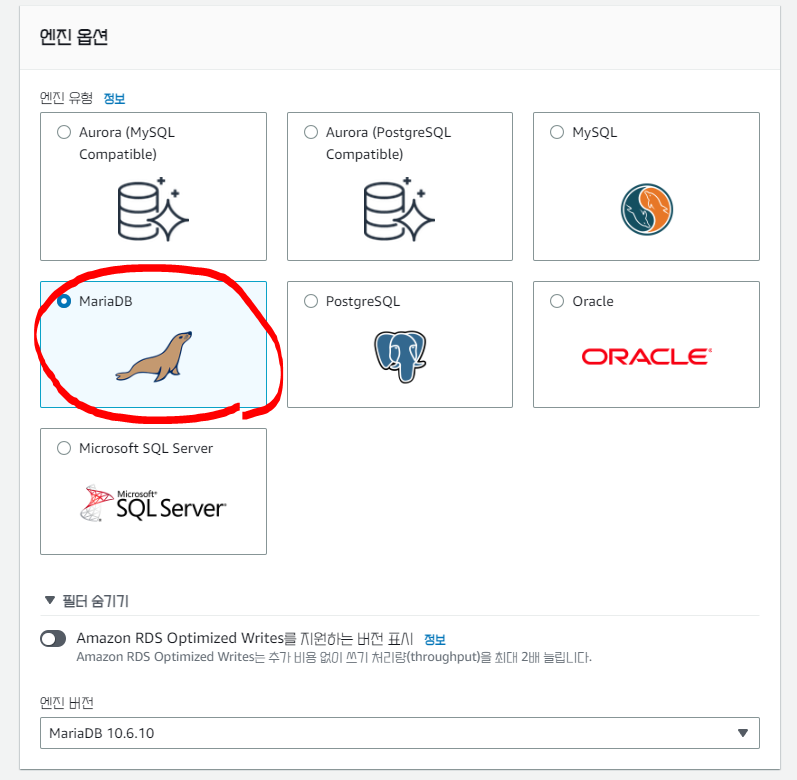
DB는 아무거나 써도 되지만 MariaDB를 쓸 것이다.
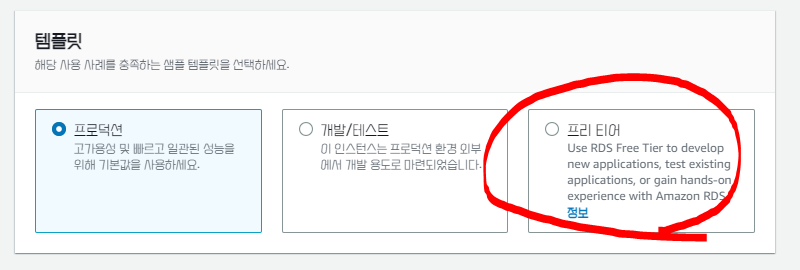
템플릿은 프리 티어를 설정해주자.

DB 인스턴스는 원하는 걸 입력하고, 마스터 사용자 이름 또한 자신이 원하는 이름으로 하자.
마스터 암호는 잘 기억해둬야 한다!
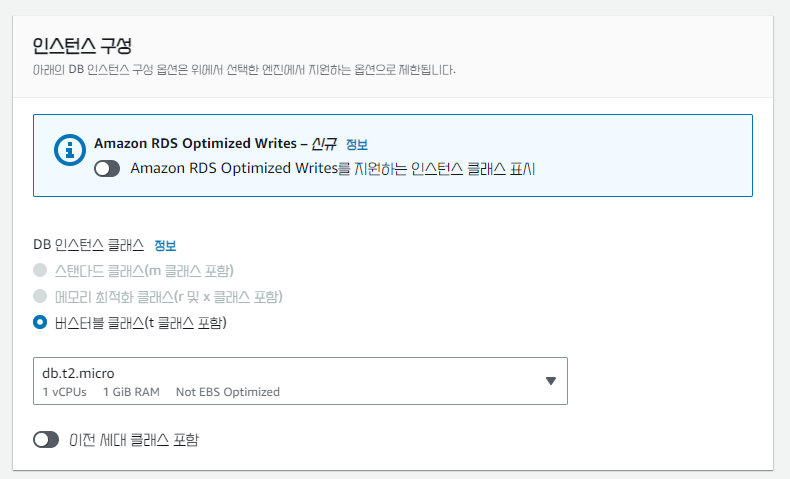
인스턴스 구성은 db.t2.micro로 변경해주자.
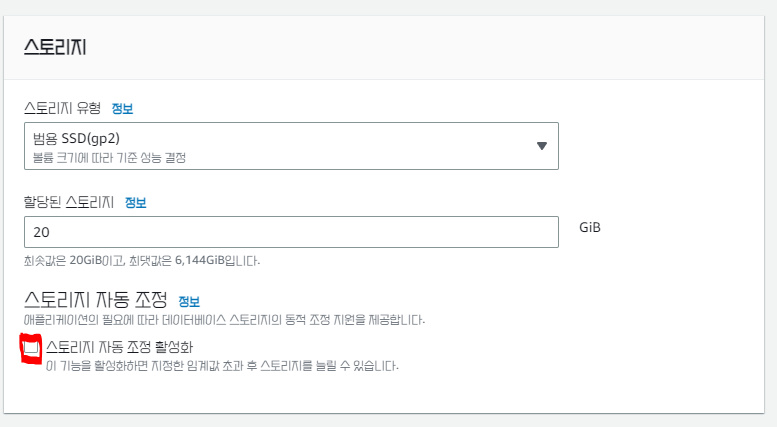
스토리지에서는 스토리지 자동 조정 활성화를 체크 해제해주자.
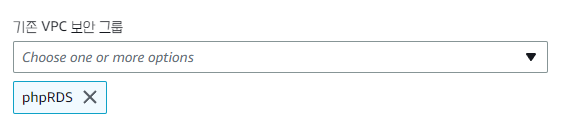
VPC 보안 그룹에는 ec2인스턴스를 만들 때 사용했던 보안그룹과 같은 그룹을 설정해주면 같은 보안 그룹의 인스턴스가 rds에 접근할 수 있게 된다.
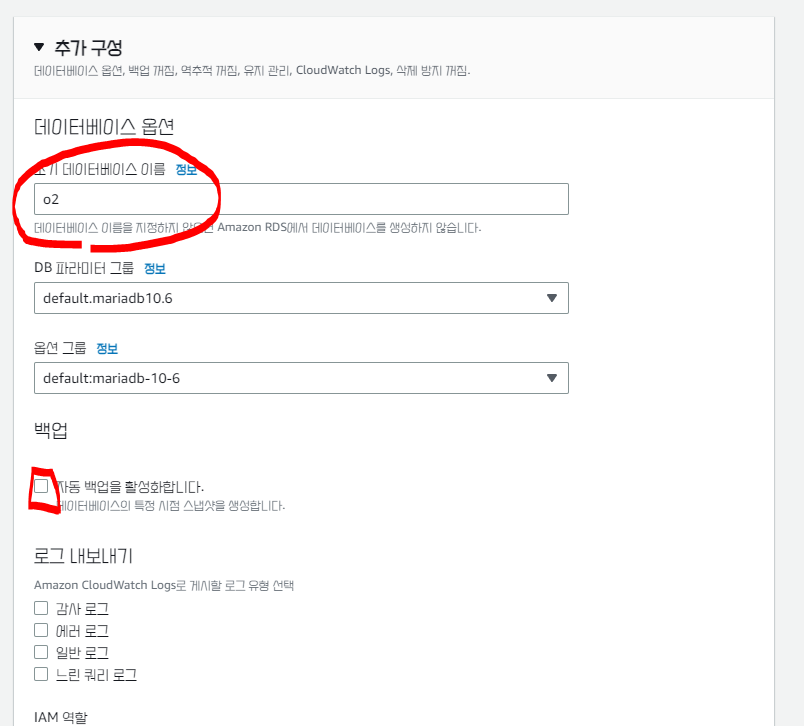
DB 이름은 원하는대로 지정하고, 자동 백업은 꼭 체크 해제 해주자.

그리고 네모친 부분도 꼭 체크해제하자.
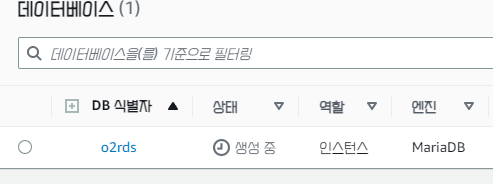
DB가 생성되고 있다.
DB가 생성이 다 되면 인스턴스 이름을 눌러보자.
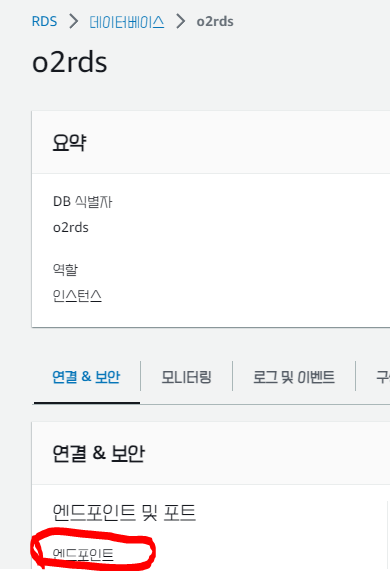
그러면 연결&보안에서 엔드포인트부분을 볼 수 있다.
이것이 마리아DB에 접속할 수 있는 주소이다.
해당 주소를 복사한 후 우리의 ec2 인스턴스로 들어가자.
$mysql -h아까복사한주소 -u아까설정한유저명 -p아까복사한주소에 뒤에 포트가 붙어있으면 안되고 .com으로 끝나야 한다.
그 다음 아까 설정한 마스터 비밀번호를 입력하자.
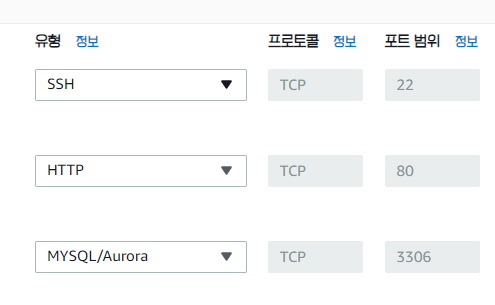
그리고 보안그룹에서 인바운드 규칙에 MySQL/Aurora를 눌러서 클릭해주자! 아니면 연결이 안된다..

그러면 접속이 된다~ 와~!!
show databases;
그러면 o2라는 DB가 생성되어있다.
use o2;o2 DB를 사용하도록 변경하자.
CREATE TABLE `topic` (
`id` int(11) NOT NULL AUTO_INCREMENT,
  `title` varchar(100) NOT NULL,
  `description` text NOT NULL,
  `author` varchar(30) NOT NULL,
  `created` datetime NOT NULL,
  PRIMARY KEY (id)
) ENGINE=InnoDB DEFAULT CHARSET=utf8;
테이블을 생성해주자!
topic이라는 테이블을 생성하는 것이다.
INSERT INTO `topic` (`id`, `title`, `description`, `author`, `created`) VALUES(1, 'About JavaScript', '<h3>Desctiption</h3>\r\n<p>JavaScript  is a dynamic computer programming language. It is most commonly used as part of web browsers, whose implementations allow client-side scripts to interact with the user, control the browser, communicate asynchronously, and alter the document content that is displayed.</p>\r\n<p>\r\nDespite some naming, syntactic, and standard library similarities, JavaScript and Java are otherwise unrelated and have very different semantics. The syntax of JavaScript is actually derived from C, while the semantics and design are influenced by the Self and Scheme programming languages.\r\n</p>\r\n<h3>See Also</h3>\r\n<ul>\r\n  <li><a href="http://en.wikipedia.org/wiki/Dynamic_HTML">Dynamic HTML and Ajax (programming)</a></li>\r\n  <li><a href="http://en.wikipedia.org/wiki/Web_interoperability">Web interoperability</a></li>\r\n  <li><a href="http://en.wikipedia.org/wiki/Web_accessibility">Web accessibility</a></li>\r\n</ul>\r\n', 'egoing', '2015-03-31 12:14:00');
INSERT INTO `topic` (`id`, `title`, `description`, `author`, `created`) VALUES(2, 'Variable and Constant', '<h3>Desciption</h3>\r\n\r\nIn computer programming, a variable or scalar is a storage location paired with an associated symbolic name (an identifier), which contains some known or unknown quantity or information referred to as a value. The variable name is the usual way to reference the stored value; this separation of name and content allows the name to be used independently of the exact information it represents. The identifier in computer source code can be bound to a value during run time, and the value of the variable may thus change during the course of program execution.\r\n\r\n<h3>See Also</h3>\r\n<ul>\r\n<li>Non-local variable</li>\r\n<li>Variable interpolation</li>\r\n</ul>\r\n', 'k8805', '2015-05-14 10:04:00');
INSERT INTO `topic` (`id`, `title`, `description`, `author`, `created`) VALUES(3, 'Opeartor', '<h2>Operator</h2>\r\n<h3>Description</h3>\r\n<p>Programming languages typically support a set of operators: constructs which behave generally like functions, but which differ syntactically or semantically from usual functions</p>\r\n<p>Common simple examples include arithmetic (addition with +, comparison with >) and logical operations (such as AND or &&). </p>\r\n', 'egoing', '2015-06-18 05:00:00');
INSERT INTO `topic` (`id`, `title`, `description`, `author`, `created`) VALUES(4, 'Conditional', '<h3>Description</h3>\r\n<p>In computer science, conditional statements, conditional expressions and conditional constructs are features of a programming language which perform different computations or actions depending on whether a programmer-specified boolean condition evaluates to true or false. Apart from the case of branch predication, this is always achieved by selectively altering the control flow based on some condition.</p>\r\n<p>In imperative programming languages, the term "conditional statement" is usually used, whereas in functional programming, the terms "conditional expression" or "conditional construct" are preferred, because these terms all have distinct meanings.</p>\r\n<h3>See Also</h3>\r\n<ul>\r\n<li><a href="http://en.wikipedia.org/wiki/Branch_(computer_science)" title="Branch (computer science)">Branch (computer science)</a></li>\r\n<li><a href="http://en.wikipedia.org/wiki/Conditional_compilation" title="Conditional compilation">Conditional compilation</a></li>\r\n<li><a href="http://en.wikipedia.org/wiki/Dynamic_dispatch" title="Dynamic dispatch">Dynamic dispatch</a> for another way to make execution choices</li>\r\n<li><a href="http://en.wikipedia.org/wiki/McCarthy_Formalism" title="McCarthy Formalism">McCarthy Formalism</a> for history and historical references</li>\r\n<li><a href="http://en.wikipedia.org/wiki/Named_condition" title="Named condition" class="mw-redirect">Named condition</a></li>\r\n<li><a href="http://en.wikipedia.org/wiki/Test_(Unix)" title="Test (Unix)">Test (Unix)</a></li>\r\n<li><a href="http://en.wikipedia.org/wiki/Yoda_conditions" title="Yoda conditions">Yoda conditions</a></li>\r\n</ul>', 'c2', '2015-07-25 00:00:00');
4개의 행도 추가해주자. 그리고 exit으로 DB를 나가자.
🎁PHP와 MySQL(MariaDB) 연동
/var/www/html로 돌아와서 rds.php라는 파일을 만들자.
DB에 insert 한 데이터를 가져오는 코드를 작성해보자.
<!DOCTYPE>
<html>
        <head><meta charset="utf-8"></head>
        <body>
        	<ul>
<?php
$conn=mysqli_connect()
?>
			</ul>
        </body>
</html>
우선, php에서 mysql에 접속할 때 사용하는 것은 mysqli_connect()이다.
먼저, 첫번째 인자는 아까 복사붙여넣기 했던 엔드포인트 주소이다.
두번째 인자는 아이디, 세번째 인자는 비밀번호, 네번째 인자는 데이터베이스가 들어온다. 각각의 인자들은 ''로 묶어줘야 한다.
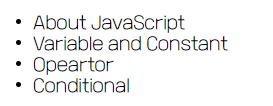
$result는 select * from topic이라는 결과값을 가리키고 있는 것이다.
$result=mysqli_query($conn,"SELECT * FROM topic");
while($row=mysqli_fetch_assoc($result)){
        $title=mysqli_real_escape_string($conn,$row['title']);
        print("<li>{$title}</li>");
}
$conn 밑에 위의 코드를 붙여넣기 해주자.
그 다음 실행시켜보자!
접속은 ec2public dns명/rds.php이다.
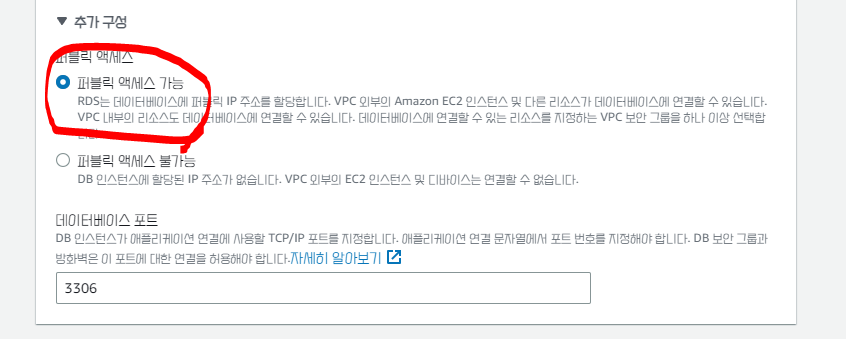
여기서, 출력이 안된다면 RDS에서 퍼블릭 액세스 가능으로 수정하도록 하자.
한참을 헤맸다!!
그러면 이렇게 결과가 나온다.
<!DOCTYPE>
<html>
        <head><meta charset="utf-8"></head>
        <body>
                <form action="rds_receiver.php" method="post">
                        <p>
                                제목 :
                                        <input type="text" name="title">
                        </p>
                        <p>
                                본문 :
                                        <textarea name="description">
                                        </textarea>
                        </p>
                        <p><input type="submit"></p>
                </from>
                <ul>
내용을 위처럼 추가해준 다음 저장하고 다시 실행시켜보자.
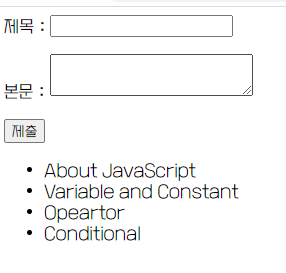
그러면 위처럼 폼이 생성되었다.
만약, 제출버튼을 누른다면 rds_receiver.php로 이동하게 된다.
rds_receiver.php파일을 생성해보자.
$title=mysqli_real_escape_string($conn,$_POST['title']);
$description=mysqli_real_escape_string($conn,$_POST['description']);
제일 위에는 아까 작성한 $conn을 붙여넣기 하고, 그 다음줄에 POST방식으로 title과 description을 받아오자.
$sql="INSERT INTO topic (title, description,author,created) VALUES('{$title}','${description}','dang',NOW())";sql문을 작성해주자. title과 description은 변수로 가지고 있으니 저렇게 작성하고 작성자는 아무나, created는 NOW()로 해주자.
header('Location: rds.php');다시 사용자를 rds.php 파일로 보내버리는 소스코드다.
<?php
$conn=mysqli_connect();
$title=mysqli_real_escape_string($conn,$_POST['title']);
$description=mysqli_real_escape_string($conn,$_POST['description']);
$sql="INSERT INTO topic (title, description,author,created) VALUES('{$title}','${description}','dang',NOW())";
mysqli_query($conn,$sql);
header('Location: rds.php');
?>
전체 코드는 이렇게 된다.
실행해보자!

이렇게 작성한 후, 제출버튼을 누르자.

추가되었다!!
🎒Read Replication
이제 DB를 확장했을 때, (Scale Out) 어떻게 php 코드가 달라져야 하는지에 대해 알아보자.
Scale Out은 한 대의 컴퓨터로 처리할 수 없는 상황을 말한다.
우리가 위에서 만든 rds_receiver.php는 수정/쓰기/삭제 하는 작업이기 때문에 Master에서 이뤄져야 한다.

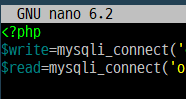
위에가 Master DB, 밑에가 읽기 복제를 한 Slave DB이다.

쓰기와 관련된 부분은 Master DB의 엔드포인트 주소로 수정하면 된다.
그리고, 읽기와 관련된 rds.php작업은 slave db의 엔드포인트 주소로 수정하면 되는 것이다.
우리가 작성했던 rds_receiver.php와 rds.php는 코드상에 비밀번호가 들어있는데 이것은 좋은 것이 아니다!
그래서 별도의 파일로 분리를 해보려고 한다.
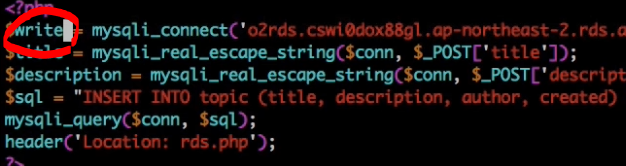
rds_receiver.php는 쓰기와 관련된 작업이므로 변수명을 $write로 해준다.
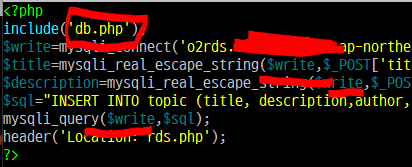
그리고 include('db.php')를 가져올 것이다.
<?php
include('db.php');
$title=mysqli_real_escape_string($write,$_POST['title']);
$description=mysqli_real_escape_string($write,$_POST['description']);
$sql="INSERT INTO topic (title, description,author,created) VALUES('{$title}','${description}','dang',NOW())";
mysqli_query($write,$sql);
header('Location: rds.php');
?>
그리고 $write라는 변수를 초기화 한 저부분을 rds_receiver.php에서 없애버릴 것이다.

그 부분을 복사해서 db.php파일을 새로 만들어 붙여넣어주자.
<!DOCTYPE>
<html>
        <head><meta charset="utf-8"></head>
        <body>
                <form action="rds_receiver.php" method="post">
                        <p>
                                제목 :
                                        <input type="text" name="title">
                        </p>
                        <p>
                                본문 :
                                        <textarea name="description">
                                        </textarea>
                        </p>
                        <p><input type="submit"></p>
                </from>
                <ul>
<?php
include('db.php');
$result=mysqli_query($read,"SELECT * FROM topic");
while($row=mysqli_fetch_assoc($result)){
        $title=mysqli_real_escape_string($read,$row['title']);
        print("<li>{$title}</li>");
}
?>
                </ul>
        </body>
</html>
그리고 rds.php는 $conn을 $read로 변경하자. 그리고 똑같이 $read라는 변수를 초기화 한 저 부분을 rds.php에서 없애고 db.php에 붙여넣기 하자.
그 다음 작동시켜보면 잘 작동될 것이다!
만약, 하나의 php에서 $read와 $write를 동시에 한다면,
<?php
include('db.php');
mysqli_query($write,"UPDATE ...");
mysqli_query($read,"SELECT ...");
위와 같은 식으로코드가 작성될 것이다.
🕐이후

일단.. 무시무시한 과금 위험에서 잘 살아남았으니 계정 해지를 하자.
이제는 무엇을 공부해야 할까.
스위프트는 맥이 있어야 할 것 같다..
Python을 지금 배우지 않는 이유는 R언어를 공부중이기 때문이다.
다시 마크업 언어인 HTML을 공부하고 차근차근 시작해볼까 한다!
그 전에 스크래치 언어를 살펴볼까 싶기도 한다.
그러면 스크래치 언어->HTML로 가자!
자바 프로젝트는 계속 만들면서~