📩 스프링 시큐리티 설치
💾 build.gradle 파일 수정
plugins {
	id 'java'
	id 'org.springframework.boot' version '3.0.11'
	id 'io.spring.dependency-management' version '1.1.3'
}

group = 'com.example'
version = '0.0.1-SNAPSHOT'

java {
	sourceCompatibility = '17'
}

repositories {
	mavenCentral()
}

dependencies {
	implementation 'org.springframework.boot:spring-boot-starter-web'
	testImplementation 'org.springframework.boot:spring-boot-starter-test'
	developmentOnly 'org.springframework.boot:spring-boot-devtools'
	implementation 'org.springframework.boot:spring-boot-starter-jdbc'
	compileOnly 'org.projectlombok:lombok'
	annotationProcessor 'org.projectlombok:lombok'
	runtimeOnly 'com.h2database:h2'
	implementation 'org.springframework.boot:spring-boot-starter-data-jpa'
	implementation 'org.springframework.boot:spring-boot-starter-thymeleaf'
    implementation 'nz.net.ultraq.thymeleaf:thymeleaf-layout-dialect'
    implementation 'org.springframework.boot:spring-boot-starter-validation'
    implementation 'org.springframework.boot:spring-boot-starter-security'
    implementation 'org.thymeleaf.extras:thymeleaf-extras-springsecurity6:3.1.1.RELEASE'
}

tasks.named('test') {
	useJUnitPlatform()
}
✅ 추가 : implementation 'org.springframework.boot:spring-boot-starter-security'
✅ 추가 : implementation 'org.thymeleaf.extras:thymeleaf-extras-springsecurity6:3.1.1.RELEASE'
로컬 서버를 재시작 하자!
💻 실행화면 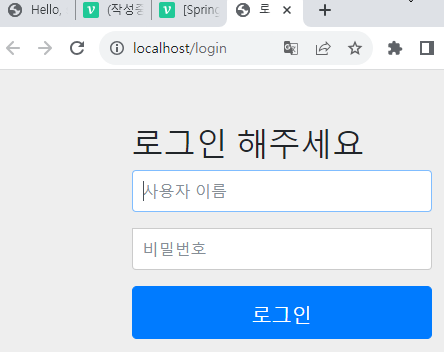
로그인 화면이 나타났다!
스프링 시큐리티는 기본적으로 인증되지 않은 사용자는 서비스를 사용할 수 없게끔 되어 있다. 따라서 인증을 위한 로그인 화면이 나타나는 것이다.
로그인 하지 않고 게시물을 조회할 수 있도록 시큐리티 설정을 해줘야 한다.
💾 SecurityConfig.java 파일을 작성
package com.mysite.sbb;

import org.springframework.context.annotation.Bean;
import org.springframework.context.annotation.Configuration;
import org.springframework.security.config.annotation.web.builders.HttpSecurity;
import org.springframework.security.config.annotation.web.configuration.EnableWebSecurity;
import org.springframework.security.web.SecurityFilterChain;
import org.springframework.security.web.util.matcher.AntPathRequestMatcher;

@Configuration
@EnableWebSecurity
public class SecurityConfig {

	@Bean
	SecurityFilterChain filterChain(HttpSecurity http) throws Exception {
        http
            .authorizeHttpRequests((authorizeHttpRequests) -> authorizeHttpRequests
                .requestMatchers(new AntPathRequestMatcher("/**")).permitAll())
        ;
        return http.build();
    }
}- @Configuration : 스프링의 환경설정 파일임을 의미하는 애너테이션
여기서는 스프링 시큐리티의 설정을 위해 사용되었다. - @EnableWebSecurity : 모든 요청 URL이 스프링 시큐리티의 제어를 받도록 만드는 애너테이션이다. @EnableWebSecurity 애너테이션을 사용하면 내부적으로 SpringSecurityFilterChain이 동작하여 URL 필터가 적용된다.
✅ 스프링 시큐리티의 세부 설정은
SecurityFilterChain 빈을 생성하여 설정할 수 있다.
http
    .authorizeHttpRequests((authorizeHttpRequests) -> authorizeHttpRequests
        .requestMatchers(new AntPathRequestMatcher("/**")).permitAll())
    ;
모든 인증되지 않은 요청을 허락한다는 의미이다. 따라서 로그인을 하지 않더라도 모든 페이지에 접근할 수 있다.
이 때, H2콘솔 로그인시 403 Forbidden 오류가 발생한다.
403 Forbidden 오류가 발생하는 이유는 스프링 시큐리티를 적용하면 CSRF 기능이 동작하기 때문이다.
💡 CSRF란?
CSRF(cross site request forgery)는 웹 사이트 취약점 공격을 방지를 위해 사용하는 기술이다. 스프링 시큐리티가 CSRF 토큰 값을 세션을 통해 발행하고 웹 페이지에서는 폼 전송시에 해당 토큰을 함께 전송하여 실제 웹 페이지에서 작성된 데이터가 전달되는지를 검증하는 기술이다.
질문등록 페이지에서 F12 를 눌러 확인해보자!
💻 http://localhost/question/create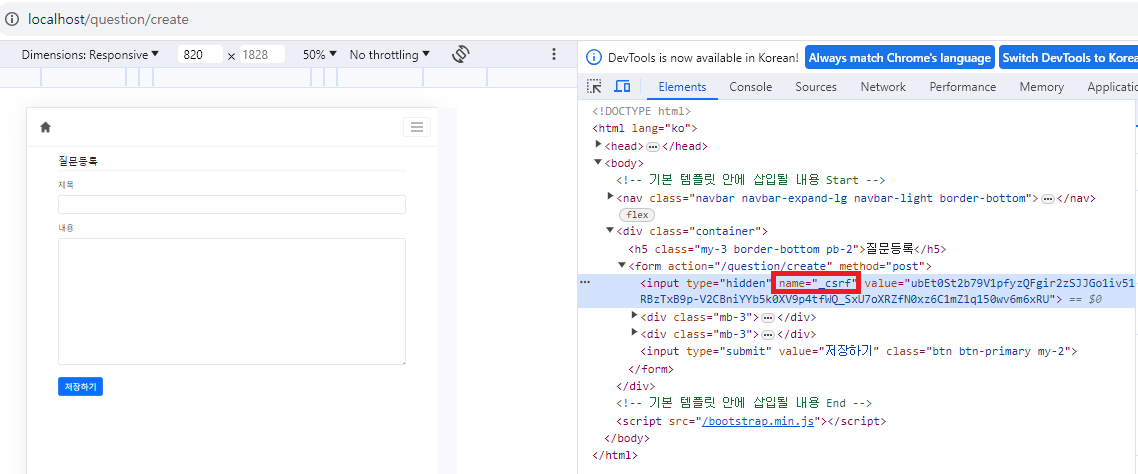
스프링 시큐리티에 의해 다음과 같은 엘리먼트가 자동으로 생성되었다.
<input type="hidden" name="_csrf" value="ubEt0St2b79V1pfyzQFgir2zSJJGo1iv51RBzTxB9p-V2CBniYYb5k0XV9p4tfWQ_SxU7oXRZfN0xz6C1mZ1q150wv6m6xRU">
스프링 시큐리티는 이렇게 발행한 CSRF 토큰의 값이 정확한지 검증하는 과정을 거친다. (만약 CSRF 값이 없거나 해커가 임의의 CSRF 값을 강제로 만들어 전송하는 악의적인 URL 요청은 스프링 시큐리티에 의해 블록킹 될 것이다.)
그런데 H2 콘솔은 이와 같은 CSRF 토큰을 발행하는 기능이 없기 때문에 위와 같은 403 오류가 발생하는 것이다.
💾 SecurityConfig.java 파일수정
package com.mysite.sbb;

import org.springframework.context.annotation.Bean;
import org.springframework.context.annotation.Configuration;
import org.springframework.security.config.annotation.web.builders.HttpSecurity;
import org.springframework.security.config.annotation.web.configuration.EnableWebSecurity;
import org.springframework.security.web.SecurityFilterChain;
import org.springframework.security.web.header.writers.frameoptions.XFrameOptionsHeaderWriter;
import org.springframework.security.web.util.matcher.AntPathRequestMatcher;

@Configuration
@EnableWebSecurity
public class SecurityConfig {

	@Bean
	SecurityFilterChain filterChain(HttpSecurity http) throws Exception {
        http
            .authorizeHttpRequests((authorizeHttpRequests) -> authorizeHttpRequests
                .requestMatchers(new AntPathRequestMatcher("/**")).permitAll())
            .csrf((csrf) -> csrf
            		.ignoringRequestMatchers(new AntPathRequestMatcher("/h2-colsole/**")))
            .headers((headers) -> headers
                    .addHeaderWriter(new XFrameOptionsHeaderWriter(
                        XFrameOptionsHeaderWriter.XFrameOptionsMode.SAMEORIGIN)))
        ;
        return http.build();
    }
}
✅ 추가 : .csrf((csrf) -> csrf .ignoringRequestMatchers(new AntPathRequestMatcher("/h2-console/**")))
CSRF 처리시 H2 콘솔은 예외로 처리할 수 있도록 설정 파일을 수정하였다.
✅ 추가 : .headers((headers) -> headers .addHeaderWriter(new XFrameOptionsHeaderWriter( XFrameOptionsHeaderWriter.XFrameOptionsMode.SAMEORIGIN)))
H2 콘솔의 화면은 frame 구조로 작성되었고, 스프링 시큐리티는 사이트의 콘텐츠가 다른 사이트에 포함되지 않도록 하기 위해 X-Frame-Options 헤더값을 사용하였기 때문에 (clickjacking 공격을 막기위해 사용함) H2콘솔 로그인 시 화면이 깨져 보일 수 있다.
위 처럼 URL 요청시 X-Frame-Options 헤더값을 sameorigin으로 설정하여 오류가 발생하지 않도록 했다. X-Frame-Options 헤더의 값으로 sameorigin을 설정하면 frame에 포함된 페이지가 페이지를 제공하는 사이트와 동일한 경우에는 계속 사용할 수 있다.
