평소에 next.js로 프로젝트를 구축하는 편이기에, 보일러플레이트를 만들어놓고 쓰면 좋겠다는 생각이들어서 구축하는 김에 포스팅도 같이 해보려 합니다 :)
해당 보일러플레이트 코드는 https://github.com/danmin20/next-styled 에서 확인할 수 있습니다.
( 잘못된 부분 또는 개선사항이 있다면 피드백 주시면 감사하겠습니다 :D )
structure
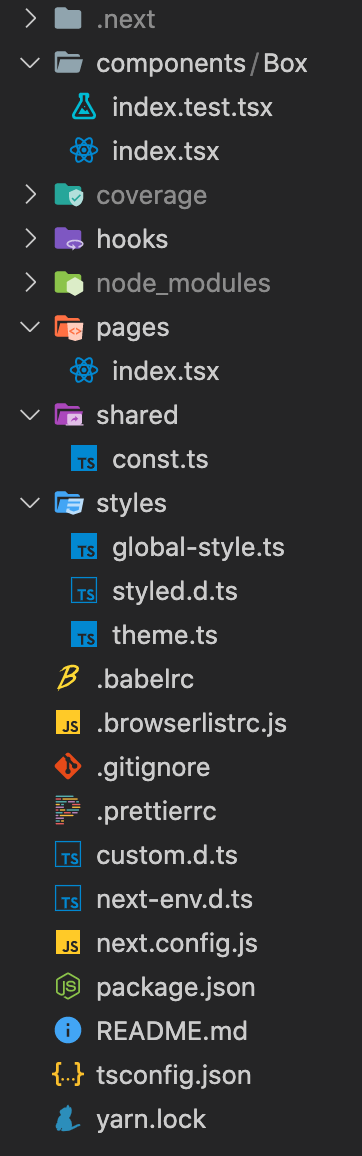
평소 pages components hooks shared styles 로 프로젝트 구조를 잡는다.
(coverage는 test --coverage 결과물)
pages는 next에서 auto routing 되는 페이지들을 작성한다.
components에는 재활용 가능한 컴포넌트들과 함께 unit 단위 테스트코드를 작성한다.
shared에는 유틸 함수들이 작성되는 utils.ts와 interface와 enum들이 작성되는 const.ts를 작성한다.
styles에는 styled-component로 작성한 글로벌스타일(+reset)과 미디어쿼리를 포함한 테마 요소들을 작성한다. (styled.d.ts는 인터페이스 정의를 위한 파일이다.)
_app.tsx & _document.tsx
이 파일들은 커스텀을 위함이다.
https://nextjs.org/docs/advanced-features/custom-app
https://nextjs.org/docs/advanced-features/custom-document
_app.tsx
import type { AppProps } from "next/app";
import Head from "next/head";
import { ThemeProvider } from "styled-components";
import { GlobalStyle } from "../styles/global-style";
import { theme } from "../styles/theme";

function MyApp({ Component, pageProps }: AppProps) {
  return (
    <>
      <Head>
        <meta name="viewport" content="width=device-width, initial-scale=1" />
        <title>boilerplate</title>
      </Head>
      <GlobalStyle />
      <ThemeProvider theme={theme}>
        <Component {...pageProps} />
      </ThemeProvider>
    </>
  );
}

export default MyApp;
이 페이지에서 스타일을 넣어준다던가 (index.css를 작성할 경우 여기에서 import)
상태관리 라이브러리의 프로바이더 등을 감싸줄 수 있다.
_document.tsx
import Document, {
  Html,
  Head,
  Main,
  NextScript,
  DocumentContext,
} from "next/document";
import { ServerStyleSheet } from "styled-components";

class MyDocument extends Document {
  static async getInitialProps(ctx: DocumentContext) {
    const sheet = new ServerStyleSheet();
    const originalRenderPage = ctx.renderPage;
    try {
      ctx.renderPage = () =>
        originalRenderPage({
          enhanceApp: (App) => (props) =>
            sheet.collectStyles(<App {...props} />),
        });

      const initialProps = await Document.getInitialProps(ctx);
      return {
        ...initialProps,
        styles: (
          <>
            {initialProps.styles}
            {sheet.getStyleElement()}
          </>
        ),
      };
    } finally {
      sheet.seal();
    }
  }

  render() {
    return (
      <Html>
        <Head>
          // 생략
        </Head>
        <body>
          <Main />
          <NextScript />
        </body>
      </Html>
    );
  }
}

export default MyDocument;styled-component를 사용할 경우 커스텀이 필요하다.
https://styled-components.com/docs/advanced#nextjs
해당 코드를 추가해주어야 SSR시에 styled가 헤더에 주입된다.
추가해주지 않으면 CSS가 적용되지 않고 먼저 렌더링되는 현상이 발생한다.
생략부분에는 메타태그를 넣어주거나 웹폰트를 preload 시켜줄 수 있다.
next.config.js
이 파일에서 웹팩 셋팅들을 할 수 있다.
css-loader, file-loader 등 필요한 로더들을 그때그때 추가하여 사용하는 편이지만,
svg를 위한 웹팩 로더는 항상 추가한다.
const withBundleAnalyzer = require("@next/bundle-analyzer")({
  enabled: process.env.ANALYZE === "true",
});

module.exports = withBundleAnalyzer({
  target: "serverless",
  env: {
    BASE_URL: process.env.BASE_URL,
  },

  webpack(conf) {
    conf.module.rules.push({
      test: /\.svg$/,
      use: [
        {
          loader: "@svgr/webpack",
          options: {
            svgoConfig: {
              plugins: [
                {
                  // Enable figma's wrong mask-type attribute work
                  removeRasterImages: false,
                  removeStyleElement: false,
                  removeUnknownsAndDefaults: false,
                  // Enable svgr's svg to fill the size
                  removeViewBox: false,
                },
              ],
            },
          },
        },
      ],
    });
    // 절대경로
    conf.resolve.modules.push(__dirname);
    return conf;
  },
});
options 내부의 코드는 피그마에서 svg를 export해올 때 마스킹이 잘못 되는 경우가 있는데, 이를 해결하는 코드이다.
절대경로 로직도 추가해주었다. (tsconfig.json에 "baseUrl": ".", "rootDir": ".", 추가)
.babelrc
최초 SSR 이후 CSR로 라우팅을 하게 되는데,
이 때 서버에서 생성하는 해시값과 브라우저에서 생성하는 해시값이 서로 달라서 에러가 발생하게 된다.
(Prop className did not match)
이를 해결하기 위해 바벨 플러그인을 설치해주었다.
https://styled-components.com/docs/tooling
{
    "presets": [
        "next/babel"
    ],
    "plugins": [
        [
            "babel-plugin-styled-components",
            {
                "fileName": true,
                "displayName": true,
                "pure": true
            }
        ]
    ]
}
fileName : 코드가 포함된 파일명을 알려줌
displayName : 클래스명에 해당 스타일 정보 추가
pure : 사용하지 않은 속성 제거
styled-components
global-style-ts
import { createGlobalStyle } from "styled-components";
import { reset } from "styled-reset";
import { media } from "./theme";

export const GlobalStyle = createGlobalStyle`
    ${reset}
    :focus {
        outline: none;
        border: none;
    }
    ::-webkit-scrollbar {
        display: none;
    }
    html{
        font-size: 11px;
        -webkit-text-size-adjust: none;
        font-family: -apple-system,BlinkMacSystemFont,helvetica,Apple SD Gothic Neo,sans-serif;
        font-display: fallback;
        ${media.tablet}{
            font-size: 10px;
        }
        -ms-overflow-style: none;
        scrollbar-width: none;
    }
    button {
        background: none;
        padding: 0;
        border: none;
        cursor: pointer;
        &:disabled {
            cursor: default;
            fill: #f2f3f4;
        }
    }

    .pc-tablet-only {
        display: block;
        ${media.mobile} {
            display: none;
        }
    }
    .tablet-mobile-only{
        display: none;
        ${media.tablet}{
            display:block;
        }
    }
    .mobile-only {
        display: none;
        ${media.mobile} {
            display: block;
        }
    }
`;
글로벌스타일에서도 미디어쿼리를 쉽게 사용할 수 있는 것이 장점이라고 생각한다.
CSS reset의 경우 styled-reset을 사용하곤 하는데, 빠져있는 것도 있어서 직접 작성해서 import시켜주기도 한다.
import styled from "styled-components";

const Index = () => {
  return (
    <Wrapper>
      <div className="title">title</div>
    </Wrapper>
  );
};

const Wrapper = styled.div`
  width: 100%;
  height: 100vh;
  .title {
    font-weight: 800;
  }
`;

export default Index;
코드 작성은 위와 같은 구조를 기반으로 BEM 기법을 자주 사용하곤 한다.


초기세팅 할때 너무 유용하게 사용할게요~!! 쿠키파킹 해놓겠습니다 :)