.png)
공부는 다른 분들의 블로그 글 말고 공식문서로 하자!
읽기 쉽게 쓰인 글보다 제작자의 의도를 파악할 수 있는 공식문서 읽기 도전
유혹을 뿌리치기 쉽지 않다..
사실 UIViewController 공식문서는 iOS 개발을 시작할 때쯤 (그러니까 아마 작년 이맘때..) 읽어본 적이 있다. 근데 사실 온전히 이해를 못 했었다. 이제 막 걸음마 배우고 있는 단계에 육상선수의 트레이닝법을 설명한 글을 읽고 있었던 것 같은 느낌.
이제 달릴 줄 아는 단계니까 다시 읽어보면 느낌이 또 다르겠지?!
뷰컨트롤러의 생명주기에 대해 공부하기 전에 먼저 ViewController가 뭔지부터 천천히 읽어보고 공부해봤습니다.
참고한 공식 문서
🖥 UIViewController
🖥 View Controller Programming Guide for iOS
🖥 loadView()
UIViewController의 역할
A view controller’s main responsibilities include the following:
- Updating the contents of the views, usually in response to changes to the underlying data.
- Responding to user interactions with views.
- Resizing views and managing the layout of the overall interface.
- Coordinating with other objects—including other view controllers—in your app.
- 데이터에 변동이 일어나면 뷰 내용 업데이트 하기
- 유저 인터랙션(터치, 드래그 등) 처리하기
- 뷰 크기 조정, 레이아웃 관리하기
- 다른 뷰컨트롤러 등의 객체들과 상호작용 하기
유저는 한 번에 한 뷰컨트롤러의 뷰만 볼 수 있지만, 그 뷰 컨트롤러 이외에도 다른 뷰 컨트롤러들이 존재할 수 있다. (공식문서에서는 '하나의 뷰 컨트롤러에서 여러 항목을 테이블뷰로 보여주고 있으면 다른 한 뷰 컨트롤러에서 선택된 항목들만 보여주는 뷰가 존재할 수 있다'라고 설명하고 있네요.) 이렇게 뷰 컨트롤러는 새로운 뷰를 보여주기 위해 다른 뷰 컨트롤러를 띄우거나(present), 다른 뷰컨트롤러의 컨테이너 역할을 하면서 뷰에 애니메이션을 적용시키는 역할을 하기도 한다.
[ViewController의 종류]
There are two types of view controllers:
- Content view controllers manage a discrete piece of your app’s content and are the main type of view controller that you create.
- Container view controllers collect information from other view controllers (known as child view controllers) and present it in a way that facilitates navigation or presents the content of those view controllers differently.
Content view controllers: 앱의 구성요소들을 관리. 메인이 되는 뷰 컨트롤러.Container view controllers: 다른 뷰 컨트롤러(child view controllers; 자식 뷰 컨트롤러)로부터 정보를 수집. 뷰 사이의 이동을 돕거나 자식 뷰 컨트롤러의 내용을 여러 방면에서 보여주는 방식으로 뷰를 띄움.
(말이 어려웠지만, Container view controller는 위에서 설명한 것처럼 애니메이션을 보여준다든지, 다른 뷰로 넘어가는 그 과정을 관장하는 것 같습니다. container view controller의 예시로는 UINavigationController, UITabBarController, UISplitViewController 등이 있습니다.)
대부분의 앱은 이 두 종류의 뷰 컨트롤러가 적절하게 섞여 만들어진다.
뷰 관리
아무래도 뷰 컨트롤러의 가장 중요한 역할은 뷰의 계층을 관리하는 것이다.(라고 애플이 그랬어요)
The most important role of a view controller is to manage a hierarchy of views. Every view controller has a single root view that encloses all of the view controller’s content. To that root view, you add the views you need to display your content.
모든 뷰 컨트롤러는 뷰 컨트롤러 위에 있는 모든 뷰들을 담는 하나의 root view를 가지고 있다. 그래서 우리는 그 root view에 우리가 보여주고자 하는 내용을 얹으면 된다.
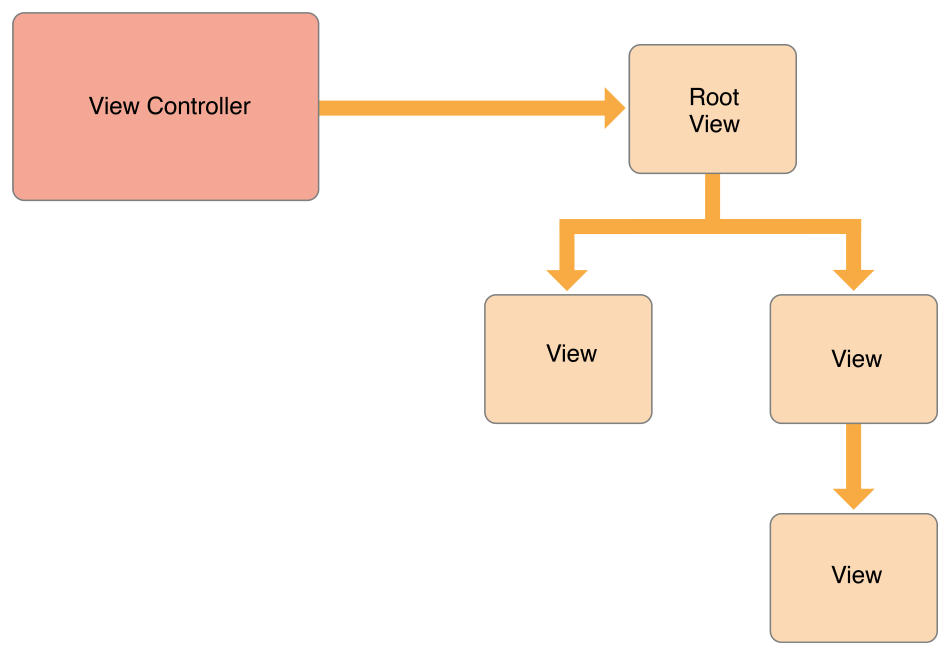
위 사진은 뷰 컨트롤러와 뷰의 관계를 그린 모식도입니다.
보면, 뷰 컨트롤러가 하나의 root view를 가지고 있고, 우리가 화면에 띄우고자 하는 view들이 모두 그 root view 위에 얹어져 있는, 하나의 계층을 이루고 있는 모습을 확인할 수 있어요.
The view controller always has a reference to its root view and each view has strong references to its subviews.
뷰 컨트롤러는 항상 root view를 참조하고(가리키고) 있고, 모든 뷰는 그 subview(뷰 계층에서 하단에 위치하는 뷰; 아마 자식 뷰)를 강하게 참조하고 있다.
뷰 컨트롤러와 뷰들의 강한 관계성을 설명하고 있는 듯합니다.
A content view controller manages all of its views by itself. A container view controller manages its own views plus the root views from one or more of its child view controllers. The container does not manage the content of its children. It manages only the root view, sizing and placing it according to the container’s design. Figure 1-2 illustrates the relationship between a split view controller and its children. The split view controller manages the overall size and position of its child views, but the child view controllers manage the actual contents of those views.
content view controller는 그 위의 모든 뷰를 스스로 관리한다. container view controller는 자신의 뷰 + 자식 뷰 컨트롤러들의 root view들까지 관리한다. content 자체에는 관여하지 않고, 오직 root view만 컨트롤한다.
사진을 보면 split view controller와 자식 뷰 컨트롤러들을 보여주고 있는데, 최상단의 split view controller는 자식 뷰들의 전체적인 크기와 위치를 관리하고 있지만, 자식 뷰 컨트롤러 위에 있는 실제 보여지는 내용(뷰)들은 자식 컨트롤러가 직접 관리하고 있다.

content view controller와 container view controller의 차이를 설명하기 위해 split view controller가 등장했습니다. 모식도를 보면, split view controller 위에 두 개의 자식 뷰 컨트롤러가 얹어져 있는 모습을 볼 수 있습니다. 여기서 강조하고 있는 건, 자식 뷰 컨트롤러의 위치와 크기(즉 어떻게 배치되어 있느냐겠지요)는 container view controller인 split view controller에서 관리하지만, 실제 유저가 보는 화면의 내용 그 자체는 content view controller인 자식 뷰 컨트롤러들 (View Controller A, View Controller B)가 띄우고 있다는 것을 확인할 수 있습니다. 쉽게 말해 IBOutlet 같은 걸 자식 뷰 컨트롤러들에서 정의하고 레이아웃도 거기서 잡아준다는 걸 이야기하고 있는 것 같아요.
View controllers load their views lazily. Accessing the view property for the first time loads or creates the view controller’s views. There are several ways to specify the views for a view controller:
- Specify the view controller and its views in your app’s Storyboard. Storyboards are the preferred way to specify your views. With a storyboard, you specify the views and their connections to the view controller. You also specify the relationships and segues between your view controllers, which makes it easier to see and modify your app's behavior.
To load a view controller from a storyboard, call the instantiateViewController(withIdentifier:) method of the appropriate UIStoryboard object. The storyboard object creates the view controller and returns it to your code.- Specify the views for a view controller using a Nib file. A nib file lets you specify the views of a single view controller but does not let you define segues or relationships between view controllers. The nib file also stores only minimal information about the view controller itself.
To initialize a view controller object using a nib file, create your view controller class programmatically and initialize it using the init(nibName:bundle:) method. When its views are requested, the view controller loads them from the nib file.- Specify the views for a view controller using the loadView() method. In that method, create your view hierarchy programmatically and assign the root view of that hierarchy to the view controller’s view property.
뷰 컨트롤러는 뷰를 lazy하게 로드한다. 뷰 프로퍼티에 처음 접근할 때에야 비로소 뷰 컨트롤러에 뷰를 로드하고 만드는 작업을 하게 된다. 뷰 컨트롤러에 어떤 뷰를 띄워야 할지 정해줄 수 있는 방법이 있다.
- 스토리보드에서 뷰 컨트롤러 위에 뷰를 직접 얹기.
뷰와 뷰 컨트롤러를 바로 연결해줄 수 있음. 뷰 컨트롤러 간 관계성이나 세그도 정해줄 수 있음. 보기 쉽고 수정하기 쉬워짐.
특정 스토리보드에 있는 뷰 컨트롤러를 로드하기 위해서는 해당 UIStoryboard 객체에서instantiateViewController(withIdentifier:) 메서드를 호출해주면 됨. - Nib file 활용하기.
nib으로 뷰 컨트롤러 위에 해당 뷰를 띄울 수는 있지만, 세그나 뷰 컨트롤러 사이의 관계성을 정의하지는 못함.
nib파일로 뷰 컨트롤러에 뷰를 띄우기 위해서는 init(nibName:bundle:)를 활용. 해당 코드로 뷰가 불러지면 뷰 컨트롤러가 그 nib 파일을 로드하게 됨. - loadView() 메서드 활용.
뷰 계층을 코드로 짜서 해당 뷰 계층의 root view를 뷰 컨트롤러에 장착.
첫 번째 방법인 스토리보드에서 직접 작업해주는 방법은 제가 가장 많이 쓰고 있는 방법이기도 합니다. 공식문서에서도 언급했다시피, 가장 보편적으로 쓰이고 있는 방법이 아닐까 합니다.
/// 다른 스토리보드에 있는 뷰 컨트롤러를 호출할 때는 storyboard 이름을 명시함
let storyboard = UIStoryboard(name: "Main", bundle: nil)
guard let dvc = storyboard.instantiateViewController(withIdentifier: "ViewController") as? ViewController else { return }

/// 동일 스토리보드에 있는 뷰 컨트롤러를 호출할 때는 storyboard 정의를 생략함
self.instantiateViewController(withIdentifier: "ViewController") as? ViewController else { return }
이런 식의 코드를 보신 적이 있을 겁니다.
이 코드는 Main 스토리보드 파일에 있는 ViewController 뷰 컨트롤러를 불러오라는 뜻의 코드입니다. 그리고 ViewController에는 사용자에게 보여주고자 하는 뷰들이 짜여져 있겠지요. 이게 바로 첫 번째 방법에서 설명하고 있는 스토리보드를 이용해 뷰컨트롤러 위에 뷰를 띄우는 방법입니다.
두 번째 방법은 nib 파일(xib)에 뷰를 만들어 불러와주는 코드입니다.
let vc = NibViewController(nibName: "NibViewController", bundle: nil)이런 식으로 사용되는 코드입니다. 스토리보드 방식과 큰 차이는 없지만, 스토리보드가 제공하는 GUI 상에서 드래그 해 세그를 연결해주는 건 못 한다는 점이 다릅니다.
마지막 방법인 loadView()를 활용하는 방법은 개인적으로 쓰여진 코드를 읽어본 적만 있고 써본 적은 없는 방식입니다.
loadView()를 사용할 일이 많이 없었던 이유는 저는 항상 GUI상에 실제로 존재하는 뷰 컨트롤러를 생성했기 때문인데, (많이들 쓰시는 그 방법입니다) 
이 방법으로 뷰 컨트롤러를 생성하면 위에서도 잠깐 언급했다시피 하나의 view(root view)가 자동으로 함께 생성됩니다. 하지만 스토리보드나 xib를 사용하지 않고 코드로 뷰 컨트롤러를 만들게 되면 그 안에 뷰가 자동으로 생성되지 않기 때문에 뷰를 직접 만들어줘야 하고, 이때 그 뷰를 만들어주는 방법이 loadView()를 사용하는 방법입니다.
공식문서에서는 이 loadView()를 지금 설명하는 예시처럼 코드로 직접 ViewController를 만들어주는 상황이 아니면 직접 호출하지 말라고 이야기 하고 있습니다.
import UIKit

class NoGUIViewController: UIViewController {
    override func loadView() {
        super.loadView()
        self.view.backgroundColor = .gray
    }
    override func viewDidLoad() {
        super.viewDidLoad()
    }
}
공식 문서에서도 언급하고 있듯, 이 세 방법은 모두 같은 결과를 가져오기 때문에 상황에 맞게 골라 사용하면 됩니다.
A view controller is the sole owner of its view and any subviews it creates. It is responsible for creating those views and for relinquishing ownership of them at the appropriate times such as when the view controller itself is released. If you use a storyboard or a nib file to store your view objects, each view controller object automatically gets its own copy of these views when the view controller asks for them. However, if you create your views manually, each view controller must have its own unique set of views. You cannot share views between view controllers.
뷰 컨트롤러는 그 뷰와 서브뷰들의 오직 하나의 주인이다. 그래서 적절한 타이밍(예를 들면 뷰 컨트롤러 자체가 사라질 때)에 그 뷰들을 만들거나 제거하는 일을 한다.
스토리보드나 nib을 사용해 뷰를 만든다면 뷰 컨트롤러가 요구할 때 자동으로 뷰의 복사본을 만들어내지만, 코드로 짠 뷰는 모든 뷰 컨트롤러에서 다 다른 각자의 뷰들을 가지고 있어야 한다. 뷰를 다른 뷰 컨트롤러와 같이 사용할 수 없다는 의미다.
iOS 개발을 하며 항상 아쉬웠던 부분을 짚어줬습니다. 반복되는 뷰가 있으면 A라는 뷰 컨트롤러에서 만들어서 B라는 뷰 컨트롤러에서도 쓸 수 있으면 좋은데, 뷰는 오로지 그 뷰 컨트롤러에 종속되어야 하기 때문에 다른 뷰 컨트롤러에서는 사용할 수 없다고 이야기하고 있습니다.
(그래서 저는 xib로 custom view를 만든 후 delegate를 활용하는 방법으로 재사용이 필요한 헤더 등을 제작하고 있긴 합니다)
Viewcontroller 생명주기
공식문서에서는 Handling View-Related Notifications 타이틀로 소개되고 있는 부분입니다.
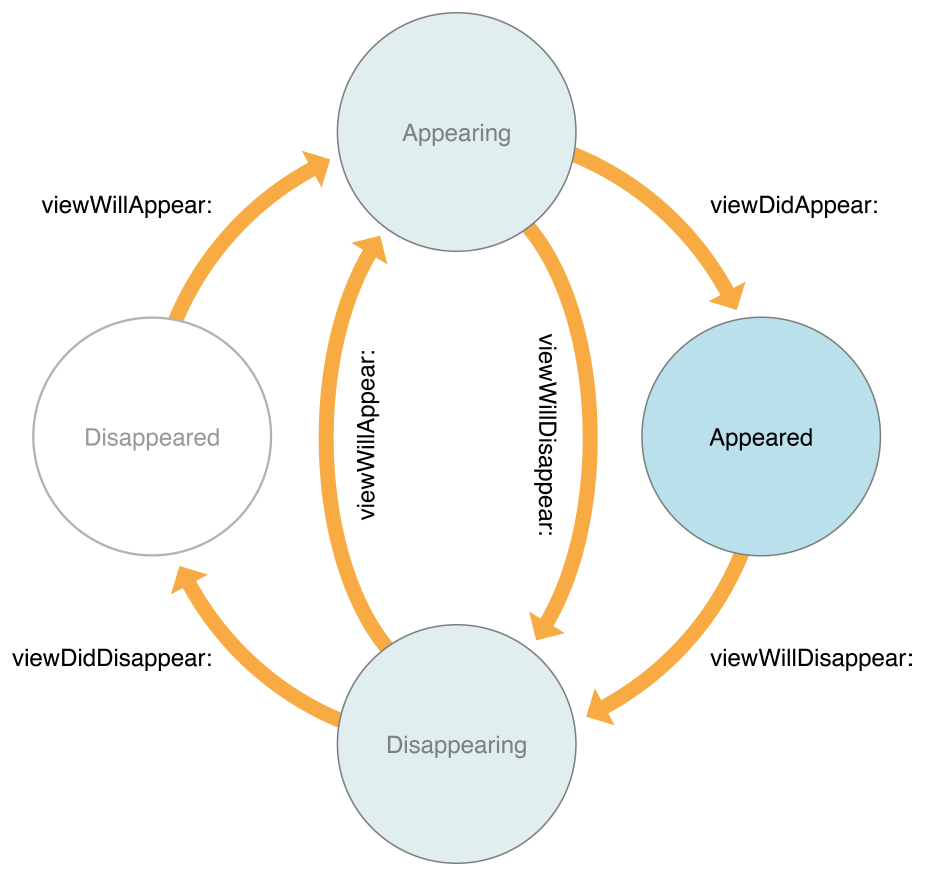
When the visibility of its views changes, a view controller automatically calls its own methods so that subclasses can respond to the change. Use a method like viewWillAppear(_:) to prepare your views to appear onscreen, and use the viewWillDisappear(_:) to save changes or other state information.
뷰의 보이는 상태가 변화하면, 뷰 컨트롤러는 자동으로 관련한 메서드를 호출해 서브클래스들이 변화에 반응할 수 있도록 한다. viewWillAppear(:)과 같은 메서드를 활용해 뷰가 스크린에 띄워지는 것을 준비하고, viewWillDisappear(:)로 변화나 상태 정보를 저장할 수 있다.
Xcode 상의 코드에서 viewDidLoad를 마우스 우클릭하고 jump to definition을 해보면, 주석에 아래처럼 쓰여있는 것을 확인할 수 있습니다.
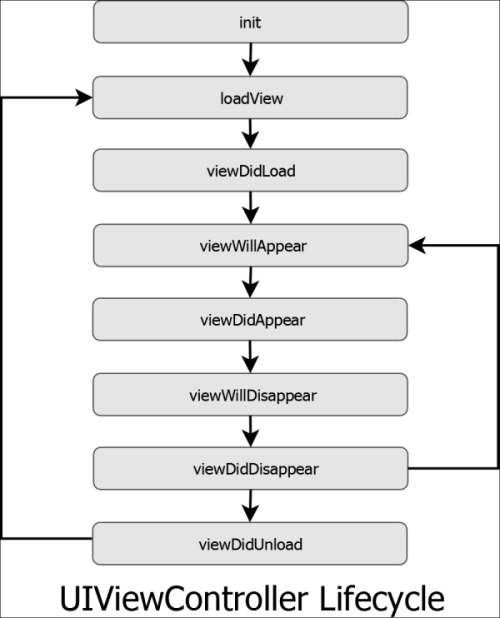
1. init
2. loadView
- (void)loadView; // This is where subclasses should create their custom view hierarchy if they aren't using a nib. Should never be called directly.위에서 계속 나왔다시피 코드로 뷰 컨트롤러를 생성하게 되면 불러야 하는 메서드입니다.
3. viewDidLoad
- (void)viewDidLoad; // Called after the view has been loaded. For view controllers created in code, this is after -loadView. For view controllers unarchived from a nib, this is after the view is set.즉, 뷰 로드가 끝나자마자 불리고, 만약 뷰컨트롤러를 코드로 짰다면 loadView 다음에 불린다고 합니다. 만약 스토리보드나 nib 파일로 뷰 컨트롤러를 만들었다면 그 뷰가 셋 되고 난 다음에 불리겠지요.
따라서 리소스 초기화, 초기 화면 구성 등을 할 때 용이하게 사용할 수 있습니다.
다만, 뷰가 처음 만들어질 때 딱 한 번만 실행되는 메서드이므로, 뷰가 나타날 때마다 초기화 되어야 하는 리소스나 바뀌어야 하는 화면 구성이 있다면 해당 메서드는 바람직하지 않습니다. (뒤에서 설명하겠지만, 이런 경우에는 viewWillAppear를 활용하면 좋습니다)
4. viewWillAppear
- (void)viewWillAppear:(BOOL)animated // Called when the view is about to made visible. Default does nothing뷰가 나타나기 직전에 호출됩니다. 뷰가 이제 나타날 거라는 신호를 뷰 컨트롤러에게 알려줍니다. viewDidLoad와 다른 점은 viewDidLoad는 로드될 때 딱 한 번 불리고, viewWillAppear는 쉽게 말해 눈에 보이기 직전에 호출 됩니다.
뷰가 눈에서 사라진다고 해서 항상 unload가 되지 않습니다. 사용자의 눈에 나타났다, 없어졌다 하는 상태를 관리하기 좋은 메서드입니다.
5. viewDidAppear
- (void)viewDidAppear:(BOOL)animated; // Called when the view has been fully transitioned onto the screen. Default does nothing뷰가 나타난 직후 호출됩니다.
6. viewWillDisappear
- (void)viewWillDisappear:(BOOL)animated; // Called when the view is dismissed, covered or otherwise hidden. Default does nothing뷰가 눈에서 사라지기 직전에 호출됩니다. 여기서 '사라진다'는 것은 dismiss 되거나, 다른 뷰에 의해 가려지거나 하는 상황을 의미합니다.
7. viewDidDisappear
- (void)viewDidDisappear:(BOOL)animated; // Called after the view was dismissed, covered or otherwise hidden. Default does nothing뷰가 눈에서 사라진 직후에 호출됩니다.
8. viewDidUnload
- (void)viewDidUnload API_DEPRECATED("", ios(3.0, 6.0)) API_UNAVAILABLE(tvos); // Called after the view controller's view is released and set to nil. For example, a memory warning which causes the view to be purged. Not invoked as a result of -dealloc.메모리 관리
Memory is a critical resource in iOS, and view controllers provide built-in support for reducing their memory footprint at critical times. The UIViewController class provides some automatic handling of low-memory conditions through its didReceiveMemoryWarning() method, which releases unneeded memory.
메모리 관리를 위해 UIViewController 클래스에서 메모리가 부족할 경우를 핸들링 할 수 있게 해주는 didReceiveMemoryWarning() 메서드를 제공하고 있다. 해당 메서드는 필요없는 메모리를 해제시킨다.