Three.js
오디오 설정하기
출처 https://www.youtube.com/watch?v=5zFlKE552QU
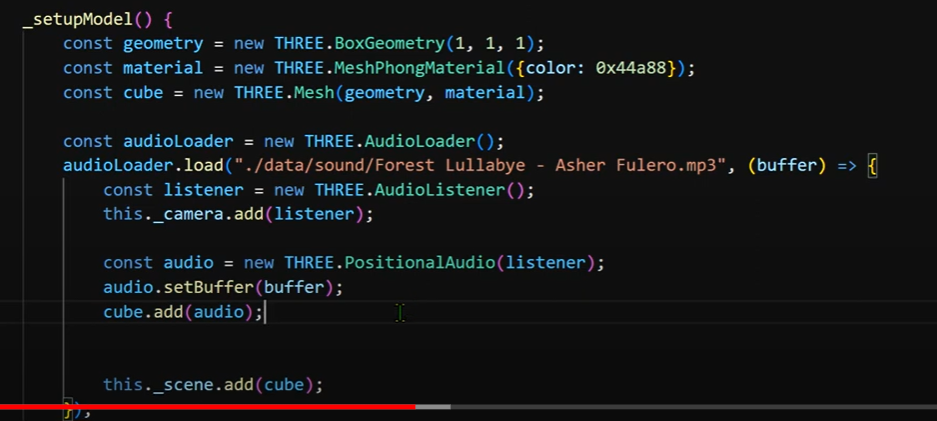
- audio loader 불러오기
- audiolaoder.load('경로' ,(buffer) =>{
- 리스터 불러오기 const listener=new Three.audioListener();
- 카메라에 리스너 붙이기 this._camera.add(listener);
- 리스너 자식 변수 대려오기 const audio= new Three.postionAudio(listenr)
- audio.setBufffer(buffer)
- 모델에.add(audio)더하기
8.this._scene.add(모델 );
애니메이션 확대/ 축소 하기
차를 클릭하면 zoom-in 하는법
위치에 대한
gsap.to(this._camera.position, {duration:1.5, x:newPosition.x
gsap.to(this._controls.target{duration:0.5, x:centerBox.x. y:centerBox.y ,z:centerBox.y, onUpdate()=>{
this._camera.lookAt(this.camera.target.x,
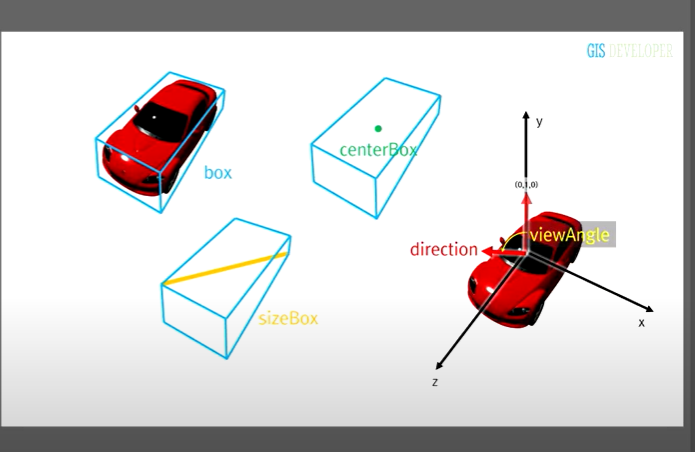
- 박스는 모델을 담는거
- sizebox= 박스에서 모서리 사이중에 가장 긴 모서리 길이
- centerbox= 박스의 중심
- direction 은 처음에 0 1 0 으로 설정
- view 앵글만큼 회전 -> direction.applyAxisAngle(new Three.Vector3(1,0,0), Three,MatgdegToRad(viewAngle)
degToRad ( degrees : Float ) : Float
Converts degrees to radians.= 도를 라디안 단위로 변환시킨다.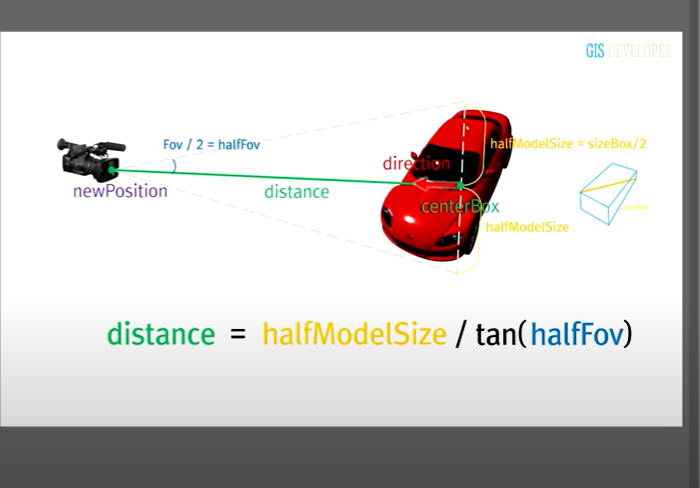
- halfsizeModel= 카메라와 모델사이의 세로 길이
- 카메라와 모델의 각도
- distance= 녹색의 길이로 카메라가 모델을 봤을때의 길이
탄젠트를 이용해서 구할수 있따. - newposition =새로운 포지션
벡터를 복사해서.mutiplyscalar(distance).add(centerBox)
->크기와 방향에 대한 것을 얻는다.
.add(centerbox) 위치까지 얻게 된다.
==> 3차원의
multiplyScalar ( s : Float ) : this
이 벡터에 스칼라 s를 곱합니다.- 카메라의 최종 위치
gsap.to(this._control.target,{duration:0.5, x:centerBox.x ...
centerBox- 모델의 중심으로 이동
자유롭게 화면 조절하는방법
https://www.youtube.com/watch?v=REqsqClCHuQ&t=7s
- import{ OrbitControls} from /example/jsm/controls/orbitcontrols.js
OrbitControls
Orbit controls allow the camera to orbit around a target.
To use this, as with all files in the /examples directory, you will have to include the file separately in your HTM- 최대 / 최소 줌 값 지정
-> controls 에 추가하기
controls.mindistance=2;
maxdistance=4;
contorls.update();
디자인 > https://dribbble.com/jongpil_77 코딩 > https://www.codewars.com/users/bikijjang