바닐라 자바스크립트로 Virtual DOM 만들기

제가 소속된 키즈노트 프론트엔드 개발 파트는 정기적으로 스터디를 운영하고 있어요. 이번 주에는 리액트의 가상 돔을 이해하고 학습한 내용을 서로 공유하기로 하였습니다.
생각해 보면 매일 리액트로 개발을 하고 있지만, 리액트가 어떻게 가상 돔을 만들어서 실제 돔에 반영하는지 구체적으로 알지 못했던 것 같아요. 게다가 리액트를 처음 배울 때 "가상 돔"이라는 단어는 왠지 모르게 공포 그 자체였던 것 같습니다.

"가상... 돔이라고? 자비스 같은 건가?" 🙄
이번 스터디를 기회로 가상 돔을 더 깊게 이해하기 위해 직접 만들어보는 실습을 진행했어요.
🔧 실습을 시작해 봅시다!
1. JSX 예제 만들기
리액트 공식 문서에는 아래와 같은 내용이 있어요.
각 JSX 엘리먼트는 React.createElement(component, props, ...children)를 호출하기 위한 문법 설탕(Syntax Sugar)입니다. 그래서 JSX로 할 수 있는 모든 것은 순수 JavaScript로도 할 수 있습니다.
문서를 읽어보니 React.createElement()를 호출하면 엘리먼트를 만들 수 있는 것 같습니다. 그런데 엘리먼트가 굉장히 많아지는 경우 React.createElement()를 계속 호출하게 된다면 가독성이 떨어지고 유지 보수가 어려워지겠죠? React.createElement()를 호출하는 대신, 간단한 JSX 예제를 만들어서 실습을 진행해 볼게요.
아래는 과일 리스트와 Add 버튼으로 구성된 간단한 예제입니다.
const vm = (
  <div>
    <ul>
      <li>🍎<li>
      <li>🍌<li>
    </ul>
    <button
      type="button"
      aria-label="Add"
    >
      Add
    </button>
  </div>
);
이제 위 예제를 가상 돔으로 변환해 주어야 합니다. 가상 돔은 아래와 같은 자바스크립트 객체 형태를 가지고 있어요.
{
  type: 'div',
  props: null,
  children: [
    {
      type: 'ul',
      props: null,
      children: [
        {
          type: 'li',
          props: null,
          children: ['🍎'],
        },
        {
          type: 'li',
          props: null,
          children: ['🍌'],
        },
      ],
    },
    {
      type: 'button',
      props: {
        type: 'button',
        aria-label: 'Add',
      },
      children: ['Add'],
    },
  ],
}
2. Babel로 컴파일 하기
JSX를 어떻게 객체로 변환할 수 있을까요? 먼저 자바스크립트는 JSX를 이해할 수 없기 때문에, 바벨을 이용해서 예제를 바닐라 자바스크립트로 컴파일 해줄게요. 바벨과 plugin-transform-react-jsx 플러그인을 설치하고, babel.config.json 파일을 추가합니다.
{
  ...
  "plugins": ["@babel/plugin-transform-react-jsx"]
}
바벨을 실행하기 위해 package.json에 명령어를 추가했어요. 명령어를 실행하면 src 디렉토리 하위에 있는 파일들을 컴파일해서 dist 디렉토리에 넣어줍니다.
{
  "scripts": {
    ...
    "babel": "babel src --out-dir dist"
  }
}
이제 npm run babel 명령어를 실행해서 예제를 컴파일 해볼까요?
"use strict";

var vm = /*#__PURE__*/React.createElement("div", null, /*#__PURE__*/React.createElement("ul", null, /*#__PURE__*/React.createElement("li", null, "\uD83C\uDF4E"), /*#__PURE__*/React.createElement("li", null, "\uD83C\uDF4C")), /*#__PURE__*/React.createElement("button", {
  type: "button",
  "aria-label": "Add"
}, "Add"));
JSX 예제가 바닐라 자바스크립트로 컴파일 되었습니다. 컴파일 결과물을 보니 JSX 문법에 감사함을 느끼게 되는군요!
코드를 자세히 확인해 보니 createVirtualDOM() 함수를 직접 만들어서 React.createElement() 대신에 호출하도록 만들면 가상 돔을 만들 수 있을 것 같아요.
3. createVirtualDOM 함수 만들기
위에서 가상 돔은 { type, props, children } 형태인 것을 확인했으니 그대로 만들어 줄게요.
export function createVirtualDOM(type, props, ...children) {
  return { type, props, children: children.flat() };
}
이제 React.createElement() 대신에 createVirtualDOM()을 호출하도록 예제 파일 상단에 /** @jsx createVirtualDOM */ 주석을 추가해 주었습니다.
/** @jsx createVirtualDOM */
import { createVirtualDOM } from './utils';

const vm = (
  <div>
    <ul>
      <li>🍎<li>
      <li>🍌<li>
    </ul>
    <button
      type="button"
      aria-label="Add"
    >
      Add
    </button>
  </div>
);
예제가 수정되었으니 다시 컴파일해서 결과물을 확인해 볼게요.
"use strict";

var _utils = require("./utils");
/** @jsx createVirtualDOM */

var vm = (0, _utils.createVirtualDOM)("div", null, (0, _utils.createVirtualDOM)("ul", null, (0, _utils.createVirtualDOM)("li", null, "\uD83C\uDF4E"), (0, _utils.createVirtualDOM)("li", null, "\uD83C\uDF4C")), (0, _utils.createVirtualDOM)("button", {
  type: "button",
  "aria-label": "Add"
}, "Add"));createVirtualDOM()을 잘 가져오고 있는 것 같네요!
4. 브라우저에서 확인해 보기
정성스럽게 만든 함수를 잘 호출하고 있는지, 가상 돔을 제대로 만들고 있는지 로그로 확인해 보고 싶습니다. HTML 파일을 추가해서 컴파일 결과물을 가지고 오도록 해볼게요.
<!DOCTYPE html>
<html lang="en">
<head>
  <meta charset="UTF-8">
  <meta http-equiv="X-UA-Compatible" content="IE=edge">
  <meta name="viewport" content="width=device-width, initial-scale=1.0">
  <title>Simple Virtual DOM</title>
</head>
<body>
  <div id="root"></div>
  <script src="./dist/main.js"></script>
</body>
</html>
예제에서 console.log()를 호출한 후, 다시 컴파일 해줄게요.
console.log(vm);HTML 파일을 열었더니 에러가 발생했어요. 컴파일 결과물에서 createVirtualDOM()을 가져오기 위해 require()를 호출하는데, 여기서 발생한 문제인 것 같습니다.

다행히 없는 게 없는 Stack Overflow에서 답을 찾을 수 있었어요.


"웹팩이요...?"
5. Webpack 설정하기
사실 웹팩이랑 아주 어색한 사이지만, 실습을 여기까지 진행한 이상 무라도 썰어야 합니다. 웹팩과 babel-loader를 설치하고 webpack.config.js에 로더를 추가해 줄게요. 아! 그리고 위에서 설치했던 plugin-transform-react-jsx 플러그인도 함께 추가해 주겠습니다.
module.exports = {
  ...
  module: {
    rules: [
      {
        ...
        use: {
          loader: 'babel-loader',
          options: {
            presets: [
              ['@babel/preset-env', { targets: 'defaults' }]
            ],
            plugins: ['@babel/plugin-transform-react-jsx']
          }
        }
      }
    ]
  }
};webpack.config.js에 babel-loader를 추가해 주었으니 위에서 만들었던 babel.config.json과 babel 명령어를 제거해 줄게요. 대신 웹팩을 실행할 수 있도록 새로운 명령어를 추가했어요.
{
  "scripts": {
    ...
    "build": "webpack"
  }
}
6. (진짜) 브라우저에서 확인해 보기
터미널에 npm run build 명령어를 입력해서 빌드 후 HTML 파일을 열어볼게요.
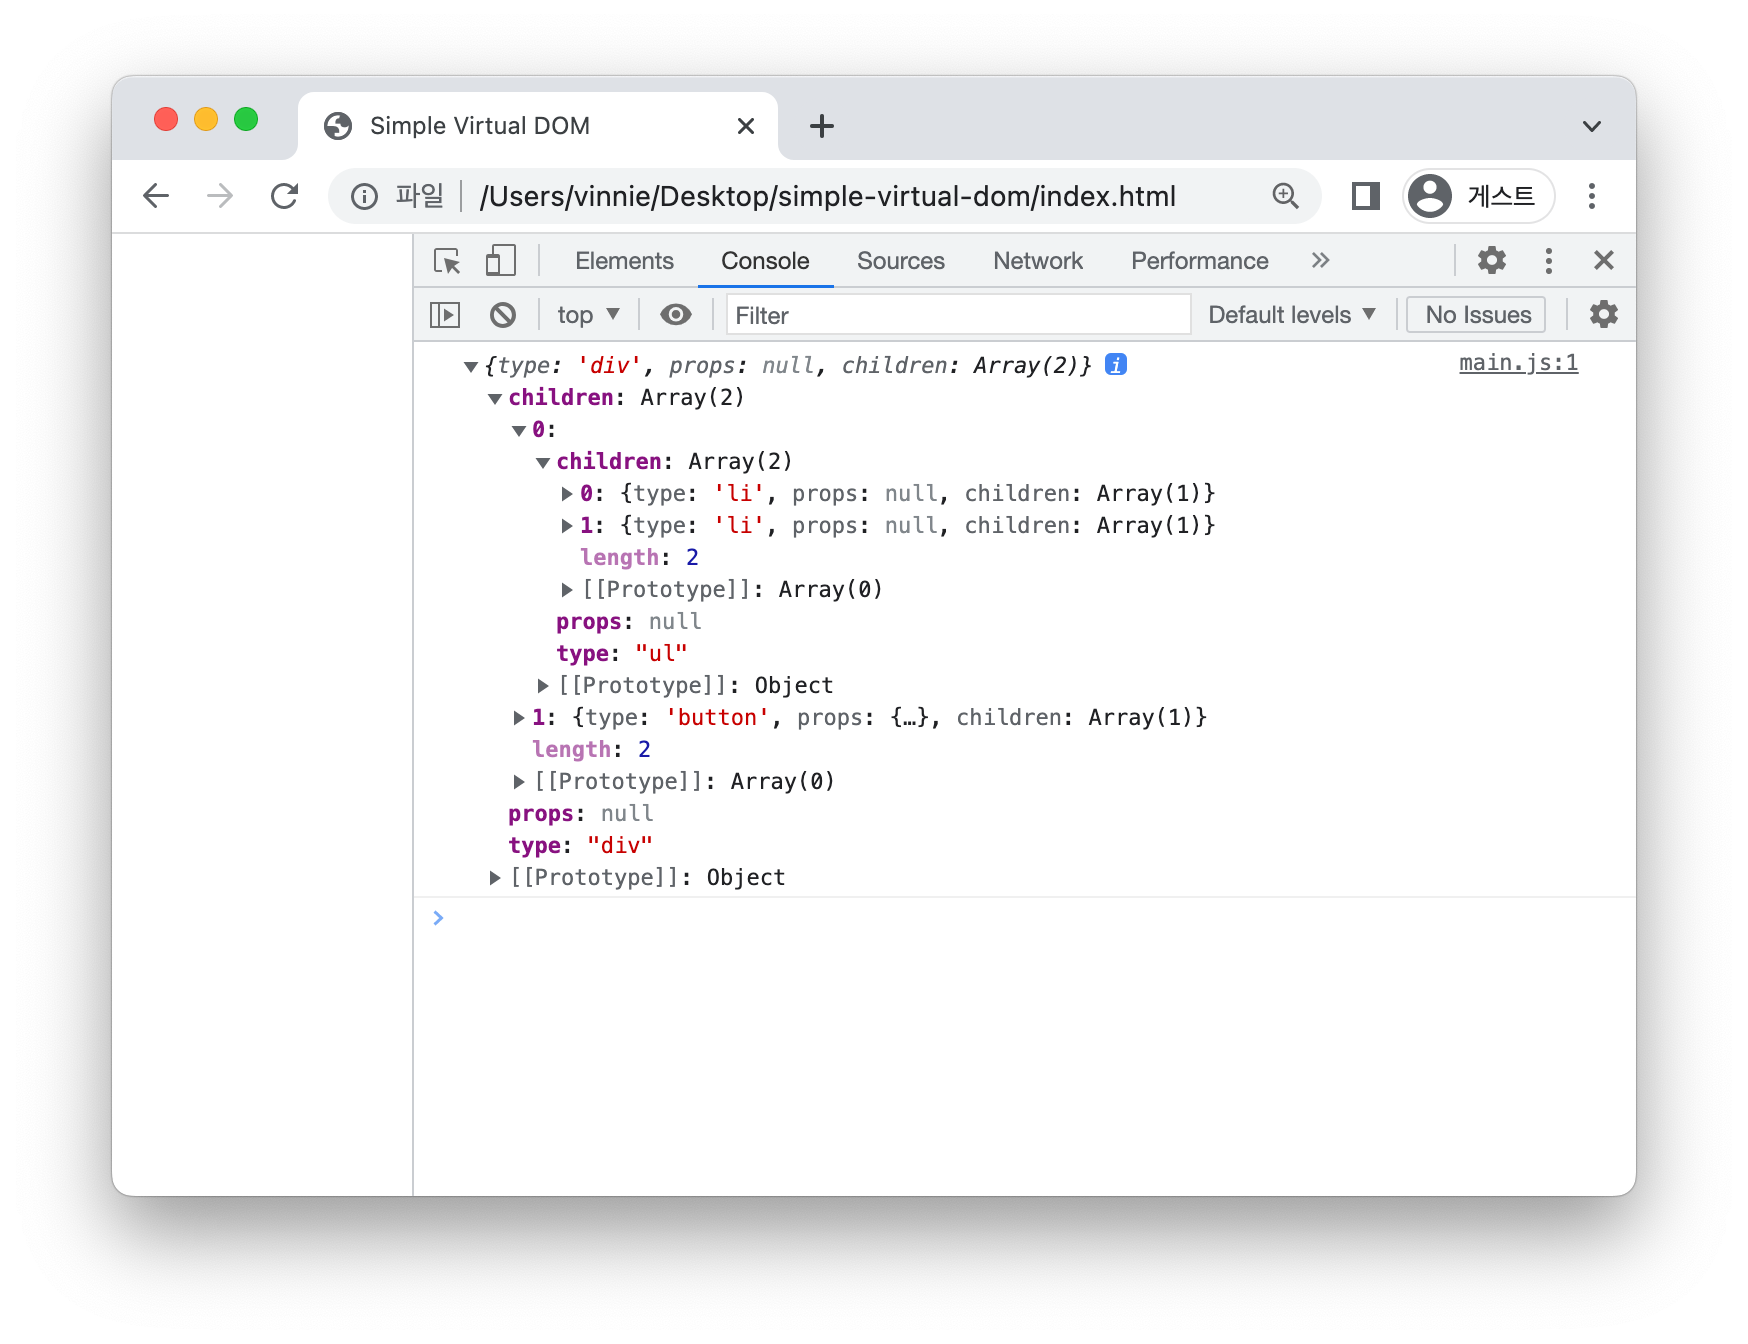
콘솔에 로그가 잘 찍히고 있네요! 이 가상 돔을 실제 돔으로 만들어 주겠습니다.
7. 실제 돔 만들기
createElement() 함수를 만들어 줄게요. 이 함수는 가상 돔을 인자로 받습니다.
export function createElement(node) {
  // 노드가 문자열인 경우
  if (typeof node === 'string') {
    return document.createTextNode(node);
  }

  // 노드가 문자열이 아닌 경우
  // 1. 엘리먼트를 생성합니다.
  const $el = document.createElement(node.type);

  // 2. 노드에 props가 있는 경우 attribute로 넣어줍니다.
  Object
    .entries(node.props ?? {})
    .forEach(([ key, value ]) => {
      $el.setAttribute(key, value);
    });

  // 3. 노드에 children이 있는 경우 자식 엘리먼트를 생성하여 노드 하위로 넣어줍니다.
  node.children?.forEach((child) => {
    $el.appendChild(createElement(child));
  });

  return $el;
}
이제 예제에서 createElement()를 호출해 봅시다.
/** @jsx createVirtualDOM */
import { createVirtualDOM, createElement } from './utils';
const vm = createElement(
<div>
<ul>
<li>🍎<li>
<li>🍌<li>
</ul>
<button
type="button"
aria-label="Add"
>
Add
</button>
</div>
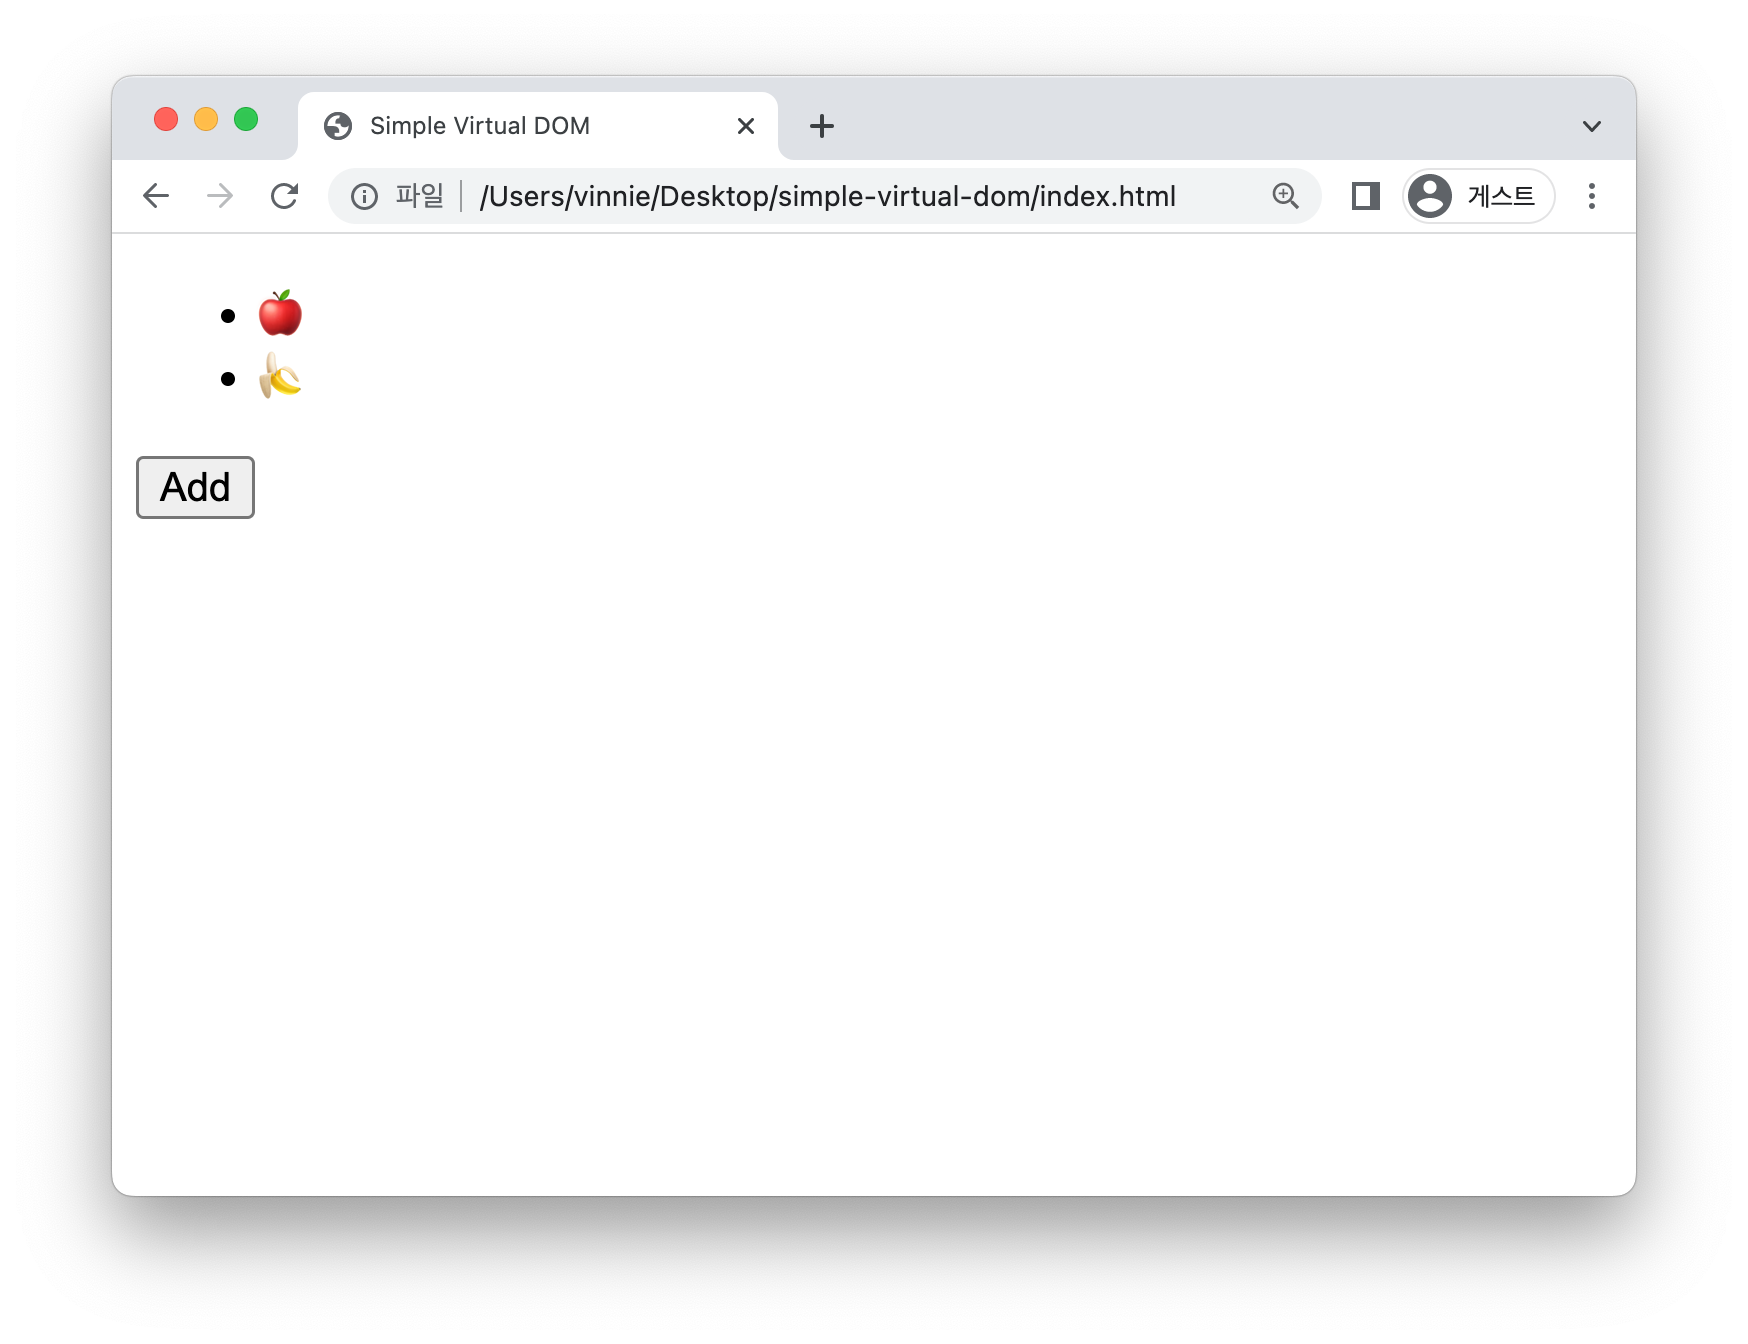
);이렇게 vm은 실제 돔이 되었습니다! vm을 #root 하위에 넣어보면 아래와 같이 나타납니다. (예제를 시각적으로 보여드리기 위해 임시로 #root 하위에 넣었습니다. 실습을 진행하시는 경우 아직 넣지 말아 주세요!)
하지만 리액트는 돔에 변경이 발생했을 때 돔을 통째로 바꾸지 않고, 변경이 필요한 부분만 실제 돔에 업데이트합니다. 이 부분이 가상 돔의 꽃이라고 말할 수 있는데요, 이를 구현해 보도록 하겠습니다.
8. 새로운 state로 업데이트하기
과일 리스트에 🥝를 추가해 줄게요. 지금까지는 과일 리스트를 하드 코딩해서 보여주었지만, 이제는 상수로 분리해서 관리해 주겠습니다.
export const OLD_LIST = ['🍎', '🍌'];
export const NEW_LIST = ['🍎', '🍌', '🥝'];
첫 화면에서 OLD_LIST를 보여주고 Add 버튼을 클릭하면 NEW_LIST로 업데이트해 주어야 합니다. 비교 알고리즘을 참고해서 노드를 업데이트하는 updateElement() 함수를 만들어 줄게요.
import { createElement } from './createElement';

export function updateElement({ parentNode, oldNode, newNode, index = 0 }) {
  // 노드가 새로 추가된 경우 부모 노드 아래에 추가합니다.
  if (!oldNode && newNode) {
    parentNode?.appendChild(createElement(newNode));
    return;
  }

  // 기존 노드가 삭제된 경우 부모 노드에서 삭제합니다.
  if (oldNode && !newNode) {
    parentNode?.removeChild(parentNode?.childNodes?.[index]);
    return;
  }

  // 노드의 type이 다른 경우 새로운 노드로 대체합니다.
  if (oldNode.type !== newNode.type) {
    parentNode?.replaceChild(createElement(newNode), parentNode?.childNodes?.[index]);
    return;
  }

  // 노드의 type이 같은 경우 attribute를 업데이트합니다.
  // 1. newNode의 props를 순회하면서 노드의 attribute를 추가/수정합니다.
  Object
    .entries(newNode?.props ?? {})
    .forEach(([key, value]) => {
      if (oldNode?.props?.[key] !== value) {
        parentNode?.childNodes?.[index].setAttribute(key, value);
      }
    });

  // 2. oldNode의 props를 순회하면서 newNode에 해당 prop이 없는 경우 노드의 attribute를 삭제합니다.
  Object
    .keys(oldNode?.props ?? {})
    .forEach((key) => {
      if (!newNode?.props?.[key]) {
        parentNode?.childNodes?.[index].removeAttribute(key);
      }
    });

  // 자식 노드들을 순회합니다.
  const maxLength = Math.max((oldNode?.children?.length ?? 0), (newNode?.children?.length ?? 0));

  for (let i = 0; i < maxLength; i += 1) {
    updateElement({
      parentNode: parentNode?.childNodes?.[index],
      oldNode: oldNode?.children?.[i],
      newNode: newNode?.children?.[i],
      index: i,
    });
  }
}
브라우저에 OLD_LIST 먼저 보여줄게요.
과일 리스트를 인자로 받아서 가상 돔을 리턴하는 render() 함수를 추가해 줍니다. 이렇게 만들어진 oldVirtualDOM과 #root 엘리먼트를 updateElement()의 인자로 넣어서 호출해 볼게요.
/** @jsx createVirtualDOM */
import { createVirtualDOM, updateElement } from './utils';
import { OLD_LIST } from './constants';

const render = (state) => (
  <div>
    <ul>
      {state.map((item) => <li>{item}</li>)}
    </ul>
    <button
      type="button"
      aria-label="Add"
    >
      Add
    </button>
  </div>
);

const oldVirtualDOM = render(OLD_LIST);
const $root = document.querySelector('#root');

updateElement({
  parentNode: $root,
  newNode: oldVirtualDOM,
});
빌드 후 HTML 파일을 열어보면 OLD_LIST를 확인할 수 있습니다.
이제 Add 버튼을 클릭하면 과일 리스트를 업데이트하도록 예제를 수정해 볼게요.
NEW_LIST를 이용해서 newVirtualDOM을 만들고, oldVirtualDOM과 비교해서 엘리먼트를 업데이트할 수 있도록 handleClickAddButton() 함수를 추가해 줍니다. 마지막으로, button 엘리먼트를 클릭하면 handleClickAddButton()을 호출하도록 설정할게요.
/** @jsx createVirtualDOM */
import { createVirtualDOM, updateElement } from './utils';
import { OLD_LIST, NEW_LIST } from './constants';

const render = (state) => (
  <div>
    <ul>
      {state.map((item) => <li>{item}</li>)}
    </ul>
    <button
      type="button"
      aria-label="Add"
    >
      Add
    </button>
  </div>
);

const oldVirtualDOM = render(OLD_LIST);
const newVirtualDOM = render(NEW_LIST);
const $root = document.querySelector('#root');

updateElement({
  parentNode: $root,
  newNode: oldVirtualDOM,
});

const handleClickAddButton = () => {
  updateElement({
    parentNode: $root,
    oldNode: oldVirtualDOM,
    newNode: newVirtualDOM,
  });
};

const $button = document.querySelector('[aria-label="Add"]');
$button.onclick = handleClickAddButton;
Add 버튼을 클릭하면 과일 리스트를 정상적으로 업데이트하는 것을 확인할 수 있습니다.
👏🏻 실습을 완료했습니다!
이렇게 가상 돔을 만드는 실습을 진행해 보았습니다. 실제로 리액트에서 사용하는 알고리즘은 더 복잡하겠지만, 간단하게 구현을 해보니 가상 돔과 좀 더 가까워진 기분이 드는 것 같아요.
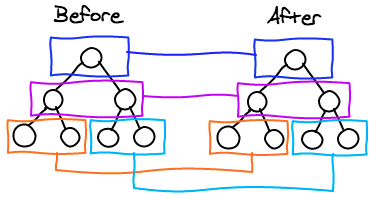
리액트는 성능 상 이점을 위해 휴리스틱에 의존하고 있어요. 같은 레벨의 노드만 비교하고, 부모 노드와 자식 노드를 비교하지 않아요. (실습에서 만들었던 updateElement() 함수 내용과 유사하죠?) 이것이 리액트가 O(n) 복잡도로 돔을 업데이트할 수 있었던 비결이었네요!
실습에서 사용된 코드는 여기에서 확인할 수 있습니다.
📚 Reference