
[Spring] FCM을 통해 Push 알림 서버 구축하기
Push 알림 기능을 구현하고 나서 천천히 생각해 보니 요구 사항과 맞지 않았다.
알림 요청을 보낼 때마다 Postman으로 보낼 수는 없으니까

결국 팀원들과 정한 최초 요구사항에 맞추기로 결정했다.
-
Web View 단에서 액션을 주면 -> Server에서 Firebase 알림 요청을 보내주는 것
-
관리자의 여러 작업 고려하여
비동기로 전송할 것 -
모바일 현장 관리자는 2~3명,
다중 송신이 가능할 것
Web -> Serve -> Firebase FCM backend -> SDK on device
위와 같은 구조로 흘러가는 것을 목표로 Push 알림 기능을 개선해 보자.
우선 pom.xml에 라이브러리를 추가해 주자.
- firebase-admin
- Json
- slf4j
NotificationController
@RestController
public class NotificationController {

    Logger logger = LoggerFactory.getLogger(this.getClass());

    @Autowired
    AndroidPushNotificationsService androidPushNotificationsService;

    @GetMapping(value = "/report/list/send")
    public @ResponseBody ResponseEntity<String> send() throws JSONException, InterruptedException  {
        String notifications = AndroidPushPeriodicNotifications.PeriodicNotificationJson();

        HttpEntity<String> request = new HttpEntity<>(notifications);

        CompletableFuture<String> pushNotification = androidPushNotificationsService.send(request);
        CompletableFuture.allOf(pushNotification).join();

        try{
            String firebaseResponse = pushNotification.get();
            return new ResponseEntity<>(firebaseResponse, HttpStatus.OK);
        }
        catch (InterruptedException e){
            logger.debug("got interrupted!");
            throw new InterruptedException();
        }
        catch (ExecutionException e){
            logger.debug("execution error!");
        }

        return new ResponseEntity<>("Push Notification ERROR!", HttpStatus.BAD_REQUEST);
    }
}
신고 목록에서 모바일 현장 관리자에게 알림을 보낼 것이므로 /report/list/send로 접속하여 동작이 실행되게 한다.
firebase project server key, device token으로 알림을 json 데이터 형식으로 Firebase FCM backend에게 요청
CompletableFuture.allOf(pushNotification).join()
- 여러 작업을 모두 실행하고 모든 작업 결과에 콜백 실행,
콜백으로 넘긴 작업이 끝나고 난 이후의 결과값을 반환
HeaderRequestInterceptor
public class HeaderRequestInterceptor implements ClientHttpRequestInterceptor {
    private final String headerName;
    private final String headerValue;

    public HeaderRequestInterceptor(String headerName, String headerValue) {
        this.headerName = headerName;
        this.headerValue = headerValue;
    }

    @Override
    public ClientHttpResponse intercept(HttpRequest request, byte[] body, ClientHttpRequestExecution execution)
            throws IOException {
        HttpRequest wrapper = new HttpRequestWrapper(request);
        wrapper.getHeaders().set(headerName, headerValue);
        return execution.execute(wrapper, body);
    }
}
AndroidPushNotificationService
@Service
public class AndroidPushNotificationsService {
    private static final String firebase_server_key="콘솔에서 firebase server key를 확인하고 넣으세요";
    private static final String firebase_api_url="https://fcm.googleapis.com/fcm/send";

    @Async
    public CompletableFuture<String> send(HttpEntity<String> entity) {

        RestTemplate restTemplate = new RestTemplate();

        ArrayList<ClientHttpRequestInterceptor> interceptors = new ArrayList<>();

        interceptors.add(new HeaderRequestInterceptor("Authorization",  "key=" + firebase_server_key));
        interceptors.add(new HeaderRequestInterceptor("Content-Type", "application/json; UTF-8 "));
        restTemplate.setInterceptors(interceptors);

        String firebaseResponse = restTemplate.postForObject(firebase_api_url, entity, String.class);

        return CompletableFuture.completedFuture(firebaseResponse);
    }
}
@Async Annotation을 이용해 send 메서드를 비동기로 작성하고,
이미 값을 알고 있으므로 쓰레드를 만들지 않고 completedFuture()로 값을 할당해 준다.
AndroidPushPeriodicNotifications
public class AndroidPushPeriodicNotifications {
    public static String PeriodicNotificationJson() throws JSONException {
        LocalDate localDate = LocalDate.now();

        String sampleData[] = {"디바이스 토큰 1", "디바이스 토큰 2"};

        JSONObject body = new JSONObject();

        List<String> tokenlist = new ArrayList<>();

        for (int i = 0; i < sampleData.length; i++) {
            tokenlist.add(sampleData[i]);
        }

        JSONArray array = new JSONArray();

        for (int i = 0; i < tokenlist.size(); i++) {
            array.put(tokenlist.get(i));
        }

        body.put("registration_ids", array);

        JSONObject notification = new JSONObject();
        notification.put("title", "TEST");
        notification.put("body", "App Push");

        body.put("notification", notification);

        System.out.println(body.toString());

        return body.toString();
    }
}-
tokenlist : 디바이스 토큰 list
- registration_ids 값
-
title : 알림 제목
-
body : 알림 내용
Json 구조
https://fcm.googleapis.com/fcm/send
Content-Type : application/json
Authorization : key = SERVER_KEY
{
    "registration_ids" : ["token value1", ... ]
    "notification" :
    {
        "title" : "value"
        "body" : "value"
    }
}
결과
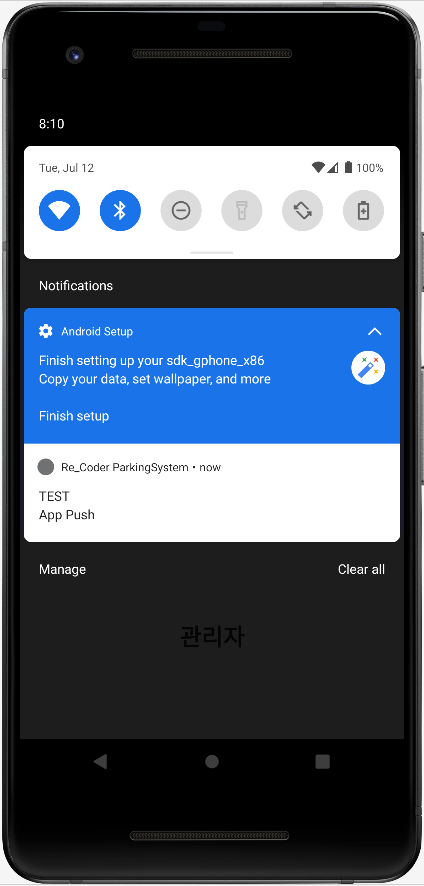
성공

습관이 전부다.