
setNeedsLayout와 setNeedsDisplay의 차이에 대해 설명하시오.
setNeedLayout
- 하위 뷰들의 레이아웃을 조정하고 싶을 때 호출하는 메소드
- 요청을 기록하고 즉시 반환
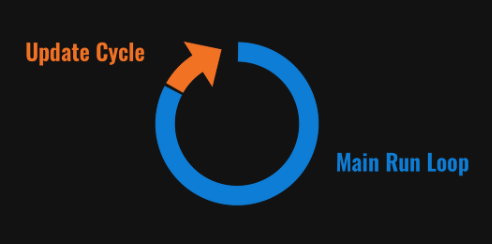
- 메소드는 강제로 즉시 업데이트하지 않고 다음 업데이트 주기를 기다림
- 레이아웃 업데이트를 하나의 업데이트 주기로 통합할 수 있으며, 일반적으로는 성능이 더 좋음
- 내부적으로 layoutSubviews() 메소드를 호출하여 수행
해당 메소드는 비용이 많이 들기 때문에 개발자가 직접 호출하는 것은 지양해야 함.
- 뷰의 레이아웃을 즉시 업데이트하려면 layoutIfNeeded()를 호출
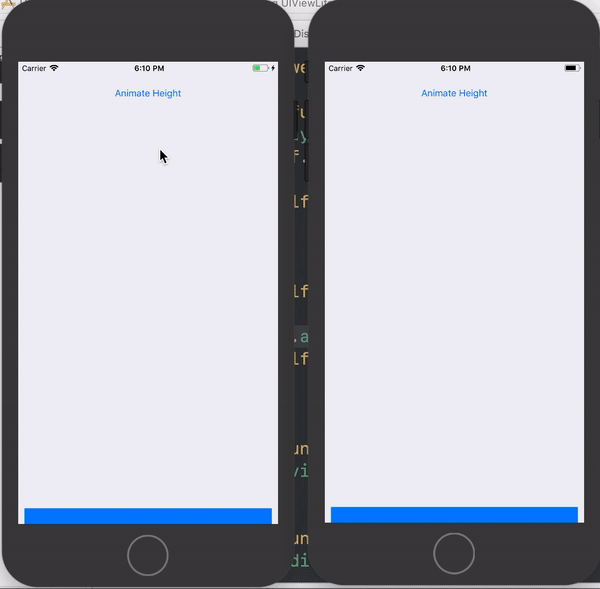
왼쪽이 layoutIfNeed, 오른쪽이 setNeedLayout 메소드를 적용한 결과이다.
layoutIfNeeded는 즉시 레이아웃을 반영하기 때문에 애니메이션이 보인다.
setNeedLayout은 다음 업데이트 주기를 기다리고 한번에 업데이트하기 때문에 즉시 업데이트되는 것 처럼 보인다.
setNeedsDisplay
- 뷰의 컨턴츠를 다시 그리고 싶을 때 호출하는 메소드
- 요청을 기록하고 즉시 반환
- 메소드는 강제로 업데이트 되지 않고 다음 업데이트 주기를 기다림
- 내부적로 draw메소드를 호출하여 수행
- CAEAGLLayer를 사용할 경우 효과가 없다.
- UI와 직접적인 연관이 없는 프로퍼티가 변경되었을 때 호출하면 된다.
stackView의 장점과 단점에 대해서 설명하시오.
장점
쉽다
복잡한 화면을 오토 레이아웃으로 모두 설정해주기 위해서는 많은 조건들이 필요하다. 하지만 stackview를 쓴다면 주어진 설정값에 맞게 stackview가 자동으로 조건을 조절해주기 때문에 개발자가 직접 설정해줘야하는 조건이 엄청 줄어든다.
빠르다
stackview는 자체 컨텐츠가 없기 때문에 렌더링하는 수고가 들어가지 않는다. 따라서 일반 뷰보다 훨씬 빠르고 가볍다.
뷰를 추가하거나 삭제할 때 편리하다
위 같이 복잡한 화면에서 레이아웃을 유지한 채로 뷰를 추가해야 된다. 오토 레이아웃의 경우에도 할 수는 있으나 굉장히 귀찮은 작업이 될 것이다.
단점
모르겠다
NSCache와 딕셔너리로 캐시를 구성했을때의 차이를 설명하시오.
NSCache
- 메모리 관리가 기본적으로 제공
리소스가 부족하면 자동으로 삭제
- Thread safe
- retain 카운트만 증가
복사를 지원하지 않는 객체까지 포용
NSCopying 프로토콜을 채택하지 않은 객체까지 사용할 수 있다.
let mutableDic = NSMutableDictionary()
var dicKey: NSMutableString = "key" // K₁
mutableDic.setObject("one", forKey: dicKey) // K₂
dicKey.setString("changedKey") // still K₁
mutableDic.setObject("two", forKey: dicKey) // K₃

print(mutableDic.object(forKey: "key") ?? "") // "one"
print(mutableDic.object(forKey: "changedKey") ?? "") // "two"
let cache = NSCache<NSString, NSString>()
var cacheKey: NSMutableString = "key" // K₁
cache.setObject("one", forKey: cacheKey) // still K₁
cacheKey.setString("changedKey") // still K₁
cache.setObject("two", forKey: cacheKey) // still K₁!
print(cache.object(forKey: "key") ?? "") // ""
print(cache.object(forKey: "changedKey") ?? "") // "two"URLSession에 대해서 설명하시오.
- 앱과 서버간 데이터를 주고 받은 API를 제공
- HTTP를 포함한 프로토콜을 지원하고 인증, 쿠키 관리, 캐시 관리 등도 지원
- 비동기적으로 동작
- URL 인스턴스를 통해 직접 통신하는 형태와 URLRequest 인스턴스를 만들어 옵션을 설정하여 통신하는 형태가 있다.
동작 순서
- URLSessionConfiguration 생성
- Session 생성
- 사용할 Task 결정, 적절한 Response 메소드 작성
- Task 실행
- Task 완료 후 Response 메소드 실행
URLSessionConfiguration
세션의 타임아웃 값, 쿠키나 캐시 설정 등을 할 수 있음
- .default : 기본 통신
- .ephemeral : 쿠키나 캐시를 저장하지 않을 때
- .background : 앱이 백그라운드 상태에 있을 때 데이터를 다운로드, 업로드 할 때 사용
URLSession 유형
URLSession.shared() // 기본 요청을 위한 세션, 사용자 정의 불가
URLSession(configuration: .default) // 기본적인 세션, 디스크 기반 캐싱
URLSession(configuration: .ephemral) // 디스크에 어떤 데이터도 저장하지 않고 메모리에 올림, 세션 만료시 관련된 데이터 삭제
URLSession(configuration: .background) // Suspended 상태에서도 업로드 다운로드 가능, 앱이 종료되고 다시시작하면 identifier를 사용해 진행 중이던 전송 상태를 찾을 수 있다.
URLSessionTask
세션 작업을 나타내는 추상 클래스
URLSessionDataTask
- 다운로드한 데이터를 앱의 메모리에 직접 전달하는 URLSession
- Data 객체를 통해 데이터를 주고받으며 백그라운드 세션을 지원하지 않는다.
URLSessionUploadTask
- 업로드할 데이터를 body에 넣어 전달
- 백그라운드 세션 지원
URLSessionDownloadTask
- response 데이터를 임시 파일에 직접 작성하여 데이터가 도착할 때 앱에 진행률 업데이트를 제공
- 백그라운드 세션 지원
- 일시 중지한 후 다시 시작할 수도 있다.(서버에서 지원할 때)
- 네트워크 문제로 실패했을 때도 재시작 가능
prepareForReuse에 대해서 설명하시오.
- 만약 UITableViewCell 객체가 reuse identifier가 있을 경우 테이블뷰는
dequeueReuseableCell(:_)이전에 객체를 반환한다. - Cell 객체에 reuse identifier가 없거나
reconfigureRows(:_)를 사용해서 기존의 셀 내용을 업데이트 하는 경우 메소드를 호출하지 않는다. - 잠재적 성능 이슈를 피하기 위해 콘텐츠와 관련이 없는 셀 속성만 reset해야 한다.
alpha, 셀 선택 상태 등등
선택하지 않은 셀에도 체크 표시가 되어있는 것을 확인할 수 있다. 이는 셀을 재사용하기 때문에 preparedForReuse에서 초기화를 해 해결할 수 있다.
다크모드를 지원하는 방법에 대해 설명하시오.
- 시스템 컬러를 사용할 경우 Semantic color를 이용해 다른 컬러가 표현된다.
- Assets를 이용해서 지원한다.
2.1 모드 별로 다른 색을 정의
2.2 모드 별로 다른 이미지를 정의 - 코드로 지원한다.
if UITraitCollection.userInterfaceStyle == .dark
/*				구현							*/
Info.plist 에서 apperance를 Light로 하면 다크모드를 지원하지 않는다.
ViewController의 생명주기를 설명하시오.

init(coder:)
- 스토리보드로 ViewController를 생성할 경우 객체를 초기화하는 메소드
- 이메소드에서 초기화 작업을 할 때 생명주기동안 필요한 자원을 할당 받게 된다.
init(nibName:bundle:)
- 스토리보드가 아닌 분리된 nib파일로 관리될 경우 해당 메소드로 초기화한다.
loadView
- 화면에 띄워질 View를 만드는 메소드
- outlet과 action들이 이 메소드에서 생성되고 연결된다.
viewDidLoad
- 생애주기에서 단 한번만 호출
- 화면에서 보여지기 전 데이터를 뿌려주는 행위에 대한 코드를 작성
- 이 메소드가 호출되는 시점에는 outlet들이 메모리에 위치한다.
viewWillAppear
- View가 화면이 올라오고 난 이후에 호출되는 메소드
- 애니메이션을 실행시키거나, 데이터의 업데이트 등을 수행
- 화면 전환이 되어 현재 화면으로 돌아올때도 호출된다.
viewDidAppear
- View의 화면이 완전히 올라오고 호출되는 메소드
viewWillDisappear
- 다음 화면으로 전환되기 전 화면에서 사라질 때 호출
viewDidDisappear
- 화면에서 완전히 사라지고 나서 호출되는 메소드
deinit
- 메모리에서 사라지기 전 호출
TableView와 CollectionView의 차이점을 설명하시오.
- 둘 모두 cell을 기반으로 여러 데이터를 표현하는 뷰이다.
- TableView는 하나의 열에 여러 행의 Cell이 나열 되있는 형태이나 CollectionView는 다양한 행렬의 형태로 표현할 수 있다.
TableView는 수직으로만 스크롤이 가능하다.
- TableView는 기본으로 제공되는 스타일이 존재한다.
오토레이아웃을 코드로 작성하는 방법은 무엇인가? (3가지)
- NSLayoutConstrain
NSLayoutConstraint.activate([NSLayoutConstraint(item: UIButton, attribute: .centerX, relatedBy: .equal, toItem: UIView, attribute: .centerX, multiplier: 1.0, constant: 0.0), ...])- Visual Format Language
let views = ["redView": redView,
             "blueView": blueView,
             "greenView": greenView]

let format1 = "V:|-[redView]-8-[greenView]-|"
let format2 = "H:|-[redView]-8-[blueView(==redView)]-|"
let format3 = "H:|-[greenView]-|"

var constraints = NSConstraint.constraints(withVisualFormat: format1,
                    options: alignAllLeft,
                    matrics: nil,
                    views: views)
constraints += NSConstraint.constraints(withVisualFormat: format2,
                    options: alignAllTop,
                    matrics: nil,
                    views: views)
constraints += NSConstraint.constraints(withVisualFormat: format3,
                    options: []
                    matrics: nil,
                    views: views)
NSConstraint.activateConstraints(constraints)- Anchor
NSLayoutConstraint.activate([button.centerXAnchor.constraint(equalTo: view.centerXAnchor), ...])hugging, resistance에 대해서 설명하시오.
huggine
우선 순위가 클수록 자신의 크기를 유지하려고 하고, 작을수록 크기가 늘어나는 속성
resistance
우선 순위가 클수록 자신의 크기를 유지하려 하고, 작을수록 크기가 작아지는 속성
참고자료
- https://zeddios.tistory.com/359
- https://velog.io/@zeke/difference-between-setNeedsLayoutsetNeedsDisplay
- https://h4njun.tistory.com/entry/setNeedsDisplay-setNeedsLayout
- https://velog.io/@eddy_song/stack-view
- https://firekokoma.tistory.com/344
- https://inuplace.tistory.com/1050
- https://jeong9216.tistory.com/464
- https://sihyungyou.github.io/iOS-dequeueReusableCell/
- https://bmwe3.tistory.com/1773
- https://one10004.tistory.com/121
- https://github.com/lunchScreen/Interview_Questions/issues/25
- https://github.com/iOS-SOPT-iNNovation/iOS_Traning/issues/20
- https://github.com/lunchScreen/Interview_Questions/issues/36