게시물의 정보 데이터를 받아 전달하는 getPostFB() 함수를 reduce() 함수로 ♻️리팩토링 하였다. 이는 JavaScript의 reduce() 함수를 연습하는 목적이다.
🔍 2. reduce() 함수 알아보기.
const array = [1,2,3,4];
const reduce = (누적값 accumulator, 현재값 currentValue) => accumulator + currentValue;

// 1 + 2 + 3 + 4
array.reduce(reducer) // 결과: 10

// 5 + 1 + 2 + 3 + 4
array.reduce(reducer,5) // 결과: 15
5는 기본 값, 기본적으로 5라는 값을 넣고 시작하겠다.
reduce()는 값을 누산하는 함수이다. 어떠한 연산을 한 것에 또 연산을 해주는 것!
배열의 값을 줄여서 하나의 값으로 만들어주는 것. (숫자,문자,배열 등) 하나의 값으로 return 시킨다.
debugger로 reduce 동작 방식 살펴보기.
📚 배열안에 있는 모든 원소의 값을 합쳐 하나의 값으로 만들기.
- 초기 값을 설정해주면 acc 는 0 부터 시작
- 초기 값을 설정 안해주면 cons arr = [ ] 에 있는 10 부터 시작.
- 현재 값이란 각 원소 arr = [10,20,30,40,50]을 순회 할 때 마다 만나는 원소의 값들을 말한다.
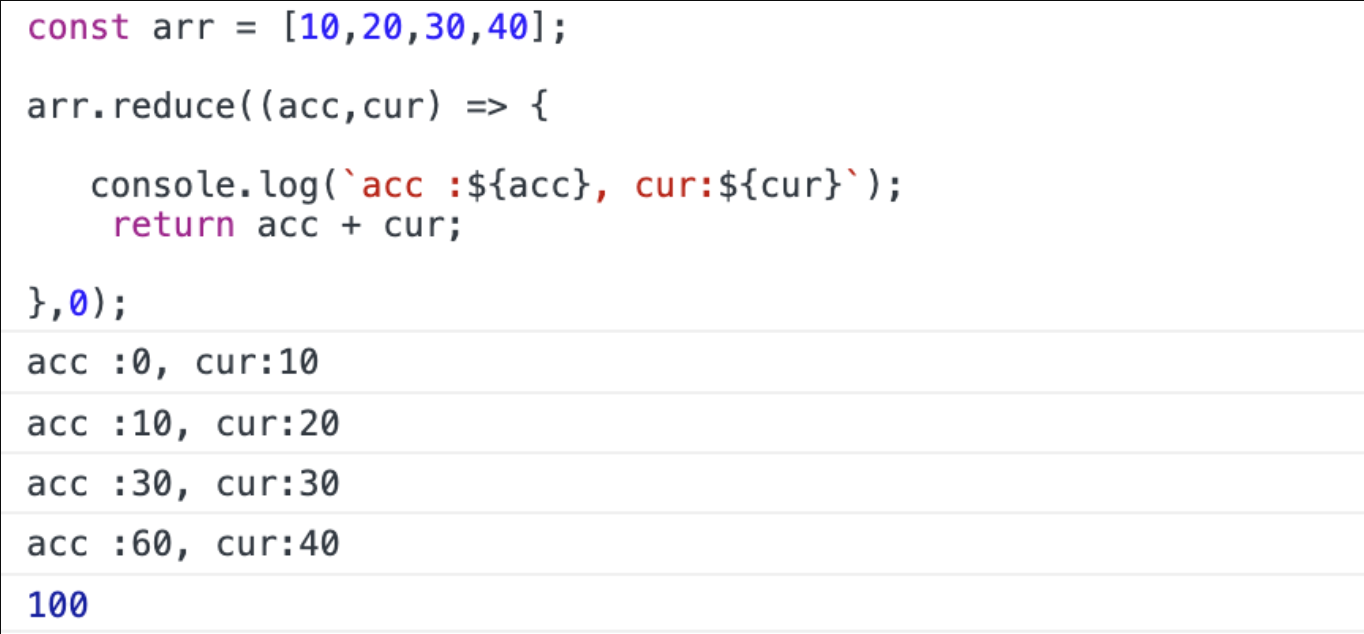
const array = [10,20,30,40];

array.reduce(function(누적값acc, 현재값cur, index, src(원본배열)) {

return acc + cur;

}, 0) // 0은 초기화


___________________

index 0번째

누적값(return) 0
현재값 10
return 값 10
___________________

index 1번째

누적값(return) 10
현재값 20
return 30
___________________

index 2 번째

누적값 30
현재값 30
return 60
___________________

index 3번째

누적값 60
현재값 40
return 100
___________________

index 4번째

누적값 100
현재값 50
return 150
📚 배열 안에 있는 원소 두배씩(x2) 증가시키기.

📝 getPostFB() 함수 작성하기
defaultProps에 수기로 작성한 데이터 대신 firestore에 작성한 데이터들을 reducer의 SET_POST 함수를 통해 최종적으로 list 배열에 firestore 데이터를 넣어주는 함수이다.
const getPostFB = () => {
  return function(dispatch, getState, { history }) {
    const postDB = firestore.collection('post'); 📚

    postDB.get().then((docs) => {
// 📚 postDB.get() 데이터를 가져옴 then() 가져온 데이터를 후처리 사용.
      let post_list = [];
      docs.forEach((docElements) => {
// Post.defaultProps = {..}의 키 값에 임의로 작성한 데이터를 firestore 데이터 값으로 적용하기
        let _post = {
          id: docElements.id,
          ...docElements.data(),
        };
        let post = {
          id: _post.id,
          user_info: {
            user_name: _post.user_name,
            user_profile: _post.user_profile,
            user_id: _post.user_id,
          },
          image_url: _post.image_url,
          contents: _post.contents,
          comment_cnt: _post.comment_cnt,
          insert_dt: _post.insert_dt,
        };
        post_list.push(post);
      });
      dispatch(setPost(post_list));
    });
  };
};
🍱 getPostFB() 함수 reduce로 ♻️리팩토링
 postDB.get().then((docs) => {
      let post_list = [];
      docs.forEach((docElements) => {
      📚 let _post = docElements.data(); //firebase에서 가지고 온 데이터들.

        // ['user_name', 'user_profile', 'contents','comment_cnt' ... ];
      ✅ let post = Object.keys(_post).reduce(
          (acc, cur) => {
            return { ...acc, [cur]: _post[cur] };
          },
          {
            id: docElements.id,
            user_info: {},
          }
        );

        post_list.push(post);
      });
📚 let _post = docElements.data(); // dictionary 형태의 데이터🍕 1. dictionary의 key값들을 배열[] 형태로 만들어 주기.
dictionary 형태란?
key, value의 pair로 저장하게 되는데 리스트에서 인덱스로 접근하는거와 다르게
key의 값으로 접근하기 때문에 원하는 값을 찾을때 빠르게 찾을 수 있는게 장점이다.
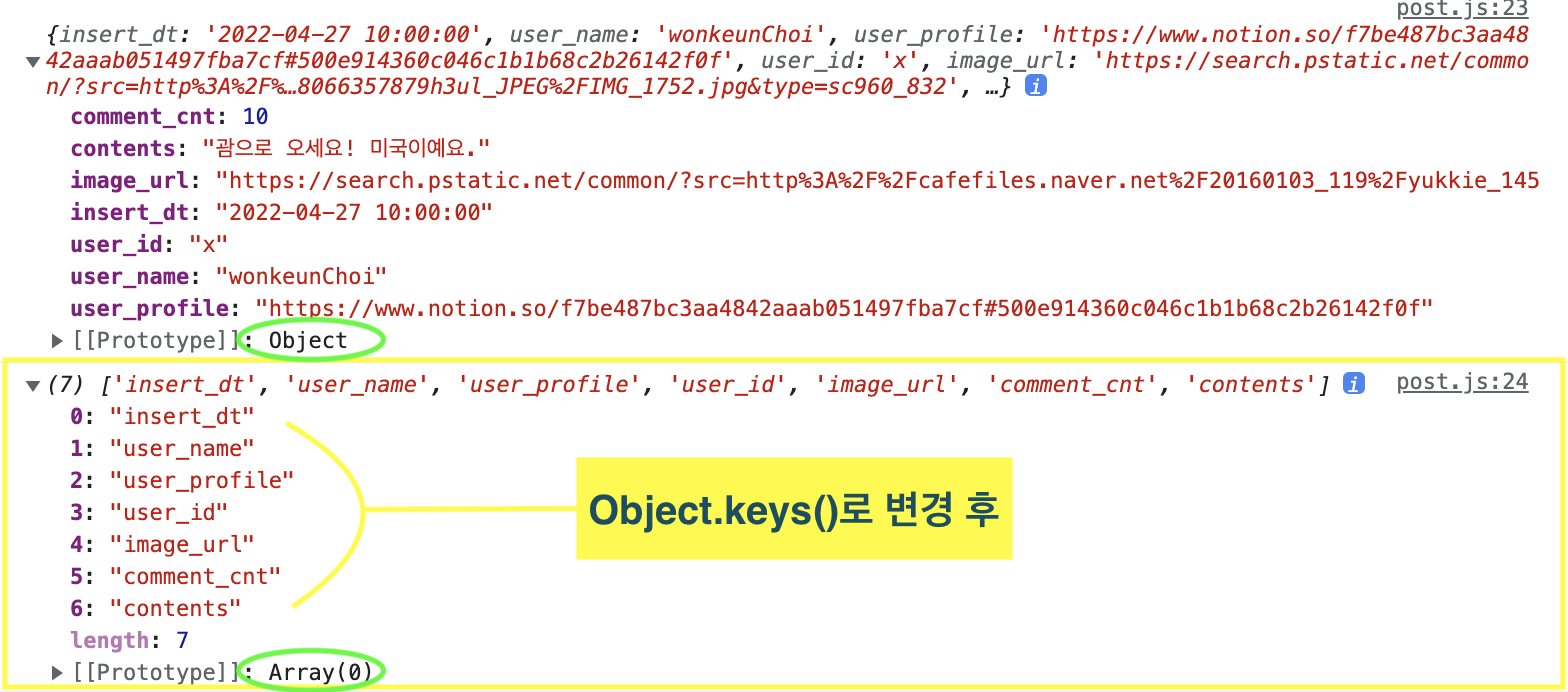
✅ 왜 key 값들을 배열 [ ] 로 만들어주는걸까?
reduce()는 Javascript의 내장 배열 함수이기 때문에 배열 형태일 때만 사용 가능!
let post = Object.keys(_post);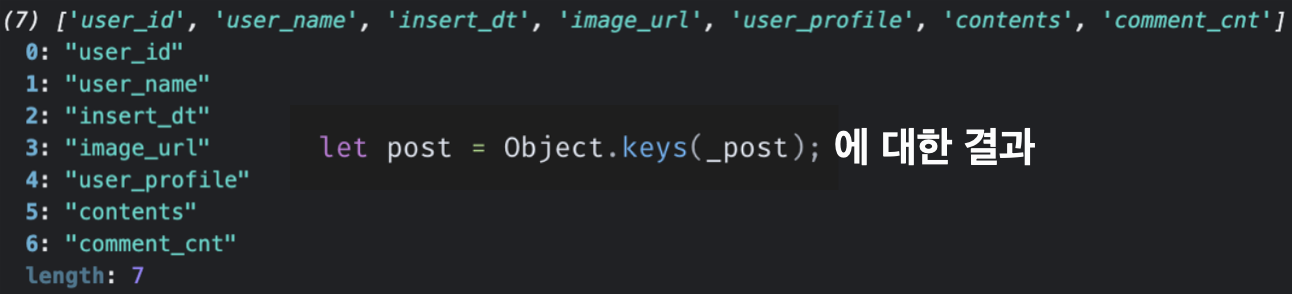
firestore에서 가져온 데이터를 변수_post에 담았고 _post를 reduce함수를 사용할 수 있도록 Object.keys(_post)함수로 데이터를 배열 형식으로 가공해주었다.
2. 🍕dictionary 형태로 post 데이터 형식 맞추기
현재
let _post = documents.data()에는 id 값이 존재하지 않는다.
id를 지정하여 객체에 담긴 데이터의 그룹을 식별해줘야 하는데 어려운 상황이다.
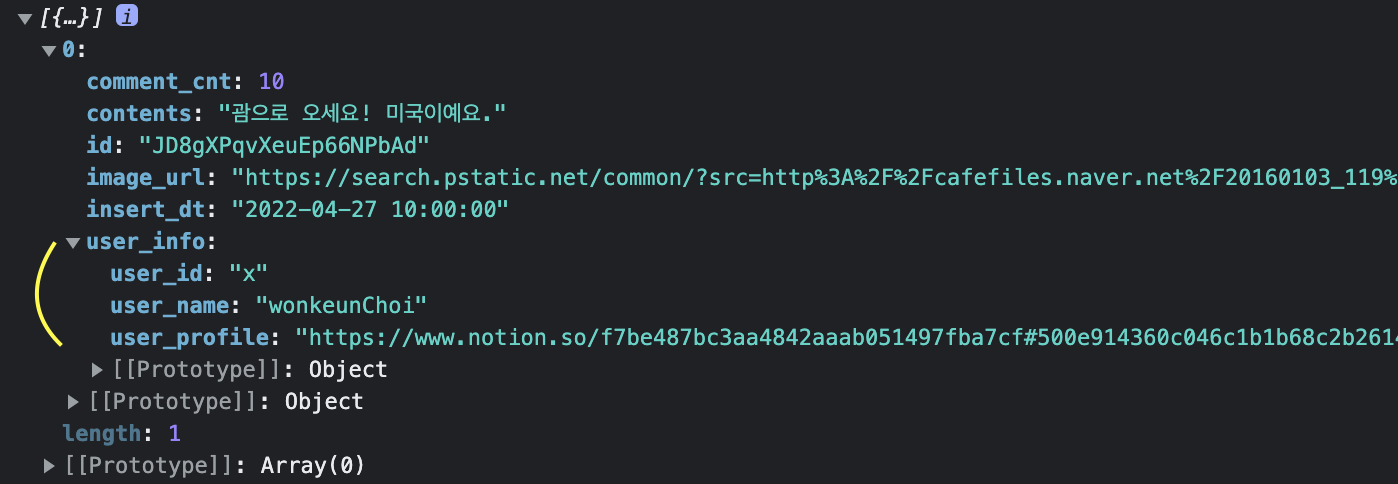
데이터를 firestore에서 가져왔기 때문에 가져온 firestore 데이터에 어떠한 값들이 있는지 console.log으로 찍어봤다
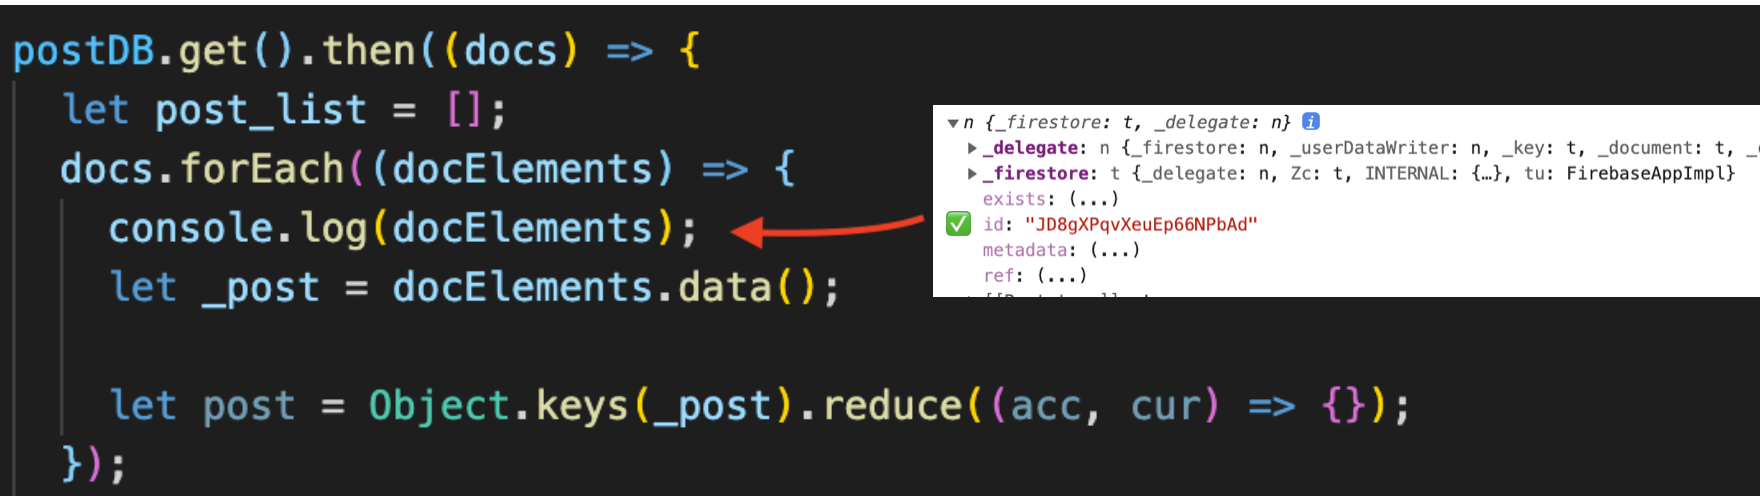
firestore에서 id 값을 제공하는 것을 찾을 수 있었다.
이제 firestore에서 제공하는 id 값을 reduce에 초깃값으로 설정해서 데이터가 등록되어 있는 값들에게 id 값을 지정해 줄 수 있다. post의 데이터 형식에 한걸음 가까워진 것이다.
✅ id를 reduce 기본값으로 넣어주기 !

postDB.get().then((docs) => {
 docs.forEach((docElements) => {
  let _post = docElements.data();

  let post = Object.keys(_post).reduce((acc,cur) => {

  },{id: docElements.id}) //✅ id를 reduce 기본값으로 넣어주기
 })
})
3. 🍕post_list 배열에 reduce(acc,cur)로 가공한 _post 값 넣기.
    postDB.get().then((docs) => {
      let post_list = [];
      docs.forEach((docElements) => {
        let _post = docElements.data();
        let post = Object.keys(_post).reduce(
          (acc, cur) => {
            return { ...acc, [cur]: _post[cur] };
          },
          {
            id: docElements.id,
          }
        );
        post_list.push(post);
      });
    }
0번째
acc: id
cur: comment_cnt
1번째
acc: id, comment_cnt
cur: contents
2번째
acc: id, comment_cnt, contents
cur: image_url
3번째
acc: id, comment_cnt, contents, image_url
cur: insert_dt
4번째
acc: id, comment_cnt, contents, image_url, insert_dt
cur: user_id
5번째
acc: id, comment_cnt, contents, image_url, insert_dt, user_id
cur: user_name
6번째
acc: id, comment_cnt, contents, image_url, insert_dt, user_id, user_name
cur: user_profile
7번째
acc: id, comment_cnt, contents, image_url, insert_dt, user_id, user_name, user_profile
cur:
🍕 데이터 Object.keys() 적용 전 처음 형태로 적용하기
목적은 리팩토링이었기 때문에 처음 데이터 형식에 맞춰줘야 한다.

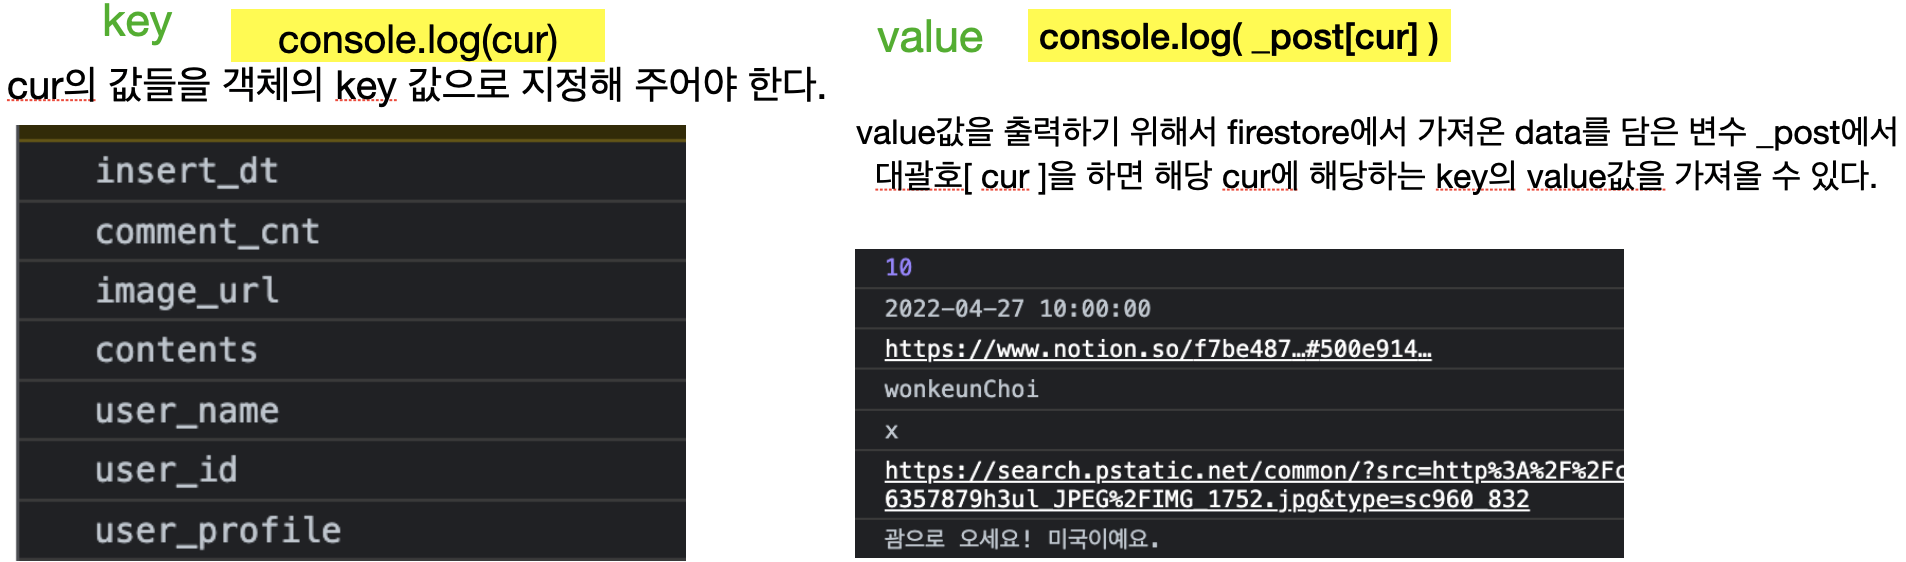
 // console.log()로 cur을 찍어보자!
  let post = Object.keys(_post).reduce(
          (acc, cur) => {
            console.log(cur);
            console.log(_post[cur])
          }
        );
객체의 key를 변수로 가져오는 방법중에
 let key = 'insert_dt';
 let obj = {};

obj[key] = 10;
console.log(obj);
를 출력하면

결과
{insert_dt: 10}

reduce(acc,cur) {} 의 return 값을 이 방법을 이용하여 cur의 key값과 _post[cur] 값을 합친다.

--> 1번
 let post = Object.keys(_post).reduce(
          (acc, cur) => {
	return { } // let obj = {} 처럼 객체 형식으로!
          }
        );

--> 2번
         ..(acc, cur) => {
     return {...acc} // 기본값으로 정했던 id 값부터 cur의 마지막 누적값 까지를 출력
          }
        );

--> 3번
         ..(acc, cur) => {
     return { ...acc, [cur] } // obj[cur] 같이
     // [] 안에 넣어주면 변수안에 담긴 key값들을 사용할 수 있다.
          }
        );

--> 4번
         ..(acc, cur) => {
     return { ...acc, [cur]: _post[cur] } //key에 해당하는 value를 넣어준다.
           // firestore 데이터 _post의 key값과 cur의 key값의 이름은 동일하다
           // 즉, cur의 key값 이름이 _post에 있는 key값과 동일하다면 해당하는
           // _post의 key값에 value를 [cur]의 value로 설정하겠다는 의미.
          }
        );

코드
   postDB.get().then((docs) => {
      let post_list = [];
      docs.forEach((docElements) => {
        let _post = docElements.data();
        let post = Object.keys(_post).reduce(
          (acc, cur) => {
            return { ...acc, [cur]: _post[cur] };
          },
          {
            id: docElements.id,
          }
        );
        post_list.push(post);
      });
    }
...acc 👇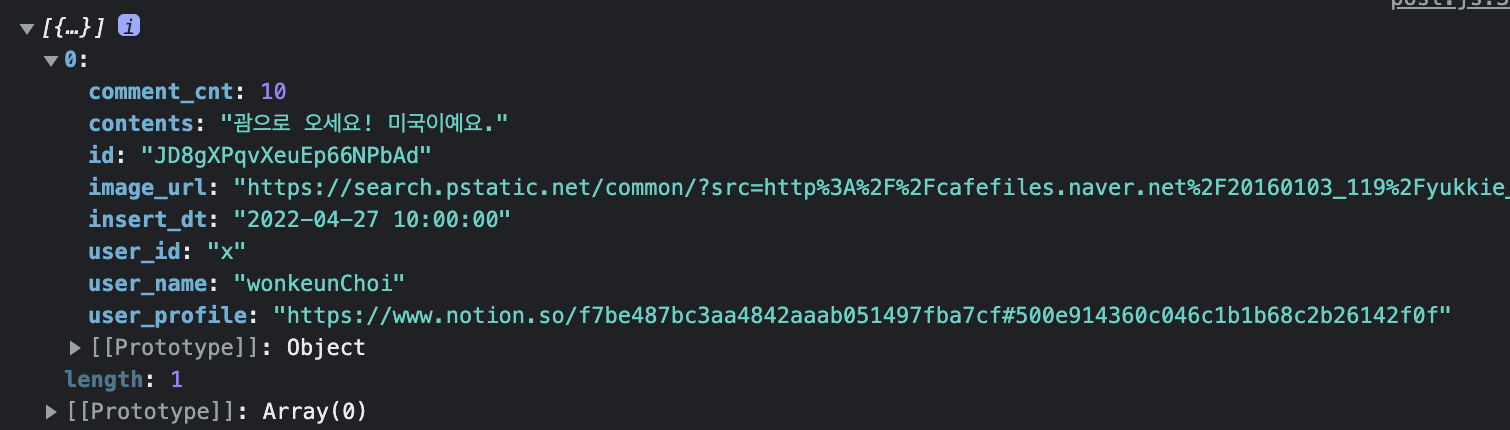
🍕 + user에 대한 정보만 담는 객체 생성하기
 // reduce()의 새로운 기본(초기)값 user_info:{} 객체를 생성하기.

--> 1번
 let post = Object.keys(_post).reduce(
        (acc, cur) => {
          return { ...acc, [cur]: _post[cur] };
        },
        {
          id: docElements.id, user_info:{ } //user 정보를 담을 객체를 reduce기본값으로!
          })


--> 2번
 // indexOf() 함수로 cur의 key값 이름에 'user_'가 있는지 없는지 판별하기.(유저에 대한 정보인가)_

      ..(acc, cur) => {
          if(cur.indexOf('user_') !== -1 ){ // 일치하는 값이 있다면.
           return ?
          }
           return { ...acc, [cur]: _post[cur] };
        },
        {
          id: docElements.id, user_info:{ }
         })


 --> 3번
// 이름 user_를 포함한 key가 있을 경우에 user_info객체 안에 해당하는 key만 넣기.
       ..(acc, cur) => {
          if(cur.indexOf('user_') !== -1 ){
           return { ...acc, user_info:{...acc.user_info, [cur]:_post[cur]} }
          }//1. ...acc 지금까지의 값과 함께, user_info라는 빈 객체를 생성한다.
           //2.생성한 user_info{} 객체 안에 ...acc 지금까지 출력된 값 중에 user_info에
           //해당하는 값 [cur]:_post[cur]을 넣는다.
           return { ...acc, [cur]: _post[cur] };
        },
        {
          id: docElements.id, user_info:{ }
        })