
gaol : 외부의 font와 icon을 사용하여 내 얼굴이 들어간 명함 만들기
구성요소 배치
총 5행으로 구성할것이다. 1행은 원형모양의 얼굴사진, 2행과 3행은 이름과 직업, 4행과 5행은 번호와 메일주소를 보여주는 박스로 구성할 것이다.
우선, 'Column' 클래스로 5개의 행을 만들자. 아래와 같은 구조로 코드를 작성했다.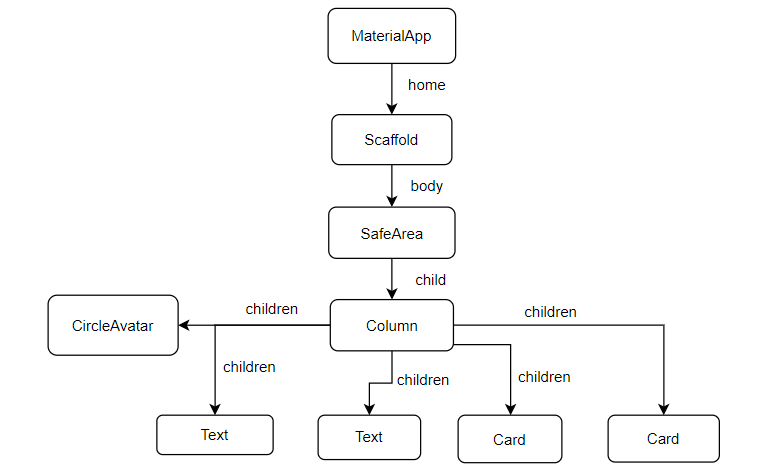
import 'package:flutter/material.dart';
void main() {
runApp(
MyApp(),
);
}
class MyApp extends StatelessWidget {
Widget build(BuildContext context) {
return MaterialApp(
home: Scaffold(
backgroundColor: Colors.teal,
body: SafeArea(
child: Column(
children: [
CircleAvatar(),
Text('Jangyunchan'),
Text('COMMISSIONED OFFICER'),
Card(child: Text('010-****-****')),
Card(
child: Text('flutter@sejong.ac.kr'),
) // Card
],
), // Column
), // SafeArea
), // Scaffold
); // MaterialApp
}
}실행결과 모습이 굉장히 형편없다...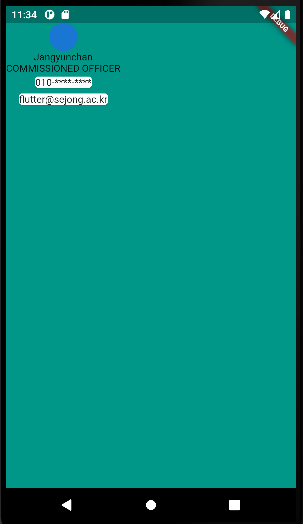
화면 스타일 설정
이제 Column내 각 구성요소들의 스타일과 배치, 사이즈 등등의 속성을 설정하자.
- Column
mainAxisAlignment : 가운데정렬
-CircleAvatar
반경 : 50픽셀
backgroundImage : 사진삽입
-Text1
fontFamily : Pacifico
color : white
fontsize : 40
fontWeight : bold
-Text2
fontFamily : SouceSansPro
color : teal.shade100
fontsize : 20
fontweight : bold
letterSpacing : 2.5
-Card1
margin : 수직10, 수평25 (대칭)
color : white
--Card1Text
color : teal.shade900
fontsize : 20
fontfamily : SourceSansPro
-Card2
margin : tnwlr10, 수평25 (대칭)
color : white
--Card2Text
color : teal.shade900
fontsize : 20
fontfamily : SourceSansPro
import 'package:flutter/material.dart';
void main() {
runApp(
MyApp(),
);
}
class MyApp extends StatelessWidget {
Widget build(BuildContext context) {
return MaterialApp(
home: Scaffold(
backgroundColor: Colors.teal,
body: SafeArea(
child: Column(
mainAxisAlignment: MainAxisAlignment.center,
children: [
CircleAvatar(
radius: 50,
backgroundImage: AssetImage('images/profile.jpg'),
), // CircleAvatar
Text(
'Jangyunchan',
style: TextStyle(
color: Colors.white,
fontFamily: 'Pacifico',
fontSize: 20,
fontWeight: FontWeight.bold), // TextStyle
), // Text
Text(
'COMMISSIONED OFFICER',
style: TextStyle(
color: Colors.teal.shade100,
fontFamily: 'SourceSansPro',
fontSize: 20,
fontWeight: FontWeight.bold,
letterSpacing: 2.5), // TextStyle
), // Text
Card(
margin: EdgeInsets.symmetric(vertical: 20, horizontal: 25),
color: Colors.white,
child: Text(
'010-****-****',
style: TextStyle(
color: Colors.teal.shade900,
fontSize: 20,
fontFamily: 'SourceSansPro'), // TextStyle
), // Text
), // Card
Card(
margin: EdgeInsets.symmetric(vertical: 10, horizontal: 25),
color: Colors.white,
child: Text(
'flutter@sejong.ac.kr',
style: TextStyle(
fontFamily: 'sourceSansPro',
fontSize: 20,
color: Colors.teal.shade900), // TextStyle
), // Text
) // Card
],
), // Column
), // SafeArea
), // Scaffold
); // MaterialApp
}
}실행결과는 아래와 같다.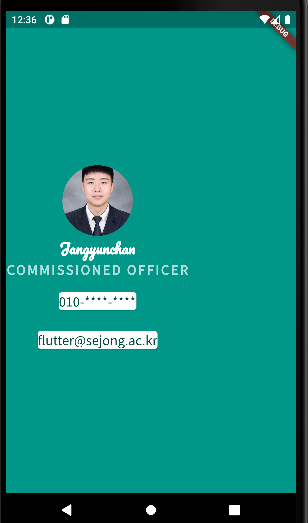
아이콘/구분선 추가
이제 전화번호와 메일주소 박스의 왼쪽에 아이콘 이미지를 넣어주자.
https://www.materialpalette.com/icons
또한, 텍스트와 박스사이에 'Divider'클래스를 이용하여 구분선을 넣어주자.
※아이콘과 텍스트가 각각의 열로 구성되는 번거로움을 없애고자 'Text'클래스를 'ListTile'클래스로 감싸줄것이다.※
- Icon1
icons : phone
color : teal- Icon2
icons : email
color : teal- SizedBox
height : 20
width : 150
-Divider
color : teal.shade100
             SizedBox(
               height: 20,
               width: 150,
               child: Divider(
                 color: Colors.teal.shade100,
               ),
             ),
             Card(
               margin: EdgeInsets.symmetric(vertical: 10, horizontal: 25),
               color: Colors.white,
               child: ListTile(
                 title: Text(
                   '010-8706-1283',
                   style: TextStyle(
                       color: Colors.teal.shade900,
                       fontSize: 20,
                       fontFamily: 'SourceSansPro'),
                 ),
                 leading: Icon(
                   Icons.phone,
                   color: Colors.teal,
                 ),
               ),
             ),
             Card(
               margin: EdgeInsets.symmetric(vertical: 10, horizontal: 25),
               color: Colors.white,
               child: ListTile(
                 title: Text(
                   '18011103@sejong.ac.kr',
                   style: TextStyle(
                       fontFamily: 'SourceSansPro',
                       fontSize: 20,
                       color: Colors.teal.shade900),
                 ),
                 leading: Icon(
                   Icons.email,
                   color: Colors.teal,
                 ),
               ),
             )
           ],
         ),
       ),
     ),
   );
 }
}
Column내의 두번째 'Text'클래스 다음부터, 위와 같이 코드를 수정했다.
최종적으로 아래와 같은 명함앱이 완성되었다.

Flutter 학습 일기