goal : List, if/else 를 이용해 주어진 문제들을 맞추는 퀴즈앱을 구현하자.
화면구현
화면상에는 문제와 문제를 맞출 'True', 'False' 버튼이 보이도록하자.
문제와 버튼 두개, 총 3개의 행을 'Column' 클래스안에 구성해야한다.
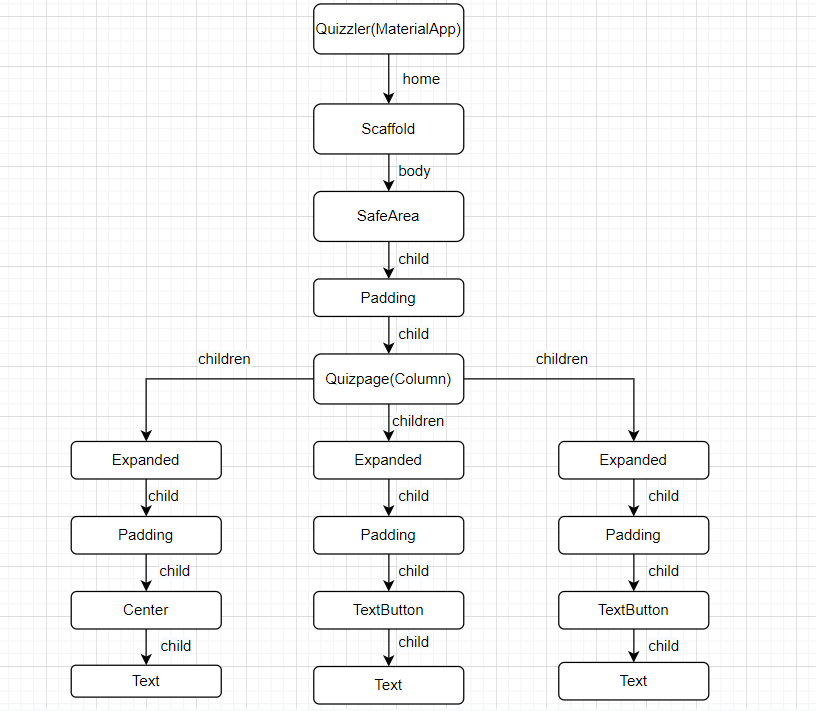
- Scaffold
bacckgroundColor : grey.shade[900]
-Padding
padding : 대칭(수평10)- Quizepage(Column)
주축정렬 : spaceBetween
교차축정렬 : stretch- Expanded1
flex : 5
-Padding
padding : 전방향10
-Text('You can lead a cow down stairs but not up stairs')
정렬 : center
크기 : 25
color : white- Expanded2
-Padding
padding : 전방향15
-TextButton
backgroundColor : green
-Text('True')
color : white
크기 : 20- Expanded3
-Padding
padding : 전방향15
-TextButton
backgroundColor : red
-Text('False')
color : white
크기 : 20
위와같이 구조와 속성을 구상하고, 코드를 작성했다.
void main() => runApp(Quizzler());
class Quizzler extends StatelessWidget {
Widget build(BuildContext context) {
return MaterialApp(
home: Scaffold(
backgroundColor: Colors.grey.shade900,
body: SafeArea(
child: Padding(
padding: EdgeInsets.symmetric(horizontal: 10.0),
child: QuizPage(),
), // Padding
), // SafeArea
), // Scaffold
); // Material
}
}
class QuizPage extends StatefulWidget {
_QuizPageState createState() => _QuizPageState();
}
class _QuizPageState extends State<QuizPage> {
Widget build(BuildContext context) {
return Column(
mainAxisAlignment: MainAxisAlignment.spaceBetween,
crossAxisAlignment: CrossAxisAlignment.stretch,
children: <Widget>[
Expanded(
flex: 5,
child: Padding(
padding: EdgeInsets.all(10.0),
child: Center(
child: Text(
'You can lead a cow down stairs but not up stairs.',
textAlign: TextAlign.center,
style: TextStyle(
fontSize: 25.0,
color: Colors.white,
), // TextStyle
), // Text
), Center
), // Padding
), Expanded
Expanded(
child: Padding(
padding: EdgeInsets.all(15.0),
child: TextButton(
style: ButtonStyle(
backgroundColor: MaterialStateProperty.all(Colors.green),
), ButtonStyle
child: Text(
'True',
style: TextStyle(
color: Colors.white,
fontSize: 20.0,
), // TextStyle
), // Text
), // TextButton
), // Padding
), // Expanded
Expanded(
child: Padding(
padding: EdgeInsets.all(15.0),
child: TextButton(
style: ButtonStyle(
backgroundColor: MaterialStateProperty.all(Colors.red)),
child: Text(
'False',
style: TextStyle(
fontSize: 20.0,
color: Colors.white,
), // TextStyle
), // Text
), // TextButton
), // Padding
), // Expanded
], // <Widget>[]
); // Column
}
}아래와 같은 화면이 실행됨을 확인했다.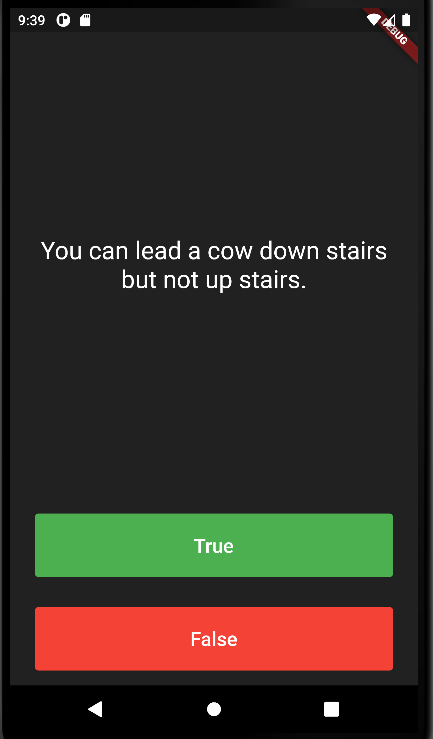 이제 유저와의 상호작용을 위해 3가지를 생각해야한다.
1. 유저가 'True' 버튼이나 'False' 버튼을 누르면 다음문제로 넘어가야한다.
2. 유저가 선택한 답이 맞는지 틀린지 실시간으로 알려줘야한다.
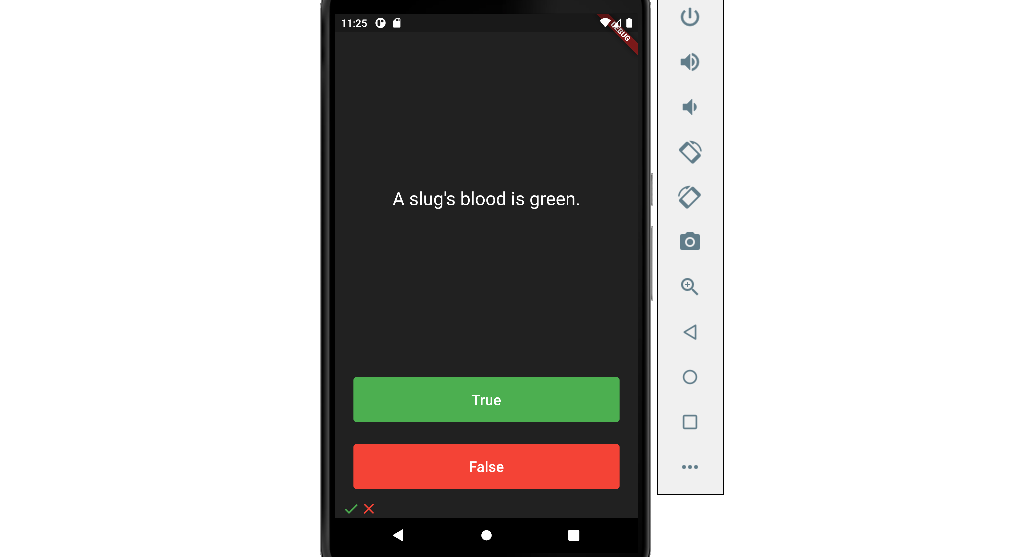
3. 'True' 버튼을 클릭하면check아이콘을, 'False' 버튼을 클릭하면 close아이콘을 화면하단에 실시간으로 추가 해주어야 한다.
위의 3가지 조건을 만족시켜주기 위해서 List 데이터타입을 이용해야한다.
텍스트/정수형 타입의 LIST생성
먼저 조건1을 만족하자.
질문들을 담을 List 타입의 변수와 정수형변수 0 을 생성하자.
List<String> questions = [
    'You can lead a cow down stairs but not up stairs.',
    'Approximately one quarter of human bones are in the feet.',
    'A slug\'s blood is green.'
  ];
  int questionNumber = 0;
※ slug's의 '를 문자 그자체로 인식시키기 위해 앞에\를 써준다.
'List'안에 들어가는 데이터타입들은 문자형이므로<>안에 'String'이라고 명시해야한다. ※
이제, 'Text'안의 하드코드 문자열을 'questionNumber' 변수로 변경하고, 'TextButton'의 'onPressed'를 세팅하자.
- 변경전
child: Text('You can lead a cow down stairs but not up stairs.',
            textAlign: TextAlign.center,
            style: TextStyle(
              fontSize: 25.0,
              color: Colors.white,
            ),  // TextStyle
), // Text- 변경후
child: Text(questions[questionNumber],
            textAlign: TextAlign.center,
            style: TextStyle(
              fontSize: 25.0,
              color: Colors.white,
            ),  // TextStyle
), // Text- 'True' & 'False' 버튼의 'onPressed'설정
onPressed(){
  setState((){
    questionNumber+=1;  // = questionNumber++;
  });
}
※ 버튼클릭시 'questionNumber'가 0에서 1로 치환되어 'Text'에 'questions[1]'이 전달된다. ※
if/else 설정
이제 조건2를 만족시키자.
준비한 3가지의 질문의 답은 순서대로 거짓, 참, 참이다. 이를 List변수로 생성하자.※ 'List'안 데이터들의 타입은 'bool(true, false)'이다. ※
List<bool> answers = [false, true, true];n번째 질문이라 가정했을때, 유저가 클릭한 버튼(true or flase)이 answers[n-1]과 같다면 정답을, 다르다면 오답을 출력하면된다.
※ List는 1이아닌 0부터 시작한다. questionNumber를 0으로 시작시킨 이유이기도하다. ※
'onPressed'안에 'if/else' 코드를 추가하자.
onPressed(){
  if (answers[questionNumber] == true) { // 'False버튼은 answers[questionNumber] == False'
    print('correct');
  } else {
    print('not correct');
  }
  setState((){
    questionNumber+=1;  // = questionNumber++;
  });
}
WIGET(Icon)타입 리스트생성
마지막으로 조건3을 만족시키자. 하단에 아이콘을 나타낼 'Row' 클래스를 'Column'의 마지막에 추가하고, 아이콘을 담을 비어있는 List변수를 생성하자.
List<Widget> scorekeeper = [];  // List생성
'
'
'
'
        Row(children: scorekeeper)
      ], // <Widget>[]
    );  // Column
  }
}
버튼 클릭시에 'scorekeeper'에 아이콘이 추가되도록해둬야한다.
다음은 최종적으로 완성된 'True'/'False'버튼의 'onPressed'내 코드이다.
- True 버튼
onPressed: () {
  if (answers[questionNumber] == true) {
    print('right');
  } else {
    print('not correct');
  }
  setState(() {
    scorekeeper.add(Icon(
      Icons.check,
      color: Colors.green,
    ));
    questionNumber += 1; //= questionNumber++;
  });
},- False 버튼
onPressed: () {
  if (answers[questionNumber] == false) {
    print('right');
  } else {
    print('not correct');
  }
  setState(() {
    scorekeeper.add(Icon(
      Icons.close,
      color: Colors.red,
    ));
    questionNumber += 1; //= questionNumber++;
  });
},