swagger
1. 설치
npm i @nestjs/swagger2. swagger 설정
1) main.ts 수정
import { NestFactory } from '@nestjs/core';
import { AppModule } from './app.module';
import { ValidationPipe } from '@nestjs/common';
import { setupSwagger } from './util/swagger';

async function bootstrap() {
  const app = await NestFactory.create(AppModule);
  app.useGlobalPipes(new ValidationPipe({ transform: true }));
  setupSwagger(app); // 한줄 추가 for swagger
  await app.listen(3005);
}
bootstrap();
2) src/util/swagger.ts 파일 생성 및 코드 입력
import { INestApplication } from "@nestjs/common";
import { DocumentBuilder, SwaggerModule } from "@nestjs/swagger";

/**
 * Swagger 세팅
 *
 * @param {INestApplication} app
 */
export function setupSwagger(app: INestApplication): void {
  const options = new DocumentBuilder()
    .setTitle('NestJS Study API Docs')
    .setDescription('NestJS Study API description')
    .setVersion('1.0.0')
    .build();

  const document = SwaggerModule.createDocument(app, options);
  SwaggerModule.setup('api-docs', app, document);
}
3. http://localhost:3005/api-docs 로 들어가기
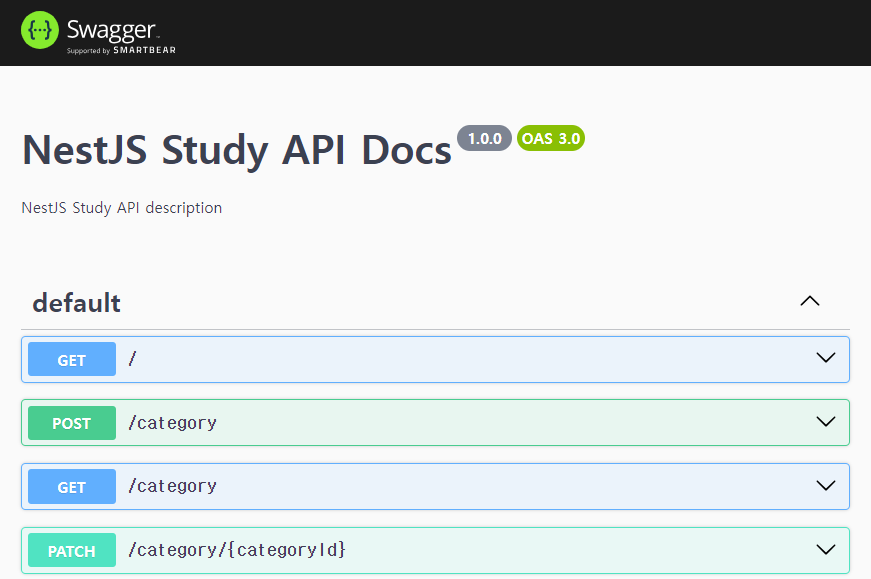
4. api문서화 시작
@nestjs/swagger에서 제공하는 데코레이터를 사용하여 api문서화.
1) dto : 기존에 만들어 놨던 dto에 데코레이터 부착.
import { ApiProperty } from '@nestjs/swagger';
import { IsNotEmpty, IsNumber } from 'class-validator';
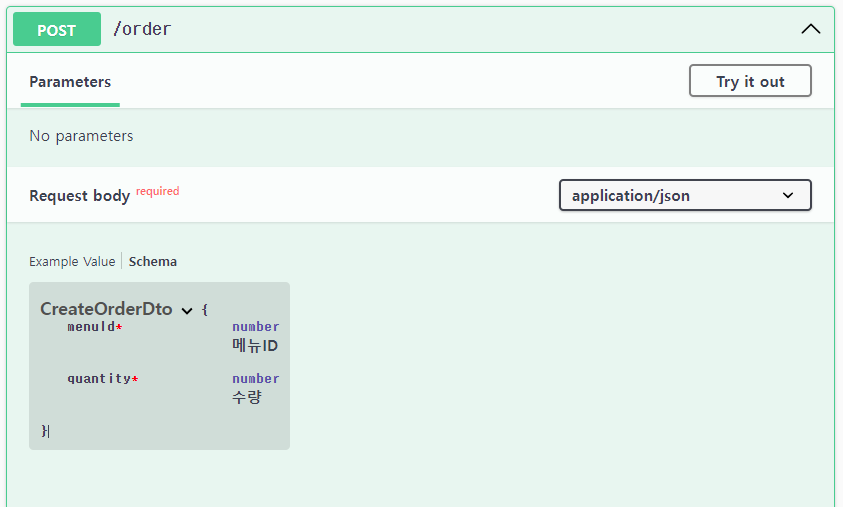
export class CreateOrderDto {
@ApiProperty({ description: '메뉴ID' }) // 데코레이터 추가
@IsNumber()
@IsNotEmpty({ message: 'menuId를 입력해주세요.' })
menuId: number;
@ApiProperty({ description: '수량' }) // 데코레이터 추가
@IsNumber()
@IsNotEmpty({ message: 'quantity를 입력해주세요.' })
quantity: number;
}
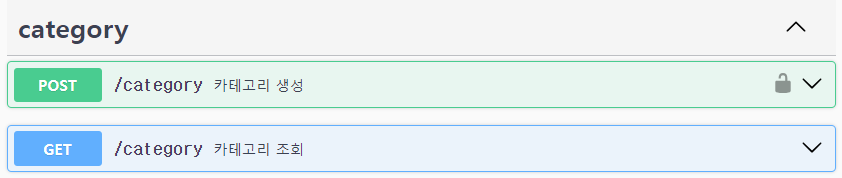
2) cotroller: 기존에 만들어 놨던 controller에 데코레이터 부착.
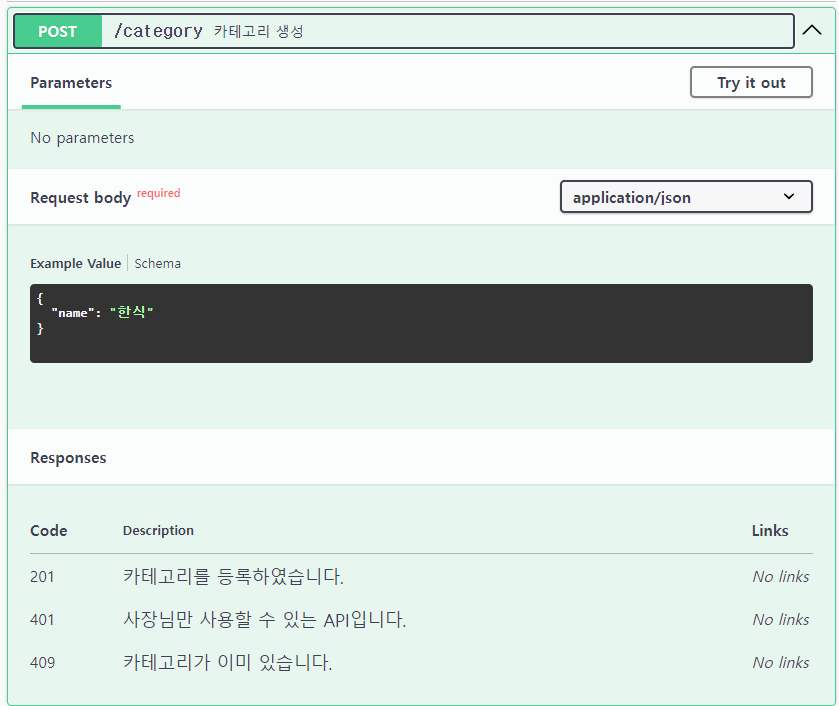
- @ApiOperation : API 동작에 대한 설명 추가 ( summary property )
- @ApiResponse : API의 response 값에 대한 예시 표시 (상태코드에 따른 결과값 표시 가넝 ( status, description property )
- @ApiQuery : query로 받을 값에 대한 명세 표시 ( name, type, enum property )
- @ApiParam : param으로 받을 값에 대한 명세 표시 ( name, type property )
- @ApiBody : body로 받을 값에 대한 명세 표시 ( description, type property )
  @Post()
  @ApiOperation({
    summary: '카테고리 생성',
  })
  @ApiBody({ type: CreateCategoryDto })
  @ApiResponse({
    status: 201,
    description: '카테고리를 등록하였습니다.',
  })
  @ApiResponse({
    status: 401,
    description: '사장님만 사용할 수 있는 API입니다.',
  })
  @ApiResponse({
    status: 409,
    description: '카테고리가 이미 있습니다.',
  })
  async createCategory(@Req() req: Request, @Body() data: CreateCategoryDto) {
    return await this.categoryService.createCategory(req, data.name);
  }
위와 같이 사용해도 되고, 하나하나 상태코드를 적기보다는 아래와 같이도 사용할 수 있다.
  @Post()
  @ApiOperation({
    summary: '카테고리 생성',
  })
  @ApiBody({ type: CreateCategoryDto })
  @ApiCreatedResponse({
    description: '카테고리를 등록하였습니다.',
  })
  @ApiUnauthorizedResponse({
    description: '사장님만 사용할 수 있는 API입니다.',
  })
  @ApiConflictResponse({
    description: '카테고리가 이미 있습니다.'
  })
  async createCategory(@Req() req: Request, @Body() data: CreateCategoryDto) {
    return await this.categoryService.createCategory(req, data.name);
  }
위에서 사용한 응답에 대한 데코레이터말고 추가는 아래의 링크에 제시되어있다.
https://docs.nestjs.com/openapi/operations
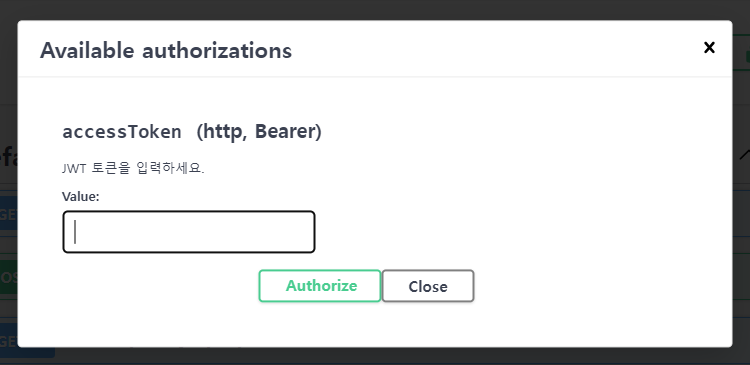
3) 인증 (JWT, ACCESS TOKEN...)
인증 후 사용하는 API의 경우 아래와 같이 코드를 추가해줘야한다.
1) swagger.ts 코드 수정
코드를 꼭 build() 위로 작성해줘야한다.
import { INestApplication } from '@nestjs/common';
import { DocumentBuilder, SwaggerModule } from '@nestjs/swagger';

/**
 * Swagger 세팅
 *
 * @param {INestApplication} app
 */
export function setupSwagger(app: INestApplication): void {
  const options = new DocumentBuilder()
    .setTitle('NestJS Study API Docs')
    .setDescription('NestJS Study API description')
    .setVersion('1.0.0')
    .addBearerAuth( // 하위 코드들 추가
      {
        type: 'http',
        scheme: 'bearer',
        bearerFormat: 'JWT',
        name: 'JWT',
        description: 'JWT 토큰을 입력하세요.',
        in: 'header',
      },
      'accessToken',
    )
    .build();

  const document = SwaggerModule.createDocument(app, options);
  SwaggerModule.setup('api-docs', app, document);
}
2) controller 코드 수정
인증이 필요한 엔드포인트에 ApiBearerAuth('accessToken') 를 넣어준다.
@Post()
@ApiBearerAuth('accessToken') //이거
@ApiOperation({
summary: '카테고리 생성',
})
@ApiBody({ type: CreateCategoryDto })
@ApiCreatedResponse({
description: '카테고리를 등록하였습니다.',
})
@ApiUnauthorizedResponse({
description: '사장님만 사용할 수 있는 API입니다.',
})
@ApiConflictResponse({
description: '카테고리가 이미 있습니다.',
})
async createCategory(@Req() req: Request, @Body() data: CreateCategoryDto) {
return await this.categoryService.createCategory(req, data.name);
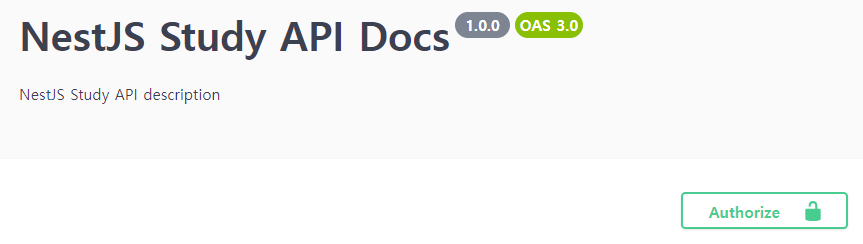
}위와 같이 코드를 입력하고 swagger를 새로고침하면 아래와 같이 authorize 버튼이 생성되면서 accesstoken을 입력할 수 있게 되고, 인증 기능을 추가한 api에는 자물쇠버튼이 생긴걸 알 수 있다.
CLI plugin 사용하기
만약 데코레이터를 저렇게 계속 다는게 별로라고 느낄 때는 cli plugin을 사용하면 된다.
1. nest-cli.json 파일에 코드 추가
{
  "$schema": "https://json.schemastore.org/nest-cli",
  "collection": "@nestjs/schematics",
  "sourceRoot": "src",
  "compilerOptions": {
    "deleteOutDir": true,
    "plugins": [{
      "name": "@nestjs/swagger",
      "options": {
        "classValidatorShim": true,
        "introspectComments": true,
        "controllerKeyOfComment": "summary",
        "dtoKeyOfComment": "description",
        "dtoFileNameSuffix":[
          ".dto.ts",
          ".entity.ts"
        ],
        "controllerFileNameSuffix": ".controller.ts"
      }
    }]
  }
}
2. 아래 주석처럼 사용할 수 있다.
export class CreateOrderDto {
  /**
   * 메뉴ID
   * @example 3
   */
  @IsNumber()
  @IsNotEmpty({ message: 'menuId를 입력해주세요.' })
  menuId: number;

  /**
   *  수량
   * @example 2
   */
  @IsNumber()
  @IsNotEmpty({ message: 'quantity를 입력해주세요.' })
  quantity: number;
}
주석으로 표현하는지 데코레이터로 표현하는지는 취향차이라고 생각했는데 막상 내가 데코레이터를 계속 써보니까 cli plugin을 사용하는 이유를 뼈절이게 알았다.
데코레이터 계속 쓰니까 뭐가 로직코드인지조차 구분이 힘들어졌다.
하지만 확실히 주석으로 표현하니 코드가 눈에 잘들어온다.
cli-plugin
https://docs.nestjs.com/openapi/cli-plugin

시간이 걸릴 뿐 내가 못할 건 없다.