Nginx 설정파일은 기본적으로 nginx.conf 라는 이름을 가지며, /usr/local/nginx/conf 혹은 /etc/nginx, /usr/local/etc/nginx 밑에 존재한다.
설정파일은 directive로 제어되는 모듈로 구성되며, directive는 simple과 block으로 구분된다.
simple의 경우, 공백으로 구분되는 이름과 매개변수, 세미콜론으로 이뤄진다.
block의 경우, simple과 동일한 구조를 가지나, 세미콜론 대신{}로 둘러싸인 추가코드로 이뤄진다.
block directive는 {}내에 또 다른 directive들이 올 수 있으며, 이는 context라고 불린다. (ex: events, http, server, location)
directive 목록들은 이 곳(events .. ), 그리고 이 곳(http, server, location ...)에서 확인할 수 있다.
위 두 개의 링크에 접속하면 구문과 기본값, 그리고 context 유형에 대해 소개되어 있다.
여기서 main유형은 최상위에 작성될 수 있는 http, user 등의 simple 및 block directive를 뜻한다.
기본 생성되는 설정파일에 작성된 것을 포함한 몇 개의 주요 directive들만 조금 더 상세하게 알아보자
Nginx 설치
root@0f275b3768c3:/# apt update
root@0f275b3768c3:/# apt install nginx
root@0f275b3768c3:/# nginx -v
nginx version: nginx/1.24.0 (Ubuntu)
우분투 환경에서 우선 간단한 명령어를 통해 Nginx를 설치했다.
root@0f275b3768c3:/# cat /etc/nginx/nginx.conf
user www-data;
worker_processes auto;
pid /run/nginx.pid;
error_log /var/log/nginx/error.log;
include /etc/nginx/modules-enabled/*.conf;

events {
        worker_connections 768;
        # multi_accept on;
}

http {
		# ...
처음에 소개한대로 /etc/nginx 경로에 설정파일(nginx.conf)이 생성된 것을 확인할 수 있다.
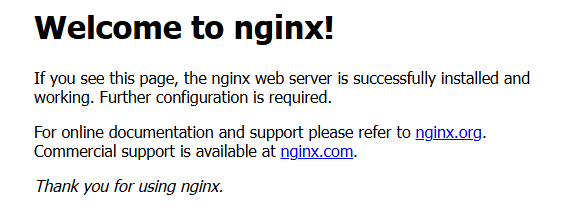
root@0f275b3768c3:/# service nginx start
 * Starting nginx nginx           [ OK ]
service nginx start 명령을 통해 nginx를 시작할 수 있으며,
이후에는 nginx -s {singal} 명령을 통해 중지, 새로고침 등의 명령을 내릴 수 있다.
Simple Directives
Simple Directives는 Nginx를 설치했을 때 자동생성되는 설정파일의 5개 정도만 알아 볼 예정이다.
user user [group];
작업 프로세스의 UID, GID를 결정한다. 기본 설정값은 user nobody nobody 다.
group은 생략이 가능하며, 생략하면 user와 동일한 이름이 사용된다.
root@d1360f22acd1:/# cat /etc/nginx/nginx.conf
user www-data;root@d1360f22acd1:/# ps -ef | grep nginx
root 59 1 0 13:28 ? 00:00:00 nginx: master process /usr/sbin/nginx
www-data 93 59 0 13:32 ? 00:00:00 nginx: worker process작업 프로세스의 UID가 설정파일에 작성한 www-data 인 것을 확인할 수 있다.
root@d1360f22acd1:/# ps -o pid,uid,gid,group,comm -p 93
  PID   UID   GID GROUP    COMMAND
93 33 33 www-data nginxgroup을 생략했으므로, UID와 GID가 같은 것도 확인할 수 있다.
worker_processs number | auto
작업 프로세스의 개수를 결정한다. 기본 설정값은 worker_processes 1; 다.
최적 값은 CPU 코어 수와 데이터를 저장할 디스크 드라이브 수 등에 따라 결정된다.
일반적으로 CPU 코어 수를 선택하는 경우가 있고, auto를 설정하면 자동으로 결정된다.
worker_processes의 값을 2로 설정했을때 ps -ef | grep nginx를 이용해 프로세스 목록을 확인해보자
root@d1360f22acd1:/# cat /etc/nginx/nginx.conf
user www-data;
worker_processes 2;root@d1360f22acd1:/# ps -ef | grep nginx
root 59 1 0 13:28 ? 00:00:00 nginx: master process /usr/sbin/nginx
www-data 93 59 0 13:32 ? 00:00:00 nginx: worker process
www-data 94 59 0 13:32 ? 00:00:00 nginx: worker process
root 96 9 0 13:32 pts/1 00:00:00 grep --color=auto nginx2개의 작업 프로세스가 생성되는 것을 확인할 수 있다.
pid file
root@d1360f22acd1:/# ps -ef | grep nginx
root        59     1  0 13:28 ?        00:00:00 nginx: master process /usr/sbin/nginx
www-data    60    59  0 13:28 ?        00:00:00 nginx: worker process
www-data    61    59  0 13:28 ?        00:00:00 nginx: worker process
www-data    62    59  0 13:28 ?        00:00:00 nginx: worker process
www-data    63    59  0 13:28 ?        00:00:00 nginx: worker process
www-data    64    59  0 13:28 ?        00:00:00 nginx: worker process
www-data    65    59  0 13:28 ?        00:00:00 nginx: worker process
www-data    66    59  0 13:28 ?        00:00:00 nginx: worker process
www-data    67    59  0 13:28 ?        00:00:00 nginx: worker process
www-data    68    59  0 13:28 ?        00:00:00 nginx: worker process
www-data    69    59  0 13:28 ?        00:00:00 nginx: worker process
www-data    70    59  0 13:28 ?        00:00:00 nginx: worker process
www-data    71    59  0 13:28 ?        00:00:00 nginx: worker process
root        87     9  0 13:30 pts/1    00:00:00 grep --color=auto nginx
root@d1360f22acd1:/# cat /run/nginx.pid
59
메인 프로세스의 PID를 저장할 파일경로를 file로 지정한다. 기본 설정값은 pid logs/nginx.pid; 다.
12개의 작업 프로세스와 1개의 마스터 프로세스를 확인할 수 있으며,
그 중에서 마스터 프로세스의 pid가 설정파일의 pid와 동일한 것을 확인할 수 있다.
error_log file [level]
로그가 저장될 경로를 file로 결정한다. 기본 설정값은 error_log logs/error.log error; 다.
stderr을 경로에 입력하면 표준 오류파일을 선택한다.
level 파라미터는 로깅의 레벨을 결정한다. ( debug, info, notice, warn, error, crit, alert, emerg )
작성 순서대로 오른쪽으로 갈수록 심각도가 증가하는 레벨을 의미한다. 특정 로깅레벨을 결정하면 그것보다 심각한 수준레벨의 로그가 모두 출력된다. 즉, debug를 선택하면 모든 레벨의 로그가 출력된다.
debug로그를 출력하기 위해서는 이 문서를 참고하자
root@d1360f22acd1:/# cat /etc/nginx/nginx.conf
user www-data;
worker_processes 2;
pid /run/nginx.pid;
error_log /var/log/nginx/error.log info;
...root@d1360f22acd1:/# cat /var/log/nginx/error.log
2024/12/12 13:55:28 [notice] 59#59: using the "epoll" event method
2024/12/12 13:55:28 [notice] 59#59: start worker processes
2024/12/12 13:55:28 [notice] 59#59: start worker process 125
2024/12/12 13:55:28 [notice] 59#59: start worker process 126
2024/12/12 13:55:29 [notice] 59#59: signal 17 (SIGCHLD) received from 93
2024/12/12 13:55:29 [notice] 59#59: worker process 93 exited with code 0
2024/12/12 13:55:29 [notice] 59#59: worker process 94 exited with code 0
2024/12/12 13:55:29 [notice] 59#59: signal 29 (SIGIO) receivedlevel을 info로 설정하고 해당 파일을 살펴보면 notice 레벨의 로그들도 출력된 것을 볼 수 있다.
include file | mask
file형식으로 직접 경로를 입력하거나 mask형식으로 매칭되는 파일들을 설정파일에 추가한다.
포함되는 파일은 구문적으로 올바른 directive와 block으로 구성되어야 한다.
main context가 아닌 어느 위치에도 올 수 있다
Block Directives
주요 directive들인 events, http, server, location 등에 대해 알아볼 예정이다.
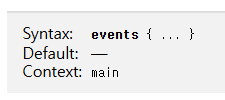
events { ... }
연결처리에 영향을 미치는 설정들을 지정할 수 있는 블록이다.
이벤트 처리 방식(use)이나 작업 프로세스가 처리할 수 있는 최대 동시 연결 수(worker_connections), 작업 프로세스가 한번에 여러개의 연결을 허락할지(multi_accept) 등을 블록내에 작성할 수 있다.
worker_processes와worker_connections의 곱한 값이 전체 연결 수가 된다.
http { ... }
HTTP 프로토콜과 관련된 전반적인 설정들을 작성할 수 있는 블록이다.
SSL, 로깅, Gzip, 가상 호스트 등의 설정들을 작성할 수 있고, server block directive를 작성할 수 있다.
몇개의 작성가능한 directive들을 살펴보자
sendfile on | off: 파일전송 효율을 높이기 위한sendfile()시스템 콜의 사용 여부를 설정한다.( 기본 off )tcp_nopush on: 작은 패킷들을 하나로 묶어서 파일 전송성능을 최적화하기 위한 설정한다. ( 기본 off )
sendfile on이어야만 동작한다.types_hash_max_size 2048: MIME Type( =Media Type) 매핑을 위한 해시 테이블의 크기를 설정한다.( 기본 1024 )
server { ... }
가상서버 설정들을 작성할 수 있는 블록이다. 이 곳에 작성된 정보에 대한 요청들을 처리한다.
IP기반( IP주소 )과 이름 기반( HOST 요청 헤더 값 )의 가상서버간 명확한 구분이 존재하지 않는다.
listen directive를 통해 IP주소, 포트를 작성할 수 있다.
listen 127.0.0.1:8000;
listen 127.0.0.1;
listen 8000;
listen *:8000;
listen localhost:8000;
server_name directive를 통해 서버 이름목록들을 작성할 수 있다.
server {
server_name example.com www.example.com;
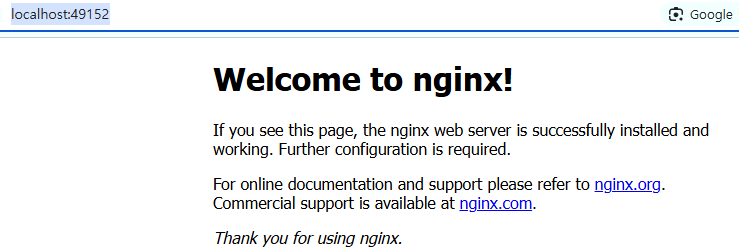
}http {
server{
listen 49152;
server_name my-nginx.net www.my-nginx.net;
}
}설정파일에 49152포트와 my-nginx.net 등의 서버이름을 설정해주면 아래와 같이 해당 포트와 이름으로 접속이 가능해진다.
다만, 서버이름에 해당되는 도메인으로 접속하고 싶다면 DNS 설정이 필요하다
Nginx의 요청 처리흐름에 대해서는 이 곳에서 확인할 수 있다.
location { ... }
server와 location 밑에서 서버로 들어오는 요청의 경로에 따른 설정들을 작성할 수 있는 블록이다.
location = / {						# ex : `/`
    [ configuration A ]
}

location / {						# ex : `/index.html`
    [ configuration B ]
}

location /documents/ {				# ex : `/documents/document.html`
    [ configuration C ]
}

location ^~ /images/ {				# ex : `/images/1.gif`
    [ configuration D ]
}

location ~* \.(gif|jpg|jpeg)$ {		# ex : `/documents/1.jpg`
    [ configuration E ]
}
위와 같은형식으로 특정 경로로 들어온 요청들을 따로 처리하는게 가능하다.
location에 입력한 경로가 /로 끝나고, 요청이 proxy_pass, fastcgi_pass, uwsgi_pass, scgi_pass, memcached_pass, grpc_pass로 처리되면, 해당 경로와 동일하지만 마지막에 /가 오지않는 요청에 대해 301 redirect가 수행된다.
location /user/{
	proxy_pass https://velog.io/;
}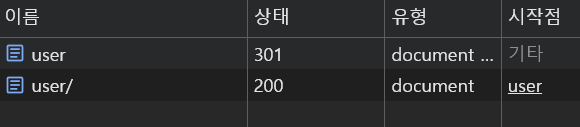
즉, 이렇게 설정되어 있다면 /user 요청은 /user/로 301 redirect되고, 최종적으로 https://velog.io/으로 전달된다.
만약, 이런 상황을 원하지 않는다면 따로 locatiuon 블록을 작성하면 된다.
location /user/{
	proxy_pass https://velog.io/;
}

location = /user{
	proxy_pass https://www.youtube.com;
}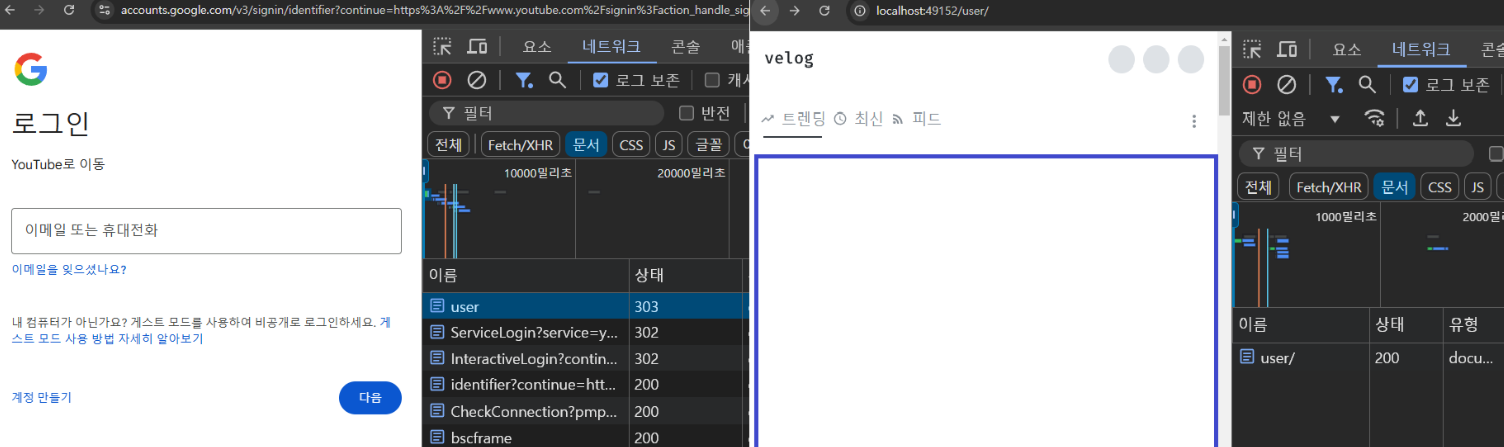
이렇게되면 /user 요청은 https://www.youtube.com으로, /user/요청은 https://velog.io/으로 전달된다.
