Spring Security 아키텍처
현재 생성한 프로젝트는 Spring MVC를 사용한다.
Spring은 Servlet과 Reactive 두 가지의 웹 스택을 제공하는데, MVC구조의 프로젝트는 Servlet 스택에 해당된다.
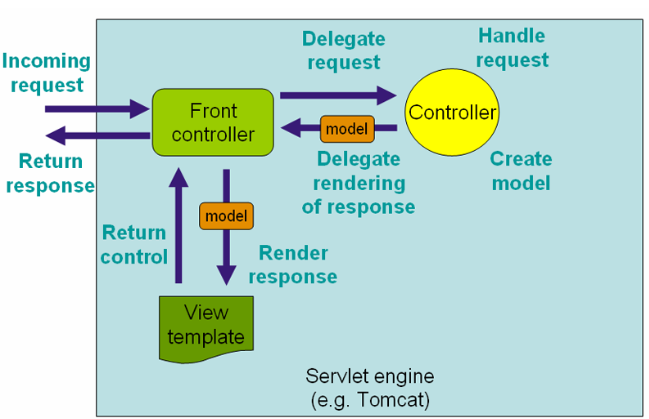
Spring MVC는 DispatcherServlet이 FrontController의 역할로 동작한다.
요청을 수행할 컨트롤러를 찾고, 뷰를 반환하는 등의 동작을 수행한다.
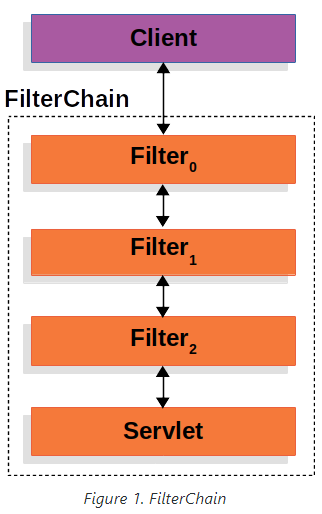
스프링 시큐리티의 서블릿 환경은 Servlet Filter 기반으로 동작한다.
Spring MVC 환경에서 단일 HTTP 요청이 DispatcherServlet에 도착하기까지 여러가지의 필터들을 거치게 된다.
필터와 서블릿에서는 HttpServletRequest와 HttpServletResponse를 조작할 수 있다.
다음 필터 혹은 서블릿으로의 진행을 막거나,
HttpServletRequest와 HttpServletResponse를 수정할 수 있다.
각 필터는 다음 필터 혹은 서블릿에 영향을 끼치기 때문에 필터들의 실행 순서가 중요하다.
( 예를들어, 인가의 경우 인증 이후에 동작해야한다 )
DelegatingFilterProxy
필터의 동작시점은 Incoming request와 Return response 위치에 해당한다. Bean의 영역 밖에 위치하기에 일반적으로 Spring의 관리하에 놓이지 않는다. 이를 해결하기위해 스프링 시큐리티에서는 DelegatingFilterProxy 구현체를 사용한다.
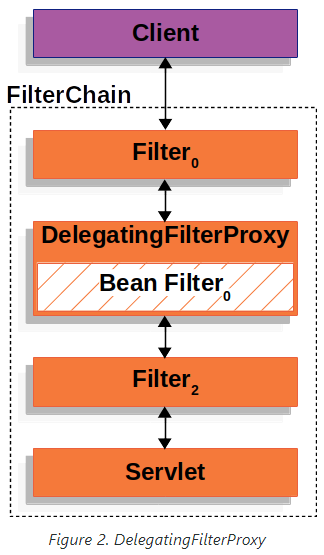
기본 구성은 필터체인에 등록된 DelegatingFilterProxy에서 Bean으로 등록된 필터를 대신 실행하는 구조다.
실제 필터 동작이 따로 관리되기 때문에 DI, AOP같은 Spring 기능을 이용할 수 있게된다.
정리하자면 서블릿 필터로 등록되는 필터는 DelegatingFilterProxy이고, 실제로 필터로직이 작성되는 곳은 Spring 의 관리하에 있게된다는 말이다.
public void doFilter(ServletRequest request, ServletResponse response, FilterChain chain) {
	Filter delegate = getFilterBean(someBeanName); // 여기서 Bean 초기화
	delegate.doFilter(request, response);
}
슈도 코드에서 볼 수 있듯이 실제 필터의 동작시점인 doFilter 호출 이전에 Bean을 초기화하고 준비할 수 있다.
FilterChainProxy와 SecurityFilterChain
인증, 인가, 보안등의 목적으로 사용되는 필터들은 FilterChainProxy에 의해 관리되며, 특정한 순서를 가지고 실행된다( ex : 인증 이후에 인가 )
필터의 동작순서는 이곳에서 확인할 수 있다.
예를들어, 아래 필터들은 나열한 순서대로 동작한다.
- CSRF 필터(
csrf) - UsernamePasswordAuthentication 필터 (
formLogin) - BasicAuthentication 필터 (
httpBasic) - Authorization 필터(
authorizeHttpRequests)
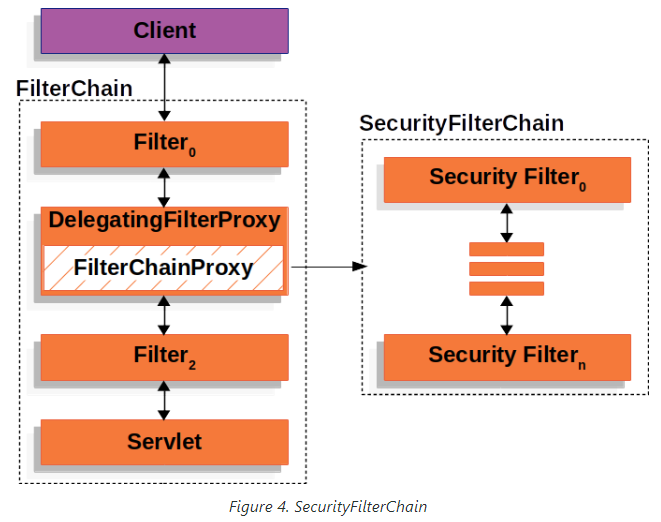
FilterChainProxy는 DelegatingFilterProxy에 의해 실행되는 Spring Bean이기 때문에 Spring의 기능들을 사용할 수 있다.
해당 프록시빈을 통해 ServletFilterChain에서 SecurityFilterChain라는 또 다른 필터체인이 동작하는 구조를 띈다.
FilterChainProxy를 통해 SecurityFilterChain가 동작하기에 오는 몇 가지의 장점이 있다.
- 디버그 포인트로 잡기 적절하다
스프링 시큐리티 서블릿 환경의 시작위치에 해당하기에 디버그 포인트로 설정하기에 좋다.- 핵심적인 작업 수행 위치로 적절하다
FilterChainProxy는 스프링 시큐리티의 핵심 구성 요소이기에 핵심적인 작업을 수행하는 위치로 적절하다
( ex : 메모리 부족을 피하기위해SecurityContext를 초기화 )- SecurityFilterChain의 호출 시기를 결정하는데 유연하다
서블릿 컨테이너의 필터는 URL 정보만을 기반으로 실행된다. 반면, FilterChainProxy는 HttpServletRequest에 있는 여러 요청 정보를 기반으로 실행을 결정할 수 있다. RequestMatcher를 통해 URL, 메서드, 헤더, 파라미터 등의 요청속성에 따라 FilterChain의 실행을 제어할 수 있다.
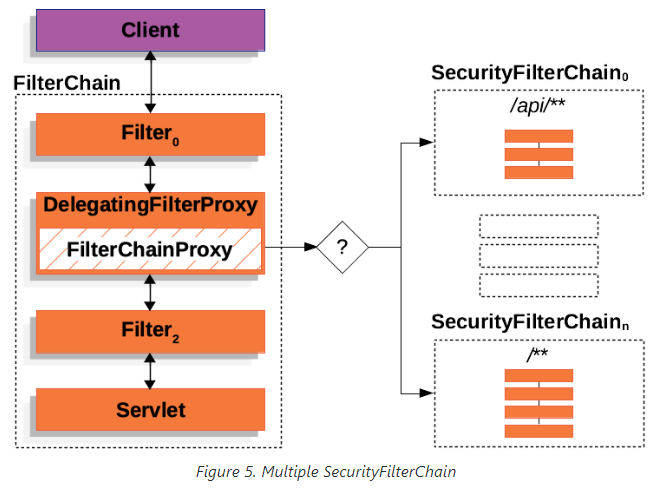
위 이미지와 같이 RequestMatcher를 통해 주어진 속성에 따라 원하는 필터체인을 독립적으로 관리하고, 동작시킬 수 있다
커스텀 필터 추가
public class TenantFilter implements Filter {

    @Override
    public void doFilter(ServletRequest servletRequest, ServletResponse servletResponse, FilterChain filterChain) throws IOException, ServletException {
        HttpServletRequest request = (HttpServletRequest) servletRequest;
        HttpServletResponse response = (HttpServletResponse) servletResponse;

        String tenantId = request.getHeader("X-Tenant-Id");
        boolean hasAccess = isUserAllowed(tenantId);
        if (hasAccess) {
            filterChain.doFilter(request, response);
            return;
        }
        throw new AccessDeniedException("Access denied");
    }

}SecurityFilterChain에 커스텀 필터를 추가하고 싶다면 Filter 또는 OncePerRequestFilter 등을 상속하는 필터를 만들면 된다. 주의해야할 점으로 필터의 동작시기를 파악해야한다.
인증목적의 커스텀 필터를 만드는 것이라면
AbstractAuthenticationProcessingFilter를 구현하는게 적절하다
예를들어, TenantFilter는 현재 사용자의 요청헤더에 있는 tenantId를 검증하여 해당 tenant에 접근할 수 있는지 확인하는 필터다.
인증된 사용자를 대상으로 인가가 가능한지 확인하는 필터이기 때문에 반드시 인증( Authentication )필터 이후에 동작해야 한다.
@Bean
SecurityFilterChain filterChain(HttpSecurity http) throws Exception {
    http
        // ...
        .addFilterBefore(new TenantFilter(), AuthorizationFilter.class);
    return http.build();
}
따라서, 필터를 AuthorizationFilter 동작 이전에 위치하도록 작성해주면 된다.
( addFilterAfter를 이용해도 된다 )
커스텀 필터 생성과
@Component
Servlet,Filter,Listener인스턴스는 내장 컨테이너에 의해 Spring Bean으로 등록된다.
만약, 커스텀 필터에@Component를 설정하면 서블릿 컨테이너와 스프링 시큐리티 필터체인에 의해 2번 실행될 수 있다.@Bean public FilterRegistrationBean<TenantFilter> tenantFilterRegistration(TenantFilter filter) { FilterRegistrationBean<TenantFilter> registration = new FilterRegistrationBean<>(filter); registration.setEnabled(false); return registration; }만일 커스텀 필터에서 Spring 기능을 이용하고 싶다면
FilterRegistrationBean의setEnabled(false)를 통해 컨테이너를 통한 자동등록을 막아주면 된다.
보안 예외 처리
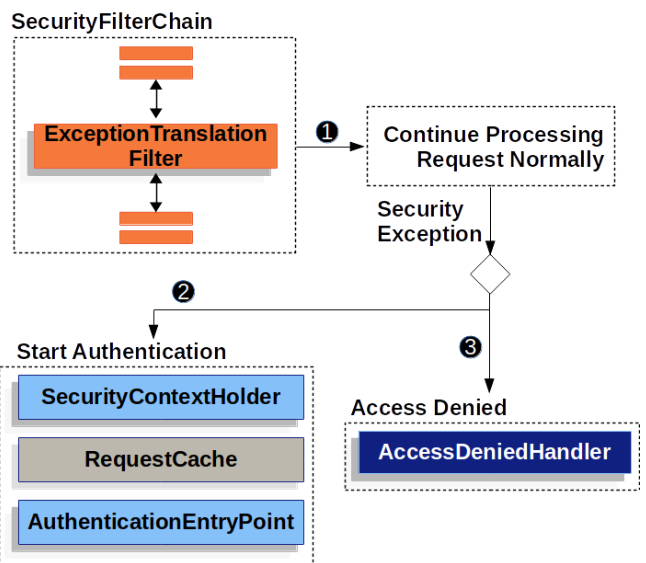
ExceptionTranslationFilter는 AccessDeniedException와 AuthenticationException를 HTTP 응답으로 변환하는 필터다.
try {
	filterChain.doFilter(request, response);
} catch (AccessDeniedException | AuthenticationException ex) {
	if (!authenticated || ex instanceof AuthenticationException) {
		startAuthentication();
	} else {
		accessDenied();
	}
}
슈도 코드로 표현하면 위와 같으며, 설명을 아래와 같다.
- 필터체인을 수행하면서
AccessDeniedException와AuthenticationException이벤트를 감지한다.AuthenticationException이거나 사용자가 인증되지 않았을 경우 인증절차를 수행한다.
- SecurityContextHolder를 비운다.
- 인증 성공시, 요청을 복구하기 위해
RequestCache의 구현체를 이용해HttpServletRequest를 저장한다.- 클라이언트에게 인증정보를 요구하기 위해
AuthenticationEntryPoint를 사용한다.AccessDeniedException의 경우, 접근 거부를 의미한다.
인증( Authentication ) 아키텍처
인증( Authentication )은 시스템에 접근이 가능한 유저인지 확인하는 절차를 의미한다.
SecurityContextHolder
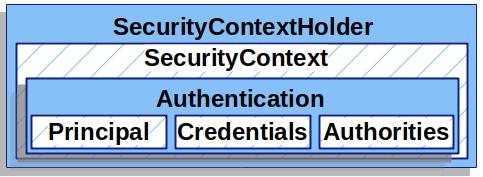
스프링 시큐리티 인증모델의 핵심으로 인증된 유저를 저장하는 역할이며, SecurityContext가 저장된다.
SecurityContext context = SecurityContextHolder.createEmptyContext();
Authentication authentication =
    new TestingAuthenticationToken("username", "password", "ROLE_USER");
context.setAuthentication(authentication);

SecurityContextHolder.setContext(context);
인증된 유저정보를 이용하여 SecurityContext를 생성하고, 저장하여 관리한다.
SecurityContext context = SecurityContextHolder.getContext();
Authentication authentication = context.getAuthentication();
String username = authentication.getName();
Object principal = authentication.getPrincipal();
Collection<? extends GrantedAuthority> authorities = authentication.getAuthorities();
저장되어있는 유저정보를 받아오는 것 또한 가능하다.
기본적으로 SecurityContextHolder는 ThreadLocal을 이용하여 이러한 정보를 저장한다.
즉, 메서드 인수를 통해 명시적으로 SecurityContext를 전달하지 않아도 동일한 스레드에서 항상 사용할 수 있다.
FilterChainProxy는 요청이 처리되고 나서 SecurityContext가 삭제됨을 보장하기에 다음 요청이 이전 요청의 SecurityContext에 영향을 받지 않는다.
요청 간 사용자 정보는
SecurityContextRepository에서 관리한다
만약, ThreadLocal이 아닌 다른 방법으로 SecurityContext들을 관리하고 싶다면 SecurityContextHolder의 전략을 변경하면 된다.
SecurityContextHolder.MODE_GLOBAL: 모든 스레드에서 동일하게 유지SecurityContextHolder.MODE_INHERITABLETHREADLOCAL: 보안 스레드에서 파생된 스레드들은 동일하게 유지SecurityContextHolder.MODE_THREADLOCAL: 스레드별 관리
이러한 전략 변경은 시스템 property 또는 SecurityContextHolder의 static 메서드를 이용하면 된다.
Authentication
SecurityContext의 구성요소로, 스프링 시큐리티에서 두 가지 주요목적으로 사용되는 인터페이스다.
- 사용자가 입력한 자격 증명을 제공하기 위해
AuthenticationManager에 전달
이 경우,isAuthenticated()의 결과는false다- 현재 인증된 유저정보를 대표
principal, credentials, authorities로 구성된다.
principal: 사용자 식별의 용도로, username/password로 인증할 때는 종종UserDetails의 인스턴스가 된다credentials: 종종 비밀번호가 저장되며, 대부분의 경우 사용자 인증 이후 비밀번호 유출을 막기위해 초기화된다authorities:GrantedAuthority의 인스턴스로 유저에게 부여된 권한을 의미한다( ex : role, scope )
GrantedAuthority사용자에게 부여된 권한을 의미하며,
Authentication.getAuthorities()를 통해 얻을 수 있다.
관리자, 감독관같은 Role이 부여되는 경우가 대다수다. 이러한 Role은 인가 상황에서 사용된다.username/password로 인증한 상황에서
GrantedAuthority인스턴스는 주로UserDetailsService에 의해 부여된다.일반적으로
GrantedAuthority는 애플리케이션 전역적인 권한을 의미한다.
즉, 특정한 도메인 객체에 대한 권한이 따로 존재하지 않는다. 이는 메모리 관리나 사용자 인증시간 등의 이유가 있다.
AuthenticationManager
스프링 시큐리티의 필터가 인증을 수행하는 방법을 정의한 클래스다.
AuthenticationManager를 호출한 Filter 인스턴스에 의해 SecurityContextHolder에 Authentication이 저장된다.
Filter 인스턴스와 통합하지 않는 경우에는 AuthenticationManager를 사용하지않고 SecurityContextHolder에 직접 설정하면 된다.
가장 일반적인 구현체로 ProviderManager가 있다.
ProviderManager

리스트 형태의 AuthenticationProvider 인스턴스들을 위임하고 있다.
각 AuthenticationProvider들은 각자의 인증 수행방법을 가지고 있으며,
인증의 성공/실패/결정불가 를 표시하고 다음 AuthenticationProvider로 넘어간다.
만약, 모든 AuthenticationProvider를 이용해도 인증이 불가능하다면 ProviderNotFoundException와 함께 인증이 실패한다.
AuthenticationEntryPoint
사용자로부터 자격증명 정보를 얻기위한 HTTP 응답을 전송하기 위해 사용된다.
예를들어, username과 password을 요구하기위해 Login 페이지로 리다이렉트 할 수 있다.
AbstractAuthenticationProcessingFilter
유저의 자격증명을 인증하기 위한 기본 필터로 사용된다.
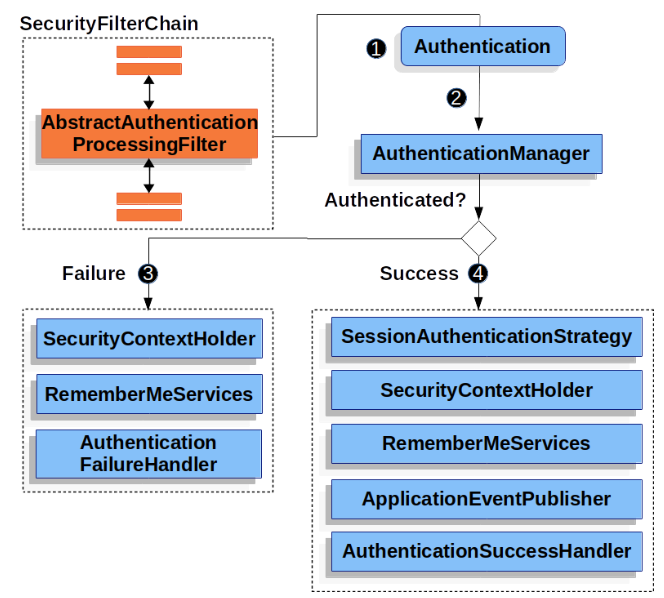
AbstractAuthenticationProcessingFilter를 통해 유저의 자격증명을Authentication으로 가공AuthenticationManager를 통해AuthenticationProvider들을 거쳐 인증
2-1. 실패한 경우,SecurityContextHolder를 비우는 등의 작업을 수행하고,AuthenticationFailureHandler수행Authentication을SecurityContextHolder에 저장하는 등의 작업을 수행하고,AuthenticationSuccessHandler수행
인가( Authorization ) 아키텍처
인가( Authorization )란, 특정 리소스에 대한 접근 권한 및 정책을 지정하는 기능을 의미한다.
보통 사용자 인증( Authentication )이라는 사전절차가 필요하다.
Authorities
인증( Authentication ) 객체에는 Principal, Credentials, Authorities가 저장된다
public static UsernamePasswordAuthenticationToken authenticated(Object principal, Object credentials,
	Collection<? extends GrantedAuthority> authorities) {
	return new UsernamePasswordAuthenticationToken(principal, credentials, authorities);
}
예를들어, form로그인에 사용되는 UsernamePasswordAuthenticationToken를 살펴보면 인증된 토큰을 생성하는 팩토리 메서드에서 앞선 3가지의 인수를 받는 것을 확인할 수 있다.
Authorities는 GrantedAuthority타입이어야 하며, Principal에 부여된 권한들을 의미한다.
인증이 완료되고나면 AccessDecisionManager의 인스턴스에서 인가결정이 이뤄진다.
Spring Security 6 기준,
AccessDecisionManager는AuthorizationManager로 대체되었다
String getAuthority();이렇게 저장된 GrantedAuthority 타입의 객체들은 문자열의 형태로 표현된다.
만약, 문자열로 표현할 수 없는 경우에는 null이 반환된다.
즉, 단순한 문자열의 형태가 아니라면 별도의 GrantedAuthority 구현체 등을 이용하여 문자열로 변환하는 수단을 넣어줘야한다.
Spring Seucrity에서는
SimpleGrantedAuthority라는 뼈대 구현체를 제공한다
기본적으로 role-based 인가 규칙은 접두사에 ROLE_을 추가해야한다. 즉, USER는 ROLE_USER가 된다.
만약 이를 수정하고 싶다면 GrantedAuthorityDefaults를 이용하여 변경이 가능하다
@Bean
static GrantedAuthorityDefaults grantedAuthorityDefaults() {
	return new GrantedAuthorityDefaults("MYPREFIX_");
}
Invocation Handling
스프링 시큐리티는 메서드 실행, web 요청과 같은 보안 개체들에 대한 접근 제어 인터셉터를 제공한다.
AuthorizationManager 인스턴스를 통해 호출 전의 진행여부와 호출 후 주어진 값의 반환여부 등을 결정할 수 있다.
AuthorizationManager
AccessDecisionManager와 AccessDecisionVoter를 대체하는 클래스다.
스프링 시큐리티의 request-based, method-based, message-based 인가 컴포넌트에 의해 호출되며 최종 접근제어 결정을 내린다.
AuthorizationDecision check(Supplier<Authentication> authentication, Object secureObject);

default AuthorizationDecision verify(Supplier<Authentication> authentication, Object secureObject)
        throws AccessDeniedException {
    // ...
}
check() 는 authentication과 secureObject를 인수로 받아 사용자가 특정 작업을 수행할 권한이 있는지 결정하는 역할을 한다.
예를들어, secureObject가 MethodInvocation라고 가정해보자.
MethodInvocation은 어떤 메서드가 호출되었고, 어떤 인수가 전달되었는지와 같은 메서드 호출에 대한 정보를 담고 있다.
이때, MethodInvocation에 Customer라는 인수가 존재한다면 check()에서는 주어진 Authentication에게 Customer에 대한 작업권한이 있는지를 확인한다.
verify() 는 check()를 호출하며, 부정적인 반환결과인 경우 AccessDeniedException 예외를 발생시킨다.
Delegate 기반 AuthorizationManager 구현체
사용자가 직접 AuthorizationManager를 구현하지 않아도 Spring Security에서 제공하는 여러 AuthorizationManager 구현체들을 사용할 수 있다.
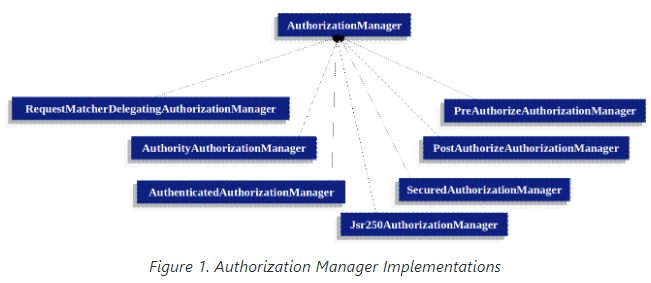
AuthorityAuthorizationManager
스프링 시큐리티에서 제공하는 가장 일반적인 AuthorizationManager 다.
주어진 Authentication이 authorities 집합에 있는 authorities를 포함하고 있다면 긍정적인 AuthorizationDecision를 반환한다.
AuthenticatedAuthorizationManager
익명 사용자 / 완전 인증된 사용자 / remember-me 사용자를 구별하는 용도로 사용된다.
Hierarchical Roles
역할 계층 구조를 통해 다른 역할이나 권한을 포함하는 역할을 구성할 수 있다.
예를들어, 관리자와 사용자 역할이 있는 응용프로그램에서 관리자가 사용자의 모든 권한을 포함하도록 구성하려는 상황이 있다.
스프링 시큐리티에서는 이러한 역할 계층 구조를 위해 아래의 방법들을 지원한다.
필터 기반인
HttpSecurity#authorizeHttpRequests
메서드 기반인DefaultMethodSecurityExpressionHandler
애노테이션 기반인@Secured를 이용하는SecuredAuthorizationManager
애노테이션 기반의JSR-250애노테이션을 이용하는Jsr250AuthorizationManager
@Bean
static RoleHierarchy roleHierarchy() {
    return RoleHierarchyImpl.withDefaultRolePrefix()
        .role("ADMIN").implies("STAFF")
        .role("STAFF").implies("USER")
        .role("USER").implies("GUEST")
        .build();
}

// and, if using pre-post method security also add
@Bean
static MethodSecurityExpressionHandler methodSecurityExpressionHandler(RoleHierarchy roleHierarchy) {
	DefaultMethodSecurityExpressionHandler expressionHandler = new DefaultMethodSecurityExpressionHandler();
	expressionHandler.setRoleHierarchy(roleHierarchy);
	return expressionHandler;
}
위 코드는 DefaultMethodSecurityExpressionHandler를 사용하는 방법이다.
ROLE_ADMIN ⇒ ROLE_STAFF ⇒ ROLE_USER ⇒ ROLE_GUEST 순으로 이어지는 역할 계층 구조를 나타내며,
ROLE_ADMIN에 해당하는 유저라면 모든 역할에 해당하는 권한을 가지고 있게된다.
Legacy Authorization Components( @Deprecated )
과거에 사용되던 컴포넌트들로 이를 사용하기 보다는
AuthorizationManager를 사용하는게 권장된다.
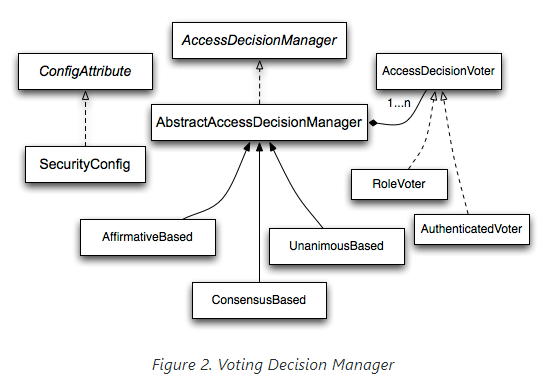
AccessDecisionManager
void decide(Authentication authentication, Object secureObject,
	Collection<ConfigAttribute> attrs) throws AccessDeniedException;

boolean supports(ConfigAttribute attribute);

boolean supports(Class clazz);
최종 접근 제어 결정과 관련된 컴포넌트로 AbstractSecurityInterceptor에 의해 호출된다.
decide : AuthorizationManager#check와 동일한 역할
supports(ConfigAttribute) : AbstractSecurityInterceptor에 의해 호출되며, AccessDecisionManager가 전달한 ConfigAttribute들을 처리할 수 있는지 확인
supports(Class) : AccessDecisionManager가 전달된 secureObject를 처리할 수 있는지 확인
Voting 기반 AccessDecisionManager 구현체
스프링 시큐리티에서 제공하는 voting기반의 AccessDecisionManager 구현체들을 의미한다.
자세한 사항이 궁금하면 공식문서 하단의 부분을 확인해보자
