설정
요약
스프링 시큐리티는 인증 (Authentication) ,권한(Authorize) 부여 및 보호 기능을 제공하는 프레임워크다.
이러한 스프링 시큐리티를 사용하기 위해선 설정을 해야하는데,
Filter Chain을 애플리케이션의 니즈에 맞게 설정하여 직접 등록해줘야만 한다.
필터체인 내부의 필터들은 각각 doFilter()
라는 메서드를 담고 있다. 필터에 해당하는 작업을 하고, 다음 필터로 넘어가는 것이다.
각각의 필터를 모두 통과한 이후에는 Dispatcher Servlet에 의해 적절한 Controller에 요청이 위임될 것이다.
@Configuration
@EnableWebSecurity // 스프링 시큐리티 필터가 스프링 필터체인에 등록이 됨.
public class SecurityConfig {
		@Bean
		public SecurityFilterChain filterChain(HttpSecurity http) throws Exception {
				return http
                // stateless한 rest api를 개발할 것이므로 csrf 공격에 대한 옵션은 꺼둔다.
 				.csrf(AbstractHttpConfigurer::disable)

				// 특정 URL에 대한 권한 설정.
                .authorizeHttpRequests((authorizeRequests) -> {
                    authorizeRequests.requestMatchers("/user/**").authenticated();

                    authorizeRequests.requestMatchers("/manager/**")
                            // ROLE_은 붙이면 안 된다. hasAnyRole()을 사용할 때 자동으로 ROLE_이 붙기 때문이다.
                            .hasAnyRole("ADMIN", "MANAGER");

                    authorizeRequests.requestMatchers("/admin/**")
                            // ROLE_은 붙이면 안 된다. hasRole()을 사용할 때 자동으로 ROLE_이 붙기 때문이다.
                            .hasRole("ADMIN");

                    authorizeRequests.anyRequest().permitAll();
                })

                .formLogin((formLogin) -> {
                /* 권한이 필요한 요청은 해당 url로 리다이렉트 */
				    formLogin.loginPage("/login");
                })

                .build();
		}
}
간단한 필터체인
WebSecurityConfigurerAdapter 쓰던데요?
일단 WebSecurityConfigurerAdapter가 deprecated 되었다.
따라서 이를 상속하여 configure 함수를 오버라이딩 하는 식으로 개발하는 것이 아니라, 아예 자체적으로 SecurityFilterChain Bean을 생성하는 방식으로 바뀌었다.
우선, 기존의 HttpSecurity 의 무분별한 메서드 체이닝을 지양하도록 바뀌었다.
// 기존의 메서드 체이닝 방식
.csrf().disable()

.sessionManagement().sessionCreationPolicy(...)

.and()
.authorizeHttpRequests()
// ...
코드를 보면 알겠지만, 기존에는 전혀 관계가 없는 요소들 끼리도 서로 직렬로 연결해서 사용했다.
// 수정된 메서드 체이닝 방식
.csrf(이곳에 CSRF 설정을 위한 함수)

.sessionManagement(이곳에 세션 설정을 위한 함수)

.authorizeHttpRequests(이곳에 인가 설정을 위한 함수);

shon5544.log 님이 아주 설명을 너무 잘해주셨다.
특징
- Filter를 기반으로 동작한다.
- Spring MVC와 분리되어 관리하고 동작할 수 있다.
- Bean으로 설정할 수 있다.
- Spring Security 3.2부터는 XML설정을 하지 않아도 된다.
구조
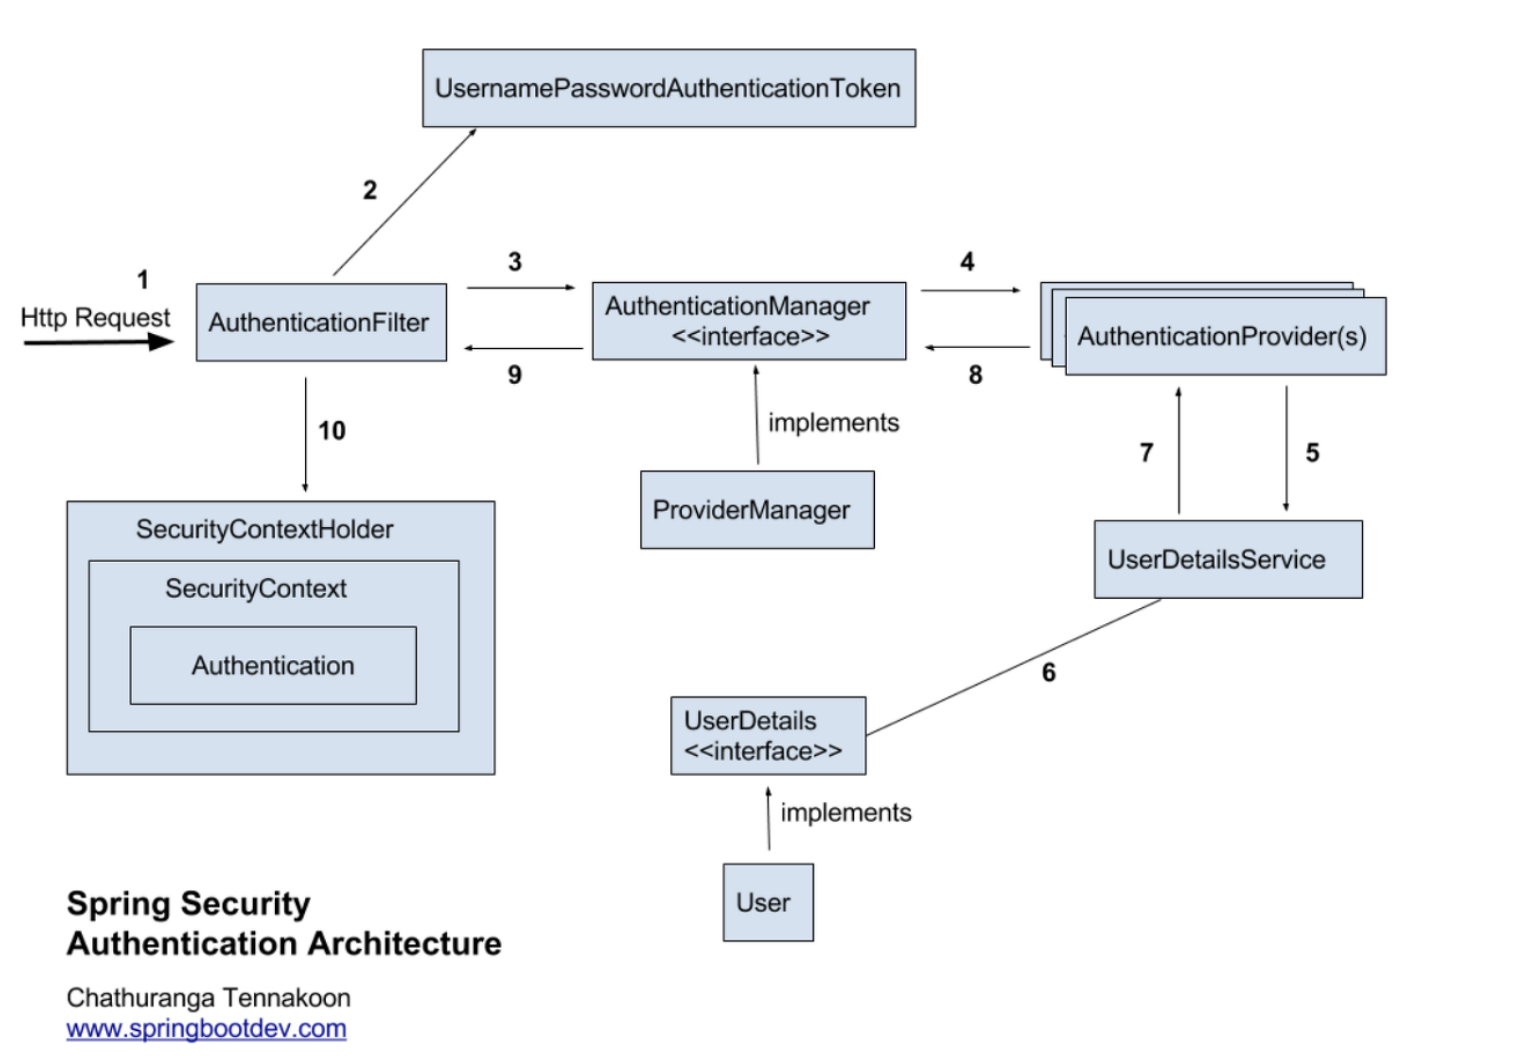
Spring Security Architecture(구조)
1. Http Request 수신
-> 사용자가 로그인 정보와 함께 인증 요청을 한다.
2. 유저 자격을 기반으로 인증토큰 생성
-> AuthenticationFilter가 요청을 가로채고, 가로챈 정보를 통해 UsernamePasswordAuthenticationToken의 인증용 객체를 생성한다.
3. FIlter를 통해 AuthenticationToken을 AuthenticationManager로 위임
-> AuthenticationManager의 구현체인 ProviderManager에게 생성한 UsernamePasswordToken 객체를 전달한다.
4. AuthenticationProvider의 목록으로 인증을 시도
-> AutenticationManger는 등록된 AuthenticationProvider들을 조회하며 인증을 요구한다.
5. UserDetailsService의 요구
-> 실제 데이터베이스에서 사용자 인증정보를 가져오는 UserDetailsService에 사용자 정보를 넘겨준다.
6. UserDetails를 이용해 User객체에 대한 정보 탐색
-> 넘겨받은 사용자 정보를 통해 데이터베이스에서 찾아낸 사용자 정보인 UserDetails 객체를 만든다.
7. User 객체의 정보들을 UserDetails가 UserDetailsService(LoginService)로 전달
-> AuthenticaitonProvider들은 UserDetails를 넘겨받고 사용자 정보를 비교한다.
8. 인증 객체 or AuthenticationException
-> 인증이 완료가되면 권한 등의 사용자 정보를 담은 Authentication 객체를 반환한다.
9. 인증 끝
-> 다시 최초의 AuthenticationFilter에 Authentication 객체가 반환된다.
10. SecurityContext에 인증 객체를 설정
-> Authentication 객체를 Security Context에 저장한다.
최종적으로는 SecurityContextHolder는 세션 영역에 있는 SecurityContext에 Authentication 객체를 저장한다. 사용자 정보를 저장한다는 것은 스프링 시큐리티가 전통적인 세선-쿠키 기반의 인증 방식을 사용한다는 것을 의미한다.
Spring Security의 주요 모듈
UsernamePasswordAuthenticationToken
이 클래스는 Autentication을 구현한 AbstractAuthenticationToken의 하위의 하위클래스로, 유저의 ID가 Principal의 역할을 하고 유저의 Password가 Credential의 역할을 한다. UserPasswordAuthenticationToken의 첫번째 생성자는 인증 전에 객체를 생성하고, 두번째는 인증이 완료된 객체를 생성한다.
public abstract class AbstractAuthenticationToken implements Authentication, CredentialsContainer {
}

public class UsernamePasswordAuthenticationToken extends AbstractAuthenticationToken {

	private static final long serialVersionUID = SpringSecurityCoreVersion.SERIAL_VERSION_UID;

	private final Object principal;

	private Object credentials;

	// 인증 완료 전의 객체 생성
	public UsernamePasswordAuthenticationToken(Object principal, Object credentials) {
		super(null);
		this.principal = principal;
		this.credentials = credentials;
		setAuthenticated(false);
	}

	// 인증 완료 후의 객체 생성
	public UsernamePasswordAuthenticationToken(Object principal, Object credentials,
			Collection<? extends GrantedAuthority> authorities) {
		super(authorities);
		this.principal = principal;
		this.credentials = credentials;
		super.setAuthenticated(true); // must use super, as we override
	}
수업에서 들었던 한가자의 모듈만 정리 할 예정,
시간이 지나면 다른 모듈도 사용해보며 대비해보자