소개글
요즘 소마에서 프로젝트를 해보며 개발 기술들에 대해 배우고 적용해보고 있습니다. 이러한 기술들에 대해 개념을 자세히 설명하기보다는 실제로 어떻게 썼는지, 어떤 점이 좋았는지 정리해보고자 합니다!
RichText란
이번 포스팅은 저번에 설명했던 ServerDriven UI에서 이어집니다.
우선 RichText란 글자마다 서로 다른 스타일이 혼합된 텍스트를 말합니다. 개발을 하다보면 아래와 같이 한 텍스트에서 단어마다 각각 다른 색상이나 크기, Weight 값을 주고싶을 수 있습니다. 그럴 때 사용할 수 있는게 RichText이며, 이를 가능하게 하는 핵심 키워드는 NSMutableAttributedString 입니다.
다만 NSMutableAttributedString에 대해 설명하기보다는, ServerDriven UI로 어떻게 RichText를 표현해냈는지 설명드리고자 합니다.
코드
코드와 함께 어떻게 구현했는지 설명드리겠습니다.
Response
RichText를 ServerDriven으로 하기 위해서는 API 설계부터가 중요합니다. 직접 고민하고 멘토님께 도움을 받으면서 API를 설계해봤는데, 핵심은 문장을 스타일 단위로 끊어서 리스트 형태로 내려주는 것입니다.
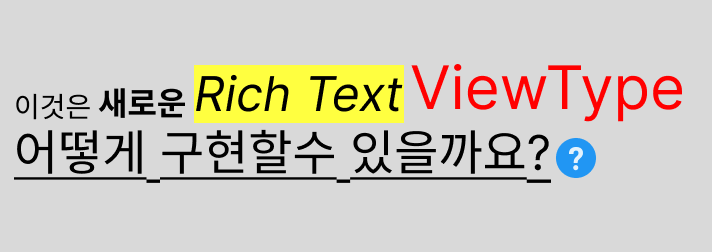
AViewType, BViewType은 저번 포스팅에서 한 것이니 넘어가고, RichViewType을 보시면, 특정 글자마다 스타일을 명시하는 형식으로 되어 있습니다. 예를 들어 "이것은" 이란 글자는 사이즈를 14로 하고 있으며, "Rich Text"라는 글자는 사이즈는 24로, 배경은 노랑으로 해주라고 써있습니다.
특이한 점은 텍스트 뿐만 아니라 이미지도 올 수 있다는 점인데, 이를 어떻게 파싱했는지는 밑에서 이어서 설명드리겠습니다.
{
  "responseData":{
      "screenName":"Home",
      "contents":[
          {
              "viewType":"BViewType",
              "content":{
                  "title":"This is B ViewType"
              }
          },
          {
              "viewType":"AViewType",
              "content":{
                  "title":"This is A ViewType",
                  "iconUrl":"https://avatars.githubusercontent.com/u/103282546?s=200&v=4"
              }
          },
          {
              "viewType":"RichViewType",
              "content":{
                  "title":"This is RichText ViewType",
                  "richText":[
                      {
                          "text":{
                              "text":"이것은",
                              "fontSize":14
                          }
                      },
                      {
                          "text":{
                              "text":"새로운",
                              "fontSize":16
                          }
                      },
                      {
                          "text":{
                              "text":"Rich Text",
                              "background":"yellow",
                              "fontSize":24
                          }
                      },
                      {
                          "text":{
                              "text":"ViewType",
                              "textColor":"red",
                              "fontSize":30
                          }
                      },
                      {
                          "text":{
                              "text":"어떻게 구현할수 있을까요?",
                              "textStyle":[
                                  "underline"
                              ],
                              "fontSize":24
                          }
                      },
                      {
                          "image":{
                              "url":"https://img.icons8.com/?size=512&id=63684&format=png",
                              "width":24,
                              "height":24
                          }
                      }
                  ]
              }
          }
      ]
  }
}
DTO (파싱 구조체)
전체적인 파싱 구조체도 저번에 했던 것과 동일하며 ContentTypes enum에서 case 추가와 RichContentInfo 구조체를 만들어 주기만 하면 됩니다. 이렇게 ViewType이 하나씩 추가될 때마다 변화되는 코드양이나 파일을 최소화하는 것도 ServerDriven을 잘 설계하는 방법 중 하나입니다.
아까 텍스트와 이미지 둘 중에 어떤게 올지 모른다고 했었는데, 그렇다면 텍스트, 이미지 객체를 모두 정의해놓고 옵셔널로 하면 파싱이 가능합니다.
또한, JSON에서 사이즈, 색상, 배경 등 모든 속성을 일일이 다 명시해줘야하는게 아닌지 의문이 들었을 수도 있는데, 저희는 JSON 코드를 줄이기 위해서 아무것도 명시되어 있지 않을 때는 기본값으로 설정되도록 했습니다. 예를 들어 "이것은" 이라는 글자가 fontSize만 명시되어있다면, 나머지 속성들은 기본값으로, 즉 배경색은 하얀색, 그리고 글자색은 검은색으로 되도록 했습니다.
public enum ContentTypes {
    case AViewType(AContentInfo)
    case BViewType(BContentInfo)
    case RichViewType(RichContentInfo) // 새로 추가
    case Unknown(DefaultContentInfo)

    init(rawValue: String, container: KeyedDecodingContainer<Content.CodingKeys>) throws {
        switch rawValue {
        ...
        case "RichViewType":  // 새로 추가
            let contentInfo = try container.decode(RichContentInfo.self, forKey: .content)
            self = .RichViewType(contentInfo)
        ...
        }
    }

    public func toVO() -> ViewsVO {
        switch self {
        ...
        case .RichViewType(let richContentInfo):  // 새로 추가
            let richTextsVO = richContentInfo.richText.map{ $0.toVO() }
            return ViewsVO.RichViewType(title: richContentInfo.title ?? "Unknwon", richTextsVO: richTextsVO)
        ...
    }
}

// ------- ContentInfo -------
...
public struct RichContentInfo: Decodable {
    let title: String?
    let richText: [RichText]
}

// 텍스트가 올 수도 있고, 이미지가 올 수도 있다면 둘 다 옵셔널로 정의해놓기
public struct RichText: Decodable {
    let text: TextStyle?
    let image: ImageStyle?

    public func toVO() -> RichTextVO {
        return RichTextVO(textStyleVO: text?.toVO(), ImageStyleVO: image?.toVO())
    }
}

public struct TextStyle: Decodable {
    let text: String
    let fontSize: Float?
    let background: String?
    let textColor: String?
    let textStyle: [String]?

    // 따로 명시가 안되어있을 경우 지정할 기본값 설정
    func toVO() -> TextStyleVO {
        return TextStyleVO(text: text, fontSize: fontSize ?? 14, background: background ?? "white", textColor: textColor ?? "black", textStyle: textStyle ?? ["regular"])
    }
}

public struct ImageStyle: Decodable {
    let url: String
    let width: Float?
    let height: Float?

    // 따로 명시가 안되어있을 경우 지정할 기본값 설정
    func toVO() -> ImageStyleVO {
        return ImageStyleVO(url: url, width: width ?? 15, height: height ?? 15)
    }
}
VO
여기서 VO는 DTO에서 옵셔널 처리가 된 형태, 즉 nil인 값들에 기본값들이 설정된 형태라고 보시면 됩니다.
public struct RichTextVO {
    public let textStyleVO: TextStyleVO?
    public let ImageStyleVO: ImageStyleVO?

    public init(textStyleVO: TextStyleVO?, ImageStyleVO: ImageStyleVO?) {
        self.textStyleVO = textStyleVO
        self.ImageStyleVO = ImageStyleVO
    }
}

public struct TextStyleVO {

    public let text: String
    public let fontSize: Float
    public let background: String
    public let textColor: String
    public let textStyle: [String]

    public init(text: String, fontSize: Float, background: String, textColor: String, textStyle: [String]) {
        self.text = text
        self.fontSize = fontSize
        self.background = background
        self.textColor = textColor
        self.textStyle = textStyle
    }
}

public struct ImageStyleVO {
    public let url: String
    public let width: Float
    public let height: Float

    public init(url: String, width: Float, height: Float) {
        self.url = url
        self.width = width
        self.height = height
    }
}
공통 DataSource
Data 영역에서부터 Presentation 영역까지 데이터를 가져오는 형식은 똑같으므로 생략하겠습니다.
공통 DataSource도 단순히 case를 하나 더 추가해주기만 하면 됩니다.
public class CommonTableViewDataSource: NSObject, UITableViewDataSource {
    ...

    public func tableView(_ tableView: UITableView, cellForRowAt indexPath: IndexPath) -> UITableViewCell {
        let content = items[indexPath.row]
        switch content {
        ...
        case .RichViewType(let title, let richTextsVO): // 새로 추가
            registerCell(tableView: tableView, cellType: RichTextCell.self)
            let cell: RichTextCell = useCell(tableView: tableView, indexPath: indexPath)
            cell.setCell(richTextsVO: richTextsVO)
            return cell
        }
    }
    ...
}
Cell
마지막으로 RichTextCell을 만들어주면 되는데, 여기서 바로 NSMutableAttributedString이 쓰입니다.
정말 간략하게 NSMutableAttributedString (MAS 라고 하겠습니다) 에 대해 설명드리자면, MAS는 스타일을 지정할 수 있는 문장이고 MAS는 다른 MAS와 이어 붙일 수 있습니다. 예를 들면 글자색이 노랑, 사이즈는 15인 MAS와 글자색이 빨강, 사이즈는 10인 MAS를 이어 붙여서 한개의 UILabel에 넣어줄 수 있습니다. 물론 텍스트뿐만 아니라 이미지도 대입 가능합니다.
NSAttributedString도 있는데, NSMutableAttributedString과 대부분 비슷하지만 차이점은 변할 수가 없다는 것이어서 append, setAttributes 등의 함수가 따로 없습니다.
class RichTextCell: UITableViewCell, CellIdentifier {

    static let identifier = "RichTextCell"

    let titleLabel: UILabel = {
        ...
    }()

    var baseAttributedText = NSMutableAttributedString(string: "")

    // 하나씩 단어 (또는 문장) 살펴보면서 서식 지정하고 이어붙이기
    func setCell(richTextsVO: [RichTextVO]) {
        for richText in richTextsVO {
            setText(richText: richText)
            setImage(richText: richText)
        }
        titleLabel.attributedText = baseAttributedText
    }

    // 텍스트 세팅하기
    private func setText(richText: RichTextVO) {
        if let textStyle = richText.textStyleVO {
            let attributedText = NSMutableAttributedString(string: textStyle.text)
            setTextColorForAttributedString(textStyle: textStyle, attributedText: attributedText)
            setTextStyleForAttributedString(textStyle: textStyle, attributedText: attributedText)
            baseAttributedText.append(attributedText)
        }
    }

    // 텍스트 세팅하기 (글자색, 배경색)
    private func setTextColorForAttributedString(textStyle: TextStyleVO, attributedText: NSMutableAttributedString) {
        let attribute: [ NSAttributedString.Key : Any ] = [
            .foregroundColor: RichTextColor(rawValue: textStyle.textColor)?.UIColor ?? .black,
            .backgroundColor: RichTextColor(rawValue: textStyle.background)?.UIColor ?? .white,
        ]
        attributedText.setAttributes(attribute, range: NSRange(location: 0, length: attributedText.length))
    }

    // 텍스트 세팅하기 (bold / underline 여부, 글자 크기)
    private func setTextStyleForAttributedString(textStyle: TextStyleVO, attributedText: NSMutableAttributedString) {
        for fontStyle in textStyle.textStyle {
            let richTextFont = RichTextFont(rawValue: fontStyle, fontSize: textStyle.fontSize)
            attributedText.addAttribute(richTextFont.key, value: richTextFont.value, range: NSRange(location: 0, length: attributedText.length))
        }
    }

    // 이미지 세팅하기 (URL에서 다운)
    private func setImage(richText: RichTextVO) {
        if let imageStyle = richText.ImageStyleVO {
            guard let url = URL(string: imageStyle.url) else { return }

            URLSession.shared.dataTask(with: url) { [weak self] (data, _, error) in
            	...
                if let data = data, let image = UIImage(data: data) {
                    DispatchQueue.main.async {
                        if let imageAttributedString = self?.setImageToAttributedString(imageStyle: imageStyle, image: image) {
                            self?.baseAttributedText.append(imageAttributedString)
                        }
                        self?.titleLabel.attributedText = self?.baseAttributedText
                    }
                }
            }.resume()
        }
    }

    // 이미지 세팅하기 (이미지 크기)
    private func setImageToAttributedString(imageStyle: ImageStyleVO, image: UIImage) -> NSAttributedString {
        let imageAttachment = NSTextAttachment()
        imageAttachment.image = image

        let imageSize = CGSize(width: CGFloat(imageStyle.width), height: CGFloat(imageStyle.height))
        imageAttachment.bounds = CGRect(origin: .zero, size: imageSize)

        return NSAttributedString(attachment: imageAttachment)
    }
    ...
}

// ------- Enum 값 -------

// 색상
public enum RichTextColor: String {
    case black = "black"
    case red = "red"
    case blue = "blue"
    case yellow = "yellow"
    case green = "green"
    case gray = "gray"

    public var UIColor: UIColor {
        switch self {
        case .black:
            return .black
        case .blue:
            return .blue
        case .red:
            return .red
        case .green:
            return .green
        case .yellow:
            return .yellow
        case .gray:
            return .gray
        }
    }
}

// 사이즈 및 bold, underline 여부
public enum RichTextFont {
    case bold(Float)
    case underline(Float)
    case regular(Float)

    var key: NSAttributedString.Key {
        switch self {
        case .bold, .regular:
            return .font
        case .underline:
            return .underlineStyle
        }
    }

    var value: Any {
        switch self {
        case .bold(let fontSize), .regular(let fontSize):
            return UIFont.boldSystemFont(ofSize: CGFloat((fontSize)))
        case .underline:
            return NSUnderlineStyle.single.rawValue
        }
    }

    init(rawValue: String, fontSize: Float) {
        switch rawValue {
        case "bold":
            self = .bold(fontSize)
        case "underline":
            self = .underline(fontSize)
        case "regular":
            self = .regular(fontSize)
        default:
            self = .regular(fontSize)
        }
    }
}
정리
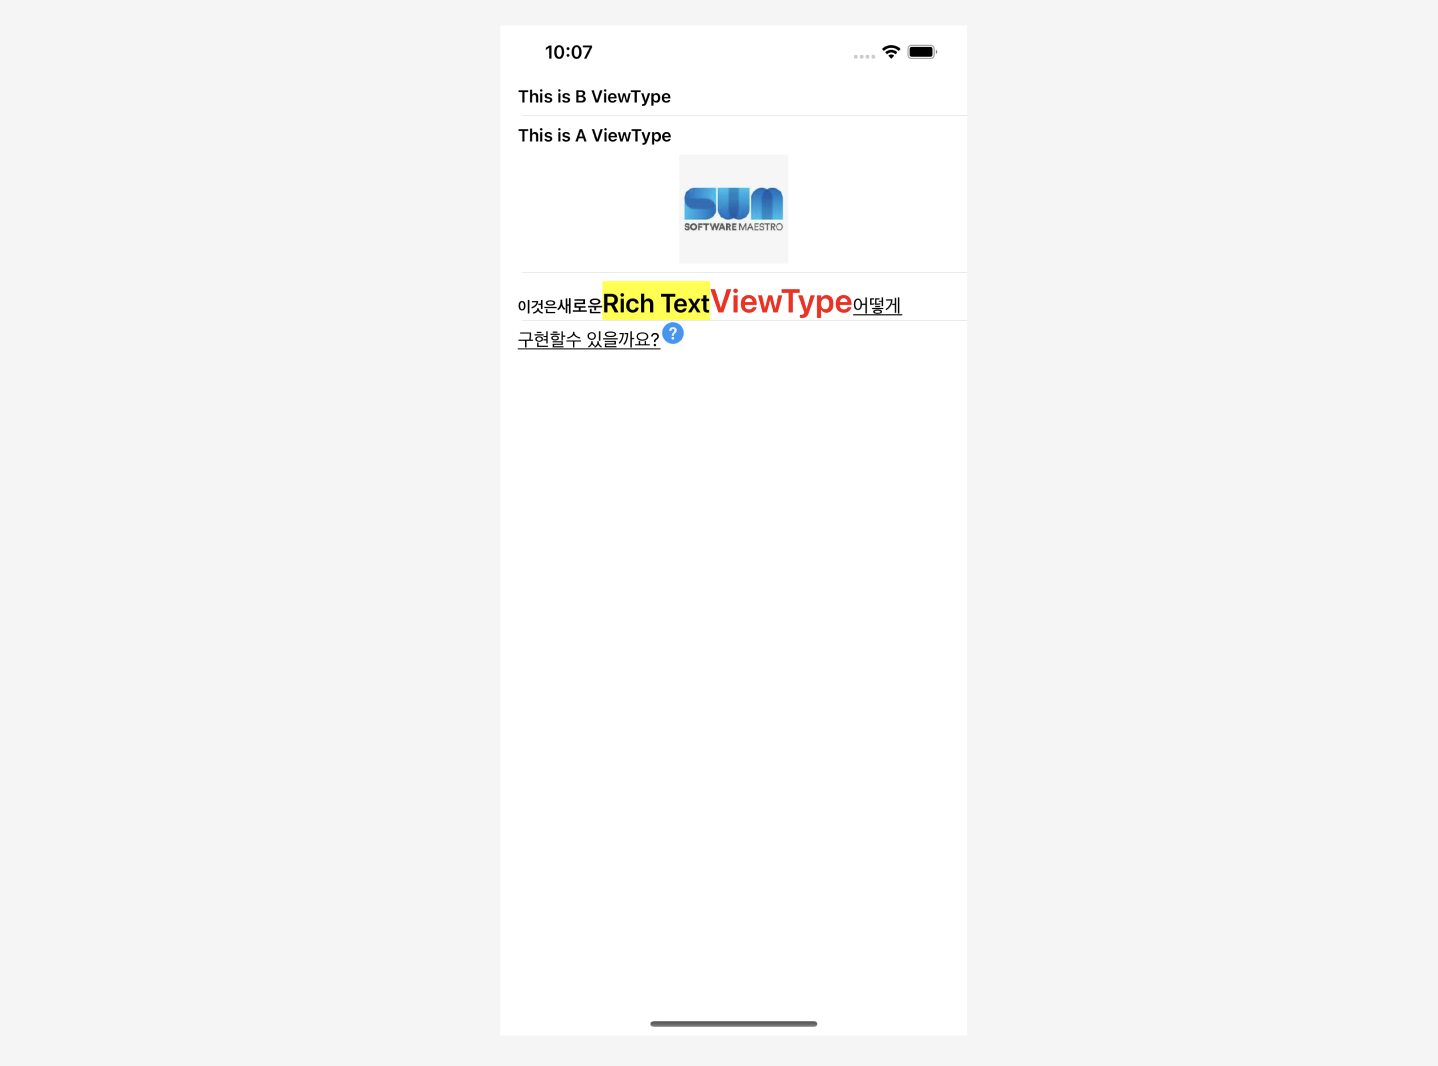
코드를 실행해보면 결과는 아래와 같습니다.
추가로 저희가 작성한 코드가 무조건 최적의 방법은 아닐 수 있습니다. 예를 들어 RichTextCell 코드 맨 아래에 enum 값들을 보면 조금 지저분하게 되어있는데, JSON 설계를 좀 더 잘했다면 아마 이 코드 양도 줄어들지 않았을까 예상합니다. 만약 색상을 'red'라는 문자열이 아닌 헥사코드로 내려줬다면 enum 값을 굳이 만들 필요가 있었을까하는 생각도 들었습니다. 그러니 마구잡이로 따라하기보다는 한번 생각하면서 도전해보면 좋을 것 같습니다!
마무리
이상으로 제가 도전해본 RichText를 코드와 함께 설명드렸습니다. 사실 저도 현재 배우고 있는 입장이기 때문에 틀린 개념, 부족한 개념들이 있을 수 있습니다. 혹시라도 그런 부분이 있다면 언제든지 지적해주셔도 됩니다. 긴 글 읽어주셔서 감사합니다. 😊
