이 게시글은 강의를 듣고 사이드 프로젝트에 적용한 내용이 주를 이루고 있습니다
수강 강의 : (인프런) 스프링부트 시큐리티 & JWT 강의
🏠 Basic Exam : https://github.com/devwuu/spring-security-exam
🏠 사이드 프로젝트 : https://github.com/devwuu/todaktodak
1. Spring boot 3.X + Spring security 6.X의 변화
시작과 동시에 내게 첫번째로 주어진 시련은 내 프로젝트의 spring boot, spring security 버전과 강의의 버전이 다르다는 것이었다. (강사님의 spring boot 버전은 2.3.3 이다.) 강사님의 깃허브에 최신 소스가 제공되고 있긴 했지만 나는 공부할 겸 구글링과 공식 문서를 가지고 해결을 해보기로 했다. 이전 버전과 비교를 해보니 꽤 많은 부분이 deprecated 되었다. 다행히 stackoverflow나 공식 문서에 참고할만한 예제들이 꽤 나와있어서 기능 구현을 하는덴 큰 문제가 없었다.
SecurityFilterChain 사용 방법 변경
가장 큰 변화는 SecurityFilterChain의 설정 방법 변경이었다. 강의에서는 WebSecurityConfigurerAdapter 를 상속받고 http.(..).and() 같은 체이닝 메서드를 이용했다면 내 버전에서는 @EnableWebSecurity 어노테이션과 람다를 이용해 SecurityFilterChain을 Bean으로 등록한다. 상속을 사용하지 않고 Bean으로 등록하는 방식이라 SecurityFilterChain 뿐만 아니라 AuthenticationManager 같이 SecurityFilterChain에 필요한 다른 객체들도 Bean으로 등록해줘야 한다. 공식 문서에 나와있는 예제 코드는 아래와 같다
@Configuration
@EnableWebSecurity
public class SecurityConfig {

    @Bean
    public CorsConfigurationSource corsConfigurationSource() {
        CorsConfiguration configuration = new CorsConfiguration();
        configuration.setAllowedOrigins(Arrays.asList("https://example.com"));
        configuration.setAllowedMethods(Arrays.asList("GET","POST"));
        UrlBasedCorsConfigurationSource source = new UrlBasedCorsConfigurationSource();
        source.registerCorsConfiguration("/**", configuration);
        return source;
    }

    @Bean
    public SecurityFilterChain filterChain(HttpSecurity http) throws Exception {
        http
        	.cors(configurer ->
                configurer.configurationSource(corsConfigurationSource())
        	)
            .authorizeHttpRequests(authorize -> authorize
                .requestMatchers("/blog/**").permitAll()
                .anyRequest().authenticated()
            )
            .formLogin(formLogin -> formLogin
                .loginPage("/login")
                .permitAll()
            )
            .rememberMe(Customizer.withDefaults());

        return http.build();
    }
}
AuthenticationManager 를 bean으로 등록하는 방법은 stackoverflow에서 찾았다. userDetailService와 getPassWordEncoder()는 자신이 사용할 bean을 넣어주면 된다.
@Bean
public AuthenticationManager authenticationManager(){
    DaoAuthenticationProvider authProvider = new DaoAuthenticationProvider();
    authProvider.setUserDetailsService(userDetailService);
    authProvider.setPasswordEncoder(getPassWordEncoder());
    return new ProviderManager(authProvider);
}
2. 내 프로젝트에 필요한 Configuration
두번째 시련은 내 프로젝트에 필요한 설정들을 어떻게 구현하느냐에 대한 문제였다. 내 프로젝트에 필요한 설정은 크게 세 가지였다.
(1) SecurityFilterChain 을 두 개 등록한다. 첫번째 필터는 동물병원 관리 권한(동물병원 근무자들 중 관리자 권한)과 관련된 필터이고 두번째 필터는 예약 시스템 총괄 관리 권한와 관련된 필터였다. 두 권한을 다루는 table부터 완전히 다르기 때문에 꼭 둘이 분리가 되길 원했다.
(2) 각 SecurityFilterChain 에 서로 다른 패턴의 url이 맵핑 되어야 한다. 동물병원 관리 권한과 관련된 url 패턴은 **/client/**이고 시스템 총괄 관리 권한과 관련된 url 패턴은 **/admin/** 이기 때문에 SecurityFilterChain 뿐만 아니라 SecurityFilterChain과 관련된 다른 bean들도 별도로 맵핑이 되어야 했다.
(3) AuthorizationFilter를 구현할 때 AuthenticationManager를 주입하지 않아도 되는 방향으로 구현한다. 강의에서 설명해준 방법으로 AuthorizationFilter를 구현하니 AuthenticationManager를 사용하지 않음에도 불구하고 부모 생성자에 주입 해주기 위해 꼭 주입해줘야 했다. 기왕이면 AuthenticationManager를 주입받지 않아도 되는 방향으로 구현하여 꼭 필요한 bean만 주입받는 방향으로 설계하고 싶었다.
이 세 설정 방법은 강의 예제에는 없는 패턴이기 때문에 완전히 처음부터 구글링을 해야했다.
(1) SecurityFilterChain을 여러개 등록하는 방법
구글링 했을 때 가장 많이 나오는 방법은 @Order 어노테이션을 이용하는 방법이었는데 내 프로젝트에선 유효하지 않았다. 그래서 HttpSecurity 의 메서드 중 하나인 .securityMatchers() 를 이용해 각 url에 맵핑되는 SecurityFilterChain 을 등록해줬다. .securityMatchers() 를 이용하면 람다를 이용해 각 필터에 맵핑되는 url 패턴을 적어줄 수 있는데 .requestMatchers()를 사용하면 된다.
    @Bean
    public SecurityFilterChain clientFilterChain(HttpSecurity http) throws Exception {
        http
                .securityMatchers((matchers) -> matchers
                        .requestMatchers("client/**", "v1/client/**")
                )
                .csrf(AbstractHttpConfigurer::disable)
                .sessionManagement(httpSecuritySessionManagementConfigurer ->
                        httpSecuritySessionManagementConfigurer
                                .sessionCreationPolicy(SessionCreationPolicy.STATELESS))
                .httpBasic(AbstractHttpConfigurer::disable)
                .authorizeHttpRequests(authorize ->
                        authorize.
                                requestMatchers("v1/client/**").hasRole("ADMIN")
                                .requestMatchers("client/token").permitAll()
                                .anyRequest().authenticated())
                .cors(httpSecurityCorsConfigurer ->
                        httpSecurityCorsConfigurer
                                .configurationSource(corsConfigurationSource()))
                .formLogin(AbstractHttpConfigurer::disable)
                .addFilter(clientAuthenticationFilter())
                .addFilterBefore(clientAuthorizationFilter(), UsernamePasswordAuthenticationFilter.class);

        return http.build();
    }

    @Bean
    public SecurityFilterChain adminFilterChain(HttpSecurity http) throws Exception {
        http
                .securityMatchers((matchers) -> matchers
                        .requestMatchers("admin/**", "v1/admin/**")
                )
                .csrf(AbstractHttpConfigurer::disable)
                .sessionManagement(httpSecuritySessionManagementConfigurer ->
                        httpSecuritySessionManagementConfigurer.sessionCreationPolicy(SessionCreationPolicy.STATELESS))
                .httpBasic(AbstractHttpConfigurer::disable)
                .authorizeHttpRequests(authorize ->
                        authorize
                                .requestMatchers("v1/admin/**").authenticated()
                                .requestMatchers("admin/token").permitAll()
                                .anyRequest().authenticated())
                .cors(httpSecurityCorsConfigurer ->
                        httpSecurityCorsConfigurer
                                .configurationSource(corsConfigurationSource()))
                .formLogin(AbstractHttpConfigurer::disable)
                .addFilter(adminAuthenticationFilter())
                .addFilterBefore(adminAuthorizationFilter(), UsernamePasswordAuthenticationFilter.class);

        return http.build();
    }
(2) 커스텀된 login url을 여러개 적용하는 방법
formLogin을 사용하는 경우에는 SecurityFilterChain에 바로 설정하면 되지만 내 프로젝트는 JWT 토큰만을 이용하기 때문에 formLogin 기능을 사용하지 않게 되어있었다. 따라서 병원 관리자 로그인을 담당하는 ClientAuthenticationFilter와 시스템 관리자 로그인을 담당하는 AdminAuthenticationFilter에 서로 다른 패턴의 login url이 맵핑 되어야 했다. AuthenticationManager 역시 권한별로 로그인을 담당하는 UserDetailsService가 다르기 때문에 구분되어 등록이 되어야했다. 다만 AuthenticationManager 의 경우엔 AuthenticationFilter 에서만 사용되는 객체이기 때문에 각각의AuthenticationFilter 를 bean으로 등록할 때 구분해서 주입해주기로 했다.
AuthenticationFilter를 구현할 때 UsernamePasswordAuthenticationFilter를 상속받아 구현했는데, 이렇게 구현하면 .setFilterProcessesUrl() 메서드를 사용할 수 있게 된다. 이 메서드를 사용해서 각 필터에 매핑될 url을 커스텀 해줄 수 있다.
    @Bean
    public ClientAuthenticationFilter clientAuthenticationFilter(){
        DaoAuthenticationProvider authProvider = new DaoAuthenticationProvider();
        authProvider.setUserDetailsService(employeeDetailService());
        authProvider.setPasswordEncoder(passwordEncoder());
        ProviderManager providerManager = new ProviderManager(authProvider);
        ClientAuthenticationFilter clientAuthenticationFilter = new ClientAuthenticationFilter(providerManager);
        clientAuthenticationFilter.setAuthenticationManager(providerManager);
        clientAuthenticationFilter.setFilterProcessesUrl("/client/token");
        return clientAuthenticationFilter;
    }

    @Bean
    public AdminAuthenticationFilter adminAuthenticationFilter(){
        DaoAuthenticationProvider authProvider = new DaoAuthenticationProvider();
        authProvider.setUserDetailsService(adminDetailService());
        authProvider.setPasswordEncoder(passwordEncoder());
        ProviderManager providerManager = new ProviderManager(authProvider);
        AdminAuthenticationFilter adminAuthenticationFilter = new AdminAuthenticationFilter(providerManager);
        adminAuthenticationFilter.setAuthenticationManager(providerManager);
        adminAuthenticationFilter.setFilterProcessesUrl("/admin/token");
        adminAuthenticationFilter.setPostOnly(true);
        return adminAuthenticationFilter;
    }
(3) AuthorizationFilter 구현하는 방법
AuthorizationFilter를 구현할 때 OncePerRequestFilter를 상속받아 구현하면 AuthenticationManager를 주입받지 않고 doFilterInternal() 메서드만 작성하여 AuthorizationFilter를 구현할 수 있다. 따라서 User 확인에 필요한 UserDetailService만 주입받아서 AuthorizationFilter를 구현할 수 있다. 참고로 OncePerRequestFilter는 이름 그대로 request 한 번당 한 번씩만 실행되는 filter로 다른 서블릿으로 dispatch가 돼도 한 번만 실행이 된다.
[ 230817 수정 ]
주의 : OncePerRequestFilter의 경우 Bean으로 등록하면 securityMatchers에 관계 없이 모든 filterChain에 등록되기 때문에
(1) filterChain이 복수개일 경우 Bean으로 등록하지 않거나(new 연산자로 filterChain에 등록)
(2) shouldNotFilter() 메서드를 overriding하여 제외시킬 url을 등록해준다
public class ClientAuthorizationFilter extends OncePerRequestFilter {

    private final EmployeeDetailService employeeDetailService;

    public ClientAuthorizationFilter(EmployeeDetailService employeeDetailService) {
        this.employeeDetailService = employeeDetailService;
    }

    @Override
    protected void doFilterInternal(HttpServletRequest request, HttpServletResponse response, FilterChain filterChain) throws ServletException, IOException {

        String header = request.getHeader("Authorization");
        if(StringUtil.isEmpty(header) || !StringUtil.startsWith(header, JwtProperties.PRE_FIX)){
            filterChain.doFilter(request, response);
            return;
        }
        String id = JWT.require(JwtProperties.SIGN)
                .build()
                .verify(StringUtil.remove(header, JwtProperties.PRE_FIX))
                .getClaim("id")
                .asString();
        EmployeePrincipal principal = (EmployeePrincipal) employeeDetailService.loadUserByUsername(id);
        UsernamePasswordAuthenticationToken token = new UsernamePasswordAuthenticationToken(principal, null, principal.getAuthorities());
        SecurityContextHolder.getContext().setAuthentication(token);
        filterChain.doFilter(request, response);
    }
}
3. 테스트
Security를 적용한 후 러프한 테스트 코드를 작성해서 동작을 확인했다. Security Test에는 MockMvc를 사용했고 추후엔 다른 테스트 코드들과의 일관성을 유지하기 위해 리팩토링을 통해 공통화가 이루어져야 하는 부분이라고 느꼈다. 특히 setup() 메서드에서 MockMvc를 다시 build 해줘야 하는 부분이... 그때쯤이면 Access token 뿐만 아니라 Refresh token도 구현해보는 게 소소한 목표다.
public class SecurityTest extends RestDocsTestSupport {

    @BeforeEach
    public void setup(WebApplicationContext context){
        mvc = MockMvcBuilders
                .webAppContextSetup(context)
                .apply(springSecurity())
                .build();
    }

    @Test @DisplayName("시스템 관리자로 로그인합니다.")
    public void adminLogin() throws Exception {
        AdminVO vo = new AdminVO()
                .id("test")
                .password("1234");

        mvc.perform(post("/admin/token")
                .contentType(MediaType.APPLICATION_JSON)
                .content(mapper.writeValueAsString(vo)))
                .andDo(print())
                .andExpect(status().isOk());
    }

    @Test @DisplayName("동물병원 관리자로 로그인합니다")
    public void employeeLogin() throws Exception {
        EmployeeVO vo = new EmployeeVO()
                .id("test")
                .password("1234");

        mvc.perform(post("/client/token")
                        .contentType(MediaType.APPLICATION_JSON)
                        .content(mapper.writeValueAsString(vo)))
                .andDo(print())
                .andExpect(status().isOk());
    }

    @Test @DisplayName("시스템 관리자 권한이 필요한 api를 요청합니다")
    public void adminApi() throws Exception {
        mvc.perform(get("/v1/admin/test")
                        .header("Authorization", "Bearer eyJhbGciOiJIUzI1NiIsInR5cCI6IkpXVCJ9.eyJzdWIiOiJhZG1pbiIsImlkIjoidGVzdCIsImV4cCI6MTY5MTA0Mzk4MH0.5N5wP1xqnxOVUQB-MNYPpXvYr12CQVTkIocDP9ED5mU"))
                .andDo(print())
                .andExpect(status().isNotFound());
    }

    @Test @DisplayName("동물병원 관리자 권한이 필요한 api를 요청합니다")
    public void employeeAdminApi() throws Exception {
        mvc.perform(get("/v1/client/test")
                        .header("Authorization", "Bearer eyJhbGciOiJIUzI1NiIsInR5cCI6IkpXVCJ9.eyJzdWIiOiJjbGllbnQiLCJpZCI6InRlc3QiLCJleHAiOjE2OTEwNDQ5MDV9.CN01PwiENuiSZ2W2HsdSxgJfYL4i49kdGsaf8fg7N5o"))
                .andDo(print())
                .andExpect(status().isNotFound());
    }

}
4. 마치며
현재 내 프로젝트에 구현된 인증 및 인가 프로세스는 아래와 같다
(1) 로그인 프로세스
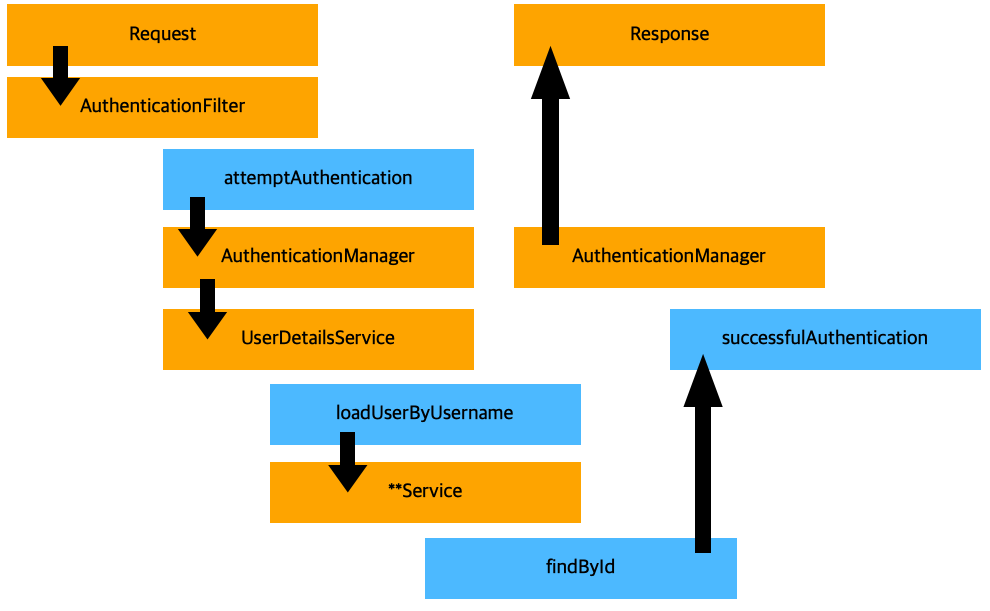
1. 로그인 요청
2. AuthenticationFilter 의 attemptAuthentication 메서드 실행
3. Username, Password로 UsernamePasswordAuthenticationToken을 생성
4. AuthenticationManager 의 authenticate 메서드 실행
5. UserDetailsService 의 loadUserByUsername 메서드 실행
6. DB에서 User 확인
7. User 확인이 정상적으로 완료되면 AuthenticationFilter의 successfulAuthentication 메서드 실행
8. JWT 토큰 발급
9. JWT 토큰 response
(2) 권한 인증 프로세스

1. api 요청
2. AuthorizationFilter 의 doFilterInternal 메서드 실행
3. Token 유효성 확인
5. UserDetailsService 의 loadUserByUsername 메서드 실행
6. DB에서 User 확인
7. User 확인이 정상적으로 완료되면 Username, Authorities로 UsernamePasswordAuthenticationToken을 생성하여 Security Context에 Authentication을 등록
8. Client 의 Request 처리
9. 처리 결과 응답
(3) 앞으로
아주 간단한 Access token 구현이었지만 Spring Security를 다뤄보는 건 처음이라 앞으로 더 많은, 또 더 깊은 이해가 필요하다고 느꼈다. 단순 기능 구현은 끝났으니 리팩토링 할 수 있는 부분은 리팩토링도 해보고... 이해가 깊어져 수정이 필요하다고 느껴지는 부분이 생기면 수정도 해보고 싶다.
출처
- https://docs.spring.io/spring-security/reference/migration-7/configuration.html
- https://docs.spring.io/spring-security/reference/reactive/integrations/cors.html
- https://stackoverflow.com/questions/74877743/spring-security-6-0-dao-authentication
- https://docs.spring.io/spring-security/reference/5.8/migration/servlet/config.html#use-new-security-matchers
- https://www.danvega.dev/blog/2023/04/20/multiple-spring-security-configs/
- https://stackoverflow.com/questions/49583373/how-to-change-login-url-in-spring-security
- https://www.toptal.com/spring/spring-security-tutorial
- https://minkukjo.github.io/framework/2020/12/18/Spring-142/
- https://beanbroker.github.io/2019/12/01/etc/cors_curl
