Prologue
연결 리스트 구현을 위한 메서드를 정리합니다. 연결리스트 개념을 접한 지는 조금 되었고, 컨셉에 대해서 이해는 하고 있지만, 조금 시간이 지난 후 연결리스트와 관련된 문제를 접하게 되면 막막해지곤 합니다. 수학 공식을 암기하듯이 관련된 메서드를 외워야 한다는 생각도 들었지만, 최대한 많이 접해보자라는 생각으로 다시 관련된 개념과 메서드를 정리하게 되었습니다.
Concept
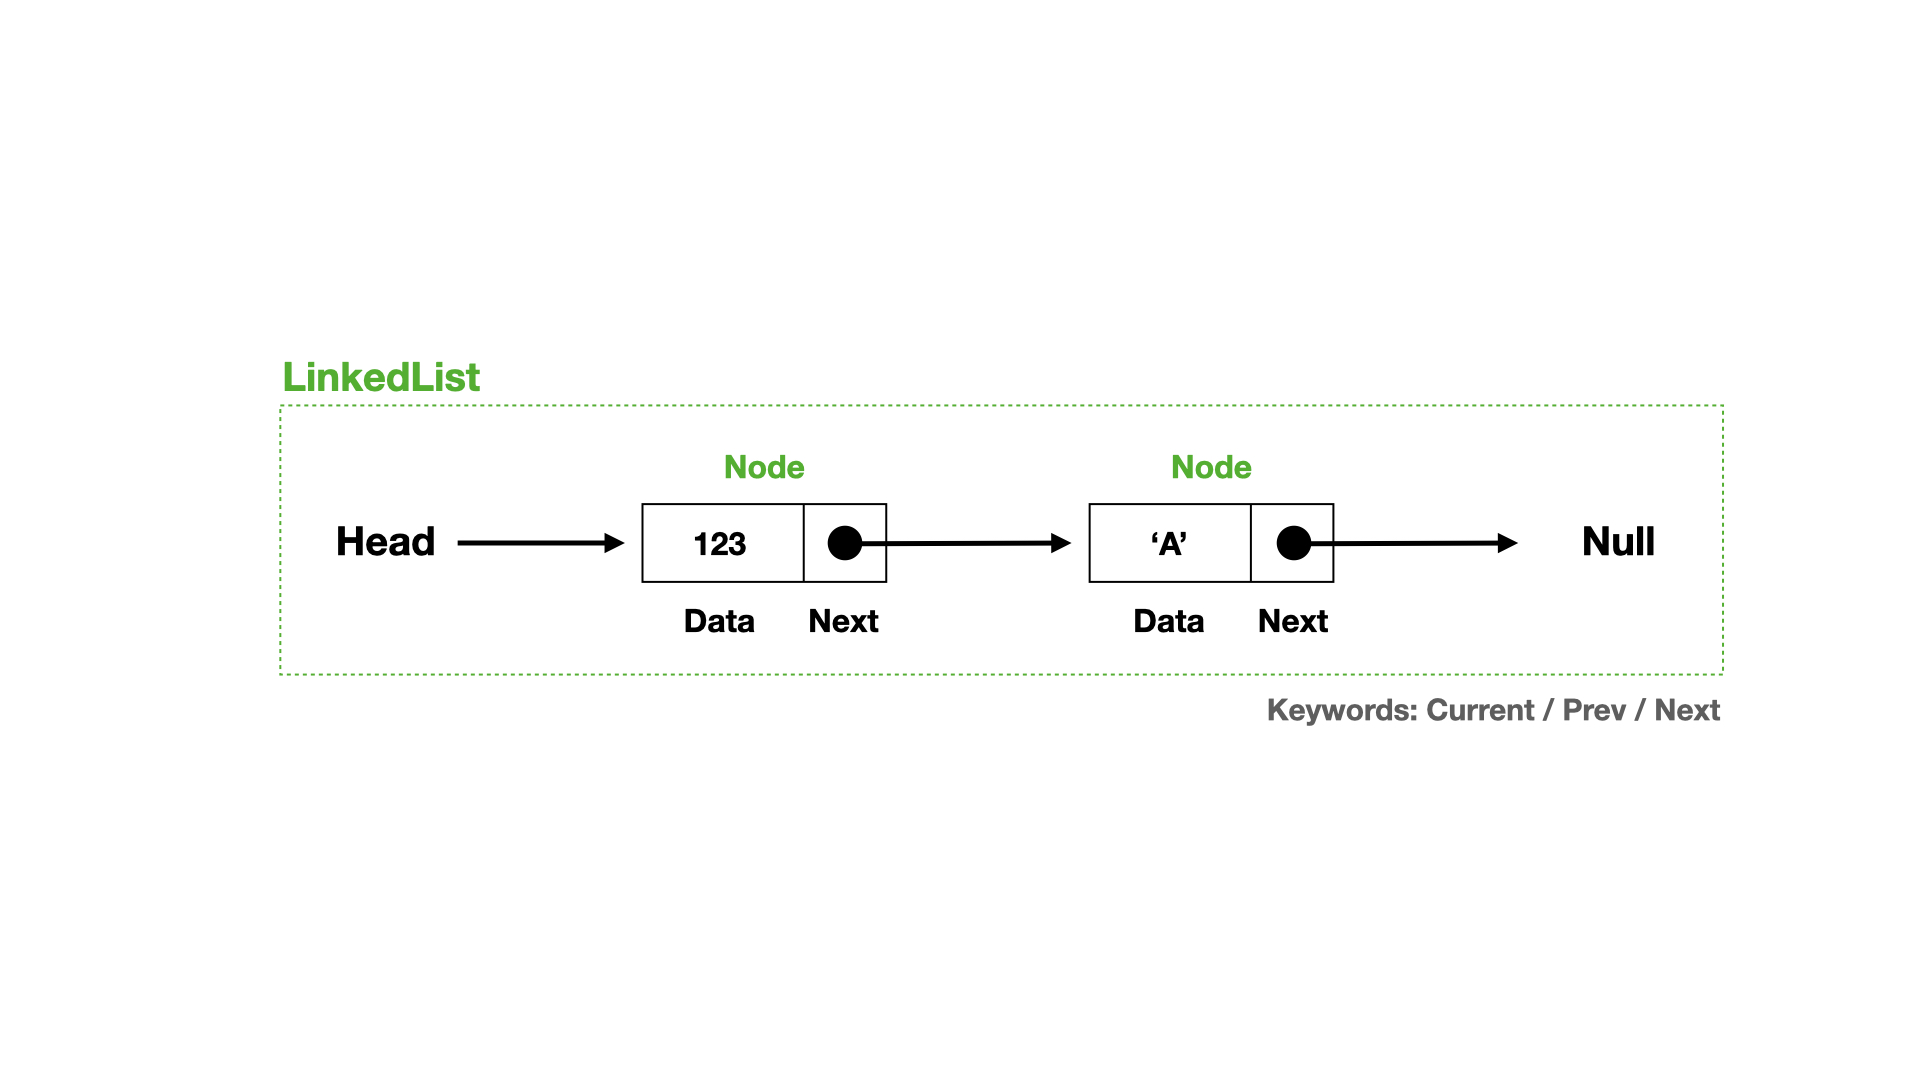
개념을 다이어그램으로 표현해 보았습니다. head를 시작으로 다음 Node를 next라는 포인터를 이용해서 연결하고, 연결된 Node는 자신의 next 포인터를 이용하여, 다음 node의 데이터를 가리킵니다.
해당 Node는 이런 구조를 가진 생성자 함수입니다.
function Node(data){
  this.data = data;
  this.next = null;
연결리스트 내에서 Node들 사이에 연결시키기 전까지 각 Node의 next 포인터는 null 값을 가리킵니다.
위의 다이어그램처럼 head 포인터, Node들의 연결관계를 보여주는 LinkedList 생성자 함수는 다음과 같은 구조를 갖고 있습니다.
function LinkedList(){
	this.head = null;
  	this.length = 0;
}
아직 어떠한 Node들도 연결된 상태가 아니며, head라는 포인터는 어떤 Node도 가리키고 있지 않기 때문에, null이라는 값이 할당된 것을 볼 수 있습니다.
append(data)
append 메서드는 head 포인터를 시작으로 해당 연결리스트의 끝에 data를 담은 Node를 연결시켜주는 메서드라고 정의할 수 있습니다.
function Node(data){
 	this.data = data;
  	this.next = null;
}

LinkedList.prototype.append = function(data){
	let node = new Node(data);
 	let current = this.head;

  	if(this.head === null){
     	this.head = node;
    } else {
    	while(current.next !== null){
         	current = current.next;
        }
      	current.next = node;
    }
  	this.length++;
}
그러면, 연결리스트의 인스턴스를 생성하고, append 메서드를 이용해서 연결리스트에 Node를 연결시켜보겠습니다. 연결관계를 명시적으로 보여주기 위해, printNode라는 메서드를 추가로 만들어서, 활용해보겠습니다.
LinkedList.prototype.printNode = function(){
 	process.stdout.write('head -> ');
  	for(let node = this.head; node !== null; node = node.next){
     	process.stdout.write(`${node.data} -> `);
    }
  	console.log(null);
}

let linkedList = new LinkedList();
linkedList.append(123);
linkedList.append('A');

linkedList.printNode();
/*
head -> 123 -> A -> null
*/
위의 결과로 더 명시적으로 Node 간의 연결 관계를 명확히 볼 수 있습니다.
insert(data, position)
array에 관련된 메서드 중 splice라는 메서드를 활용하면, 특정 위치에 기존에 있던 요소 삭제없이 원하는 요소를 추가할 수 있는 것과 같이, 이 insert라는 메서드를 활용하면 유사한 결과를 나타낼 수 있습니다.
e.g. array.prototype.splice()
let array = [1,2,3];
array.splice(1,0,4);
console.log(array); // [1,4,2,3]LinkedList.prototype.insert = function(data, position){
if(position < 0 || position > this.length){
return false;
}
let node = new Node(data);
let current = this.head; // 현재 head가 가리키고 있는 Node의 데이터
let index = 0; // 현재 어떤 node를 가리키고 있는지 확인하는 변수
let prev = 0; // 이전 node의 data 값 할당
if(position === 0){
this.head = node;
node.next = current;
} else{
while(index++ < position){
prev = current;
current = current.next;
}
prev.next = node;
node.next = current;
}
this.length++;
return true;
}활용해보면 다음과 같습니다.
let linkedList = new LinkedList();
linkedList.append(123);
linkedList.append('A');

linkedList.insert(456, 1);

linkedList.printNode();
/*
head -> 123 -> 456 -> A -> null
*/
remove(data)
remove 메서드는 찾는 data가 없을 경우 null을 반환합니다. 찾는 data를 담은 Node가 있는 경우 해당 data를 담은 Node를 연결에서 끊어내기 위해 prev.next를 current.next로 연결하고, 삭제한 데이터를 반환합니다.
LinkedList.prototype.remove = function(data){
  	let current = this.head;
  	let prev;

	while(current.data !== data && current.next !== null){
     	prev = current;
      	current = current.next;
    }

  	// current.next가 null을 가리킬 때까지, current가 가리키는 Node가 끝까지 온 경우
  	if(current.data !== data){
      	return null;
    }

  	if(current === this.head){
      	prev.next = current.next;
    }

  	this.length--;
  	return current.data;
}
메서드를 활용한 결과를 확인해 보겠습니다.
let linkedList = new LinkedList();
linkedList.append(123);
linkedList.append('A');
linkedList.append(456);
linkedList.append('B');

linkedList.printNode();
// head -> 123 -> A -> 456 -> B -> null

console.log(linkedList.remove('C')); // null
linkedList.remove(456);
linkedList.printnNode();
/*
head -> 123 -> A -> B -> null
*/
removeAt(position)
마지막으로 특정 위치에 있는 Node의 전후로 연결 관계를 끊고, 해당 위치에 있던 Node의 data 값을 반환하는 메서드를 구현해보겠습니다.
LinkedList.prototype.removeAt = function(position = 0){
  if(position < 0 || position > this.length){
   	return false;
  }
  let current = this.head;
  let index = 0;
  let prev;

  if(position === 0){
   	current = current.next;
  } else {
   	while(index++ < position){
     	prev = current;
      	current = current.next;
    }
    prev.next = current.next;
  }
  this.length--;
  return current.data;
}
insert 메서드와 remove 메서드를 섞어놓은 듯한 로직이라는 것을 알 수 있습니다.
메서드를 적용한 결과를 보면 다음과 같습니다.
let linkedList = new LinkedList();
linkedList.append(123);
linkedList.append('A');
linkedList.append(456);
linkedList.append('B');

linkedList.removeAt(2);
linkedList.printNode();
/*
head -> 123 -> A -> B -> null
*/
Conclusion
이렇게 앞으로 개인적으로 잘 적립되지 않았다고 생각하는 자료구조 또는 알고리즘과 관련해서 정리하는 시간을 가질 것 같습니다.