
🐰 24.09.21 협업 역량 강화를 위한 릴레이 온라인 특강 : 실무에서 많이 사용하는 JAVA 2
스레드(Thread) 개념과 구현 방안
스레드 개요
프로그램과 프로세스
- 프로세스 : 실행 중인 프로그램
- 다중 프로세스 : 다수 개의 프로세스를 다수 개의 CPU가 동시에 처리함
프로세스와 스레드
- 스레드 : 하나의 프로세스 내에서 동작하는 작은(lightweight) 프로세스
- 다중 스레드(multi-thread) : 하나의 프로세스(프로그램) 내에서 다수 개의 스레드가 동시에 동작하는 개념
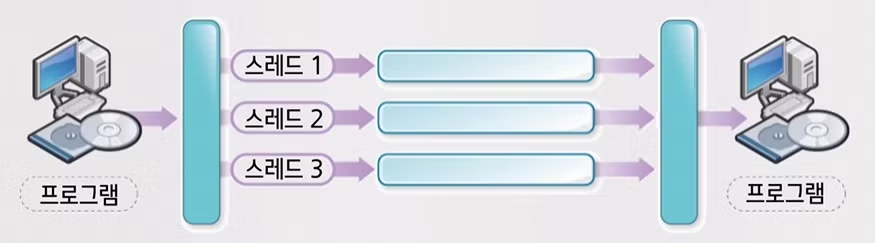
다수 개의 CPU를 가진 시스템에서 다중 스레드의 실행
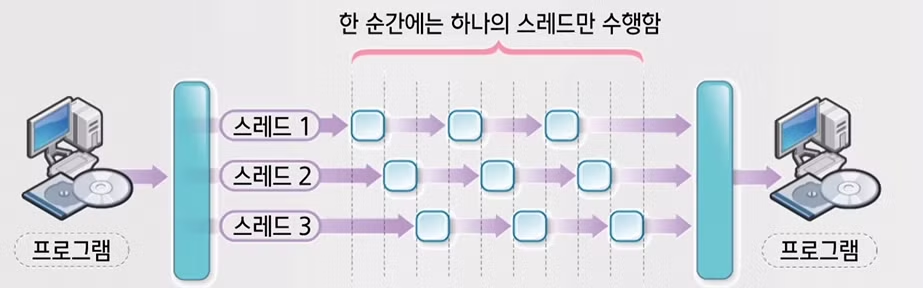
하나의 CPU를 가진 시스템에서 다중 스레드의 실행
스레드 클래스와 생명 주기
Thread 클래스
java.lang 패키지에 라이브러리 클래스로 제공함
// Thread 크래스의 생성자 형식
Thread()

Thread(String s)

Thread(Runnable r)

Thread(Runnable r, String s)

// r : Runnable 인터페이스 객체
// s : 스레드를 구별할 수 있는 이름
스레드의 생명주기
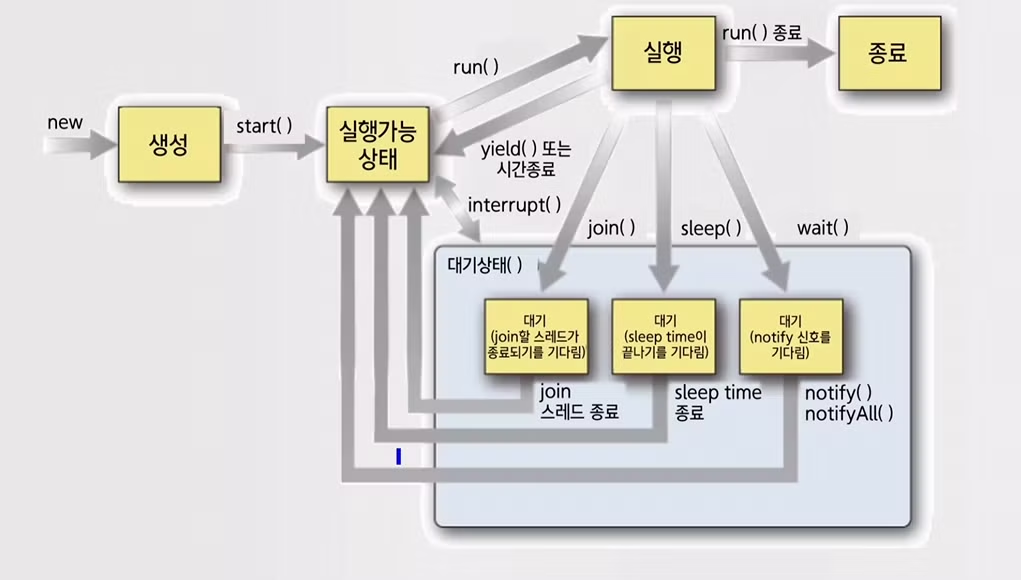
스레드의 생성되어 종료될 때까지 5가지의 상태
- 생성 상태 → 실행 가능 상태 → 실행 상태 → 종료
- 생성 상태 → 실행 가능 상태 → 실행 상태 → 대기 상태 → 실행 가능 상태(다시)
스레드 생성과 사용 방법
Thread 클래스 이용
Thread(java.lang.Thread) 클래스로부터 직접 상속받아 스레드 특징을 가지는 클래스를 생성하여 스레드를 사용하는 방법
class ThreadA extend Thread{ // Thread 클래스로부터 상속
	.....
	public void run(){ // 상위 클래스인 Thread 클래스의 run() 메소드를 오버라이딩하여 스레드가 수행하여야 하는 문장들을 기술
		....
	}
	.....
}
ThreadA ta = new ThreadA();
ta.startRunnable 인터페이스 이용
스레드의 특성을 가져야 하는 클래스가 이미 다른 클래스로부터 상속을 받고 있다면 Runnable인터페이스를 이용함
public interface Runnable{
	public void run();
}
class RunnableT extends Applet implements Runnable{
.....
public void run(){ // Runnable 인터페이스에 정의된 run() 메소드를 오버라이딩하여 스레드가 수행할 문장들을 기술
....
}
.....
}인터페이스를 이용하여 생성된 클래스로부터 스레드 객체를 생성하는 예
Runnable T rt = new RunnableT(); // 객체 rt 생성
Thread tb = new Thread(rt); // rt를 매개변수로 하여 스레드 객체 tb를 생성
tb.start();
Runnable T rt = new RunnableT(); // 스레드 객체를 생성하여 바로 시작
new Thread(rt).start();Runnable 인터페이스 이용
class ThreadTest extends Thread{ // Thread 클래스로부터 상속받아 클래스를 작성함
	public void run(){ // Thread 클래스로부터 상속받아 클래스를 작
		for(int i = 1; i <= 10; i++){
			System.out.println("스레드 실행 : " + i);
		}
	}
}

public class ThreadFromThread{
	public static void main(String args[]){
		ThreadTest t = new ThreadTest(); // 스레드 특성을 가진 객체를 생성
		t.start(); // 스레드를 시작(run() 메소드 호출)
	}
}
스레드 실행 : 1
스레드 실행 : 2
스레드 실행 : 3
스레드 실행 : 4
스레드 실행 : 5
스레드 실행 : 6
스레드 실행 : 7
스레드 실행 : 8
스레드 실행 : 9
스레드 실행 : 10
package wk09:

class Thread Test1 extends Thread { // Thread 클래스로부터 상속받아 클래스를 작성
		public ThreadTest1(String str) {
			setName(str); // 스레드의 이름을 설정
		}

		public void run() {
			for (int i = 1; i <= 10; i++) {
				System.out.println(i + getName()); // 번호와 스레드 이름을 출력
			}

			System.out.println("종료" + getName());
		}
}
public class DoubleThread {
	public static void main(String[] args) {
		// 이름이 다른 두 개의 스레드 객체를 생성
		ThreadTest1 t1 = new Thread Test1(": 첫번째 스레드");
		Thread Test1 t2 = new Thread Test1(": 두번째 스레드");
		// 스레드를 동시 실행
		t1.start();
		t2.start();
	}
}
1 : 첫번째 스레드
2 : 첫번째 스레드
3 : 첫번째 스레드
4 : 첫번째 스레드
5 : 첫번째 스레드
6 : 첫번째 스레드
1 : 두번째 스레드
2 : 두번째 스레드
7 : 첫번째 스레드
8 : 첫번째 스레드
3 : 두번째 스레드
4 : 두번째 스레드
5 : 두번째 스레드
6 : 두번째 스레드
7 : 두번째 스레드
9 : 첫번째 스레드
8 : 두번째 스레드
10 : 첫번째 스레드
9 : 두번째 스레드
종료 : 첫번째 스레드
10 : 두번째 스레드
종료 : 두번째 스레드스레드 우선순위
스레드 우선순위 부여
스레드에 우선순위를 부여하여 우선순위가 높은 스레드에 실행의 우선권을 주어 실행함
setPriority(); : Thread 클래스에는 스레드에 우선순위를 부여하는 메소드가 제공됨
static final int MAX_PRIORITY // 우선순위 값으로 10을 가짐
static final int MIN_PRIORITY // 우선순위 값으로 1을 가짐
static final int NORM_PRIORITY // 우선순위 값으로 5를 가짐
스레드 우선순위 예제
package wk09;

class PriorityTest extends Thread {
	public PriorityTest (String str) {
		setName (str);
	}

	public void run() {
		for (int i = 1; i <= 5; i++) {
		System.out.println(i+getName() + "우선순위 : " + getPriority()); // getPriority() 메소드로 우선순위를 출력
		}
	}
}

public class ThreadPriority {
	public static void main(String[] args) {
		PriorityTest t1 = new PriorityTest(" : 첫번째 스레드");
		PriorityTest t2 = new PriorityTest(" : 두번째 스레드");
		PriorityTest t3 = new PriorityTest(" : 세번째 스레드");
		int priority_t1 Integer.parseInt(args[0]);
		int priority_t2 Integer.parseInt(args[1]);
		tl.setPriority(priority_t1); // 우선 순위 설정
		t2.setPriority(priority_t2);
		t3.setPriority(Thread.MIN_PRIORITY); // 우선 순위 설정
		tl.start();
		t2.start();
		t3.start();
}
1 : 두번째 스레드 우선순위 : 5
1 : 세번째 스레드 우선순위 : 1
1 : 첫번째 스레드 우선순위 : 10
2 : 첫번째 스레드 우선순위 : 10
3 : 첫번째 스레드 우선순위 : 10
2 : 세번째 스레드 우선순위 : 1
3 : 세번째 스레드 우선순위 : 1
2 : 두번째 스레드 우선순위 : 5
3 : 두번째 스레드 우선순위 : 5
4 : 세번째 스레드 우선순위 : 1
4 : 첫번째 스레드 우선순위 : 10
5 : 세번째 스레드 우선순위 : 1
4 : 두번째 스레드 우선순위 : 5
5 : 첫번째 스레드 우선순위 : 10
5 : 두번째 스레드 우선순위 : 5스레드 시작과 종료
다중 스레드를 가진 프로그램의 실행 흐름
package wk09;
public class DoubleThread1 {
	public static void main(String[] args) {
			DoubleThreadTest1 t1 = new DoubleThread Test1(" : 첫번째 스레드");
			DoubleThreadTest1 t2 = new DoubleThread Test1(" : 두번째 스레드");
			System.out.println("***** 스레드 시작 전 *****");
			t1.start();
			t2.start();
			System.out.println("***** 스레드 종료 후 *****"); // 스레드 시작 전에 출력
		}
	}

	class Double Thread Test1 extends Thread {
		public DoubleThread Test1 (String str) {
			setName(str);
		}

		public void run() {
		for (int i = 1; i <= 3; i++) {
			System.out.println(i + getName());
		}
		System.out.println("종료" + getName());
	}
}
***** 스레드 시작 전 *****
***** 스레드 종료 후 *****
1 : 두번재 스레드
1 : 첫번째 스레드
2 : 두번째 스레드
2 : 첫번째 스레드
3 : 두번째 스레드
3 : 첫번째 스레드
종료 : 두번째 스레드
종료 : 첫번째 스레드
package wk09;
public class DoubleThread2 {
public static void main(String[] args) throws InterruptedException {
DoubleThreadTest2 t1 = new DoubleThreadTest2(" : 첫번째 스레드");
DoubleThreadTest2 t2 = new DoubleThreadTest2(" : 두번째 스레드");
System.out.println("***** 스레드 시작 전 *****");
t1.start();
t2.start();
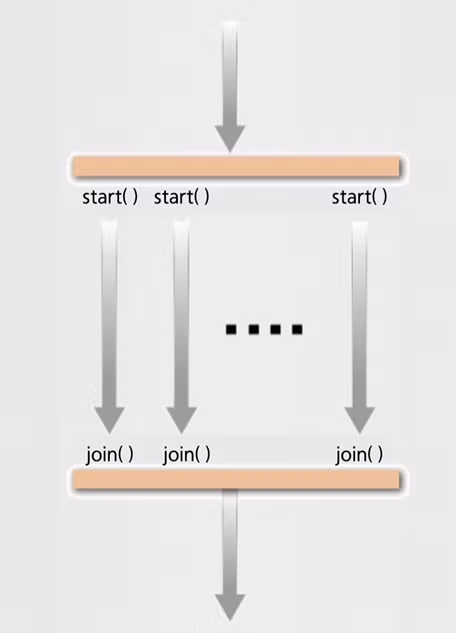
t1.join();
t2.join();
System.out.println("***** 스레드 종료 후 *****");
}
class DoubleThreadTest2 extends Thread {
public DoubleThread Test2(String str) {
setName(str);
}
public void run() {
for (int i = 1; i <= 3; i++) {
System.out.println(i + getName());
}
System.out.println("" + getName());
}
}1 : 첫번째 스레드
2 : 첫번째 스레드
3 : 첫번째 스레드
종료 : 첫번째 스레드
1 : 두번째 스레드
2 : 두번째 스레드
3 : 두번째 스레드
종료 : 두번째 스레드
***** 스레드 종료 후 *****스레드 동기화
임계영역(critical section)
자바에서는 임계영역 지정을 위한 synchronized 메소드를 제공함
- 다수 개의 스레드가 접근 가능한 영역
- 한순간에는 하나의 스레드만 사용할 수 있는 영역
다중 스레드 환경에서의 synchronized 메소드 실행
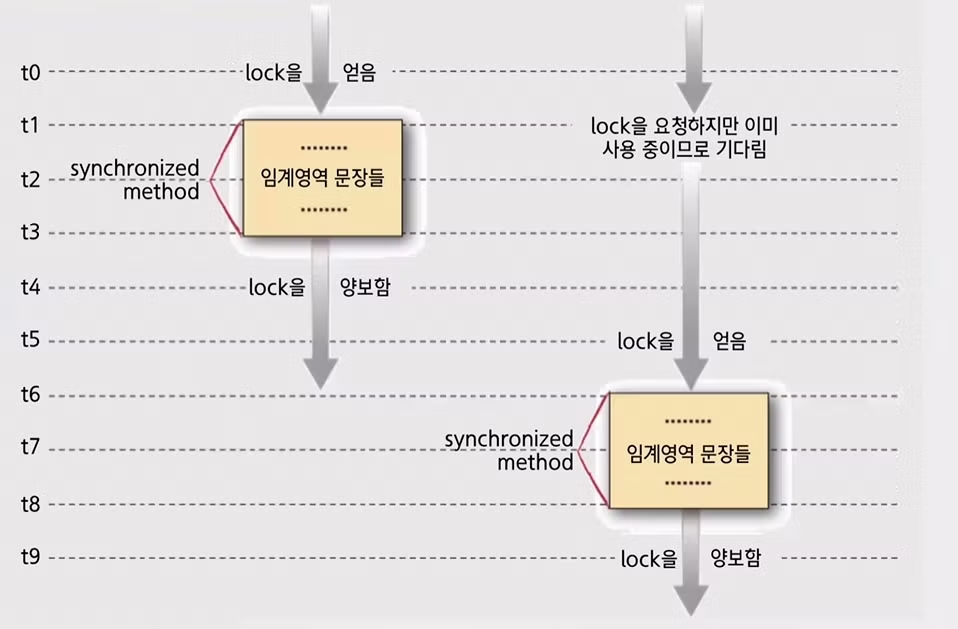
프로그램의 작동 구조
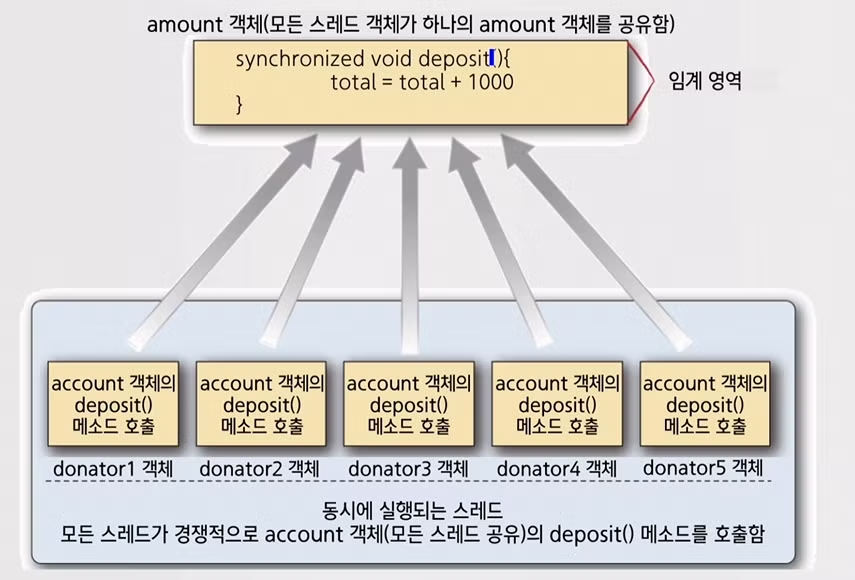
class Account {
	private int total =	0;

	synchronized void deposit () {
		total = total + 1000; // 1000원을 더하는 동기화 메소드 선언
	}
	int gettotal() {
		return total;
	}
}

class Customer extends Thread {
	Account acc;
	Customer (Account a, String s) { // 스레드 이름과 Account 객체를 설정
		acc = a;
		setName (s);
	}
	public void run() {
		for (int i = 1; i <= 200; i++) {
			System.out.println (getName() + " : " + i + "번째");
			acc.deposit(); // 반복문을 돌며 deposit(); 메소드를 호출
			if (acc.gettotal () >= 500000) // 전체금액이 50만원보다 크면 반복문을 벗어남
				break;
		}
	}
}

public class TVContribution {
	public static void main(String[] args) throws InterruptedException {
		Account same_account = new Account(); // Account 클래스로부터 객체가 생성됨
		// 생성자에서 동일한 객체를 지정(5개의 스레드가 same_account 객체를 공유함)
		Customer donator1 = new Customer(same_account,"1번째 후원자");
		Customer donator2 = new Customer(same_account,"2번째 후원자");
		Customer donator3 = new Customer(same_account,"3번째 후원자");
		Customer donator4 = new Customer(same_account,"4번째 후원자");
		Customer donator5 = new Customer(same_account,"5번째 후원자");
		donator1.start();
		donator2.start();
		donator3.start();
		donator4.start();
		donator5.start();
		donator1.join();
		donator2.join();
		donator3.join();
		donator4.join();
		donator5.join();
		System.out.println("후원 성금 총액은 : "+same_account.gettotal());
	}
}
1번째 후원자 : 1번째
5번째 후원자 : 1번째
5번째 후원자 : 2번째
5번째 후원자 : 3번째
4번째 후원자 : 1번째
3번째 후원자 : 1번째
2번째 후원자 : 1번째
3번째 후원자 : 2번째
4번째 후원자 : 2번째
5번째 후원자 : 4번째
1번째 후원자 : 2번째
1번째 후원자 : 3번째
5번째 후원자 : 5번째

*중간 생략*
4번째 후원자 : 148번째
4번째 후원자 : 149번째
4번째 후원자 : 150번째
4번째 후원자 : 151번째
4번째 후원자 : 152번째
4번째 후원자 : 153번째
4번째 후원자 : 154번째
1번째 후원자 : 53번째
5번째 후원자 : 105번째
3번째 후원자 : 130번째
2번째 후원자 : 62번째
후원 성금 총액은 : 504000
스레드 간 통신
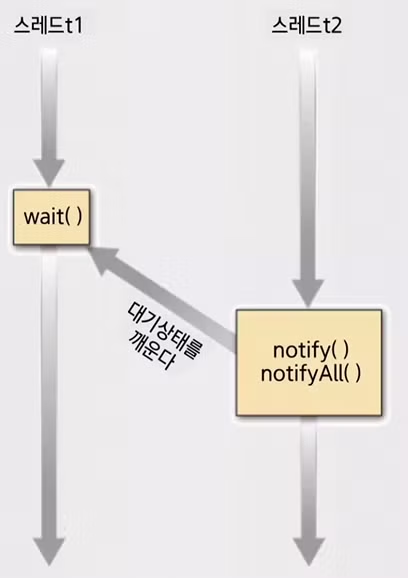
스레드 사이의 통신을 위한 메소드
- 스레드 사이의 통신을 위한 메소드를 java.lang.Object 클래스에 제공함
- Object 클래스에서 제공되는 메소드 중 wait(), notify(), notifyAll() 메소드가 스레드 사이의 통신에 이용됨
// wait() 메소드의 3가지 형태
void wait() throws InterruptedException
void wait(long msec) throws InterrupredException
void wait(long msec, int nsec) throws InterruptedExceptionwait(): 무한정 대기 상태에 들어가는 메소드wait(ling msec): msec 밀리초 동안 대기하다 스스로 깨어나는 메소드wait(long msec, int nsec): msec 밀리초와 nsec 나노초 동안 대기하다 스스로 깨어나는 메소드notify(): 대기 중인 스레드가 여러 개일 경우 그 중에 하나의 스레드만을 깨우는 메소드notifyAll(): 대기 중인 모든 스레드를 깨우는 것을 제외하고는 notify() 와 같음
void notify()
void notifyAll()
wait() 메소드와 notify(), notifyAll() 메소드의 작동
package wk09;
class Buffer {
	private int contents;
	private boolean available = false;

	public synchronized void put(int value){
		while (available == true) {
			try {
				wait();
			} catch (InterruptedException e) {
			}
	}
	contents = value;
	System.out.println("생산자########## : 생산 " + contents);
	notify();
	available = true;
}

public synchronized int get() {
	while (available == false) {
		try { wait();
		} catch (InterruptedException e) {
		}
	}
	System.out.println("소비자########## : 소비 " + contents);
	notify();
	available = false;
	return contents;
	}
} // End of Buffer Class

class Producer extends Thread {
	private Buffer b:

	public Producer (Buffer blank) {
		b = blank;
	}
	public void run() {
		for (int i = 1; i <= 10; i++)
		b.put(i);
	}
}

class Consumer extends Thread { // 소비자 스레드 클래스
	private Buffer b:
	public Consumer (Buffer blank) {
		b = blank;
	}
	public void run() {
		int value = 0;
		for (int i = 1; i <= 10; i++) {
			value = b.get();
			System.out.println("[End of Consumer/Producer]"+ value);
		}
	}
}

public class Producer Consumer {
	public static void main(String[] args) {
		Buffer buff = new Buffer(); // 하나의 Buffer 객체를 생성함
		// 동일한 Buffer 객체를 사용하여 스레드 객체를 생성함
		Producer p1 = new Producer(buff);
		Consumer c1 = new Consumer(buff);
		p1.start();
		c1.start();
	}
}
생산자########## : 생산 1
소비자########## : 소비 1
[End of Consumer/Producer]1
생산자########## : 생상 2
소비자########## : 소비 2
[End of Consumer/Producer]2
생산자########## : 생산 3
소비자########## : 소비 3
[End of Consumer/Producer]3
생산자########## : 생산 4
소비자########## : 소비 4
[End of Consumer/Producer]4
생산자########## : 생산 5
소비자########## : 소비 5
[End of Consumer/Producer]5
생산자########## : 생산 6
소비자########## : 소비 6
[End of Consumer/Producer]6
생산자########## : 생산 7
소비자########## : 소비 7
[End of Consumer/Producer]7
생산자########## : 생산 8
소비자########## : 소비 8
[End of Consumer/Producer]8
생산자########## : 생산 9
소비자########## : 소비 9
[End of Consumer/Producer]9
생산자########## : 생산 10
소비자########## : 소비 10
[End of Consumer/Producer]10
네트워크의 이해와 구현 방안
네트워킹의 개요와 java.net 패키지
TCP/IP(Transmission control Protocol/Internet Protocol)
- 프로토콜 : 컴퓨터 상호 간에 통신을 위한 규약으로 정의함
- TCP/IP 프로토콜 : 4개의 기능 계층들로 구성됨
- TCP/IP 계층 구조
- 응용 계층(HTTP, FTP, TELNET 등)
- 전달 계층(TCP, UDP 등)
- 인터넷 계층(IP 등)
- 네트워크 인터페이스 계층(device, driver 등)
- 하드웨어
TCP/IP 의 전달 계층은 크게 두 가지로 구분
- ⭐ TCP(Transmission Control Protocol) : 연결형, 연결성 통신 방식으로 전화처럼 먼저 수신자와 연결을 설정한 다음 정보를 주고받는 방식을 의미함
- ⭐ UDP(User Datagram Protocol) : 비연결형, 비연결성 통신 방식으로 편지처럼 보내는 사람에 의해 보내지면 받는 사람은 그 편지를 받아야 편지가 도착한 사실을 알게 되는 경우
소켓(socket)
- 전기선의 소켓과 유사함
- 컴퓨터가 연결된 통신의 끝점을 의미함
- 상호 연결된 응용 프로그램들 사이의 안정된 정보 교환을 제공하고 있는 매체
- TCP/IP 소켓 : TCP(Transmission Control Protocol) 소켓, UDP(User Datagram Protocol) 소켓
포트(Port)
- 통신선을 통해 수신되는 데이터가 컴퓨터 내의여러 통신 프로그램 중에서 하나의 프로그램에 전달되도록 하기 위한 번호
- 인터넷을 통하여 전달되는 정보들은 목적지 컴퓨터의 주소(32비트)와 16비트의 포트번호로 구성됨 → 예 : 203.233.51.1:8088
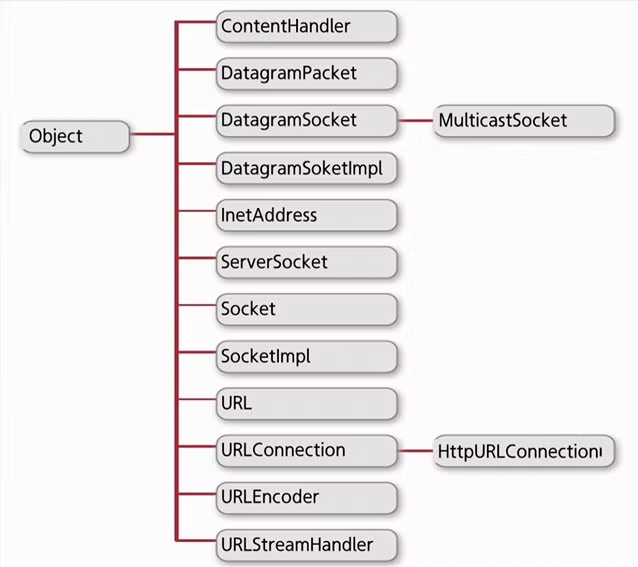
java.net 패키지의 클래스
인터넷 주소와 URL
-
IP(Internet Protocol) 주소 : 숫자로 구성된 주소 → 예 : 134.23.33.200
-
도메인(Domain) 이름 : 문자중심 → 예 : www.ehan.co.kr
-
편리함으로 인하여 대부분 사용자는 도메인 이름을 사용함
-
URL(Uniform Resource Locator)은 웹(World Wid Web) 에서 사용하는 주소임
-
URL의 형식 : protocol://hostLport/filename(경로포함)
InetAddress 클래스
[주요 메소드]
| 메소드 | 설명 |
|---|---|
| boolean equals(InetAddress other) | 현 객체가 other 객체와 같은 주소를 가지면 true, 아니면 false를 반환함 |
| byte[] getAddress() | 주소를 나타내는 4개의 요소를 가진 바이트 배열을 반환함 |
| String getHostAddress() | 주소 정보를 나타내는 문자열을 반환함 |
| String getHostName() | 컴퓨터 이름을 나타내는 문자열을 반환함 |
| static InetAddress getLocalHost() throws UnknownHostException | 현재 컴퓨터를 나타내는 InetAddress 객체를 반환함 |
| static InetAddress getByName (String hostName) throws UnknownHostException | hostName으로 지정된 컴퓨터를 나타내는 InetAddress 객체를 반환함 |
| static InetAddress[] getAlByName (String hostName) throws UnknownHostException | hostName으로 지정된 모든 컴퓨터(하나의 도메인 이름으로 여러 대의 컴퓨터를 사용하는 경우)를 나타내는 InetAddress 객체들의 배열을 반환함 |
package wk10:
import java.net.InetAddress;
import java.net.UnknownHostException:

public class Address Test {
	public static void main(String[] args) {
		try {
		InetAddress Address = InetAddress.getLocalHost(); // 현재 컴퓨터의 InerAddress 객체를 생성
		System.out.println("로컬 컴퓨터의 이름 : "+ Address.getHostName()); // 컴퓨터의 이름 추출
		System.out.println("로컬 컴퓨터의 IP 주소 : " + Address.getHostAddress()); // 컴퓨터의 IP 주소 추출
		Address = InetAddress.getByName("www.nice.ac.kr"); // 도메인 이름으로 InetAddress 객체 생성
		System.out.println("www.nice.ac.kr 컴퓨터의 이름과 IP 주소 : " + Address);
		InetAddress all[] = InetAddress.getAllByName("www.cnn.com"); // www.cnn.com 컴퓨터의 주소를 배열로 생성
		for (int i = 0; i < all.length; i++)
			System.out.println(all[i]);
		} catch (UnknownHostException ex) {
			System.out.println("Cannot resolve the URL" + ex.getMessage());
		}
	}
}
URL 클래스
Web에서 사용하는 URL에 관한 정보를 가짐
// URL 클래스의 생성자 형식
URL(String protocol, String host, int port, String file) throws MalformedURLException
URL(String protocol, String host, String file) throws MalformedURLException
URL(String urlString) throws MalformedURLException

// protocol, host, port, file: URLO
// urlString : 모든 요소를 표현한 문자열
[주요 메소드]
| 메소드 | 설명 |
|---|---|
| String getFile() | URL 파일 이름을 반환함 |
| String getHost() | URL의 호스트 이름을 반환함 |
| String getPort() | URL의 포트번호를 반환, 묵시적인(default) |
| 포트일 경우 -1을 반환함 | |
| String getProtocol() | URL의 프로토콜 이름을 반환함 |
| String toExternalForm() | 전체 URL의 문자열 객체를 반환함 |
| URLConnection openConnection() throws IOException | 지정된 URL과 연결 후 URLConnection 객체를 반환함 |
| InputStream openStream() throws IOException | 지정된 URL로부터 정보를 읽어들이기 위한 객체를 반환함 |
package wk10;
import java.net.MalformedURLException;
import java.net.URL;

public class URLTest {
	public static void main(String[] args) {
		try {
			URL nice= new URL("https://www.nice.ac.kr/user/maSnEx/goMain/30058/index.do"); // 특정 URL을 지정하여 객체를 생성
			System.out.println("프로토콜 : "+nice.getProtocol()); // 프로토콜 출력
			if(hycu.getPort() == -1) {
				System.out.println("포트 : " + nice.getDefaultPort()); // 포트 출력
			}
			else {
				System.out.println("포트 : " + nice.getPort());
			}
			System.out.println("호스트 : " + nice.getHost());
			System.out.println("파일(경로포함) : "+nice.getFile());
			System.out.println("전체 URL : " + nice.toExternalForm());
		} catch (MalformedURLException ex) {
			System.out.println("Cannot resolve the URL" + ex.getMessage());
		}
	}
}
URLConnection 클래스
- 원격지 자원의 속성(attribute)을 알아내기 위한 목적으로 많이 사용됨
- 상대 컴퓨터와 연결된 상태에서 원격지 자원의 속성을 파악함
- 원격지 파일을 읽어오는 다양한 메소드를 제공함
[주요 메소드]
| 메소드 | 설명 |
|---|---|
| int getContentLength() | 해당 문서의 길이를 바이트 수로 반환함 |
| String getContentType() | 해당 문서의 타입을 반환함 |
| long getDate() | 해당 문서의 생성 날짜를 반환함 |
| long getExpiration() | 해당 문서의 파기 날짜를 반환함 |
| long getLastModified() | 해당 문서의 마지막 수정 날짜를 반환함 |
| InputStream getInputStream() throws IOException | 원격지로부터 정보를 읽어들이기 위한 InputStream 객체를 생성하여 반환함 |
package wk10;

import java.io.*:
import java.net.*;

public class URLConnectionTest {
	public static void main(String[] args) {
		try {
			URL nice= new URL("https://www.nice.ac.kr/user/maSnEx/goMain/30058/index.do"); // URL 객체를 이용하여 URLConnection 객체를 생성
			URLConnection niceCon nice.openConnection();
			System.out.println("문서의 타입 :" + niceCon.getContentType());
			System.out.println("=== 문서의 내용 ===");
			InputStream input = niceCon.getInputStream(); // 입력을 위한 객체 생성
			DataInputStream dis = new DataInputStream(input);
			int data_size = dis.available();
			byte[] data_contents = new byte[data_size];
			dis.readFully(data_contents);
			System.out.print(new String(data_contents, "utf-8")); // 입력된 내용 출력
			dis.close();
			input.close();
		} catch (MalformedURLException ex) {
			System.out.println("Cannot resolve the URL :" + ex.getMessage());
		} catch (IOException ex) {
		System.out.println("Found the IOException : " + ex.getMessage());
		}
	}
}
TCP 소켓
ServerSocket 클래스
서버 측에서 실행되는 응용 프로그램 작성을 위해 사용됨
// ServerSocket 클래스의 생성자 형식
ServerSocket(int port) throws IOException)

// port : 요청을 받아들일 포트 번호
[주요 메소드]
| 메소드 | 설명 |
|---|---|
| Soket accept() thorws IOException | 클라이언트의 요청을 받아들인 다음, Socket클래스 객체를 반환함 |
| void close() throws IOException | 서버 소켓을 닫음 |
Socket 클래스
클라이언트와 서버 사이에 실질적인 정보 교환을 위해 사용됨
// Socket 클래스의 생성자 형식
Socket(String hostName int port) throws UnknownHostException, IOException

// hostName, port : 연결을 요청할 컴퓨터와 주소와 포트 번호
TCP 소켓의 작동
[주요 메소드]
| 메소드 | 설명 |
|---|---|
| OutputStream getOutputStream() throws IOException | 현재의 소켓과 관련된 OutputStream 객체를 반환함 |
| void close() throws IOException | 소켓을 닫음 |
| InetAddress getinetAddress() | 현재 소켓에 연결된 컴퓨터의 주소를 반환함 |
| InetAddress getLocalAddress() | 현재 소켓을 사용하고 있는 컴퓨터의 주소를 반환함 |
| int getPort() | 현재 소켓에 연결된 컴퓨터의 포트번호를 반환함 |
| int getLocalPort() | 현재 소켓이 사용하고 있는 포트번호를 반환함 |
| InputStream getInputStream() throws IOException | 현재의 소켓과 관련된 InputStream 객체를 반환함 |
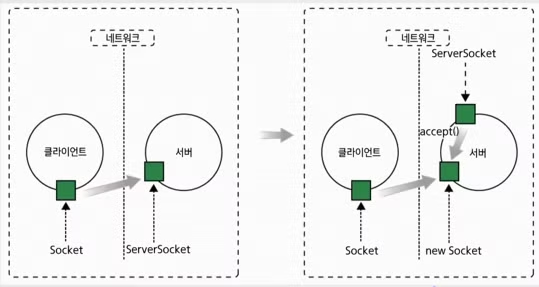
ServerSocket과 Socket 클래스를 이용한 클라이언트
서버 간의 통신 순서
- 서버측
- 서버 소켓 객체를 ServerSocket 클래스로부터 생성한 다음 클라이언트의 요청을 기다림(accept() 메소드)
- 클라이언트의 요청이 발생되면 요청을 받아들여 Socket 객체를 생성함
- Socket 객체를 이용하여 입출력을 위한 스트림을 생성함
- 통신을 수행함
- 소켓을 닫음
- 클라이언트 측
- 연결을 원하는 서버의 주소와 포트번호로 Socket 객체를 생성함
- Socket 객체를 이용하여 입출력을 위한 스트림을 생성함
- 통신을 수행함
- 소켓을 닫음
public class ServerSide {

	public static void main(String[] args) {
		ServerSocket ss = null;
		try{
			int port = Integer.parseInt(args[0]);
			int times = Integer.parseInt(args[1]);
			ss = new ServerSocket(port): // 포트 번호로 ServerSocket 객체 생성
			System.out.println("[Server =" + ss.getInetAddress() + ":" + ss.getLocalPort() + "] is started");
			int i=1;
			while(i<= times) { // 지정된 횟수만큼 클라이언트 요청 처리
				Sockets=ss.accept(); // 클라이언트 요청을 기다려 Socket 객체 생성
				OutputStream os = s.getOutputStream(); // 바이트 스트림 출력을 위한 객체를 Socket 객체로 생성
				DataOutputStream dos = new DataOutputStream(os); // 기본 자료형 데이터 출력을 위한 객체 생성
				for(int j = 1; j <= 10; j++)
					dos.writeInt(j): // 정수를 클라이언트로 전송
				s.close();
				++i;
			}
			ss.close();
		}
		catch(IOException ex) {
			ex.printStackTrace();
		}
	}
}
public class ClientSide {

		public static void main(String[] args) {
			try {
				String server args[0]:
				int port = Integer.parseInt(args[1]);
				Socket c = new Socket(server, port); // 서버의 주소와 포트번호로 Socket 객체 생성
				// 정수를 입력받기 위한 스트림 객체 생성
				InputStream is c.getInputStream();
				DataInputStream dis= new DataInputStream(is);
				for(int i = 1; i <= 10; i++) {
					int j=dis.readInt(); // 정수를 서버로부터 읽음
					System.out.println("서버로부터 받은 데이터" + j + "출력"};
				}
				c.close():
		}
		catch(IOException ex) {
			ex.printStackTrace();
		}
	}
}
UDP 소켓
UDP(User Datagram Protocol)
- TCP 소켓에 비해 신뢰성과 안정성 측면에서 떨어짐
- 연결을 설정하지 않으므로 네트워크에 부담을 주지 않는다는 장점
DatagramPacket 클래스
- 응용 프로그램들이 주고받을 데이터와 관련된 클래스
- 실제 데이터의 전송은 DatagramSocket 클래스에 의해 이뤄짐
// DatagramPacket 클래스의 생성자 형식
DatagramPacket(byte[] buffer, int size)
DatagramPacket(byte[], buffer, int size, InetAddress ia, int port)

// buffer : 송수신될 데이터가 저장되어 있는 배열
// size : 배열의 크기
// ia : 상대방 컴퓨터의 주소(InetAddress 객체)
// port : 상대방 컴퓨터의 포트 번호
DatagramSocket 클래스
- 실제 정보를 주고받기 위한 기능을 제공하는 클래스
- 두 개의 생성자를 제공함
// DatagramSocket 클래스의 생성자 형식

DatagramSocket() throws SocketException
DatagramSocket(int port) throws SocketException

// port: 소켓이 사용할 포트번호
public class UDPReceiver {

	public static void main(String[] args) {
		try{
			int port = Integer.parseInt(args[0]);
			int times = Integer.parseInt(args[1]);
			DatagramSocket ds = new DatagramSocket(port); // 특정 포트를 지정하여 객체를 생성
			System.out.println("[UDPReceiver @" + ds.getLocalPort() + "] is started");
			int i=1:
			while (i <= times) {
				byte buffer[] = new byte[100]; // 바이트 배열(100바이트 크기)를 생성함
				DatagramPacket dp = new DatagramPacket(buffer, buffer.length); // 패킷을 생성함(100 바이트 크기)
				ds.receive(dp):
				int revLength = dp.getLength();
				System.out.println("["+i+"]수신된 데이터("+revLength+" bytes): " + new String(buffer.O.revLength)); // 패킷에 저장된 데이터를 추출
				++i;
			}
			ds.close();
		} catch (IOException ex) {
				ex.printStackTrace();
			}
		}
	}
public class UDPSender {
		public static void main(String[] args) {
			try {
				DatagramSocket ds = new DatagramSocket(); // DatagramSocket 객체를 생성함(주소 지정 안함)
				InetAddress ia = InetAddress.getByName(args[0]); // InetAddress 객체를 생성함(주소를 가진 객체)
				int port = Integer.parseInt(args[1]);
				System.out.println(args[2]);
				byte buffer[] args[2].getBytes(); // 세 번째 매개변수의 값(전송 데이터)을 바이트 배열로 반환
				DatagramPacket dp = new DatagramPacket(buffer, buffer.length, ia, port); // 패킷 객체 생성(주소, 포트, 내용)
				ds.send(dp); // 패킷을 보냄
				ds.close();
			} catch (SocketException ex) {
					ex.printStackTrace();
			} catch (UnknownHostException ex) {
					ex.printStackTrace();
			} catch (IOException ex) {
					ex.printStackTrace();
			}
		}
	}