[JS] 이벤트 핸들러 내 this, 반복문 (for in과 for of), Map, Set, JSON, DOM , 클래스와 인스턴스, get과 set, 비동기 프로그래밍과 promise, fetch와 async, awit

✅ 이벤트 핸들러 내 this
이벤트 핸들러는 사용자나 브라우저의 특정 동작(이벤트)에 반응하여 실행되는 함수
자주 사용되는 이벤트에는 클릭, 키보드 입력, 마우스 이동 등이 있다.
이벤트 핸들러는 주로 addEventListener 메서드를 사용하여 특정 요소에 할당
이벤트 핸들러 내에서 this는 이벤트가 발생한 DOM 요소를 가리킴
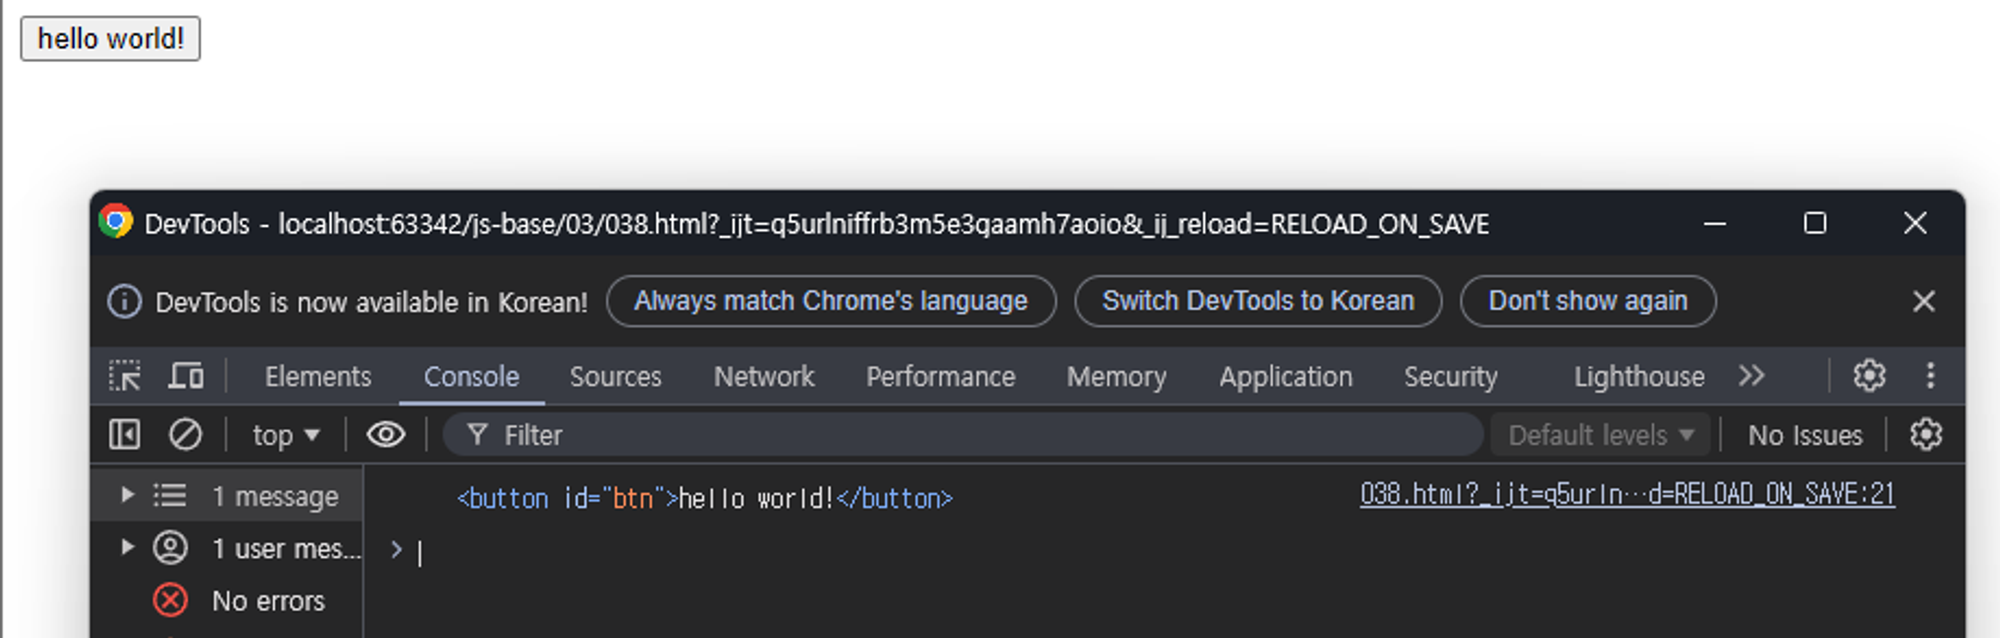
<body>
    <button id="btn">hello world!</button>

    <script>
        /* 간략하게 하는 방법
        function $(el){
            return document.querySelector(el);
        }

        const button = $('#btn');
         */

        const button = document.getElementById(('btn'));
        button.addEventListener('click', function(){
            console.log(this)
        });
    </script>
</body>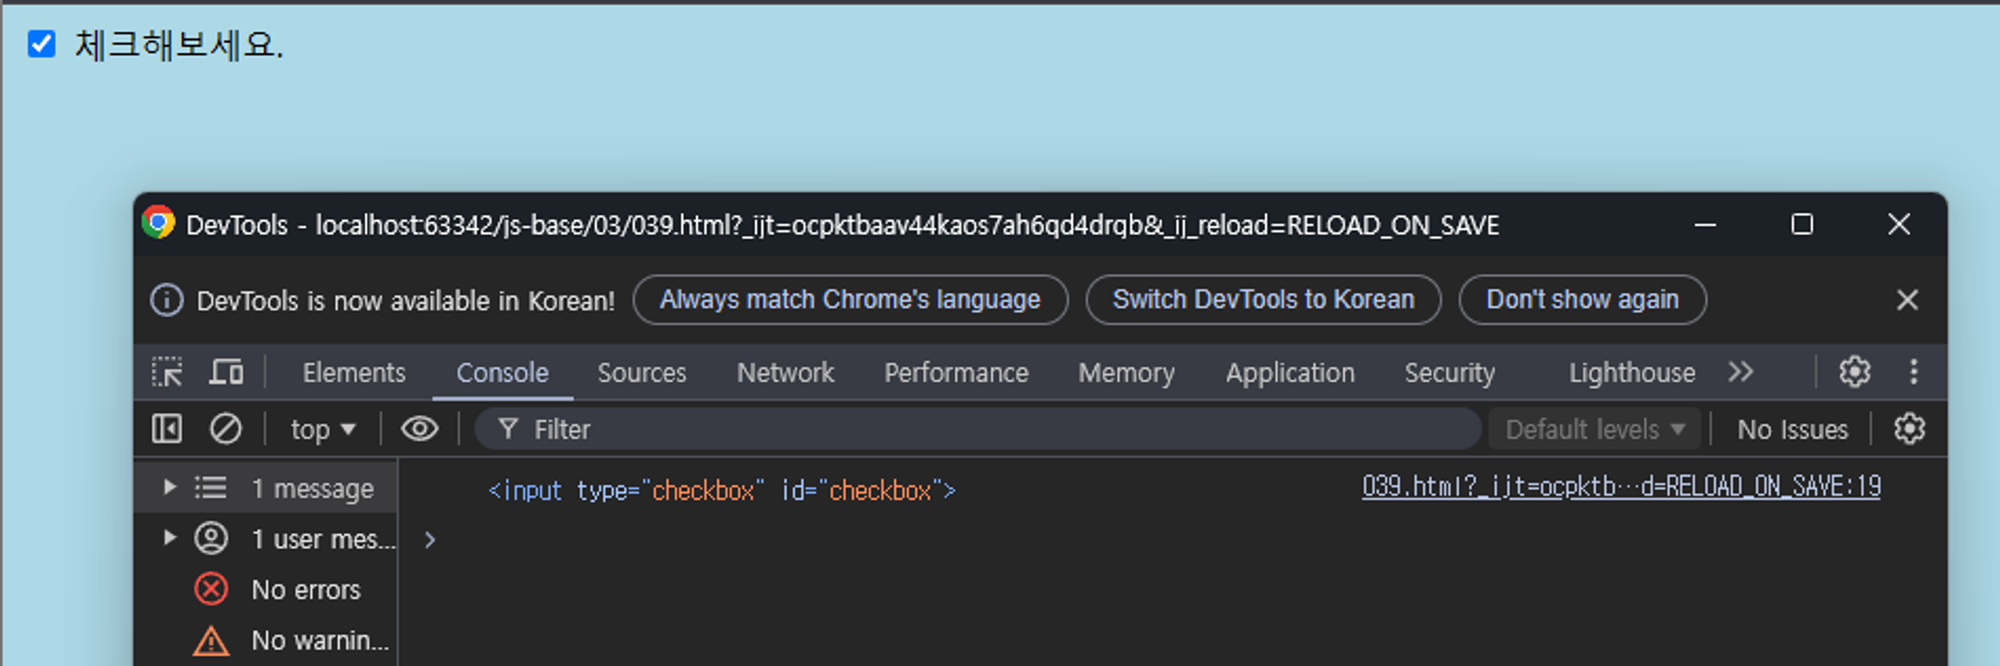
<body>
    <input type="checkbox" id="checkbox" /> 체크해보세요.

    <script>
        const checkbox = document.getElementById('checkbox');
        checkbox.addEventListener('change', function () {
            if (this.checked) {
                document.body.style.backgroundColor = 'lightblue';
            } else {
                document.body.style.backgroundColor = '';
            }

            console.log(this)
        });
    </script>
</body>
✅ 반복문(for in과 for of)
for in 반복문
객체의 속성(키)을 순회하는데 사용. 각 반복 단계에서 객체의 키가 변수에 할당된다.
객체의 모든 열거 가능한 속성을 순회한다.
const arr = [10, 20, 30, 40, 50];
const obj = {a: 1, b: 2, c: 3, d: 4, e: 5};

// 속성 순회
for (let key in obj) {
    console.log(key, obj[key]);
}

// 배열 순회
// 배열의 속성이 인덱스라는 것을 알 수 있지만 for in 반복문은 배열을 순회할 때 사용하기에 적합하지 않음
// 인덱스와 요소를 동시에 순회하고 싶다면 배열의 forEach 메서드를 사용하는 것이 좋음
for (let key in arr) {
    console.log(key, arr[key]);
}
for of 반복문
ES6에서 도입된 새로운 반복문으로, 이터러블(iterable) 객체의 값을 순회하는데 사용된다
이터러블 객체에 해당하는 것에는 배열, 문자열, Map, Set 등이 있으며, 이터러블 객체는 내부적으로 next라는 메서드를 가지고 있어 다음 값을 꺼낼 수 있는 객체를 의미한다.
for of 반복문은 배열의 요소를 직접 순회하므로, 인덱스가 필요하지 않으나,
배열의 요소를 순회할 때 사용하며, 객체의 속성을 순회할 때는 사용할 수 없다.
object는 iterable이 아니기 때문에 for of 불가
for (let value of arr) {
    console.log(value);
}

for (let value of Object.values(obj)) {
    console.log(value);
}

let data = [
    {
        "지역이름": "전국",
        "확진자수": 24889,
        "격리해제수": 23030,
        "사망자수": 438,
        "십만명당발생율": 48.0,
        "지역별확진자비율": ""
    },
    {
        "지역이름": "서울",
        "확진자수": 5607,
        "격리해제수": 5050,
        "사망자수": 66,
        "십만명당발생율": 57.61,
        "지역별확진자비율": 22.53
    },
    {
        "지역이름": "부산",
        "확진자수": 491,
        "격리해제수": 423,
        "사망자수": 4,
        "십만명당발생율": 14.39,
        "지역별확진자비율": 1.97
    },
    {
        "지역이름": "대구",
        "확진자수": 7141,
        "격리해제수": 6933,
        "사망자수": 196,
        "십만명당발생율": 293.09,
        "지역별확진자비율": 28.69
    }
];

for (let d of data) {
    console.log(d['지역이름'], d['확진자수'], d['격리해제수'], d['사망자수'], d['십만명당발생율'], d['지역별확진자비율']);
}

for (let i = 0; i < data.length; i++) {
    console.log(data[i]['지역이름'], data[i]['확진자수'], data[i]['격리해제수'], data[i]['사망자수'], data[i]['십만명당발생율'], data[i]['지역별확진자비율']);
}
배열의 인덱스를 순회할 때는
for반복문
객체의 속성을 순회할 때는for in반복문
객체의 값만 순회할 때는for of반복문인텍스와 요소를 동시에 순회하고 싶다면 배열의
forEach메서드
✅ Map
key, value로 이루어진 데이터를 저장할 때 사용되며 여기서 key는 어떤 타입도 될 수 있다.
어떠한 언어도 이렇게 비슷한 자료형을 가지고 있는 경우는 없다.
// let m = new Map();
// console.log(m); // Map(0) {}

let m = new Map();

m.set('하나', '1');
m.set(1, '하나');
m.set(true, 1);
m.set(false, 0);

console.log(m);
console.log(m.get('하나')); // '1'
console.log(m.get(true)); // 1

// in 연산자
console.log('하나' in {'하나': '1', '둘': '2'}); // true
// map에서는 has 메서드를 사용합니다.
console.log(m.has('하나')); // true

console.log(m.delete('하나')); // true
console.log(m.has('하나')); // false
console.log(m.size); // 2

const data = new Map().set('name', 'licat').set('age', 10).set('height', 180);

for (const value of data) {
    console.log(value[0]);
    console.log(value[1]);
}

for (const [key, value] of data) {
    console.log(key);
    console.log(value);
}

console.log([...data.keys()]);
console.log([...data.values()]);- Map에 값 추가하기 :
set. 객체는 문자열만 키로 사용할 수 있지만, Map은 어떤 타입도 키로 사용할 수 있다. - Map에서 값 가져오기 :
get - Map에서 값이 있는지 확인하기 : 특정 키가 있는지 확인할 때는
has메서드를 사용
객체에서 사용했던in연산자와 같은 역할을 한다. - Map에서 값 제거 :
delete - Map의 크기 확인 :
size - Map의 모든 데이터 삭제 :
clear - Map 순회 : 다양한 방법으로 순회할 수 있으며,
for...of반복문을 사용하면 키와 값을 쉽게 접근 가능하다. - Map의 키와 값에 접근 :
keys와values - 배열과 Map의 변환 :
// 배열을 Map으로 변환
let temp = new Map([
    [1, 10],
    [2, 20],
    [3, 30],
    [4, 40],
]);
// 객체를 Map으로 변환 let temp2 = new Map(Object.entries({ one: 1, two: 2 }));
✅ Set
중복되지 않는 값들의 집합을 저장할 수 있는 구조, Set은 각 값을 유일하게 유지하며, 중복된 값을 허용하지 않는다.
// Set
// 중복을 허락하지 않는 자료형
// 중복하지 않는 데이터를 저장할 때 사용
// 중복을 제거하는 용도로도 사용

// let s = new Set();
// console.log(s); // Set(0) {}

let s = new Set();

s.add(10);
s.add(20);
s.add(30);
s.add(30); // 중복된 값은 추가되지 않습니다.
s.add(30);

console.log(s);

let ss = new Set('abcdeeeeeeeee');
console.log(ss);
console.log(ss.size);

let sss = new Set([10, 20, 30, 10, 20, 30, 30]);
console.log(sss);
console.log(sss.size);
console.log(sss.has(10));

console.log(sss.delete(10));
console.log(sss.has(10));

let s2 = new Set(['apple', 'banana', 'orange']);

for (let value of s2) {
    console.log(value);
}

let setA = new Set(['apple', 'banana', 'orange']);
let setB = new Set(['banana', 'kiwi', 'orange']);

////////////////////////////////////////////

// array에 filter와 reduce
// filter는 안에 들어간 함수가 true를 리턴하는 요소만 모아서 새로운 배열을 만듭니다.
let arr = [1, 2, 3, 4, 5, 6, 7, 8, 9, 10];
arr.filter(x => x % 2 === 0);

// reduce는 배열의 각 요소를 연산합니다.
let arr2 = [1, 2, 3, 4, 5];
arr2.reduce((a, c) => a + c, 0); // a는 누적값(accumulator), c는 현재(current value)
// 0이 없으면 비어있는 배열일때 애러가 납니다.-
값 추가 :
add -
Set에서 값 확인 :
has -
Set에서 값 제거 :
delete -
Set의 크기 확인 :
size -
Set의 모든 데이터 삭제 :
clear -
Set 순회 : Set은 다양한 방법으로 순회할 수 있으며,
for...of반복문을 사용하여 값에 쉽게 접근이 가능하다. -
배열과 Set의 변환 :
// 배열을 Set으로 변환
let arr = ['apple', 'banana', 'orange', 'banana'];
let s = new Set(arr);
console.log(s); // Set(3) {"apple", "banana", "orange"}

// Set을 배열로 변환
let newArr = [...s];
console.log(newArr); // ["apple", "banana", "orange"]
- Set을 이용한 중복 제거
let arr = ['apple', 'banana', 'orange', 'banana'];
let uniqueArr = [...new Set(arr)];
console.log(uniqueArr); // ["apple", "banana", "orange"]
- Set의 교집합, 합집합, 차집합
// 교집합
let intersection = new Set([...setA].filter(x => setB.has(x)));
console.log(intersection); // Set(2) {"banana", "orange"}

// 합집합
let union = new Set([...setA, ...setB]);
console.log(union); // Set(4) {"apple", "banana", "orange", "kiwi"}

// 차집합
let difference = new Set([...setA].filter(x => !setB.has(x)));
console.log(difference); // Set(1) {"apple"
✅ JSON (JavaScript Object Notation)
주로 통신에서 많이 사용되며, 데이터를 저장하고 전송하는 데 사용되는 가벼운 텍스트 기반의 데이터 교환 형식이다.
자바스크립트 객체 표기법을 기반으로 하지만 언어에 독립적이어서 다양한 프로그래밍 언어에서 사용된다.
서로 다른 프로그래밍 언어 간에 데이터를 전달할 때 표현 방식의 다름으로 어려움을 느꼈으며 이것을 이용하여 만든 대표적인 데이터 포멧인 XML 을 더 단순히 하고자 탄생하게 된 것이 JSON이다.
JSON.parse(): JSON문자열을 자바스크립트 객체로 변환// JSON.parse // 서버에서 받은 데이터를 객체(object, array)로 변환 const json = '{"result":true, "count":42}'; console.log(json[0]) const obj = JSON.parse(json); console.log(obj); // 문자열에서 객체로 변환 console.log(obj['result']); const json2 = '[10, 20, 30]'; console.log(json2[0]) const obj2 = JSON.parse(json2); console.log(obj2); // 문자열에서 객체로 변환 console.log(obj2[0]);
JSON.stringify(): 자바스크립트 객체를 JSON문자열로 변환// JSON.stringify // 객체(object, array)를 문자열로 변환 // 내가 작성한 데이터를 서버로 전송할 때 사용 const obj3 = { result: true, count: 42 }; const obj4 = { result: [10, 20, 30], count: 42 }; const json3 = JSON.stringify(obj3); const json4 = String(obj4); const json4_ = JSON.stringify(obj4); console.log(json3); console.log(json4); console.log(json4_); console.log(json3[0]); // 객체에서 문자열로 변환 console.log(json3[1]);
- 참고하면 좋을 사이트들
- JSON Generator : JSON 형태를 받아 테이블 제작, 정렬 등 실습 가능
- JSON 형태 확인 가능 사이트 : https://www.studyin.co.kr/
- JSON 형태 확인 가능 사이트 : https://livecorona.co.kr/
✅ DOM(Document Object Model) API란?
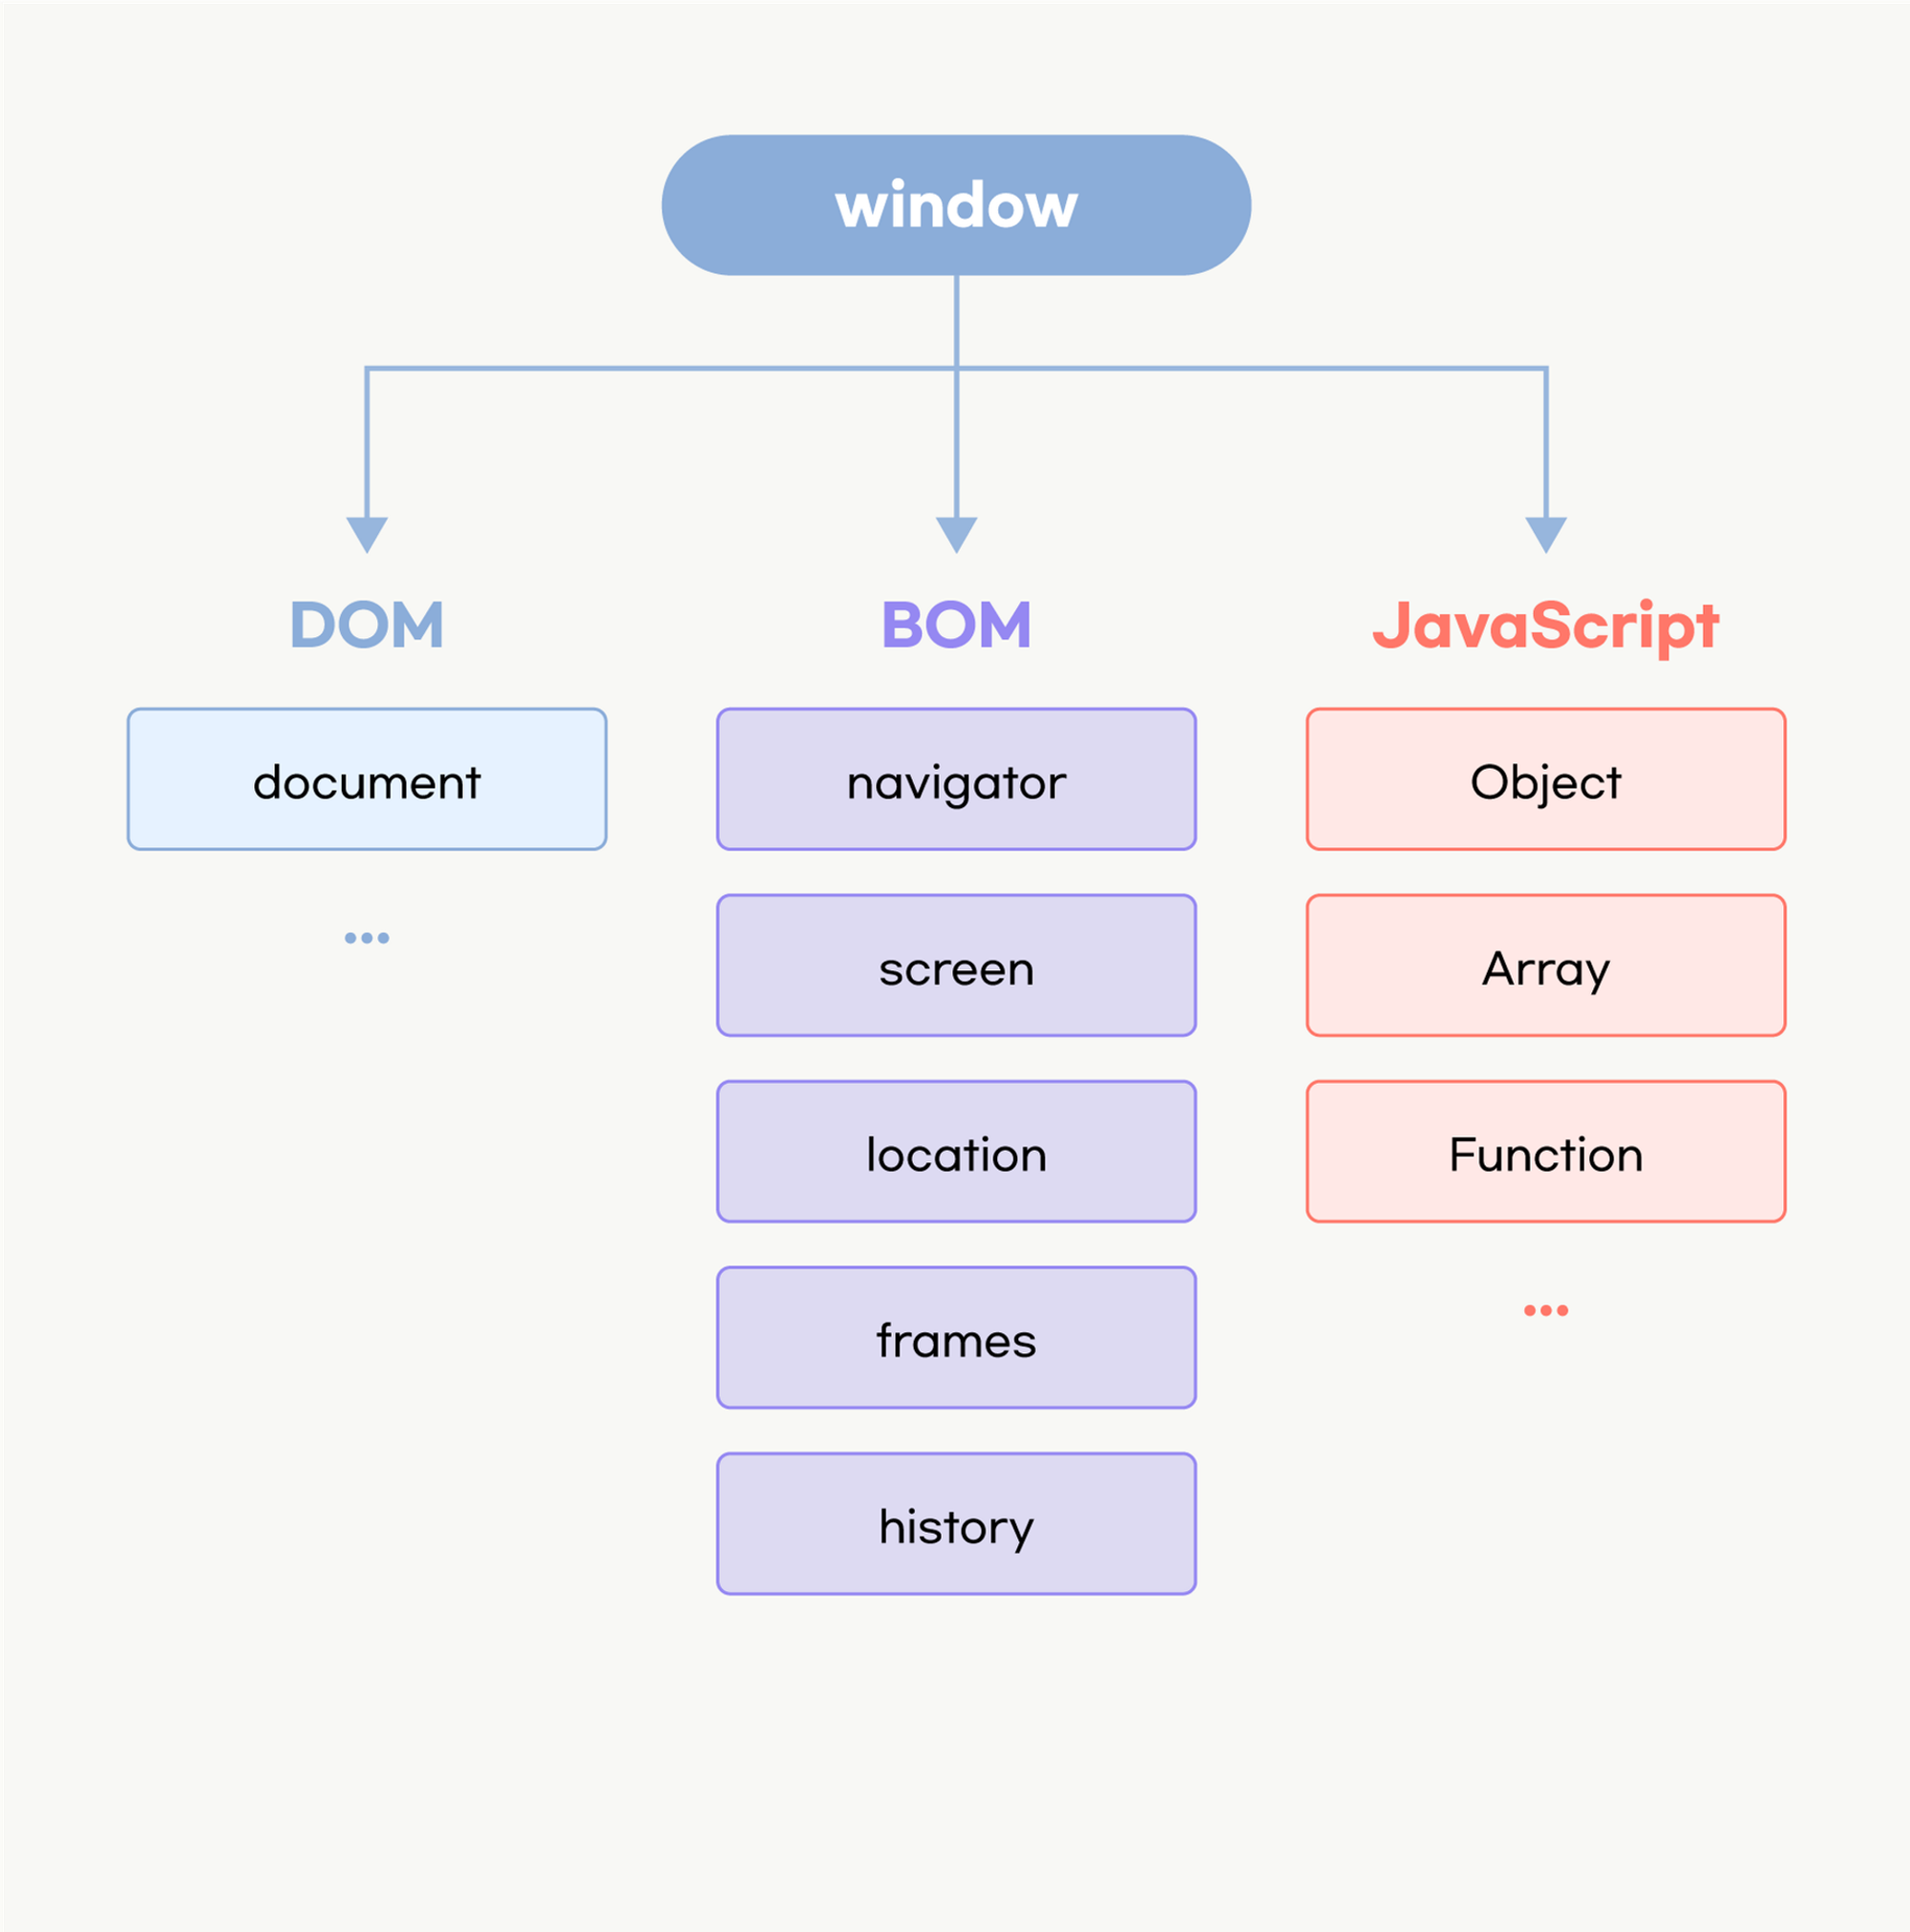
DOM은 HTML 문서의 내용을 트리 형태로 구조화하여 웹페이지와 프로그래밍 언어를 연결시켜주는 역할로 웹 페이지를 조작하고 수정할 수 있게 해주는 중요한 개념이다.
각각의 요소와 속성, 콘텐츠를 표현하는 단위를 '노드(node)' 라고 하며, 이 노드 안에 있는 텍스트를 수정하거나, 새로운 요소를 추가하거나, 요소를 삭제하는 등의 작업을 통해 웹 페이지를 동적으로 변경할 수 있다. 동적이라고 해서 꼭 움직이는 것만은 의미하는 것은 아니며, 사용자의 입력에 따라 화면이 바뀌거나, 데이터에 따라 화면이 변경되는 것도 동적이라고 할 수 있다.
예) 채팅창에 채팅이 올라오는 화면
API (Application Programming Interface)란?
프로그램 간에 상호작용할 수 있도록 도와주는 인터페이스
웹 API ? 예시 사이트
URL만 가지고 데이터를 가져올 수 있게끔 해줌
DOM 트리
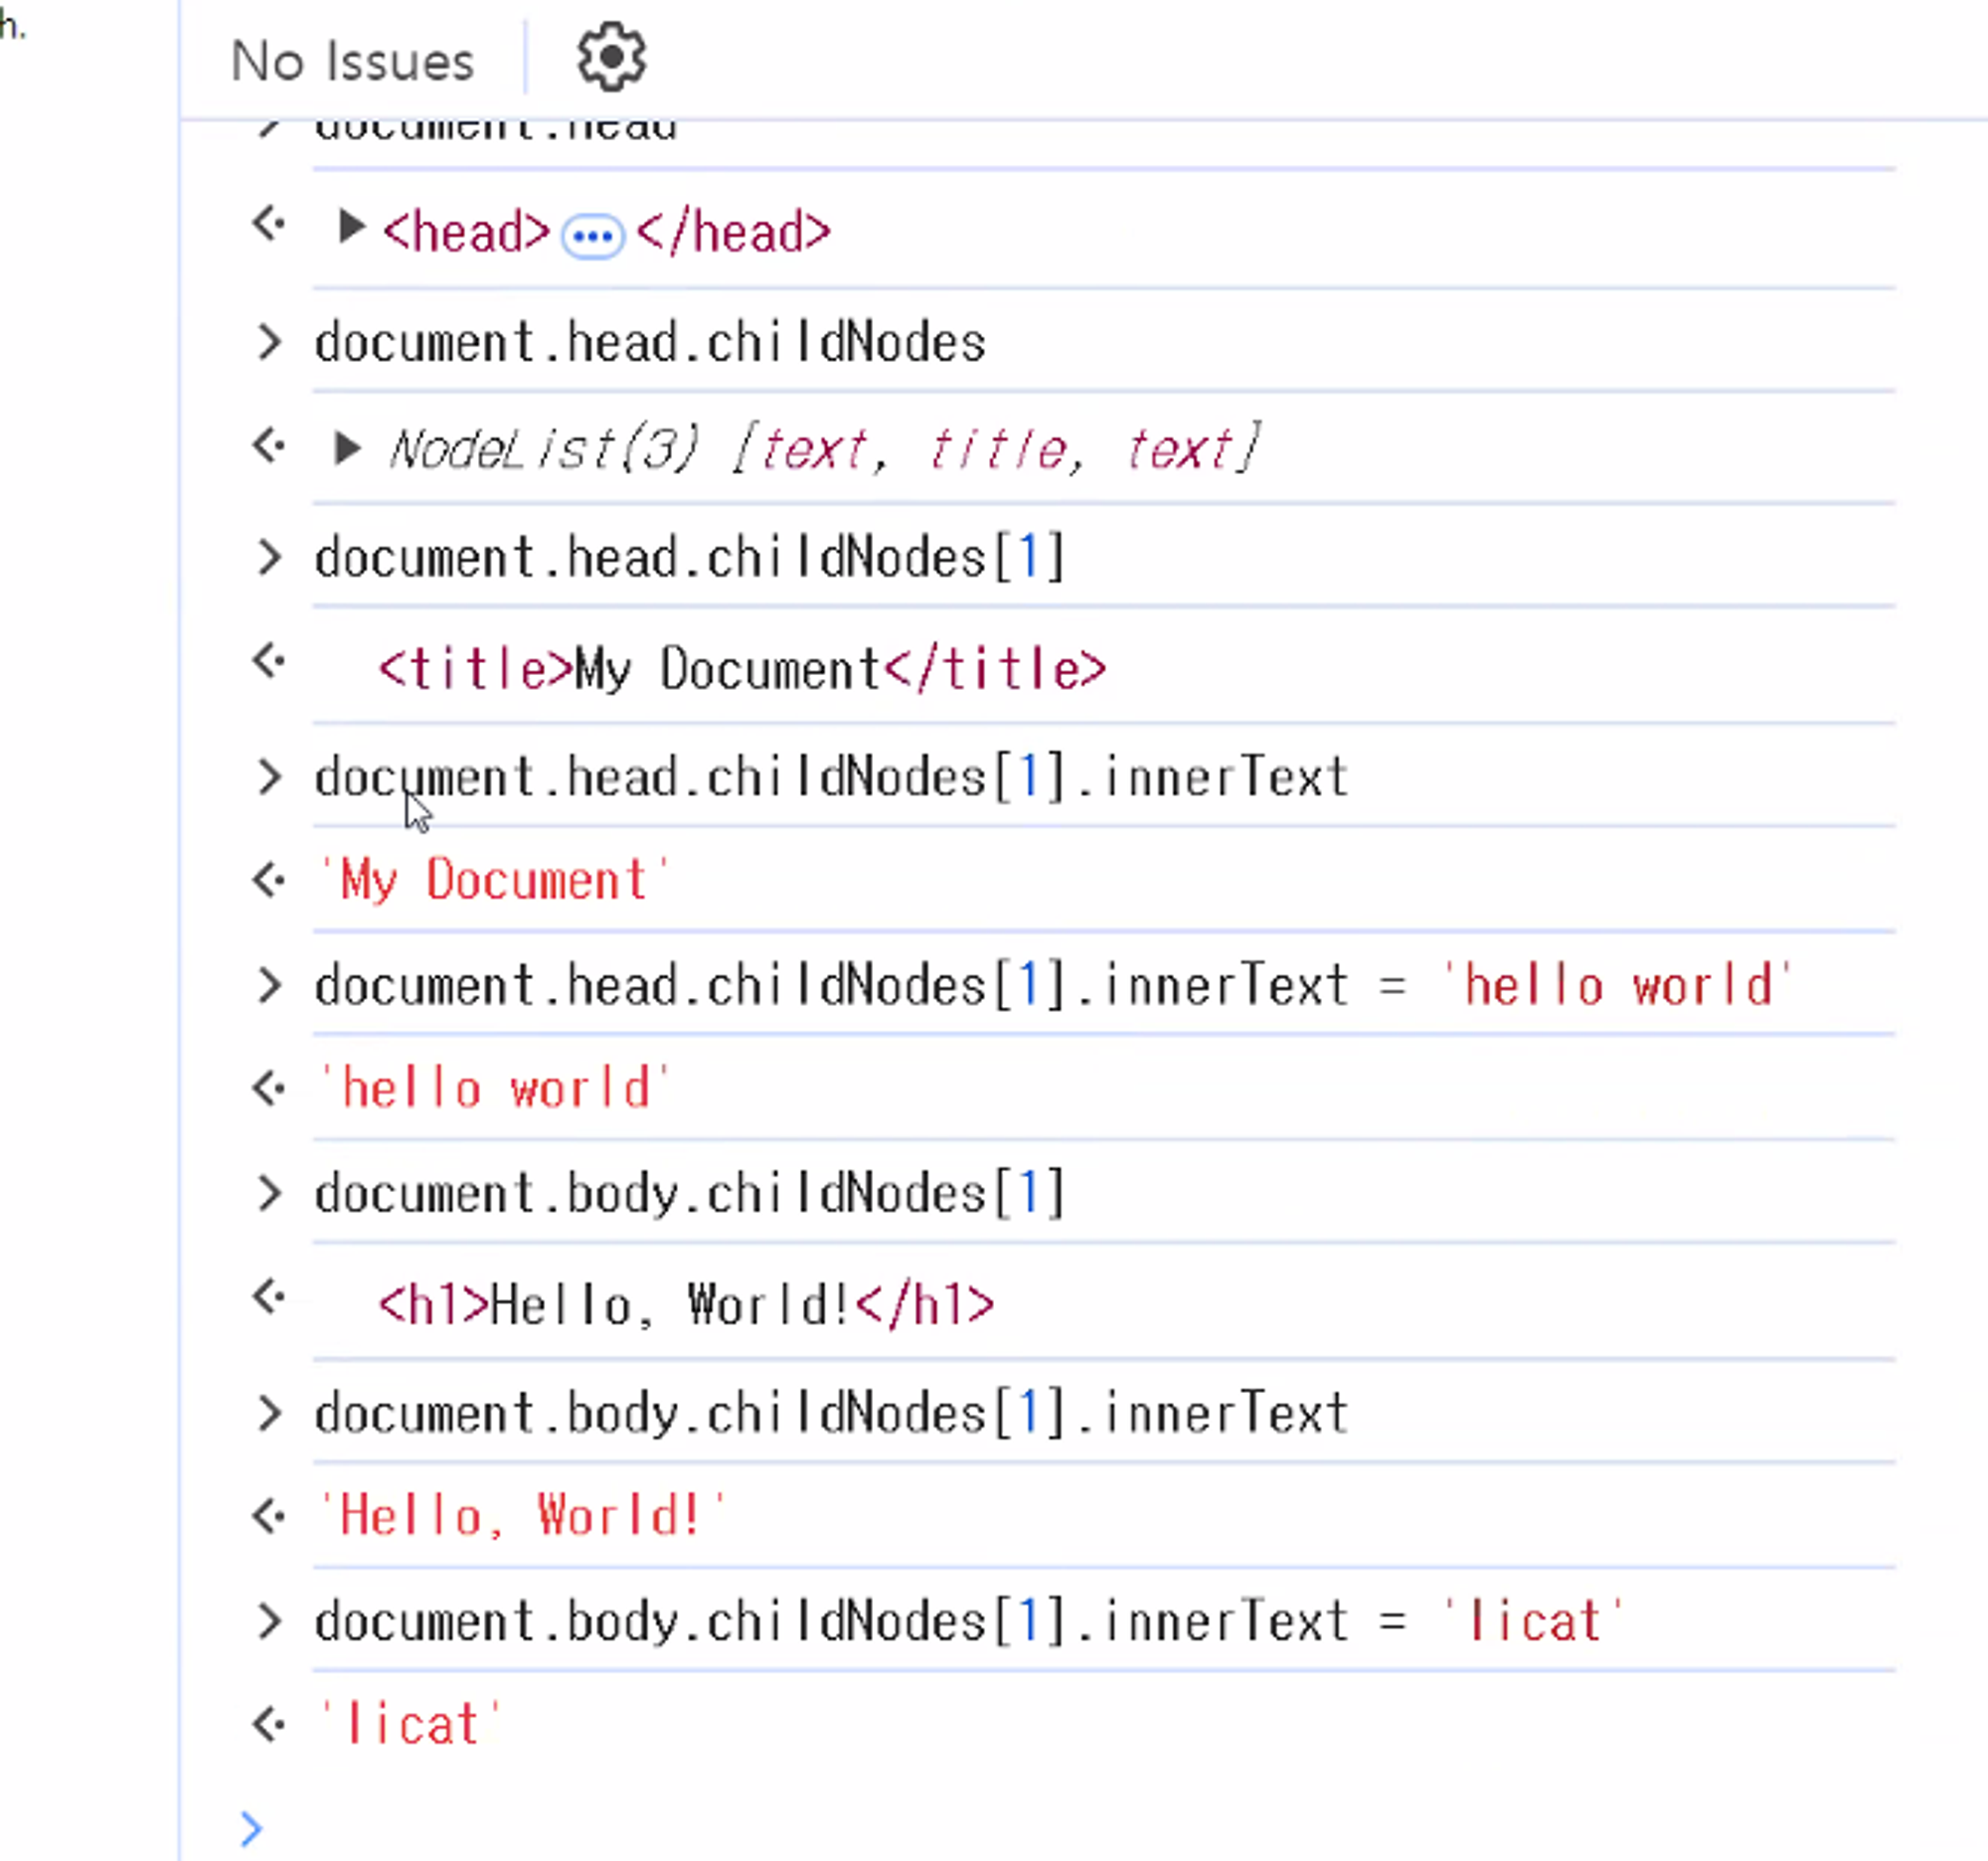
- 콘솔 입력 코드
document
// #document (file:///C:/Users/paullab/Desktop/%EC%98%A4%EB%A5%B4%EB%AF%B8%20BE%206/048.html)
document.all
// HTMLAllCollection(6) [html, head, title, body, h1, p]
document['head']
// <head>…</head>
document.head
// <head>…</head><title>My Document</title></head>
document.head.childNodes
// NodeList(3) [text, title, text]0: text1: title2: textlength: 3[[Prototype]]: NodeList
document.head.childNodes[1]
// <title>My Document</title>
document.head.childNodes[1].innerText
// 'My Document'
document.head.childNodes[1].innerText = 'hello world'
// 'hello world'
document.body.childNodes[1]
// <h1>Hello, World!</h1>
document.body.childNodes[1].innerText
// 'Hello, World!'
document.body.childNodes[1].innerText = 'licat'
// 'licat'
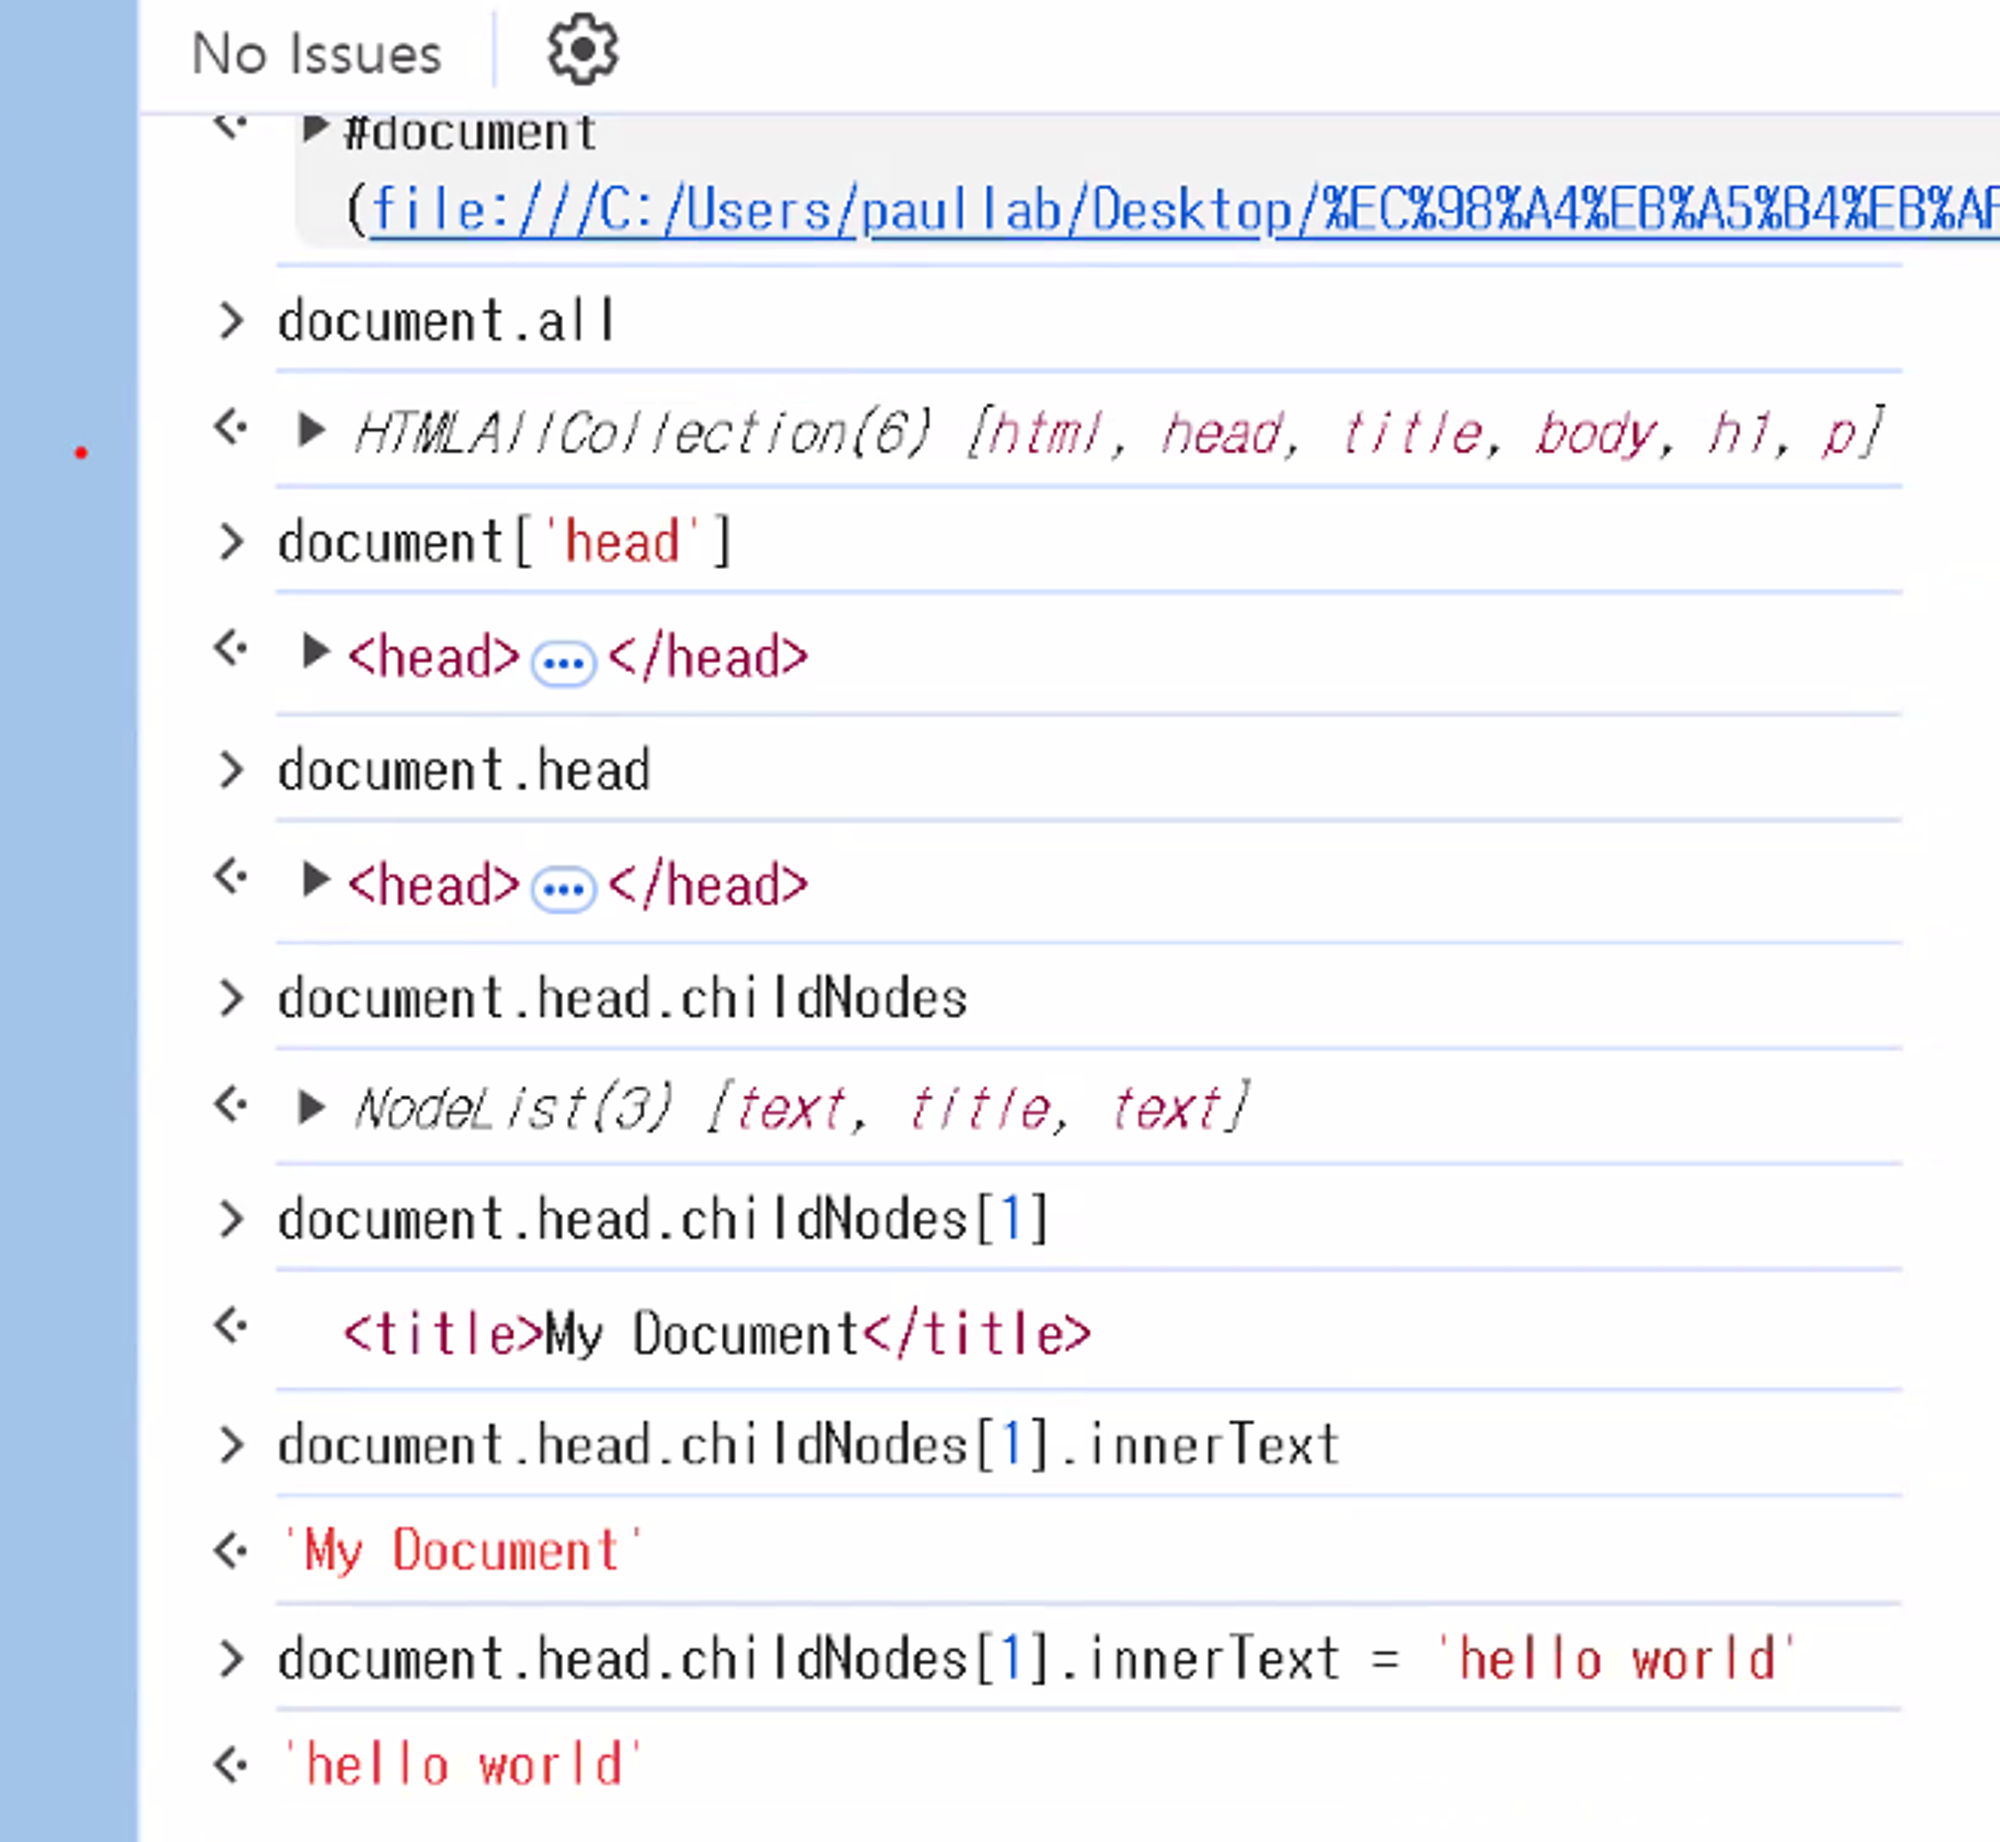
DOM 트리 접근
<body>
    <h1 id="logo" class="title">hello world</h1>
    <section>
        <h2 id="section-title">HTML 1</h2>
        <p id="contents">HTML is HyperText Markup Language. 1</p>
    </section>
    <section>
        <h2 id="section-title1">HTML 2</h2>
        <p id="contents1">HTML is HyperText Markup Language. 2</p>
    </section>
    <p class="hello">hello world</p>
    <script>
        const logo = document.getElementById('logo');
        const sectionTitle = document.querySelector('#section-title');
        const sectionTitleAll = document.querySelectorAll('#section-title');
        const hello = document.querySelector('.hello');

        console.log(logo);
        console.log(sectionTitle);
        console.log(sectionTitleAll);
        console.log(hello);
    </script>
</body>getElementById: 해당하는 ID를 가진 요소에 접근getElementsByTagName: 해당하는 태그 이름을 가진 모든 요소에 접근getElementsByClassName: 해당하는 클래스를 가진 모든 요소에 접근querySelector: CSS 선택자를 사용하여 단일 요소에 접근querySelectorAll: CSS 선택자를 사용하여 여러 요소에 접근
✅ DOM 제어하기
<body>
<button class="hello">HELLO!</button>
<script>
    // 앞에서는 Text만 수정을 했었지만
    // 이벤트 추가, 클래스 제어, 요소 생성 및 삭제, 속성 제어 등 다양한 DOM 제어를 해보도록 하겠습니다.

    const myBtn = document.querySelector('button');

    // 1. 이벤트 추가
    // myBtn.addEventListener('click', () => {
    //     console.log('hello world');
    // });

    // 2. 클래스 제어
    // myBtn.classList.add('blue');
    myBtn.addEventListener('click', function () {
        // myBtn.classList.add("blue"); // 클래스를 추가합니다.
        // myBtn.classList.remove("blue"); // 클래스를 제거합니다.
        myBtn.classList.toggle('blue'); // 클래스를 토글합니다.
        console.log(myBtn.classList.contains('blue')); // 클래스가 있는지 확인합니다.
    });

    // 3. 요소 제어
    // 이 데이터는 통신을 통해 받아온 데이터 입니다.
    const data = {
        name: 'hello',
        content: 'world',
        price: 3000
    };

    const section = document.createElement('section');
    const name = document.createElement('h2');
    const content = document.createElement('p');
    const price = document.createElement('p');
    const img = document.createElement('img');

    // img.setAttribute('src', 'https://via.placeholder.com/300');
    img.src = 'https://via.placeholder.com/300';
    name.textContent = data.name;
    content.textContent = data.content;
    price.textContent = data.price;
    price.style.color = 'red';
    // font-size -> fontSize
    price.style.fontSize = '20px';

    section.appendChild(img);
    section.appendChild(name);
    section.appendChild(content);
    section.appendChild(price);

    // document.body.appendChild(section);
    document.body.append(section); // appendChild 와 다른점은 노드 뿐만 아니라 여러개의 노드를 한번에, 그리고 텍스트도 자식 노드로 포함시킬 수 있다는것 입니다.

</script>
</body>-
target.addEventListener(type, listener): 요소에 이벤트를 추가,function () { console.log('hello world'); }는 리스너 함수(또는 이벤트 핸들러 함수)로 이벤트가 발생했을 때 실행- 이벤트의 타입에는
click,mouseover,mouseout,wheel등이 있다. - 리스너 함수의 인수에는 이벤트에 대한 정보가 담겨있다.
-
classList: 요소의 클래스 속성을 제어- 토글은 클래스가 없으면 추가하고, 있으면 제거한다.
-
DOM api를 이용하여 요소를 새롭게 생성하고, 위치하고, 제거
document.createElement(target): target 요소를 생성document.createTextNode(target): target 텍스트를 생성element.removeChild(target): element의 target 자식 요소를 제거element.append(target): target 요소를 element의 자식으로 위치.- appendChild 와 다른점은 노드 뿐만 아니라 여러개의 노드를 한번에, 그리고 텍스트도 자식 노드로 포함시킬 수 있다.
target.remove(): target 요소를 제거
-
document.createElement(): 새로운 요소를 생성 -
element.appendChild(): 생성한 요소를 추가 -
element.removeChild(): 요소를 제거 -
속성 제어
style: 요소의 스타일 제어setAttribute(): 요소의 속성 제어removeAttribute(): 요소의 속성 제거
-
setAttribute(): 요소의 속성을 설정 -
DOM 제어 예제
<script>
    const data = {
        name: 'hello',
        content: 'world',
        src: 'https://via.placeholder.com/300',
        price: 3000
    };

    document.body.innerHTML = `
    <section>
        <img src="${data.src}" alt="이미지">
        <h2>${data.name}</h2>
        <p>${data.content}</p>
        <p>${data.price}</p>
    </section>
`;

    // 1번과 비교했을 때
    // 1. 가독성은 높아졌습니다.
    // 2. 코드작성의 난이도가 낮아졌습니다.
    // 3. 요소를 컨트롤 하는 것은 1번이 더 좋습니다.
    // 4. 재활용성도 1번이 더 좋습니다.
    // 5. 이렇게 생산된 노드는 이벤트 같은 것을 가지고 있지 않습니다. 나중에 별도로 추가해야 합니다.
</script>
- JSON 데이터 활용 예제
<body> <header> <h1>쇼핑몰</h1> </header> <main></main> <footer>(주)위니브 대표: 이호준</footer> <script> fetch('https://test.api.weniv.co.kr/mall/') .then(res => res.json()) .then(data => { const main = document.querySelector('main'); data.forEach(item => { const section = document.createElement('section'); const img = document.createElement('img'); const h2 = document.createElement('h2'); const p = document.createElement('p'); img.src = 'https://test.api.weniv.co.kr/' + item.thumbnailImg; img.alt = item.productName; h2.textContent = item.productName; p.textContent = item.price; section.appendChild(img); section.appendChild(h2); section.appendChild(p); main.appendChild(section); }) }); </script> </body><body> <header> <h1>쇼핑몰</h1> </header> <main></main> <footer>(주)위니브 대표: 이호준</footer> <script> fetch('https://test.api.weniv.co.kr/mall/') .then(res => res.json()) .then(data => { const main = document.querySelector('main'); data.forEach(item => { const section = ` <section> <img src="https://test.api.weniv.co.kr/${item.thumbnailImg}" alt="${item.productName}"> <h2>${item.productName}</h2> <p>${item.price}</p> </section> `; main.innerHTML += section; }) }); </script> </body>
✅ DOM의 이벤트 흐름
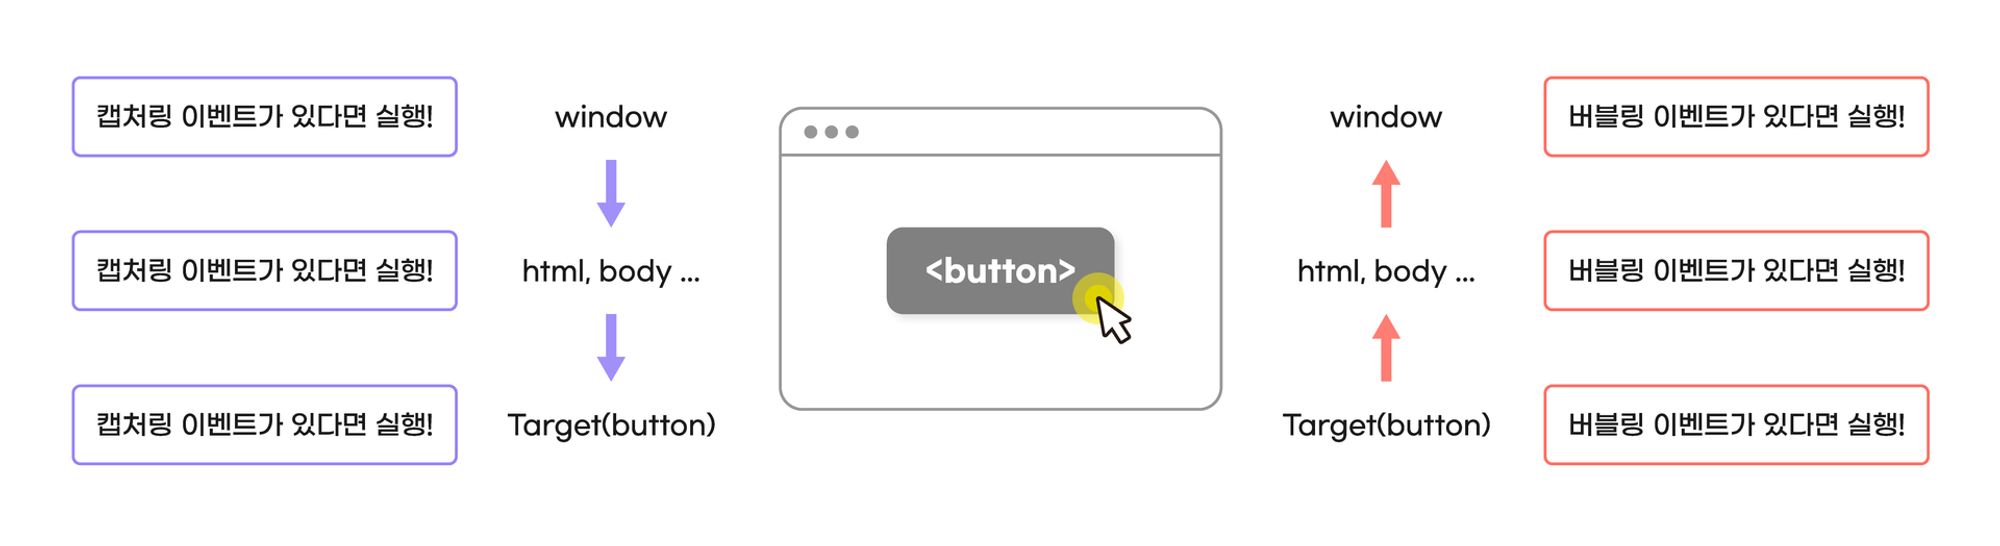
브라우저가 이벤트 대상을 찾아갈 때는 가장 상위의 window 객체부터 document, body 순으로 DOM 트리를 따라 내려 가는데, 이를 캡처링 단계라고 한다.
이벤트 대상을 찾아가는 과정에서 브라우저는 중간에 만나는 모든 캡처링 이벤트 리스너를 실행한다.
이벤트 대상을 찾고 캡처링이 끝나면 이제 다시 DOM 트리를 따라 올라가며 만나는 모든 버블링 이벤트 리스너를 실행하는데, 이를 이벤트 버블링 단계라고 한다.
이러한 과정에서 이벤트 리스너가 차례로 실행되는것을 이벤트 전파(event propagation)라고 한다.
<body>
    <article class="parent">
        <button class="btn" type="button">버튼</button>
    </article>

    <script>
        const parent = document.querySelector('.parent');
        const btnFirst = document.querySelector('.btn');

        btnFirst.addEventListener('click', (event) => {
            console.log('btn capture!');
        });

        window.addEventListener('click',() => {
            console.log('window capture!');
        }, true); // true : 캡처링 단계의 이벤트가 발생하도록 합니다.

        document.addEventListener('click',() => {
            console.log('document capture!');
        }, true);

        parent.addEventListener('click', () => {
            console.log('parent capture!');
        }, true);

        btnFirst.addEventListener('click', (event) => {
            console.log('btn bubble!');
            // event.preventDefault(); // 브라우저의 기본 동작을 막습니다.
            event.stopPropagation(); // 이벤트 전파를 막습니다.
        });

        parent.addEventListener('click', () => {
            console.log('parent bubble!');
        });

        document.addEventListener('click', () => {
            console.log('document bubble!');
        });

        window.addEventListener('click', () => {
            console.log('window bubble!');
        });
    </script>
</body>
이벤트 target, currentTarget
target 속성에는 이벤트가 발생한 진원지의 정보가 담겨있으며, target 속성을 통해 이벤트 리스너가 없는 요소의 이벤트가 발생했을 때도 해당 요소에 접근 할 수 있다.
currentTarget 속성에는 이벤트 리스너가 연결된 요소가 참조되어 있다.
preventDefault()
브라우저의 기본 동작을 중지
<body>
	<a href="https://www.naver.com" class="link">네이버 링크입니다만..</a>
	<form action="">
	  <button type="submit" class="submit">제출</button>
	</form>
	<script>
	  const link = document.querySelector('.link');
	  link.addEventListener('click', (event) => {
	    console.log('clicked');
	    event.preventDefault();
	  });

	  const submit = document.querySelector('.submit');
	  submit.addEventListener('click', (event) => {
	    console.log('clicked');
	    event.preventDefault();
	  });
	</script>
</body>
✅ 클래스와 인스턴스
class: 일종의 설계 도면 또는 템플릿인스턴스: 설계 도면을 통해 생상된 생산품
// ES6부터 도입된 class를 사용한 방식
class Robot {
    constructor(name, year) {
        // 생성자 함수라고 합니다. 하나의 클래스는 하나의 생성자만 정의할 수 있습니다.
        // 생성자 함수는 new 키워드가 호출될 때 자동으로 실행됩니다.
        this.name = name;
        this.hp = 100;
        this.year = year;
    }

    sayYourName() {
        // 메소드를 정의합니다. 메소드는 클래스가 생성한 인스턴스를 통해 사용할 수 있습니다.
        console.log(`삐리비리. 제 이름은 ${this.name}입니다. 주인님.`);
    }
}

// 클래스를 통해 인스턴스를 생성합니다.
const bot = new Robot('mura', 2024);
bot.sayYourName(); // 삐리비리. 제 이름은 mura입니다. 주인님.
bot.name
bot.hp
bot.year
✅ get과 set
getter메서드 : 값을 불러오는 메서드setter메서드 : 값을 수정하는 메서드
get과 set 키워드를 사용하면 마치 객체의 프로퍼티에 접근하듯 값을 다룰수 있게 되며, 객체의 프로퍼티를 호출, 수정하는것 처럼 사용할 수 있게 된다.
class Robot {
    #password;

    constructor(name, pw) {
        this.name = name;
        this.#password = pw;
    }

    sayYourName() {
        console.log(`삐리비리. 제 이름은 ${this.name}입니다. 주인님.`);
    }

    get password() {
        console.log('get password 호출')
        return this.#password;
    }

    set password(pw) {
        console.log('set password 호출')
        this.#password = pw;
    }
}

// get과 set사용
const bot = new Robot('재현', 1234);

console.log(bot.name); // 재현
console.log(bot.password); // 1234
bot.password = 5678;
console.log(bot.password); // 5678
✅ 비동기 프로그래밍과 Promise
동기와 비동기
- 동기 : 순차적으로 처리되는 방식
- 예 : (10시) licat : 로봇 청소기를 돌립니다. → (11시) licat : 빨래를 합니다. → (12시) licat : 설거지를 합니다. → (01시) licat : 요리를 합니다.
- 비동기 : 순차적으로 처리되지 않는 방식
- 예 : (10시) licat : 로봇 청소기를 돌리면서 → (10시) licat : 빨래를 합니다. → (10시) licat : 설거지를 합니다. → (10시) licat : 요리를 하려고 물도 끓입니다.
- 중요한 작업을 먼저 처리하고, 시간이 오래 걸리는 작업은 뒤에서 처리하는 것
Promise
비동기 작업을 처리하기 위한 방식, 비동기 작업의 완료 또는 실패를 나타내며, 완료나 실패에 따라 코드를 if문처럼 분기할 수 있다. Promise 방식은 대기(pending) 상태, 성공(fulfilled) 상태, 실패(rejected)를 가지며 중립은 없다. 성공과 실패에 따라 실행할 함수를 약속하는 것이며, 실행할 함수는 콜백함수이다.
- promise의 상태
- pending(대기상태) - resolve(해결) - fulfilled(성공)
- pending(대기상태) - reject(거부) - rejected(실패)
성공하면 then을 연달아 실행하고, 실패하면 catch를 사용하여 실패에 대한 코드를 작성하여 여 then으로 그 다음 코드를 실행할 때에 이전 코드의 결과값(return)을 아규먼트로 넘겨받는다.
또한 catch로 에러를 잡을 때에는 catch로 넘어가기 전 코드의 에러를 넘겨받는다.
console.log('hello');
let p = new Promise((resolve, reject) => {
    resolve('hello world'); // 성공
    // reject('hello world'); // 실패
})
    .then((메시지) => {
        alert(메시지);
        return 메시지.split(' ')[0];
    })
    .then((메시지) => {
        alert(메시지);
        return 메시지[0];
    })
    .then((메시지) => {
        alert(메시지);
    })
    .catch((메시지) => {
        alert('catch 실행!! :' + 메시지);
    });
console.log('world');
✅ fetch와 async, await
비동기 통신
fetch의 역할: 서버로부터 데이터를 받아와 화면에 표시.- 모놀리식 아키텍처: 서버가 모든 HTML, CSS, JS를 제공하는 방식. 서버에 부하가 많이 걸리고, 사용자가 많아지면 성능 저하 가능.
- 마이크로서비스 아키텍처: 서버의 부하를 분산시키기 위해, 이미지는 이미지 서버에서, 데이터는 데이터 서버에서 가져오는 방식. 성능이 향상되고 확장성 증가.
fetch를 사용하면 서버와 통신하여 데이터를 받아올 수 있다.
fetch
자바스크립트에서 제공하는 비동기 통신 API으로 서버에 네트워크 요청을 보내고 새로운 정보를 받아올 수 있다. fetch는 Promise를 기반으로 구현되어 있으며, .then()이나 .catch()를 통해 코드 분기를 할 수 있어 응답 값에 따라 .then()이나 .catch()를 적절히 사용할 수 있다.
fetch는 데이터를 읽고, 생성하고, 삭제하고, 수정하는 용도로도 사용할 수 있으며, 이러한 작업을 CRUD(Create, Read, Update, Delete)라고 한다. 이러한 작업을 수행할 때는 HTTP 메소드를 사용하는데, HTTP 메소드는 GET, POST, PUT, DELETE 등이 있다. 해당 메소드들을 사용하여 서버와 통신할 수 있다,
fetch('https://test.api.weniv.co.kr/mall')
    .then((data) => data.json())
    .then((data) => {
        console.log(data);
    }) // 통신이 성공했을 때!
    .catch((error) => {
        console.log(error);
    }) // 통신이 실패했을 때!

///////////////////

fetch('https://test.api.weniv.co.kr/mall')
    .then((data) => data.json())
    .then((data) => {
        console.log(data);
        return data[0]
    }) // 통신이 성공했을 때!
    .then((data) => {
        console.log(data);
    })
    .catch((error) => {
        console.log(error);
    }) // 통신이 실패했을 때!

///////////////////

fetch('https://test.api.weniv.co.kr/mall')
    .then((data) => data.json())
    .then((data) => {
        console.log(data);
        return data[0]
    }) // 통신이 성공했을 때!
    .then((data) => {
        console.log(data);
        return 'hello'
    })
    .catch((error) => {
        console.log(error);
}) // 통신이 실패했을 때!- fetch 실습 - 블로그 api 사용, console에 직접 입력하며 값 확인!
 /* fetch 실습 */

 /*-----------------------------------------------*/
 // 이 API는 30분마다 갱신되는 API 입니다.

 // CRUD : Create, Read, Update, Delete //

 // 블로그 목록 확인하기
 fetch("https://eduapi.weniv.co.kr/921/blog")
     .then((response) => response.json())
     .then((json) => console.log(json))
     .catch((error) => console.error(error));

 // // 블로그 목록 확인하기 - 1번째 게시글 확인
 fetch("https://eduapi.weniv.co.kr/921/blog/1")
     .then((response) => response.json())
     .then((json) => console.log(json))
     .catch((error) => console.error(error));

 // 게시글 작성하기
 fetch("https://eduapi.weniv.co.kr/921/blog", {
     method: "POST",
     headers: {
         "Content-Type": "application/json",
     },
     body: JSON.stringify({
         title: "test 921",
         content: "test 921",
     }),
 })
     .then((response) => response.json())
     .then((json) => console.log(json))
     .catch((error) => console.error(error));

 // 게시글 수정하기
 fetch("https://eduapi.weniv.co.kr/921/blog/1", {
     method: "PUT",
     headers: {
         "Content-Type": "application/json",
     },
     body: JSON.stringify({
         title: "test put !",
         content: "test put !",
     }),
 })
     .then((response) => response.json())
     .then((json) => console.log(json))
     .catch((error) => console.error(error));

 // 게시글 수정하기 - 2번 게시글 수정하기
 fetch("https://eduapi.weniv.co.kr/921/blog/2", {
     method: "PUT",
     headers: {
         "Content-Type": "application/json",
     },
     body: JSON.stringify({
         title: "test put !",
         content: "test put !",
     }),
 })
     .then((response) => response.json())
     .then((json) => console.log(json))
     .catch((error) => console.error(error));

 // 게시글 삭제하기
 fetch("https://eduapi.weniv.co.kr/921/blog/1", {
     method: "DELETE",
 })
     .then((response) => response.json())
     .then((json) => console.log(json))
     .catch((error) => console.error(error));
async, await(에이씽크, 어웨잇)
비동기 코드를 작성하는 새로운 방법이며, 기존의 비동기 처리 방식인 콜백이나 프로미스와는 다르게, 동기 코드처럼 보이게 작성할 수 있어 더 읽기 쉽고 이해하기 쉽다.
- 함수 앞에
async키워드를 붙이면 해당 함수는 항상 프로미스를 반환 - 함수 내부에서
await키워드를 사용하면, 프로미스가 처리될 때까지 함수 실행을 일시 중지시키고, 결과 값을 반환 - 비동기 코드를 동기 코드처럼 작성할 수 있어 가독성과 유지보수성 향상
- 에러 처리도 일반 try/catch문을 사용할 수 있어 더 간편해진다.
/* async, await */

console.log('hello');
async function getData() {
    const response = await fetch(`https://test.api.weniv.co.kr/mall`);
    const productData = await response.json();
    console.log(productData);
}
getData();
console.log('world');
와 이렇게 많은 내용을 이해하기 쉽게 정리해주셨네요 넘넘 감사합니다 잘 읽고 가요!!! 👍