TDD
테스트 주도 개발, 즉 테스트를 통해 기능을 구현하는 것
개발 전 테스트 케이스를 먼저 작성하는 것
우리가 어떻게 개발할 건지를 정리한 개발 방법론 중 하나
Unit test
특정 조건에서 함수가 어떻게 작동해야 하는지 정의하고, 정의대로 함수가 작동하는지 확인
진행 방법
- 적색 단계 : 하나의 기능에 대한 코드를 먼저 작성 후 실패

- 녹색 단계 : 기능 구현에 성공

- 리펙터 단계 : 테스트에 성공한 코드를 기반으로 코드의 품질을 높이는 단계
만약 이 단계에서 실패시, 다시 적색단계로 돌아감.
이 기능을 구현할 때 까지 테스트와 코드 수정 반복
하나의 기능이 완성되면 다른 기능으로 넘어감.
TDD를 사용하는 이유
요구사항에 대한 분석과 이해가 필요하기 때문!
명확한 이해를 바탕으로 설계가 가능해짐.
또, 사용자 입장에서 코드를 작성해 구현보단 인터페이스에 집중할 수 있게됨.
Jasmine
다운로드 https://github.com/jasmine/jasmine
기본 파일 내부의 spec 안에 있는 파일들은 테스트 되는 파일이다.
직접 연습해보기
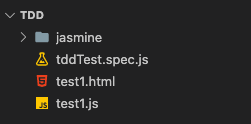
다운 받은 파일명을 jasmine으로 변경하고, 테스트할 파일들을 다음과 같이 만들어준다.
html에 jasmine 파일 안에 있던 script들을 복사해 붙여넣고 파일 경로를 수정한다.
<link rel="shortcut icon" type="image/png" href="jasmine/lib/jasmine-3.10.1/jasmine_favicon.png">
<link rel="stylesheet" href="jasmine/lib/jasmine-3.10.1/jasmine.css">

<script src="jasmine/lib/jasmine-3.10.1/jasmine.js"></script>
<script src="jasmine/lib/jasmine-3.10.1/jasmine-html.js"></script>
<script src="jasmine/lib/jasmine-3.10.1/boot0.js"></script>
<!-- optional: include a file here that configures the Jasmine env -->
<script src="jasmine/lib/jasmine-3.10.1/boot1.js"></script>
이 때 테스트용 기본 파일들까지 복사 붙여넣기 하지 않도록 조심해야 한다.
test1.html
<!DOCTYPE html>
<html lang="ko">

<head>
    <meta charset="UTF-8">
    <meta http-equiv="X-UA-Compatible" content="IE=edge">
    <meta name="viewport" content="width=device-width, initial-scale=1.0">
    <title>Document</title>

  <link rel="shortcut icon" type="image/png" href="jasmine/lib/jasmine-3.10.1/jasmine_favicon.png">
  <link rel="stylesheet" href="jasmine/lib/jasmine-3.10.1/jasmine.css">

  <script src="jasmine/lib/jasmine-3.10.1/jasmine.js"></script>
  <script src="jasmine/lib/jasmine-3.10.1/jasmine-html.js"></script>
  <script src="jasmine/lib/jasmine-3.10.1/boot0.js"></script>
  <!-- optional: include a file here that configures the Jasmine env -->
  <script src="jasmine/lib/jasmine-3.10.1/boot1.js"></script>
</head>

<body>
	<!--순서 상관 없음-->
    <script src="tddTest.spec.js"></script> <!--유닛테스트 파일-->
    <script src="test1.js"></script> // <!--테스트할 파일-->
</body>

</html>
테스트용 js 앞에는 spec을 작성해주어야한다.
그래야 이게 테스트 템플릿이라고 jasmine이 인식할 수 있다.
tddTest.spec.js
//테스트 유닛 모음
describe('자스민 테스트 입니다.', () => {
    //테스트 유닛 1
    it('덧셈을 하는 함수입니다.', () => {
        let num = 10;

        //expect : 실행할 함수의 결과값을 인수로 전달합니다. 기대식
        //toBe : 내가 기대한 결과가 일치하는지 판단하는 함수
        //실행할 함수의 결과값을 인수로 전달

        expect(plusOne(num)).toBe(11);
    })
})
test1.js
function plusOne(num){
    return num + 1;
}
이제 test1.html파일을 라이브 서버로 돌리면 다음과 같은 화면이 나타나는 것을 확인할 수 있다.
TDD 연습
객체를 사용해 테스트
// 객체지향

// 1. 모듈 패턴
function person() {
    let age = 35;

    return {
        getAge: function () { return age },
        setAge: function (data) { age = data }
    }
}

const myPerson = person();
console.log(myPerson.getAge());


// 2. 사용자 정의 타입 패턴
function PersonType() {
    this.age = 35;
}

PersonType.prototype.getAge = function () {
    return this.age
}

const instancePerson = new PersonType();
const instancePerson2 = new PersonType();
const instancePerson3 = new PersonType();
const instancePerson4 = new PersonType();


console.log(instancePerson.age);

3. 모듈 + 사용자 정의 타입

function PersonType2() {
   let age = 25;

   function innerPersonType() { }

   innerPersonType.prototype.getAge = function () {
       return age;
   }
  return innerPersonType;
}


// const Person3 = PersonType2();
// const person3 = new Person3();
// console.log(person3.getAge());

// IIFE 패턴으로 만들어보기
const PersonType3 = (function () {
    let age = 25;

    function innerPersonType() { }

    innerPersonType.prototype.getAge = function () {
        return age;
    }

    return innerPersonType;
})();

const personType3 = new PersonType3();
console.log(personType3.getAge());
beforeEach()
it 함수가 실행되기 전에 실행되는 함수.
변수 값 할당 및 공통적으로 필요한 부분을 위해 먼저 선언해줘야할 때 사용된다.
describe("텍스트 관리자입니다.", () => {

  it("텍스트 값을 전달합니다.", () => {
    const textManager = new TextManager();
    const initValue = textManager.getValue();
    expect(textManager.getValue()).toBe(initValue);
  });

  it("텍스트 값을 수정합니다.", () => {
    const textManager = new TextManager();
    const newText = { data: "Hello Zebras" };
    textManager.setValue(newText);
    expect(textManager.getValue()).toBe(newText.data);
  });
});
위 함수를 다음과 같이 변경
describe("텍스트 관리자입니다.", () => {
  let textManager;

  // it 함수 호출 이전에 실행됨.
  beforeEach(() => {
    textManager = new TextManager();
  });

  it("텍스트 값을 전달합니다.", () => {
    const initValue = textManager.getValue();
    expect(textManager.getValue()).toBe(initValue);
  });

  it("텍스트 값을 수정합니다.", () => {
    const newText = { data: "Hello Zebras" };
    textManager.setValue(newText);
    expect(textManager.getValue()).toBe(newText.data);
  });
});
실행 코드
textManager.js
// 즉시 실행 함수(IIFE)로 작성
// 즉시 실행 함수 == 익명함수
const TextManager = (() => {
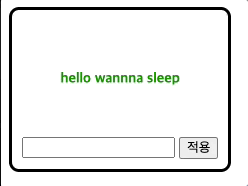
let value = { data: "hello wannna sleep" };
function innerTextManager() {}
innerTextManager.prototype.setValue = function (newValue) {
this.value = newValue;
};
innerTextManager.prototype.getValue = function () {
return this.value.data;
};
return innerTextManager;
})();textManager.js
describe("텍스트 관리자입니다.", () => {
  let textManager;

  // it 함수 호출 이전에 실행됨.
  beforeEach(() => {
    textManager = new TextManager();
  });

  it("텍스트 값을 전달합니다.", () => {
    const initValue = textManager.getValue();
    expect(textManager.getValue()).toBe(initValue);
  });

  it("텍스트 값을 수정합니다.", () => {
    const newText = { data: "Hello Zebras" };
    textManager.setValue(newText);
    expect(textManager.getValue()).toBe(newText.data);
  });
});
toBe
expect(textManager.getValue()).toBe(newText.data);
expect(함수).toBe(기대하는 리턴값)
만약 함수의 리턴값이 toBe에 입력된 값과 일치하는 경우, 테스트 통과
viewManager.js
function ViewManager(textManager, options) {
  if (!textManager || !options.btnEl || !options.viewerEl || !options.inpTxt) {
    // throw : 사용자 정의 예외를 만들고 프로그램을 종료합니다.
    throw Error("error 발생");
  }

  this.inpTxt = options.inpTxt;
  this.viewerEl = options.viewerEl;
  this.textManager = textManager;

  options.btnEl.addEventListener("click", () => {
    this.changeValue();
  });
}

ViewManager.prototype.changeValue = function () {
  this.textManager.setValue({ data: this.inpTxt.value });
  this.updateView();
};

ViewManager.prototype.updateView = function () {
  this.viewerEl.textContent = this.textManager.getValue();
};
viewManager.js
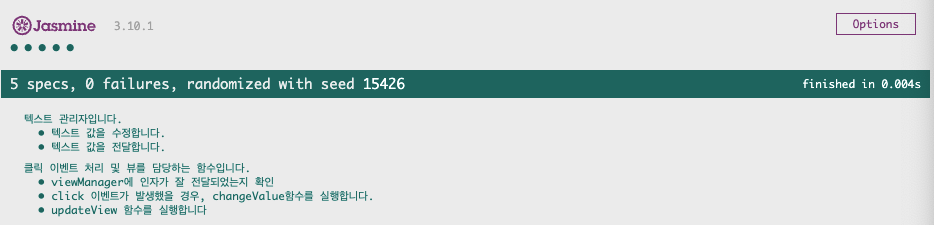
describe("클릭 이벤트 처리 및 뷰를 담당하는 함수입니다.", () => {
  // dependency injection (의존성 주입)
  // 다른 객체를 자신에게 주입시켜 사용하는 방법
  let textManager, viewerEl, btnEl, inpTxt, viewManager;

  beforeEach(() => {
    textManager = new TextManager();
    viewerEl = document.createElement("strong");
    btnEl = document.createElement("button");
    inpTxt = document.createElement("input");

    viewManager = new ViewManager(textManager, { viewerEl, btnEl, inpTxt });
  });
  it("viewManager에 인자가 잘 전달되었는지 확인", () => {
    const textManager = null;
    const btnEl = null;
    const viewerEl = null;
    const inpTxt = null;

    // 인자가 전달되는지 확인하는 함수
    const actual = () => {
      new ViewManager(textManager, {
        btnEl,
        viewerEl,
        inpTxt,
      });
    };

    // actual 에는 값이 아닌 실행할 수 있는 함수가 전달되어야함.
    expect(actual).toThrowError("error 발생");
  });

  it("click 이벤트가 발생했을 경우, changeValue함수를 실행합니다.", () => {
    // 특정한 모듈의 함수를 감시합니다.
    spyOn(viewManager, "changeValue");
    btnEl.click();

    // toHaveBeenCalled : 함수가 호출이 된적이 있는지 판별합니다.
    expect(viewManager.changeValue).toHaveBeenCalled();
  });

  it("updateView 함수를 실행합니다", () => {
    // 특정한 모듈의 함수를 감시합니다.
    spyOn(viewManager, "updateView");
    viewManager.changeValue();
    // toHaveBeenCalled : 함수가 호출이 된적이 있는지 판별합니다.
    expect(viewManager.updateView).toHaveBeenCalled();
  });
});
toThrowError
toThrowError() 는 앞선 함수에서 에러가 나오기를 기대하고 있는 함수
expect(actual).toThrowError("error 발생");
expect(함수). toThrowError() / toThrowError(일치해야하는 에러 메세지);
toThrowError()에 argument를 전달하지 않으면, 함수에서 오류 발생시 테스트 통과
argument로 메세지 전달 시, 오류 메세지가 일치하는 경우 테스트 통과
spyOn / toHaveBeenCalled()
toHaveBeenCalled() 는 함수가 호출되었는지 확인하는 함수
이 함수가 작동되기 위해선 위에서 spyOn을 통해 감시하고 있어야한다.
spyOn(viewManager, "updateView"); // spyOn(인스턴스, "updateView");
viewManager.changeValue();
expect(viewManager.updateView).toHaveBeenCalled();
index.spec.html
<!DOCTYPE html>
<html lang="ko">

<head>
  <meta charset="UTF-8">
  <meta http-equiv="X-UA-Compatible" content="IE=edge">
  <meta name="viewport" content="width=device-width, initial-scale=1.0">
  <title>Document</title>

  <link rel="shortcut icon" type="image/png" href="../jasmine/lib/jasmine-3.10.1/jasmine_favicon.png">
  <link rel="stylesheet" href="../jasmine/lib/jasmine-3.10.1/jasmine.css">

  <script src="../jasmine/lib/jasmine-3.10.1/jasmine.js"></script>
  <script src="../jasmine/lib/jasmine-3.10.1/jasmine-html.js"></script>
  <script src="../jasmine/lib/jasmine-3.10.1/boot0.js"></script>
  <!-- optional: include a file here that configures the Jasmine env -->
  <script src="../jasmine/lib/jasmine-3.10.1/boot1.js"></script>
</head>

<body>
  <!-- 데이터 관리 객체 -->
  <!-- : 데이터를 은닉하고 있다가 다른 객체에 전달 혹은 수정 -->

  <script src="textManager.js"></script>
  <script src="textManager.spec.js"></script>
  <script src="viewManager.js"></script>
  <script src="viewManager.spec.js"></script>
</body>

</html>
실행결과
index.html
<!DOCTYPE html>
<html lang="ko">

<head>
  <meta charset="UTF-8">
  <meta http-equiv="X-UA-Compatible" content="IE=edge">
  <meta name="viewport" content="width=device-width, initial-scale=1.0">
  <title>Document</title>
  <style>
    article {
      display: inline-block;
      border: 3px solid black;
      border-radius: 10px;
      padding: 10px;
    }

    .viewer {
      display: block;
      font-size: 14px;
      color: green;
      margin: 50px 0;
      text-align: center;
    }
  </style>
</head>

<body>
  <article>
    <strong class="viewer">HELLO</strong>
    <input type="text" class="inp-text">
    <button class="btn-push"> 적용 </button>
  </article>
  <script src="./textManager.js"></script>
  <script src="./viewManager.js"></script>
  <script>
    const viewerEl = document.querySelector('.viewer');
    const inpTxt = document.querySelector('.inp-text');
    const btnEl = document.querySelector('.btn-push');

    const textManager = new TextManager();
    const viewManager = new ViewManager(textManager, { viewerEl, inpTxt, btnEl })
    viewManager.updateView();
  </script>
</body>

</html>
실행결과