
간단한 Node.js API Server 만들기 #1
설계
회사 업무상 간단하게 Node.js로 API Server를 구성하게 됬다.
4단계에 걸쳐서 일정을 잡았고 단계에 맞춰 구현할 예정이다.
1. 서버 구축
Node.js, Express, PM2, (추후 NginX와 연동)
pm2는 Node.js 프로세스 매니저이며 서버의 자동 재시작, 모니터링과 같은 기능 보유
2. API 설계 및 기능 구현
클라이언트는 서버에게 2가지 API를 요청한다.
1. 특정 Directory를 스캔하여 해당 Directory의 Hierachy를 Json형태로 반환
2. 해당 Hierachy에 맞게 경로값을 인자로 보내주면 그 경로에 있는 pdf파일 다운로드
3. OAuth2.0 인증/인가 시스템
현재 OAuth2.0 인증서버는 내부적으로 구동중이며 클라이언트가 내가 구성한 서버에
API를 호출시에 해당 Token이 유효한지 OAuth2.0 서버에 인가받는 모듈이 필요.
4. 테스트
Node.js에서도 TDD를 적용해보려는 노력
Mocha, superTest
5. 문서 작성
API 명세를 작성하고 간편하게 확인하기 위하여 Swagger2.0 UI 사용
구현
1. 서버 구축
우선 Express로 서버를 구성한다
npm install express설치할 모듈에 대한 정보를 담고 있는 package.json
  "name": "earth",
  "version": "0.0.0",
  "private": true,
  "scripts": {
    "test": "mocha ./test/manual.spec.js",
    "start": "nodemon ./bin/www"
  },
  "dependencies": {
    "app-root-path": "^3.0.0",
    "cookie-parser": "~1.4.4",
    "date-utils": "^1.2.21",
    "debug": "~2.6.9",
    "directory-tree": "^2.2.4",
    "express": "~4.16.1",
    "http-errors": "~1.6.3",
    "jade": "~1.11.0",
    "morgan": "~1.9.1",
    "properties-reader": "^0.3.1",
    "winston": "^3.2.1",
    "winston-daily-rotate-file": "^4.4.1",
    "yamljs": "^0.3.0"
  },
  "devDependencies": {
    "mocha": "^6.2.2",
    "supertest": "^4.0.2",
    "swagger-ui-express": "^4.1.2"
  }
많은 모듈들을 설치했는데, 크게 눈에 띄는건 3가지이다.
1. Logger Module : morgan, winston
2. Test Module : mocha, supertest
3. API-Document : swagge-ui-express
1-1. 로거 시스템
로거 시스템을 만들기 위하여
morgan과winston을 선택했다.
1) Morgan
morgan은 대표적인 로깅 미들웨어이며 HTTP메서드로 특정 URL을 방문할 때만 함수가 호출됨.
npm install morgan//app.js
...
const morgan = require('morgan');
...
app.use(morgan('dev'));
...
//console
GET / 304 297.128 ms - -
GET /favicon.ico 404 20.966 ms - 1053morgan 함수의 인자로는 short, dev, common, combined가 올 수 있다. (정보의 노출 수준)
필자는 'dev'를 사용할 것이다.
'dev'의 정보 표현
| Http 요청 | 주소 | 응답 코드&속도 | 응답바이트 |
|---|---|---|---|
| GET | / | 304 297.128 ms | - |
| GET | /favicon.ico | 404 20.966 ms | 1053 |
2) Winston
winston은 level에 따라 사용자가 직접 로그 남기는 것이 가능(console.log 그만써야지..)
또한 로그내용을 console 혹은 file에다가 남기는 것이 가능하다winston은 따로 설정 파일을 구성하는 것이 필요하다.
필자는 로그파일을 날짜별로 남기기 위하여
winston-daily-rotate-file, date-utils 모듈을 추가로 사용하였다.
npm install winston//config/winston.js
const winston = require('winston');
const appRoot = require('app-root-path'); //프로젝트의 root경로
require('winston-daily-rotate-file');
require('date-utils');
//format을 사용자가 구성
const myformat = winston.format.printf(
info => `${new Date().toFormat('YYYY-MM-DD HH24:MI:SS')} [${info.level.toUpperCase()}] - ${info.message}`
)
const logger = winston.createLogger({
level: 'debug', //winston 로그 레벨
transports: [
new winston.transports.DailyRotateFile({
filename: `${appRoot}/logs/test.log`,
zippedArchive: false, //압축 여부
format: myformat,
handleExceptions: true
}),
new winston.transports.Console({
format: myformat,
handleExceptions: true,
colorize: true,
})
]
});
//app.js
...
const morgan = require('morgan');
const winston = require('./config/winston')
...
winston.info('starting server'); //console.log 대신 사용
app.use(morgan('dev', { stream: winston.stream })); // morgan with winston
//console
2020-01-11 18:02:24 [INFO] - starting server
2020-01-11 18:02:31 [INFO] - GET / 304 255.584 ms - -
2020-01-11 18:02:31 [INFO] - GET /stylesheets/style.css 304 1.746 ms - -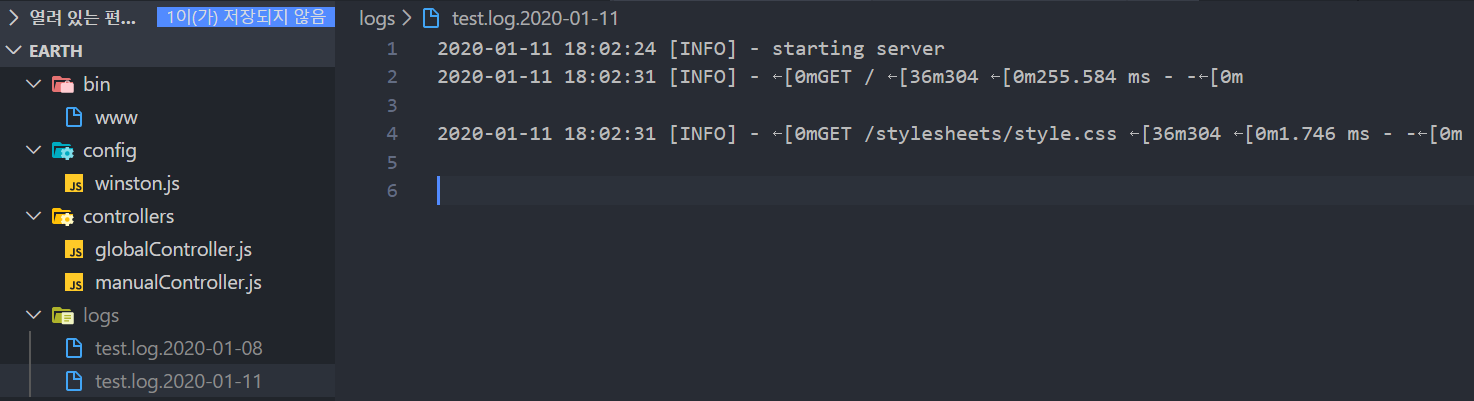
morgan과 winston의 stream을 이용하여 로그시스템을 구축하였다.
다음 포스팅은 API 구현과 테스트 모듈 사용법에 대해 작성할 예정이다.
그럼 여기까지!