
React Study 스터디 일지 1~2차
1차 Create-react-app 없이 React 프로젝트 생성하기
React & Babel & Webpack & live Dev Server 설정
참고 사이트 : https://velog.io/@yesdoing/내맘대로-리액트-A-to-Z-1-9pjwz1o6ai
2차 Open API를 사용하여 Component 만들기
개발 (Create-React-App 없이 개발하기란 참...)
Class Component를 생성하려 하니 "react unexpected token =" Error 발생
1. 1차 스터디에서 완료되지 못한 Babel 설정
npm install -D @babel/plugin-proposal-class-properties
npm install -D @babel/plugin-transform-runtime
npm install -D @babel/runtime
npm install -D babel-eslint
//.babelrc
{
"presets": [
"@babel/preset-env",
"@babel/preset-react"
],
"plugins": [
"@babel/plugin-proposal-class-properties",
"@babel/transform-runtime"
]
}
//.eslintrc.js
"parser": "babel-eslint",2. 서버와의 Proxy 설정
- Create-React-App에서는 package.json에서 proxy 설정(server의 host 주소 설정)만 해주면 가능하다.
- CRA가 아니라면 webpack.config.js의 devServer에서 proxy 설정 가능하다.
  devServer: {
    contentBase: './build',
    noInfo: true,
    open: true,
    port: PORT,
    proxy: { "/api": "http://localhost:3000" }
},- Home Component에서 server와 통신한다.
3. API Key를 React Server에서 어떻게 숨길 수 있을까?
- 답변 : Do not store any secrets (such as private API keys) in your React app!
- 간단한 express server를 구축하여 open-api server에서 호출하기로 한다.
- API Key, Secret Key를 서버의 .env파일에 저장한다.
- 주된 목적은 React 스터디이므로 Server 설정은 따로 적지 않기로 한다.
4. API 로 받아온 Row Data 가공 후 Component 생성
- Fetch와 Axios 둘 중 어떤 것을 쓸지 고민하다가 차이점을 알게 되었다.
Fetch API보다 Axios가 더 좋은 장점
1. 구형 브라우저 지원 가능 (Fetch API의 경우는 Polyfill이 필요)
2. 요청을 중단 시킬 수 있음
3. 응답 시간 초과 설정 방법 있음
4. CSRF 보호 기능 내장
5. JSON 데이터 자동변환
6. Node.js에서 사용 가능
7. status code 다루기 쉬움
- Axios로 가져온 데이터(JSON Object)를 JSX에서 Component Interation를 사용하기 위해 Map 형태로 변환 시켜주는 작업 필요하다.
const object1 = {
  a: 'somestring',
  b: 42
};

for (let [key, value] of Object.entries(object1)) {
  console.log(`${key}: ${value}`);
}
Object.entries() : for..in와 같은 순서로 주어진 객체 자체의 enumerable 속성 [key,value] 쌍의 배열을 반환한다.
//TickerList.js
<TableBody>
  {tickers.map(([key, ticker]) => (
    <Ticker
      key={key}
      id={key}
      min_price={ticker.min_price}
      max_price={ticker.max_price}
      fluctate_rate_24H={ticker.fluctate_rate_24H}
      acc_trade_value_24H={ticker.acc_trade_value_24H}
    />
  ))}
</TableBody>
App -> Home(axios) -> TickerList(Table) -> Ticker Component(TableRow)
//Ticker.js
Ticker.defaultProps = {
  min_price: '0',
  max_price: '0',
  fluctate_rate_24H: '0',
  acc_trade_value_24H: '0',
};

Ticker.propTypes = {
  id: PropTypes.string.isRequired,
  min_price: PropTypes.string.isRequired,
  max_price: PropTypes.string.isRequired,
  fluctate_rate_24H: PropTypes.string.isRequired,
  acc_trade_value_24H: PropTypes.string.isRequired,
};- prop-types를 통해 validation 체크한다.
- defaultProps를 통한 component 초기값 설정한다.
5. Private API를 호출하기까지...
- Bithumb Public API는 쉽게 호출이 가능하다. (GET URL)
- 회원정보를 얻을 수 있는 Private API를 호출하려 했고 Parameter로 Api Key와 Secret Key 등등이 필요했다. 하지만
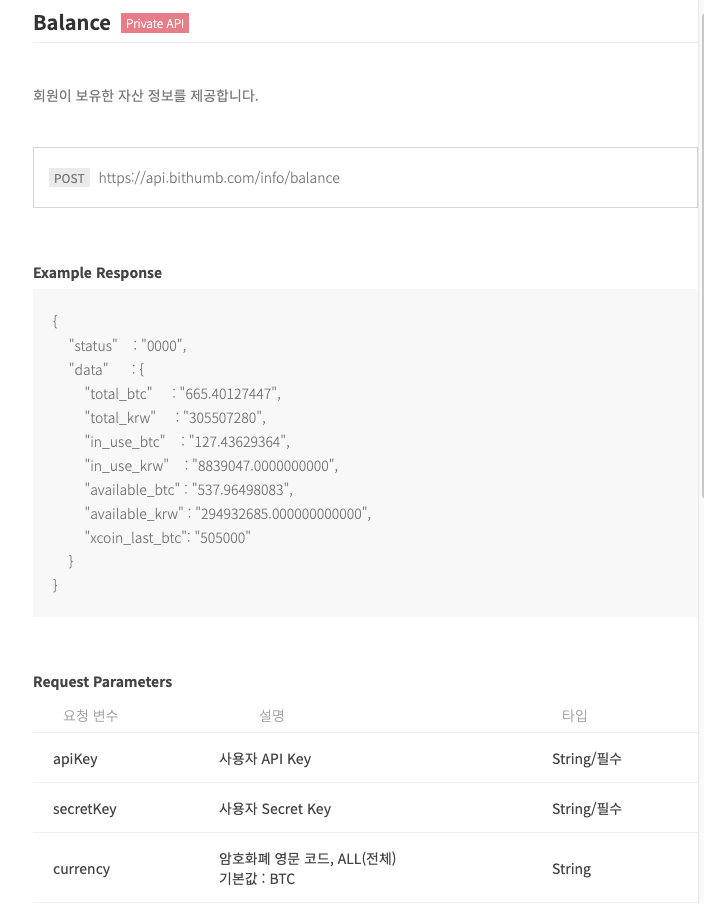
- PostMan으로 테스트 시에 값을 가져올 수가 없는 이슈가 발생하였다. (Return 값은 5300 '올바르지 않은 API Key, Secret Key로 호출')
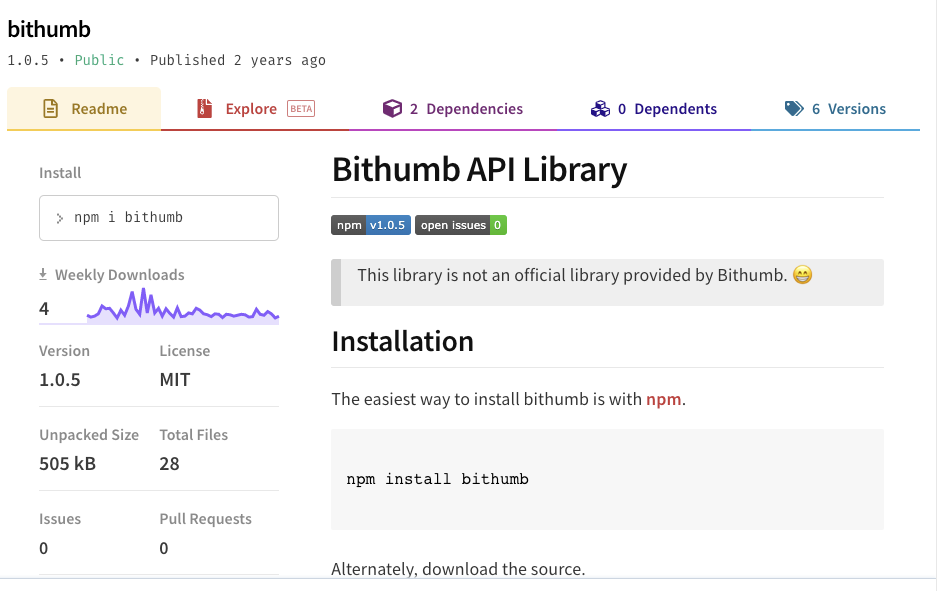
- 방법을 찾던 중 데모 프로그램을 다운로드 받아서 소스를 까보았더니 CryptoJS로 암호화 및 헤더 설정이 내부적으로 진행되고 있었다. 해당 소스대로 API를 호출하려다가 NPM에서 bithumb 모듈을 혹시나 찾아보았더니 다행히 있었고 모듈을 적용하여 호출하였다.
6. 기초적인 에러처리 구현
- 에러는 기본적으로 2가지 종류가 있을 수 있다.
1. 노드 서버에서 에러 발생 후 클라이언트에서 확인
2. 클라이언트인 리액트 앱에서 에러 발생
- 이 중 1번에 대한 구현 내용이다.
- 서버에서 API 호출 시 catch 문에서 Error 객체를 생성한다.
//[Node Server]
//apiController.js

export const getTickers = async (req, res, next) => {
  try {
    const {
      data: { data },
    } = await axios.get('https://api.bithumb.com/public/ticker/ALL_KRW');
    //throw "getTickers Error";
    res.json({ data });
  } catch (e) {
    next(new Error(e));
  }
};

export const getBalance = async (req, res, next) => {
  try {
    Bithumb.setApiKey(process.env.API_KEY, process.env.SECRET_KEY);
    const data = await Bithumb.getMyBalance('BTC');
    //throw "getBalance Error";
    res.json( data[2] );
  } catch (e) {
    next(new Error(e));
  }
};

//app.js
app.use((err, req, res, next) => {
  console.error(err);
  res.status(err.status || 500);
  res.json({
    errors: {
      message: err.message,
    },
  });
  next();
});
express에서는 모든 route에 대한 Error Handling을
오류 처리 미들웨어로 처리한다.
//[React Client]
//Home.js
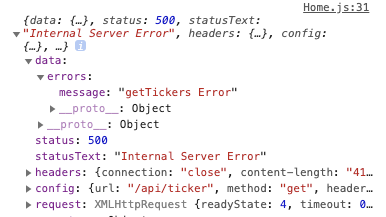
errorHandler = e => {
if (e.response) {
//요청이 이루어졌으며 서버가 2xx의 범위를 벗어나는 상태 코드로 응답
console.log(e.response);
} else if (e.request) {
//요청이 이루어졌으나 응답을 받지 못함
console.log(e.request);
} else {
//오류를 발생시킨 요청을 설정하는 중에 문제가 발생
console.log('Error', e.message);
}
console.log(e.config);
}
getTickers = async () => {
try {
const {
data: { data },
} = await axios.get('/api/ticker');
this.setState({ tickers: Object.entries(data) });
console.log(this.state.tickers);
} catch (e) {
this.errorHandler(e);
}
};
Server에서 throw로 에러 객체를 생성해서 보내면 Client에서는 해당 에러를 catch로 받은 후 해당 에러 내용(e.response)을 출력한다. 해당 axios 에러처리는 Axios 러닝 가이드를 참고하였다.
React에는 React16부터 ErrorBoundary라는 개념이 생겼다고 한다. ''ErrorBoundary''란 Component Tree의 자식 컴포넌트 트리에서 발생한 에러를 잡아내고 로그를 남기며, 나머지 컴포넌트에게 영향을 주지 않게 한다는 개념이다. 이 부분을 더 조사해보고 추후 적용해보기로 한다.
7. UI 구성
- UI를 적용하는데 있어서 몇가지 후보를 고려해보았다.
- React-Bootstrap
- React-Core UI
- React-Material UI
- 기타 등등..
- 몇가지를 고려하여 Material UI를 선택하였다.
- 쓸만한 Component들이 많으며 구글 검색 자료 등이 많다.
- React의 장점을 그대로 사용할 수 있다.
- 사용자 커스터마이징이 쉽다.
- Material-UI 컴포넌트에서는 스타일을 적용할때 스타일 패키지를 이용한다. 스타일 패키지를 적용시키는 3가지 방법이 있다.
- Hook API를 사용하는 방법
- Styles Components API를 사용하는 방법
- HOC(Higher-order Component) API를 사용하는 방법
- 이 중에서 HOC를 선택하였다.
HOC란? 여러 컴포넌트의 기능 상에서 자주 반복되는 코드들을 컴포넌트로 만들어서 반복 문제를 해결하는 개념. (Don't repeat yourself) 또한 React에서 Mixin을 대체하는 데 쓰인다.
//App.js
import {createMuiTheme, ThemeProvider } from '@material-ui/core/styles';
const theme = createMuiTheme({
  palette: {
    primary: purple,
    secondary: green,
  },
  background: '#eeeeee',
  boxShadow: '0 2px 3px 1px gray',
});

function App() {
  return (
    <ThemeProvider theme={theme}>
      <Home />
    </ThemeProvider>
  );
}

//TopChart.js
const styles = theme => ({
  root: {
    padding: theme.spacing(3),
    //background: theme.background,
    display: 'flex',
    alignItems: 'center',
    justifyContent: 'center',
  },
  paper: {
    minWidth: 200,
    padding: theme.spacing(3),		//8px * 3
    marginLeft: theme.spacing(1),	//8px
    marginRight: theme.spacing(1),
    textAlign: 'center',

    '&:hover': {
      cursor: 'pointer',
      boxShadow: theme.boxShadow,
    },
  },
});

...
<div className={classes.root}>
  {tickers.map(([key, ticker]) => (
    <Paper className={classes.paper} key={key}>
...

export default withStyles(styles)(TopChart);-
이 컴포넌트에서는 withStyles Component는 styles라는 인자와 Home이라는 인자를 받아 새로운 컴포넌트를 반환한다. 컴포넌트의 props의 styles에서 정의한 스타일 정보를 적용한 클래스들을 props.classes로 가진다. classes의 root에는 스타일이 적용된 class 이름이 저장되어 있다.
-
Theme은 React App의 전체적인 스타일을 적용하는데 사용한다. App.js에서 createMuiTheme 메소드를 이용하여 theme을 생성하고 ThemeProvicer 컴포넌트의 theme이라는 속성에 설정한다. 이 컴포넌트에 theme 속성을 설정하면 내부의 모든 컴포넌트에서 Material-UI 컴포넌트의 스타일을 설정할때 theme을 이용할 수 있다.
이슈
- 현재 TopChart 컴포넌트가 렌더링을 2번 하는 현상

TopChart 컴포넌트의 tickers가 재갱신이 되는 이유가 Home에서 혹은 TickerList에서 tickers를 재갱신하는걸로 보인다. 자세한 내용은 추후 파악해보기로 한다.
TODO
- Client Test (Component)
- Router 페이지 처리 필요
- 또한 Tab에 따라 페이지 이동없이 특정 컴포넌트만 보이게 처리
- 개인 정보 페이지
- 가상화폐에 대한 각각의 차트
- 클라이언트 - 컴포넌트 에러처리
- Header - Content - Footer 구조 구성