11. 링크_anchore, accesskey, tabindex
- anchore : 링크.
- href : 연결 주소 입력하는 명령어.
- title : 이동전 링크 정보제공.
- target="_blank" : 현재 창은 변함없고 새 창에서 링크 연결
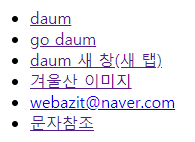
<ul>
	<li><a href="http://daum.net">daum</a></li>
	<li><a href="http://daum.net" title="다음으로 이동">go daum</a></li>
	<li><a href="http://daum.net" target="_blank">daum 새 창(새 탭)</a></li>
	<li><a href="img/snow.jpg.jpg" download>겨울산 이미지</a></li>
	<li><a href="mailto:webazit@naver.com">webazit@naver.com</a></li>
	<li><a href="01-char.html">문자참조</a></li>
</ul>
위 코딩이 적용된 웹화면
-
accesskey : 자주 방문하는 링크를 키보드에 단축키로 지정해 이동하는 태그.
alt + 지정한 키 = accesskey
<p>
  Lorem ipsum dolor sit amet, consectetur adipisicing elit.
  Laboriosam, nulla, cumque. Adipisci iusto itaque ullam,
  quia saepe quisquam, animi exercitationem dignissimos!
  Non, et, magni. Quisquam.
  <a href="https://www.wah.or.kr:444/index.asp" accesskey="w">웹접근성연구소</a>
</p>
위 코딩이 적용된 웹화면

- tabindex : 웹페이지에서 tab을 눌렀을 때 활성화되는 상자 순서 배열하는 태그.
<li><a href="img/snow.jpg.jpg" tabindex="1" download>겨울산 이미지</a></li>12. 이미지_img, map
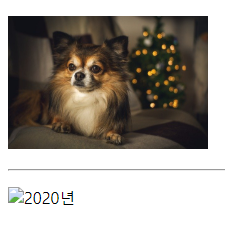
- img : 이미지.
- src : 이미지 저장장소.
- alt : 이미지가 오류로 보이지 않거나 사진을 볼 수 없는 사람들이 음성으로 사진을 알 수 있게 필수적으로 사진정보를 저장하는 명령어.
- longdesc : 이미지가 복잡한 경우 새로운 파일에 코딩을 하고 연결해서 음성으로 설명을 들을 수 있도록 하는 연결 명령어.
<p><img src="img/dog.jpg" alt="강아지" width="200px"></p>

<hr>
<p><img src="photo.png" alt="2020년" longdesc=""></p>
위 코딩이 적용된 웹화면
-
map : 그림은 하나인데 이미지 영역은 여러 곳인 경우 사용됨.
- area : 링크 범위지정해서 이미지에 올리는 명령어.
- shape : 링크 모양.
- coords : 링크모양의 좌표.
- href : 연결될 주소.
<p>
	<img src="img/map.gif" usemap="#map" alt="">
	<map name="map" id="map"></map>
	<area shape="rect" coords="15,25,218,84" href="https://naver.com/" alt="네이버로 이동">
	<area shape="circle" coords="308,55,50" href="http://daunm.net/" alt="다음으로 이동">
	<area shape="poly" coords="550,34,570,48,570,65,550,78,532,65,532,48" href="http://nate.com/" alt="네이트로 이동">
</p>
위 코딩이 적용된 웹화면

13. 아이프레임_iframe
- iframe : 홈페이지에 보충자료나 홈페이지 등을 연결해서 보여주는 태그.
- sandbox : 자바스크립트 소스가 사용된 부분이 보이지 않게 되어 보안에 좋은 태그.
<iframe src="https://choco0307.tistory.com/" sandbox="sandbox" width="500" height="300" frameborder="1" title="choco블로그로 이동,인라인 프레임"></iframe>위 코딩이 적용된 웹화면

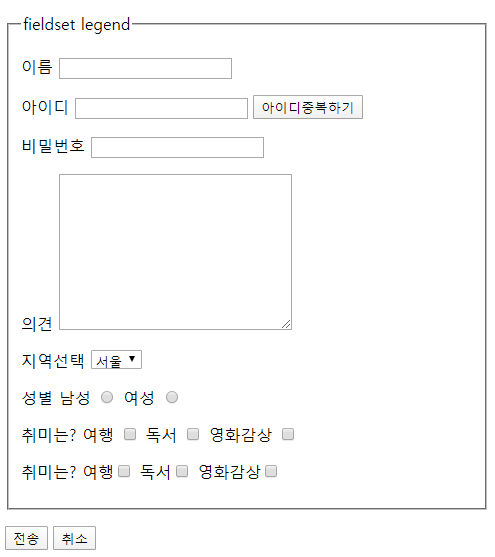
14. 폼 컨트롤_(1)
이름, 아이디, 비밀번호, 의견, 선택, 성별, 전송
- form : 액션이 필수.
- id : 전부 달라야 한다.
- fieldset : 묶어주는 역할.
- legend : 폼의 이름.
- action : 필수.
- method : post와 get가 있다.
post는 주소표시줄에 vaule값이 표현되지 않지만, get는 주소표시줄에 vaule값이 표현되어 보안에 취약하다.
post는 비밀번호와 같은 보안이 필요한 곳에 사용되고, get은 포털사이트 검색란 등에 사용된다.
<form action="#" method="post">
	<fieldset>
		<legend>fieldset legend</legend>
		<p>
			<label for="name">이름</label>
			<input type="text" id="name" name="name" value="">
		</p>
		<p>
			<label for="idname">아이디</label>
			<input type="text" id="idname" name="idname" value="">
			<input type="button" value="아이디중복하기">
		</p>
		<p>
			<label for="userpass">비밀번호</label>
			<input type="password" id="userpass" name="userpass" value="">
		</p>
		<p>
			<label for="usercomm">의견</label>
			<textarea name="usercomm" id="usercomm" cols="30" rows="10"></textarea>
		</p>
		<p>
			<label for="usersel">지역선택</label>
			<select name="usersel" id="usersel">
				<option value="">서울</option>
				<option value="">울산</option>
				<option value="">경기</option>
				<option value="">부산</option>
				<option value="">대전</option>
			</select>
		</p>
		<p><span>성별</span>
			<label for="male">남성</label>
			<input type="radio" id="male" name="one" value="male">

			<label for="female">여성</label>
			<input type="radio" id="female" name="one" value="female">
			<!-- name값이 같아야 둘중에 하나만 선택이 되고 vqlue값이 전송된다 -->
		</p>
		<p>
			<span>취미는?</span>
			<label for="trip">여행</label>
			<input type="checkbox" id="trip" name="trip" value="trip">
			<label for="read">독서</label>
			<input type="checkbox" id="read" name="read" value="read">
			<label for="movie">영화감상</label>
			<input type="checkbox" id="movie" name="movie" value="movie">
		</p>
		<p>
			<span>취미는?</span>
			<label >여행<input type="checkbox"  name="trip" value="trip"></label>

			<label >독서<input type="checkbox"  name="read" value="read"></label>

			<label >영화감상<input type="checkbox"  name="movie" value="movie"></label>
			<!-- radio와 checkbox에서 많이 사용된다 -->
		</p>

	</fieldset>

	<p>
	<!-- <input type="submit" value="전송">	 -->
	<!-- <input type="reset" value="취소"> -->

	<button type="submit">전송</button>
	<button type="reset">취소</button>
	</p>

</form>
위 코딩이 적용된 웹화면
[각각의 폼에 대한 상세설명]
- 이름 폼
<form action="#" method="post">
	<fieldset>
		<legend>fieldset legend</legend>
		<p>
			<label for="name">이름</label>
			<input type="text" id="name" name="name" value="">
		</p>
label은 폼의 이름을 지정하는 태그이다. '이름'이라고 적고 input의 type을 text로 해서 사용자가 직접 이름을 기입할 수 있도록 한다. label for의 값은 input id의 값과 반드시 동일해야 한다. name은 정보만 알 수 있도록 기입하면 되고 value값은 비워두어서 사용자가 직접 기입한 정보가 전달될 수 있게 한다.
- 아이디 폼
<p>
	<label for="idname">아이디</label>
	<input type="text" id="idname" name="idname" value="">
	<input type="button" value="아이디중복하기">
</p>
label은 아이디로 폼명을 지정하고 사용자가 아이디를 기입하는 text칸을 만들었다. 이름 폼과는 다르게 아이디폼은 아이디 중복하기 버튼을 만들기 위해 button을 이용했다. 버튼을 누르면 중복 확인하는 액션은 javascript에서 적용한다. html에서는 버튼만 생성했다.
- 비밀번호 폼
<p>
	<label for="userpass">비밀번호</label>
	<input type="password" id="userpass" name="userpass" value="">
</p>
비밀번호 폼이다.
- 의견 폼
<p>
	<label for="usercomm">의견</label>
	<textarea name="usercomm" id="usercomm" cols="30" rows="10"></textarea>
</p>
사용자들의 의견을 받을 수 있는 의견 폼이다. textarea를 이용해서 text창을 만들고 cols는 글자가 차지하는 px이 가로로 30개가 기입되는 너비이고, rows는 세로로 10개가 기입되는 너비이다. text창은 css에서 조정도 가능하다.
- 선택 폼
<p>
	<label for="usersel">지역선택</label>
	<select name="usersel" id="usersel">
		<option value="">서울</option>
		<option value="">울산</option>
		<option value="">경기</option>
		<option value="">부산</option>
		<option value="">대전</option>
	</select>
</p>
사용자들이 나열된 보기 중에 선택을 하는 선택 폼이다. select 선택창을 만들고 id는 label과 맞춘 후 option 태그로 선택 창에 나열되는 보기들을 나열했다.
- 성별 폼
<p><span>성별</span>
	<label for="male">남성</label>
	<input type="radio" id="male" name="one" value="male">

	<label for="female">여성</label>
	<input type="radio" id="female" name="one" value="female">
</p>
span 태그로 성별 폼에 제목을 달고, 2개의 label을 만들었다. 여기서 중요한 점은 name값이 반드시 동일해야 중복선택이 되지 않고 단일 선택이 된다는 점이다. value값도 적어서 정보전달이 될 수 있게 한다. 또한, input type은 radio로 선택란이 타원형이다.
- 취미 폼
(1)
<p>
	<span>취미는?</span>
	<label for="trip">여행</label>
	<input type="checkbox" id="trip" name="trip" value="trip">
	<label for="read">독서</label>
	<input type="checkbox" id="read" name="read" value="read">
	<label for="movie">영화감상</label>
	<input type="checkbox" id="movie" name="movie" value="movie">
</p>
(2)
<p>
	<span>취미는?</span>
	<label >여행<input type="checkbox"  name="trip" value="trip"></label>

	<label >독서<input type="checkbox"  name="read" value="read"></label>

	<label >영화감상<input type="checkbox"  name="movie" value="movie"></label>
</p>
취미폼은 성별폼과 비슷하지만 차이점은 중복선택이 가능하기 때문에 name이 다르게 지정된다. input type은 checkbox로 네모모양의 선택창을 지정했다. 취미폼은 (1)와 (2)가 같은 결과값을 가진다. (1)와 (2)의 차이점은 id값으로 연결하지 않고 input을 label안에 포함시켜 연결이 필요없게 묶었다. 이러한 방법은 type이 checkbox나 radio인 경우에 자주 사용된다.
- 버튼 폼
<p>
	<input type="submit" value="전송">
	<input type="reset" value="취소">

	<button type="submit">전송</button>
	<button type="reset">취소</button>
</p>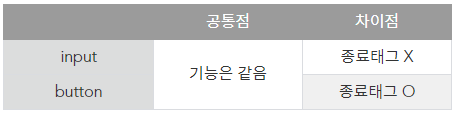
input은 종료태그가 없어서 아이콘에 대한 추가 태그는 이용이 어려워 css의 도움을 받아야 한다.
button은 종료 태그가 있어서 아이콘에 대한 추가 태그 이용이 가능하다.
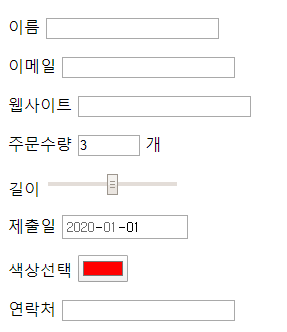
15. 폼 컨트롤_(2)
이메일, 웹주소, 수량, 길이, 날짜, 색상, 연락처
<p>
	<label for="useremail">이메일</label>
	<input type="email" id="useremail" name="useremail" value="">
</p>
<p>
	<label for="userurl">웹사이트</label>
	<input type="url" id="userurl" name="userurl" value="">
</p>
<p>
	<label for="order">주문수량</label>
	<input type="number" id="order" name="order" value="3" min="1" max="20">
	<span>개</span>
</p>
<p>
	<label for="userrange">길이</label>
	<input type="range" id="userrange" name="userrange" min="0" max="100" step="10" value="50">
	<!-- step="10" 바를 움직일때 10단위로 움직이게 할수있다. -->
</p>
<p>
	<label for="userdate">제출일</label>
	<input type="date" id="userdate" name="userdate" min="2020-01-01" max="2020-01-30" value="2020-01-01">
</p>
<p>
	<label for="usercolor">색상선택</label>
	<input type="color" id="usercolor" name="usercolor" value="#ff0000">
</p>
<p>
	<label for="usertel">연락처</label>
	<input type="tel" id="usertel" name="usertel" value="">
</p>
위 코딩이 적용된 웹화면
- novalidate : 문법검사 하지 않음
<form action="#" method="post" novalidate="novalidate"></form>예를들면 이메일은 usermail@site.com와 같이 문법이 있는데 따로 태그를 하지 않으면 문법검사가 자동으로 진행된다. novalidate을 설정하면 문법검사를 하지 않는다.
16. input태크의 추가 속성들
- disabled : 사용할 수 없는 상태로 지정
	<p>
		<label for="username">이름</label>
		<input type="text" id="username" name="username" value="" disabled="disabled">
	</p>
위 코딩이 적용된 웹화면

- placeholder : 입력힌트 지정
	<p>
		<label for="username">이름</label>
		<input type="text" id="username" name="username" value="" placeholder="user name">
	</p>
위 코딩이 적용된 웹화면

마우스커서를 클릭해서 텍스트를 입력하면 힌트가 사라진다.
- autofocus : 자동으로 포커스를 가지게 될 요소에 지정
	<p>
		<label for="username">이름</label>
		<input type="text" id="username" name="username" value="" autofocus="autofocus">
	</p>
위 코딩이 적용된 웹화면

화면을 처음 시작할 때 마우스커서를 클릭하지 않아도 자동으로 클릭이 활성화된 상태가 된다.
- required : 필수입력항목 지정
	<p>
		<label for="username">이름</label>
		<input type="text" id="username" name="username" value="" required="required">
	</p>
필수적으로 입력을 해야만 다음단계로 진행이 된다.
- autocomplete : 자동완성 on / off
	<p>
		<label for="username">이름</label>
		<input type="text" id="username" name="username" value="" autocomplete="off">
	</p>
이전에 입력했던 정보들이 검색창을 누르면 하단에 나타난다. 일반적으로는 자동완성기능이 활성화되어 있어 autocomplete태그는 자동완성기능을 끄고 싶은때 자주 사용된다.