nginx 활용한 무중단 배포2 - nginx health check 기반의 무중단 배포
PROJECT
이전 글 말미에서 살펴본 한계점을 보완하여, 이번에는 nginx 로드밸런싱에 헬스 체크를 도입한 무중단 배포를 구현해보고자 한다.
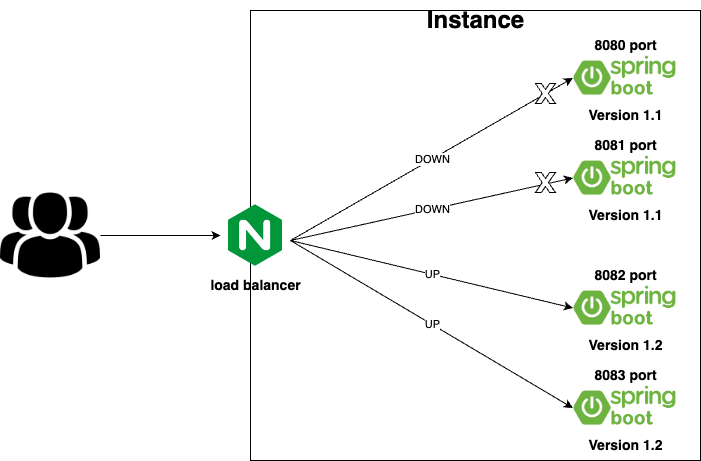
먼저 was 구성에 조금 변화가 있었다. 기존 8080,8081 포트 2개로 was를 띄웠다면 이번에는 8080~8083 포트를 열어두고 was 2개씩 운영할 예정이다.

배포 시나리오
배포 시나리오는 아래와 같다.
기존 nginx proxy_pass url 수정 후 reload하는 방식 -> actuator 활용해 블루 서버의 status를 Down, 그린 서버의 status를 Up으로 업데이트하고 loadbalancer용 nginx에서는 자체 헬스체크를 통해 up인 상태의 서버로만 트래픽이 흘러갈 수 있도록 변경

1. 현재 트래픽이 흘러가고 있지 않은 포트 2개 탐색(예:8082,8083)
2. 해당 포트(8082,8083)로 was가 떠있다면 kill -15 pid로 graceful shuthown(트래픽이 흘러가고 있지 않았기에 큰 이슈 없음)
3. 해당 포트(8082,8083)로 배포(그린서버)
4. 그린서버 Idle profile용 헬스체크(GET /health)
5. 헬스체크 문제 없을 시 그린서버의 actuator health status를 UP으로 변경(권한체크 한다고 가정)
6. 동시에 기존 구동중이던 서버(블루)의 actuator health status를 DOWN으로 변경(권한체크 한다고 가정)
7. Loadbalancer 용 nginx에서 자체 헬스체크를 통해 actuator/health가 UP인 서버로만 트래픽 전송- nginx에 health check 기능 적용하는 방법
- spring actuator 설정 방범
- 변경된 배포 파일 공유
위의 순서대로 글을 이어나가 보겠다.
nginx health check를 위한 nginx_upstream_check_module 적용
로드밸런싱은 이전 글에서 잠깐 언급했듯이, 1. 트래픽을 여러 서버로 분산 2. 서버 health check를 통해 정상 서버로만 트래픽 분배
이 2가지 기능을 한다.
하지만 무료 버전의 nginx에서는 1번의 기능만 제공하고 있다. 그렇기에 nginx에 헬스체크 기능을 더하려면 오픈소스 모듈을 활용하여야 한다.
설치 방법은 여기를 참고하기 바란다.
conf 파일 수정이 끝났다면 /usr/local/nginx/sbin/nginx -c /usr/local/nginx/conf/nginx.conf 명령어(각자 파일 경로에 맞게 수정 필요)를 통해 nginx를 기동시켜준다.
변경된 nginx.conf 파일은 아래와 같다.
worker_processes 1;

events {
    worker_connections  1024;
}


http {
    include       mime.types;
    default_type  application/octet-stream;

    sendfile        on;

    keepalive_timeout  65;

    access_log /usr/local/nginx/access.log;
    error_log /usr/local/nginx/error.log;
    gzip  on;

    upstream myApp {
        server {{ HOST_IP }}:8080;
        server {{ HOST_IP }}:8081;
        server {{ HOST_IP }}:8082;
        server {{ HOST_IP }}:8083;

        check interval=3000 rise=2 fall=5 timeout=4000 type=http;
        check_http_send "GET /actuator/health HTTP/1.0\r\n\r\n";
        check_http_expect_alive http_2xx http_3xx;
    }

    server {
        listen       80;

        location / {
            proxy_pass http://myApp;
            proxy_set_header X-Real-IP $remote_addr;
            proxy_set_header X-Forwarded-For $proxy_add_x_forwarded_for;
            proxy_set_header Host $http_host;
        }

        location /status {
                check_status;
                access_log   off;
        }
    }
}
가장 중요한 부분은 아래이다. 이 부분을 중점적으로 살펴보자.
upstream myApp {
    server {{ HOST_IP }}:8080;
    server {{ HOST_IP }}:8081;
    server {{ HOST_IP }}:8082;
    server {{ HOST_IP }}:8083;

    check interval=3000 rise=2 fall=5 timeout=4000 type=http;
    check_http_send "GET /actuator/health HTTP/1.0\r\n\r\n";
    check_http_expect_alive http_2xx http_3xx;
}
트래픽은 이제 health check 기반으로 8080~8083 포트들 중 UP인 was로만 흘러들어간다.
- interval: 3초씩에 한 번씩 설정된 url로 health check를 실시한다.
- rise: health check에 2번 성공하면 서버가 정상이라 판단한다.
- fall: 5번 이상 응답에 실패하면 서버가 정상 상태가 아니라 판단하여 해당 was로는 트래픽을 흘려보내지 않는다.
- timeout: timeout 기준은 응답 시간 초과 4초이다.
스프링 Actuator 설정
스프링 actuator는 스프링 서버 상태를 실시간으로 모니터링할 수 있는 엔드포인트를 제공한다.
/actuator/health (기본값. endpoint의 형태는 변경 가능하다)를 통해 서버 상태를 확인할 수 있다.
json 형태로 제공받는다면 아래와 같은 응답값을 받을 수 있다.
{"status": 'UP'}
/actuator/health 기능 외에도 우리는 서버의 상태를 up/down으로 변경할 수 있는 기능이 필요하다.
이는 custom HealthIndicator를 구현하여 설정 가능하다.
참고로 해당 기능은 반드시 spring security 등을 사용하여 권한체크를 해야만 한다. 지금은 해당 권한체크 부분은 생략한 상태로 설명을 이어나가겠다.
먼저 스프링 actuator를 사용하기 위해 아래와 같이 의존성을 추가해준다.
implementation 'org.springframework.boot:spring-boot-starter-actuator'이제 custom HealthIndicator를 구현해보자.
// MutableHealthIndicator.java

@Component
public class MutableHealthIndicator implements HealthIndicator {

	private final AtomicReference<Health> healthRefer = new AtomicReference<>(
	    Health.down().build());

	@Override
	public Health health() {
	    return healthRefer.get();
	}

	public void setHealth(Health health) {
	    this.healthRefer.set(health);
	}
}
// InfraController.java
@RequiredArgsConstructor
@RestController
public class InfraController {
private final MutableHealthIndicator healthIndicator;
@PutMapping(path = "/health/up")
public void up() {
healthIndicator.setHealth(Health.up().build());
}
@PutMapping(path = "/health/down")
public void down() {
healthIndicator.setHealth(Health.down().build());
}
}PUT /health/up: 서버의 상태를 UP으로 변경한다.
PUT /health/down: 서버의 상태를 DOWN으로 변경한다.
배포 파일 수정
nginx health check 기능과 spring actuator 기능을 더함으로써 health check 기반 무중단 배포가 가능해졌다. 이제 배포파일을 수정해보자.
기존 배포 파일과 거의 동일하며 변경된 부분은 switch_proxy 부분과, 마지막에 blue 서버를 끄는 부분이다.
마지막 blue 서버 끄는 부분은 제거했다.
# 기존 포트로 띄운 애플리케이션 종료
# CURRENT_PID=$(lsof -ti tcp:${CURRENT_PORT} # 여기서의 CURRENT_PORT는 switch_proxy를 하기 전의 current port이다.

# if [ -z ${CURRENT_PID} ]
# then
#   echo "> 현재 구동중인 애플리케이션이 없으므로 종료하지 않습니다."
# else
#   echo "> kill -15 $CURRENT_PID"
#   kill -15 ${CURRENT_PID}
#   sleep 5
# fi
혹시나 모를 롤백이 가능하도록 blue 서버를 살려두기로 결정했다. 만약 여러 개의 blue 서버가 띄워져있었다면 나머지는 끄고 1개 정도 남겨둬도 충분할 것 같다.
switch_proxy function은 더이상 사용안되며 switch_blue_to_green() 를 새로 만들었다.
function switch_blue_to_green() {
    idle_port_values=$(find_idle_port)
    current_port_values=$(find_current_port)

    IFS=',' read -ra IDLE_PORTS <<< "$idle_port_values"
    IFS=',' read -ra CURRENT_PORTS <<< "$current_port_values"

    echo "> UP으로 전환할 Port: ${IDLE_PORTS[0]}, ${IDLE_PORTS[1]}"
    echo "> green 서버 Up"

    curl -X PUT http://127.0.0.1:${IDLE_PORTS[0]}/health/up
    curl -X PUT http://127.0.0.1:${IDLE_PORTS[1]}/health/up

    echo "> DOWN으로 전환할 Port: ${CURRENT_PORTS[0]}, ${CURRENT_PORTS[1]}"
    echo "> blue 서버 Down"

    curl -X PUT http://127.0.0.1:${CURRENT_PORTS[0]}/health/down
    curl -X PUT http://127.0.0.1:${CURRENT_PORTS[1]}/health/down
}
actuator custom HealthIndicator에서 구현한 /health/up, /health/down 엔드포인트를 통해 그린 서버를 up 상태로, 블로 서버를 down 상태로 변경한다. nginx health check는 up인 상태가 된 서버로만 트래픽을 흘려보내게 된다.
배포 완료 후 http://ip-host/status 로 nginx의 status를 확인해보자.
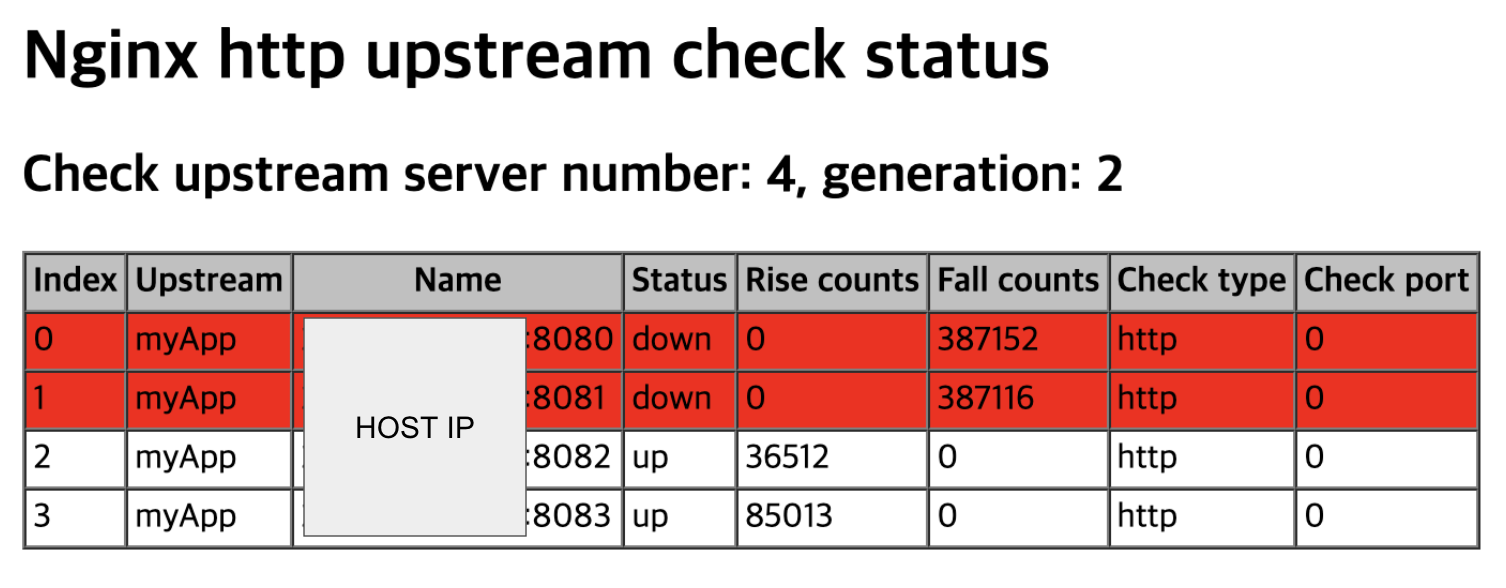
nginx health check 기반의 무중단 배포를 통해 아래와 같은 구조로 성공적으로 배포를 완료했다.
참조
https://truehong.tistory.com/124
http://forward.nhnent.com/hands-on-labs/java.spring-boot-actuator/06-health.html#id5
