Google Cloud Speech
셋팅
구글 클라우드 사이트에서 로그인 후 콘솔로 이동으로 이동하기
상단에서 프로젝트를 새로 생성하고, API 및 서비스에서 Cloud Speech-to-Text API를 사용하기
사용자 인증정보 탭 > 사용자인증 정보 만들기 - 서비스 계정 > 계정명 및 권한(소유자)로 설정 후 생성하기 > 생성된 계정 클릭 > 상단 탭 키 > 키 추가 > 새 키 만들기(JSON)를 통해 다운받기
다운 받은 키를 마이크가 달린 AR Class 보드 홈 디렉토리에 옮기기
export GOOGLE_APPLICATION_CREDENTIALS="/home/pi/xxxxxxx-xxxxxxxxx.json"를 통해 환경 변수 만들기
구글 클라우드 스피치 API 설치
우선 오류 발생을 방지하여 pip3 install --upgrade pip로 pip를 업그레이드 시킨다.
pip3 install --use-deprecated=backtrack-on-build-failures google-cloud-speech를 통해 구글 클라우드 스피치 API 설치
참고) --use-deprecated=backtrack-on-build-failures 는 오류 발생시 이전 버전을 다운받는다는 설정
구글 클라우드 예제
구글 클라우드 스피치가 음성 데이터를 텍스트로 변환하는 방법
1. 짧은 음성 파일을 보내 한번에 응답을 받는 방법
2. 긴 음성 예제를 한번에 보내면 조각조각 응답 받는 방식
3. 실시간으로 연속적으로 보내고 받는 방법
1. 짧은 음성 파일을 보내 한번에 응답을 받는 방법
오디오 신호의 개념
오디오 신호 : 아주 빠르게 변경되는 아날로그 신호
PCM(Pulse Code Modulation) : Sampling rate(얼마의 주기로 데이터를 확인할지), Bit depth(데이터 값을 얼마만큼 쪼갤지)를 통해 아날로그 신호를 디지털로 변환한다. 잘게 쪼갤수록 더 정교한 데이터를 전송할 수 있다.
코드
from google.cloud import speech
import io
# 사용할 파일 위치
local_file_path = '/home/pi/test.wav'

client = speech.SpeechClient()

# PCM 구성 : 해당 음성 데이터가 다음과 같이 구성되어 있어야 정상 작동한다.
config = speech.RecognitionConfig(
    encoding = speech.RecognitionConfig.AudioEncoding.LINEAR16, # 세로축(데이터)을 2의 16승 만큼 쪼갬
    sample_rate_hertz = 48000, # 가로축(시간)을 48000만큼 쪼갬
    language_code = "ko-KR"
)
with io.open(local_file_path, 'rb') as f:
    content = f.read()
audio = speech.RecognitionAudio(content=content)

# 한번에 음성 데이터를 보내고 변환된 모든 텍스트 데이터를 한번에 받는 함수로 오디오 파일의 구성을 파라미터로 보낸다.
response = client.recognize(config=config, audio=audio)

# response는 여러개의 대안으로 전송되어 오는데, 그 중 confidence가 가장 높은 것을 체택한다.
for result in response.results:
    print(f'Transcript: {result.alternatives[0].transcript}')
arecord -r48000 -fS16_LE -d10 -vv -c1 test.wav를 통해 데이터를 2의 16승만큼 쪼개고, 시간은 48000만큼 쪼개며, 10초동안 정상작동 되는지 보이고 채널은 mono로 제목을 test.wav로 녹음하겠다는 명령어
3. 실시간으로 연속적으로 보내고 받는 방법
구글 스피치는 시간에 따라 Response를 계속 받아서 스스로 피드백을 내리게 되며, is_final : true이라는 문구와 함께 보내오는 데이터가 완성된 문장임을 의미한다.
# transcribe_streaming_mic.py

import re # 정규표현식 모듈
import sys

from google.cloud import speech
import pyaudio  # 파이썬에서 오디오 입력 사용
import queue

# Audio recording parameters
RATE = 16000
CHUNK = int(RATE / 10)

class MicrophoneStream(object):
    def __init__(self, rate, chunk):
        self._rate = rate
        self._chunk = chunk

        # Create a thread-safe buffer of audio data
        self._buff = queue.Queue()  # pyaudio가 전달해주는 데이터를 담을 큐
        self.closed = True

    # 파이썬 context manager사용. 여기에서는 실행중 문제가 발생해도 오디오장치를 제대로 닫도록 할 수 있기 위함.
    def __enter__(self):
        self._audio_interface = pyaudio.PyAudio()   # 시작할 때 pyaudio 데이터 스트림 열림
        self._audio_stream = self._audio_interface.open( # pyaudio.open()은 pyaudio.Stream object를 리턴.
            format=pyaudio.paInt16, # 16bit 다이나믹 레인지
            channels=1,
            rate=self._rate,
            input=True,
            frames_per_buffer=self._chunk,
            stream_callback=self._fill_buffer,  # pyaudio에서 한 블록의 데이터가 들어올 때 호출되는 콜백
        )

        self.closed = False

        return self

    def __exit__(self, type, value, traceback):
        self._audio_stream.stop_stream()
        self._audio_stream.close()
        self.closed = True
        self._buff.put(None)
        self._audio_interface.terminate()   # 끝날 때 반드시 pyaudio 스트림 닫도록 한다.

    def _fill_buffer(self, in_data, frame_count, time_info, status_flags):  # pyaudio.Stream에서 호출되는 콜백은 4개 매개변수 갖고, 2개값 리턴한다. pyaudio문서 참고.
        self._buff.put(in_data) # 큐에 데이터 추가
        return None, pyaudio.paContinue

    # 한 라운드의 루프마다 현재 버퍼의 내용을 모아서 byte-stream을 yield함.
    def generator(self):
        while not self.closed:
            # Use a blocking get() to ensure there's at least one chunk of
            # data, and stop iteration if the chunk is None, indicating the
            # end of the audio stream.
            chunk = self._buff.get()
            if chunk is None:
                return
            data = [chunk]

            # Now consume whatever other data's still buffered.
            while True:
                try:
                    chunk = self._buff.get(block=False)  # 가장 오래된 데이터부터 순차적으로 data[]에 추가함.
                    if chunk is None:
                        return
                    data.append(chunk)
                except queue.Empty: # 큐에 더이상 데이터가 없을 때까지
                    break

            yield b''.join(data) # byte-stream

# response  화면에 출력
def listen_print_loop(responses):
    num_chars_printed = 0
    for response in responses:
        if not response.results:
            continue

        # The `results` list is consecutive. For streaming, we only care about
        # the first result being considered, since once it's `is_final`, it
        # moves on to considering the next utterance.
        # 최종적인 결과값은 언제나 results[0]에 반영되므로 result[0]만 고려.
        result = response.results[0]
        if not result.alternatives:
            continue

        # 확실성 가장 높은 alternative의 해석
        transcript = result.alternatives[0].transcript

        # 완성된 문장이 intrim 문장보다 짧다면, 나머지 부분은 ' '으로 overwrite해 가려준다.
        overwrite_chars = ' ' * (num_chars_printed - len(transcript))

        if not result.is_final: # 확정된 transcript가 아니라면,
            sys.stdout.write(transcript + overwrite_chars + '\r')   # '\r'로 줄바꿈은 하지 않고 맨 앞으로 돌아가 이전 문장위에 덧쓰도록 한다.
            sys.stdout.flush()

            num_chars_printed = len(transcript)

        else:   # 확정된 transcript라면
            print(transcript + overwrite_chars)

            # 문장중에 '명령끝'이라는 단어가 있다면 종료한다.
            if re.search(r'\b(명령 끝)\b', transcript, re.I):
                print('Exiting..')
                break

            num_chars_printed = 0


def main():
    # 한국말 사용
    language_code = 'ko-KR'  # a BCP-47 language tag

    client = speech.SpeechClient()
    config = speech.RecognitionConfig(
        encoding='LINEAR16', # enums.RecognitionConfig.AudioEncoding.LINEAR16
        sample_rate_hertz=RATE,
        max_alternatives=1, # 가장 가능성 높은 1개 alternative만 받음.
        language_code=language_code)
    streaming_config = speech.StreamingRecognitionConfig(
        config=config,
        interim_results=True) # 해석완료되지 않은(is_final=false) 중도값도 사용.

    with MicrophoneStream(RATE, CHUNK) as stream:   # 사운드 스트림 오브젝트 생성.
                                                    # pyaudio가 terminate()되는 것을 보장하기 위해 python
                                                    # context manager  사용.
        audio_generator = stream.generator()
        requests = (speech.StreamingRecognizeRequest(audio_content=content)
                    for content in audio_generator) # 요청 생성

        responses = client.streaming_recognize(streaming_config, requests)  # 요청 전달 & 응답 가져옴
        listen_print_loop(responses)    # 결과 출력. requests, responses 모두 iterable object


if __name__ == '__main__':
    main()
Therading vs Asyncio
Threading
동시실행을 목적으로 사용한다.
import threading
import time

def sub_thread(start, end):
	for var in range(start, end):
        print(f'we ar in SUB: {var}')
        var += 1
        time.sleep(0.6)

# 서브 thread가 동작되는 함수로 thread 오브젝트 생성
t = threading.Thread(target = sub_thread, args = (0,100))
t.daemon = True # 데몬 Therad : main Thread 종료시 sub Thread 자동 종료

t.start() # thread 실행, 이후 메인 쓰레드와 서브 쓰레드의 동시 실행

for i in range(20):
    print("메인 쓰레디 실행중 ...")
    time.sleep(1)
Asyncio
시간 효율성을 목적으로 사용한다.
Blocking vs Non-Blocking
Blocking : 메모리로부터 긴 시간동안 데이터를 가져와야하는 작업때 CPU는 쉬고 있는다.
Non-Blocing : 긴 시간이 필요한 작업의 응답을 기다리지 않고 다음 작업을 진행한다.
blocking 방식
import time

def request1() :   # 시간이 오래걸리는 함수
	time.sleep(10)
    return time.perf_counter() # 프로그램 실행 시간을 반환

def request2() :
	time.sleep(5)
    return time.perf_counter()

def main():
	print("start")
    start_time = time.perf_counter()

    req1_time = request1() # 10초 걸리는 작업
    req2_time = request2() # 5초 걸리는 작업

    # print는 15초에 실행된다.
    print(f'req1 takes {req1_time - start_time}')
    print(f'req2 takes {req2_time - start_time}')

main()
Non-blocking 방식
잠깐 멈춰서 다른 작업을 할 수 있는 작업이 정해져있다.
import time
import asyncio

async def request1():  # await 구문을 포함하므로 함수를 async화 해줘야한다.
    await asyncio.sleep(10) # time은 잠시 정지 기능이 지원한되므로, asyncio를 사용한다.
    return time.perf_counter()  # 프로그램 실행 시간을 반환

async def request2():
    await asyncio.sleep(5)
    return time.perf_counter()

 main도 async로 만들어줌
async def main():
    print("start")
    start_time = time.perf_counter()

    # event loop라고 작업을 멈추지 않고 원할하게 관리해주는 곳에 task 형태로 등록한다.
    req1_time = asyncio.create_task(request1())
    req2_time = asyncio.create_task(request2())

    await req1_time
    await req2_time

    # task에서의 return 값을 사용하기 위한 result
    print(f'req1 takes {req1_time.result() - start_time}')
    print(f'req2 takes {req2_time.result() - start_time}')

asyncio.run(main())
WebSocket 통신
HTTP 통신 : 요청과 응답이 반복
Socket 통신 : 연결이 되었다면 양방향 실시간 통신
websocket 통신 : 웹상에서도 tcp socket과 같이 실시간 양방향의 데이터 교환이 가능, 확장성 및 http의 보안성도 겸비하고 있다.
동작
서버와 클라이언트 모두 웹소켓 라이브러리 설치 : pip3 install websockets
sever 코드
import asyncio # non-blocking방식으로 네트웍 통신하기 위해 asyncio 모듈 필요.
import websockets # websockets 모듈 임포트

async def hello(websocket, path): # 아래의 websockets.serve()에 의해 호출되는 함수
    while True:
        name = await websocket.recv()  # 데이터 받기
        print(f"{name}을 받았습니다.")    # 받은 데이터 출력

        greeting = f"Hello {name}!"
        await websocket.send(greeting)  # 데이터 보내기
        print(f"{greeting}을 보냈습니다.")    # 보낸 데이터 출력

async def main():
    # 웹소켓 서버를 만들고, hello 함수를 실행시킨다.
    server = await websockets.serve(hello, host="xxx.xx", port=5678) # 본인 서버 IP 주소
    await server.wait_closed() # 서버를 명시적으로 종료할 때까지 대기

asyncio.run(main())
client 코드
import asyncio # non-blocking방식으로 네트웍 통신하기 위해 asyncio 모듈 필요.
import websockets # websockets 모듈 임포트

async def hello(websocket, path): # 아래의 websockets.serve()에 의해 호출되는 함수
    while True:
        name = await websocket.recv()  # 데이터 받기
        print(f"{name}을 받았습니다.")    # 받은 데이터 출력

        greeting = f"Hello {name}!"
        await websocket.send(greeting)  # 데이터 보내기
        print(f"{greeting}을 보냈습니다.")    # 보낸 데이터 출력

async def main():
    # 웹소켓 서버를 만들고, hello 함수를 실행시킨다.
    server = await websockets.serve(hello, host="xxx.xx", port=5678) # 본인 서버 IP 주소
    await server.wait_closed() # 서버를 명시적으로 종료할 때까지 대기

asyncio.run(main())
재부팅시 설정 고정
IP 및 환경변수 및 부팅시 실행될 파일을 고정시켜보자!
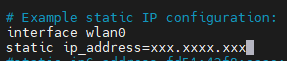
IP 고정
ifconfig를 통해 본인 보드의 연결형태와 ip주소를 기록해둔 후, sudo vi /etc/dhcpcd.conf 명령어를 통해 static IP configuration 부분을 수정하자!
부팅시 실행할 파일 설정
부팅시 자동으로 가장 늦게 되는 파일은 .bashrc라는 파일입니다.
해당 파일에서 마지막 줄에 실행할 파일을 추가해주자!
수정이 가능하도록 백그라운드 실행으로 파일을 실행시켜보자!
python3 [실행할 파일명]& : & => 백그라운드 실행
환경변수 고정
실행 파일들을 오류없이 실행시키기 위한 환경변수는 파일 실행 명령어 이전에 선언되어야 합니다.
따라서, 부팅시 제일 첫번째로 실행되는 파일인 /etc/profile에 환경변수를 선언해줄 것입니다.
sudo vi /etc/profile에서 마지막 줄에 export GOOGLE_APPLICATION_CREDENTIALS="/home/pi/xxxxxxx-xxxxxxxxx.json"를 포함시키자!