Amplify를 사용하고 싶었던 이유
기존에 존재하던 프로젝트가 언어는 파이썬이고, Amplify를 사용하여 백엔드를
'완전관리형' 서버리스로 개발이 되어 있는 상태였다.
이러한 구성방법을 나는 처음 접했는데 내가 들은 내용은 다음과 같다.
장점
서버의 구동시간보다는 요청 건수에 대한 빌링과, 함수별 모니터링기능,
실제 서버를 두지 않고, 기능별로 람다 함수를 생성하여 서버가 내려갔다 라는 소리가 나올리가 없는
장점이 존재한다고 들었고, 정말로 이러한 장점이 존재한다면 사용하지 않을 이유가 없다고 생각했다.
단점
직접 경험하면서 느낀 단점은,
- 파이썬도 Django를 사용하지 않고 순수 함수로만 작성하여야 한다고 들었고, 실제로도 그렇게 작성되어있었다.
- 그러므로 Typescript가 제대로 지원되지 않는다.
- 노드서버 개발방법과는 다른다고 느꼇다.
- 람다 함수의 용량 제한이 걸려있어, 용량에 신경써야한다.
나는 기존에 Typescript + Node.js + Express 를 통한 프로젝트 구성 및 개발이 완료된 상태였는데,
해당 프로젝트를 최대한 수정 없이 한번에 빌드애서 서버리스 방식을 적용하고 싶었다.
1. Amplify Project 생성하기
구글링을 정말 많이하고, 공식문서도 많이 보았는데
콘솔에서 amplify-cli를 사용하여 프로젝트를 생성해도 되지만
글자수 제한이 있다는점, - 을 사용하지 못한다는 점 등이 불편했다.
콘솔로 프로젝트를 생성할 시, 실제 AWS 홈페이지 콘솔에서 backend studio에 접속이 안되는 경우도 발생했다.
내가 추천하는 방법은 AWS 홈페이지 콘솔에서 프로젝트를 생성하는 것이다.
Amplify 콘솔에 접속하여 새앱 > 앱구축 메뉴를 선택한다.
사용할 앱 이름을 입력하고 앱 기본 구성을 설정한다.
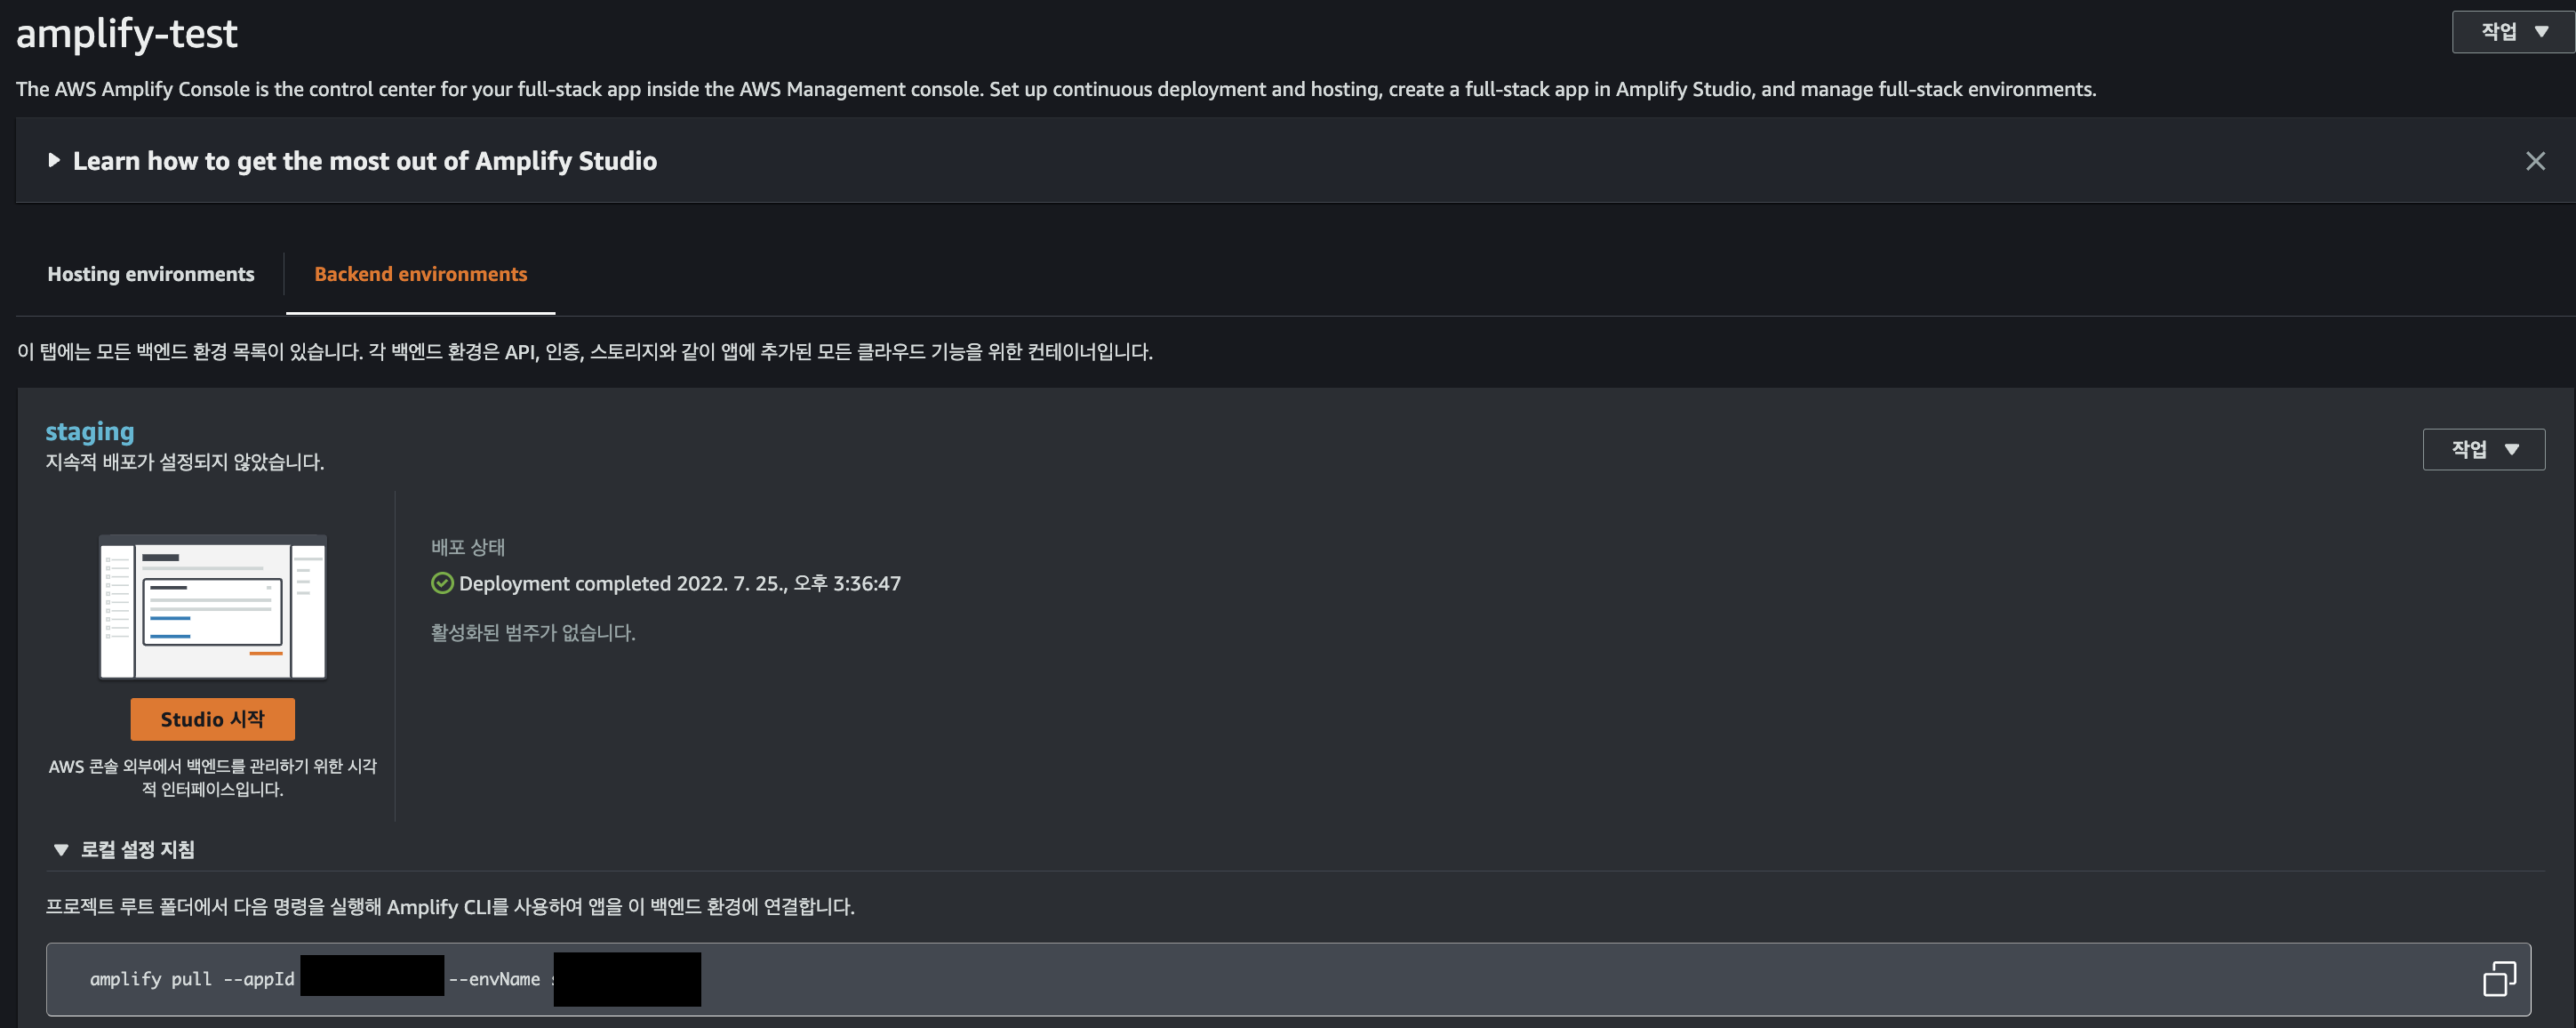
프로젝트 설정이 완료되면 해당 페이지로 이동하는데
로컬설정 지침 탭을 열면 프로젝트를 pull할 수 있는 명령어가 나온다.
mkdir amplify-test
amplify pull --appId {yourAppId} --envName {yourEnvName}
*해당 명령어를 실행하기 위해서는 amplify-cli가 설치되어 있어야 한다.
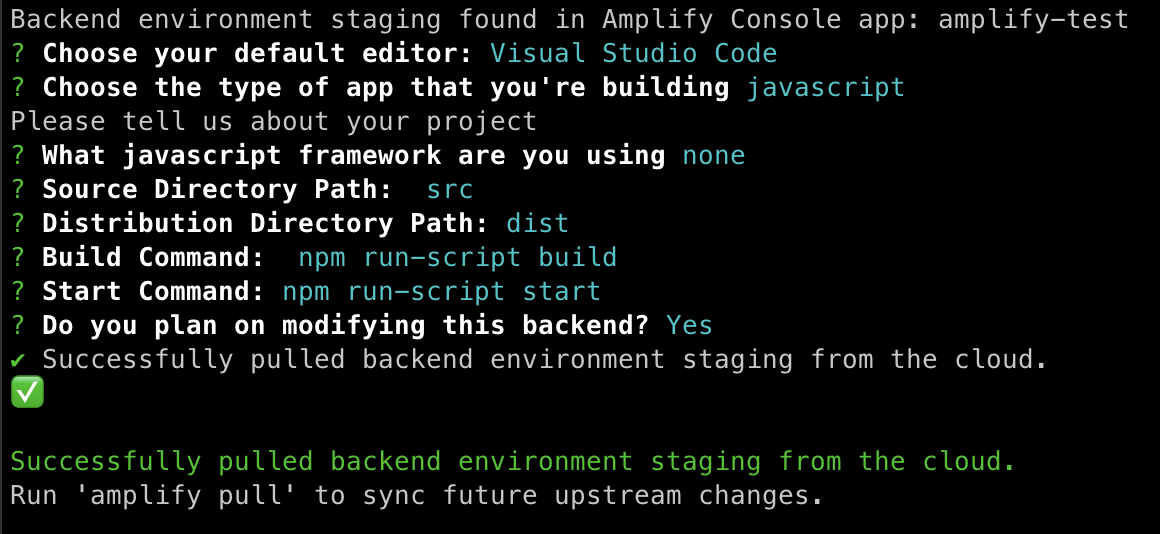
여기까지 진행하면 프로젝트 폴더에 amplify폴더와 src 폴더가 생성된다.
Amplify에 Api, Function 추가하기
Amplify 는
amplify add api
amplify add function
이러한 명령어로 api 혹은 function을 추가할 수 있다.
api 를 추가하면 배포 시에 api gateway를 자동으로 생성해주고
function을 추가하면 배포 시에 lambda function을 생성 해준다.
우리는 Typescript 프로젝트를 function안에 작성해 넣을 것이다.
function만을 추가해도 되고,
api 를 추가할떄 function을 함께 생성할 수도 있다.
마지막 결과를 보기 위해서는 api도 추가해야 하기 때문에 api를 추가한다.
amplify add api
? Select from one of the below mentioned services: REST
✔ Provide a friendly name for your resource to be used as a label for this category in the project: · testapi

✔ Provide a path (e.g., /book/{isbn}): · /items
Only one option for [Choose a Lambda source]. Selecting [Create a new Lambda function].
? Provide an AWS Lambda function name: testfunction
? Choose the runtime that you want to use: NodeJS
? Choose the function template that you want to use: Serverless ExpressJS function
(Integration with API Gateway)

Available advanced settings:
- Resource access permissions
- Scheduled recurring invocation
- Lambda layers configuration
- Environment variables configuration
- Secret values configuration

? Do you want to configure advanced settings? No
? Do you want to edit the local lambda function now? No
Successfully added resource testfunction locally.

✅ Succesfully added the Lambda function locally
✔ Restrict API access? (Y/n) · no
✔ Do you want to add another path? (y/N) · no
✅ Successfully added resource testapi locally
API를 추가하면 amplify/backend 폴더 안에 api폴더와 function 폴더에 생성된다.
npm init private먼저 루트 폴더에 npm init을 실행하여 package.json 파일을 생성한다.
typescript 프로젝트를 작성해보자
cd amplify/backend/function/testfunction
mkdir ts && cd ts
npm init -y
yarn add -D express typescript ts-node nodemon @types/node @types/express @types/aws-serverless-express
yarn add aws-serverless-express
npx tsc --init
mkdir src && cd src
touch index.ts
이렇게 필요한 모듈들을 설치하면 tsconfig.json 파일과 index.ts 파일이 생성된다.
tsconfig.json 파일의 구성은 이렇다
{
  "compilerOptions": {
    "lib": ["es6", "es2015", "dom"],
    "types": ["node"],
    "baseUrl": ".",
    "typeRoots": ["./node_modules/@types", "./types"],
    "target": "es6",
    "module": "commonjs",
    "moduleResolution": "node",
    "outDir": "../src",
    "emitDecoratorMetadata": true,
    "experimentalDecorators": true,
    "sourceMap": false,
    "strict": false
  },
  "include": ["./**/*"],
  "exclude": ["node_modules", "build"]
}
여기서 특이한점은 outDir을 상위폴더의 src 폴더로 해주는 점이다.
그다음 index.ts를 수정한다.
import * as express from 'express';

import { Context, Handler } from "aws-lambda";
import * as awsServerlessExpress from "aws-serverless-express";

const app = express();


app.get('/items', (req: express.Request, res: express.Response, next: express.NextFunction) => {
    res.send('welcome!');
});

app.post(
  "/item",
  (req: express.Request, res: express.Response, next: express.NextFunction) => {
    res.send("welcome!");
  }
);

app.listen('3001', () => {
    console.log(`
  ################################################
  🛡️  Server listening on port: 3001🛡️
  ################################################
`);
});

const server = awsServerlessExpress.createServer(app);

export const handler: Handler = (event, context: Context) => {
  return awsServerlessExpress.proxy(server, event, context, "PROMISE").promise;
};
api를 생성할때 /items 경로를 지정해두었기 때문에 /items경로에 welcome! 이라는 텍스트를 리턴하는 함수를 만들어둔다.
lambda handler를 생성하여야 한다.
tsc 빌드를 위해서 package.json 파일의 scripts에 tsc를 추가한다.
  "scripts": {
    "tsc": "tsc",
    "test": "echo \"Error: no test specified\" && exit 1"
  },
이제 루트 경로에 생성해둔 package.json파일을 수정한다.
{
  "private": true,
  "version": "0.0.0",
  "dependencies": {},
  "devDependencies": {
    "@types/node": "^18.0.3"
  },
  "scripts": {
    "amplify:testfunction": "cd amplify/backend/function/testfunction/ts && npm install && npm run tsc && cd -"
  }
}
이렇게 작성하고 function의 테스트를 위해서
amplify mock function testfunction을 실행하여 테스트 결과를 확인한다.
event json object를 지정하라는 콘솔이 나오면 그냥 엔터를 치면 된다.
결과에 에러가없어야 하고,
amplify/backend/function/testfunction/src/index.js 가 타입스크립트를 컴파일한 내용으로 변경되어 있어야 한다.
amplify push 하기
이제 api와 function을 배포한다.
배포방법은 간단하다 .
amplify push를 입력하면 변경 사항들이 나오고 continue 에서 y를 입력하면 배포가 시작된다.
배포가 성공적으로 끝나면 api의 endpoint 경로를 확인할 수 있다.
만약 endpoint를 확인하고 싶다면
루트 폴더에 src/aws-exports.js파일을 열면 확인할 수 있다.
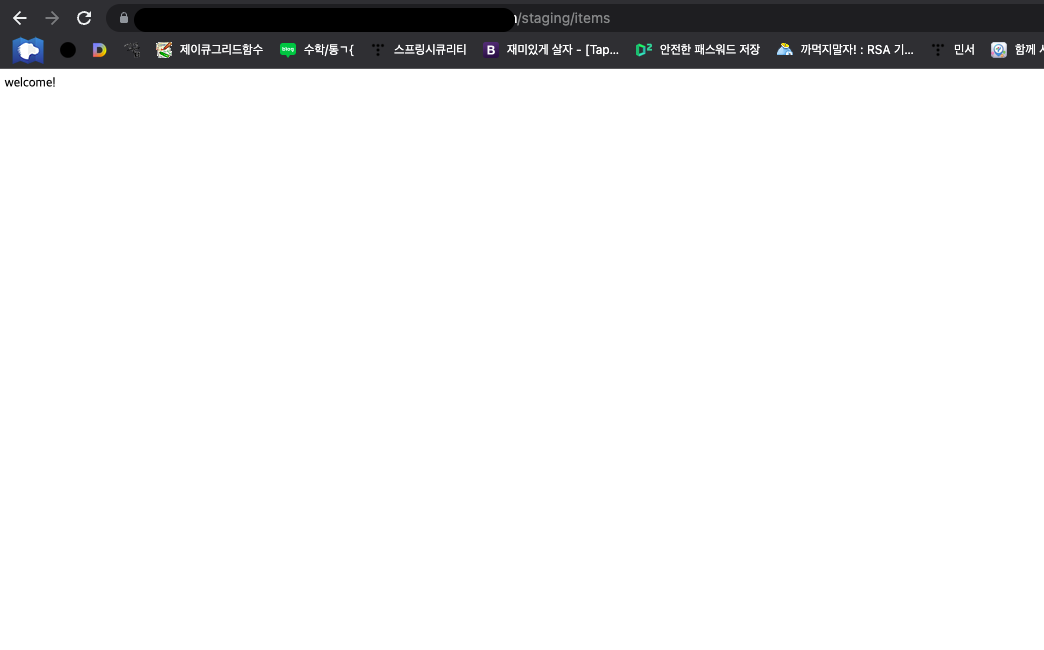
경로에 {endpoint}/{amplifyenv}/items 를입력하여 결과를 확인할 수 있다.