프로젝트: Node.js 기반의 REST API 구현
1 설계를 직접 해보자
1-1 ~ 1-6(API 설계)
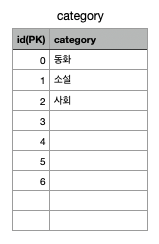
1-7 ~ 1-11(ERD 설계)
1-12 API, 테이블 점검
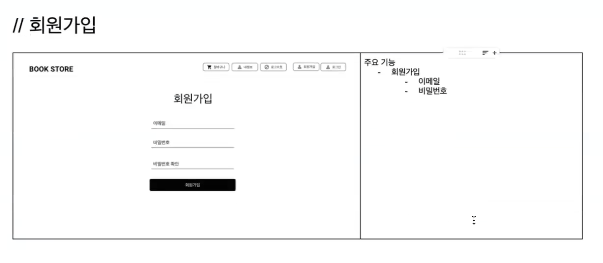
1️⃣ 회원 API
✅ 회원가입 API
- Method : POST
- URL : users/join
- HTTP status code : 성공 201(저장성공)
- Request Body :
(
email : "사용자가 입력한 이메일",
password : "사용자가 입력한 비밀번호"
) - Response Body :
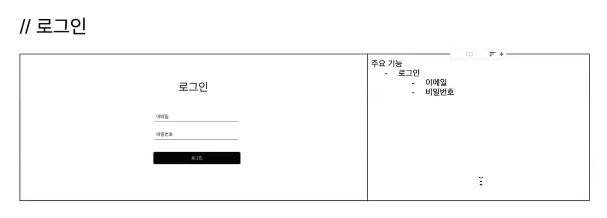
✅ 로그인 API
- Method : POST
- URL : users/login
- HTTP status code : 성공 200
- Request Body :
(
email : "사용자가 입력한 이메일",
password : "사용자가 입력한 비밀번호"
) - Response Body : jwt token
✅ 비밀번호 초기화 요청 API
- Method : POST
- URL : users/reset
- HTTP status code : 성공 200
- Request Body :
(
email : "사용자가 입력한 이메일"
) - Response Body :
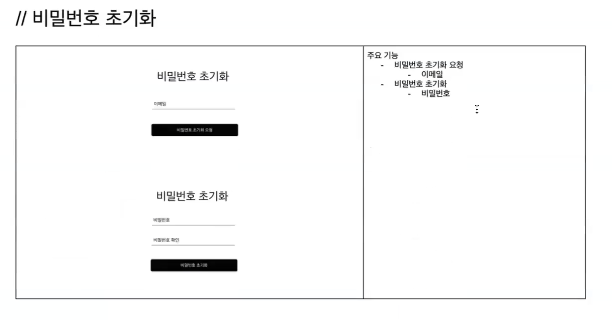
✅ 비밀번호 초기화(= 수정) API
- Method : PUT
- URL : users/reset
- HTTP status code : 성공 200
- Request Body :
(
password : "사용자가 입력한 비밀번호"
) - Response Body :
2️⃣ 도서 API
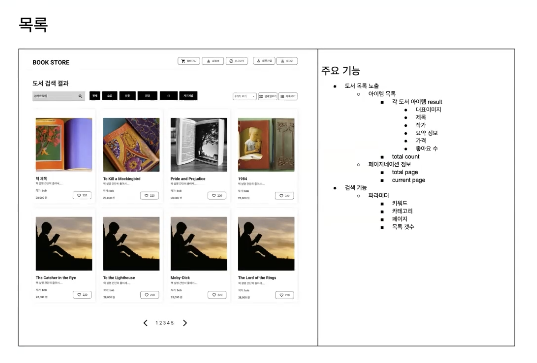
✅ 전체 상품 조회 API // 이미지 주소, 8개씩 보내줘야 함
- Method : GET
- URL : /books
- HTTP status code : 성공 200
- Request Body :
- Response Body :
[
    {
        id : 도서 id,
		title : "도서 제목",
        summary : "요약 설명",
        author : "도서 작가",
        price : 가격,
        likes : 좋아요 수,
        pubDate : "출간일"
    },
    {
        id : 도서 id,
        title : "도서 제목",
        summary : "요약 설명",
        author : "도서 작가",
        price : 가격,
        likes : 좋아요 수,
        pubDate : "출간일"
    },
    ...
]
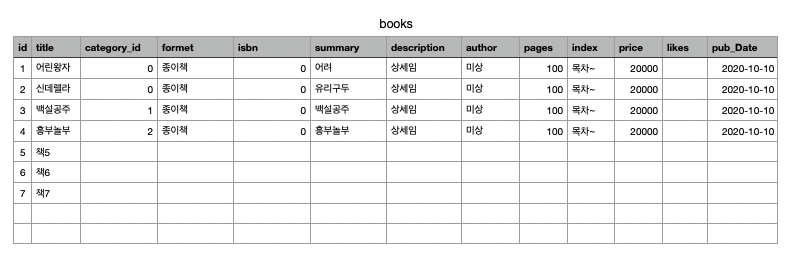
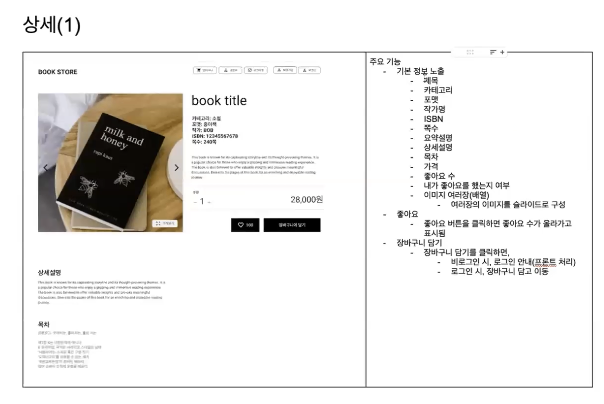
✅ 개별 도서 조회 API
- Method :GET
- URL : /books/{bookId}
- HTTP status code : 성공 200
- Request Body :
- Response Body :
{
    id : 도서 id,
    title : "도서 제목",
    category : 카테고리,
    formet : "포멧",
    isbn : isbn,
    summary : "요약 설명",
    description : "상세 설명",
    author : "도서 작가",
    pages : 쪽 수,
    index : "목차"
    price : 가격,
    likes : 좋아요 수,
    liked : boolean,
    pubDate : "출간일"
}

✅ 카테고리별 도서 목록 조회 API // new : true => 신간 조회(기준: 출간일 30일 이내)
- Method :GET
- URL : /books?categoryId={categoryId}&new={boolean}
- HTTP status code : 성공 200
- Request Body :
- Response Body :
[
    {
        id : 도서 id,
		title : "도서 제목",
        summary : "요약 설명",
        author : "도서 작가",
        price : 가격,
        likes : 좋아요 수,
        pubDate : "출간일"
    },
    {
        id : 도서 id,
        title : "도서 제목",
        summary : "요약 설명",
        author : "도서 작가",
        price : 가격,
        likes : 좋아요 수,
        pubDate : "출간일"
    },
    ...
]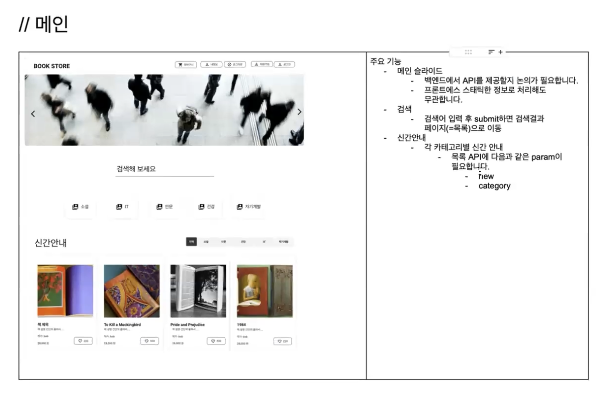
3️⃣ 좋아요 API 설계
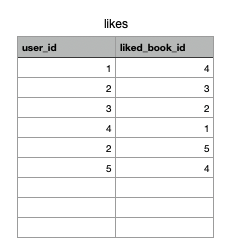
✅ 좋아요 추가 API
- Method : POST
- URL : /likes/{bookId}
- HTTP status code : 성공 200
- Request Body :
- Response Body :
✅ 좋아요 취소 API
- Method : DELETE
- URL : /likes/{bookId}
- HTTP status code : 성공 200
- Request Body :
- Response Body :
4️⃣ 장바구니 API 설계
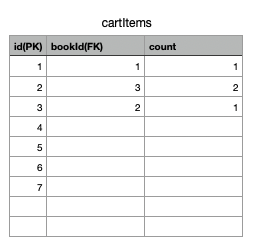
✅ 장바구니 담기 API // 장바구니 참고
- Method : POST
- URL : /cart
- HTTP status code : 성공 201
- Request Body :
{
    bookId : 도서 id,
    count : 수량
}- Response Body :
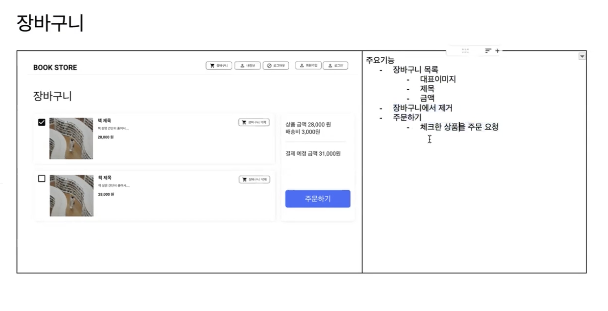
✅ 장바구니 조회 API // 장바구니 참고
- Method : GET
- URL : /cart
- HTTP status code : 성공 200
- Request Body :
[
    {
        id : 장바구니 도서 id,
        bookId : 도서 id,
        title : "도서 제목",
        summary : "도서 요약",
        count : 수량,
        price : 가격
    },
    {
        id : 장바구니 도서 id,
        bookId : 도서 id,
        title : "도서 제목",
        summary : "도서 요약",
        count : 수량,
        price : 가격
    },
    ...
]- Response Body :
✅ 장바구니 제거 API // 장바구니 참고
- Method : DELETE
- URL : /cart/{bookId}
- HTTP status code : 성공 200
- Request Body : // URL에서 보내서 딱히 필요 없음
- Response Body :
✅ 장바구니에서 선택한 상품목록 조회 API
- Method : GET
- URL : /...
- HTTP status code : 성공 200
- Request Body :
[cartItemId, cartItemId, ...]- Response Body :
[
    {
        cartItemId : 장바구니 도서 id,
        bookId : 도서 id,
        title : "도서 제목",
        summary : "도서 요약",
        count : 수량,
        price : "가격"
    },
    {
        cartItemId : 장바구니 도서 id,
        bookId : 도서 id,
        title : "도서 제목",
        summary : "도서 요약",
        count : 수량,
        price : "가격"
    },
    ...
]
5️⃣ 주문 API 구현
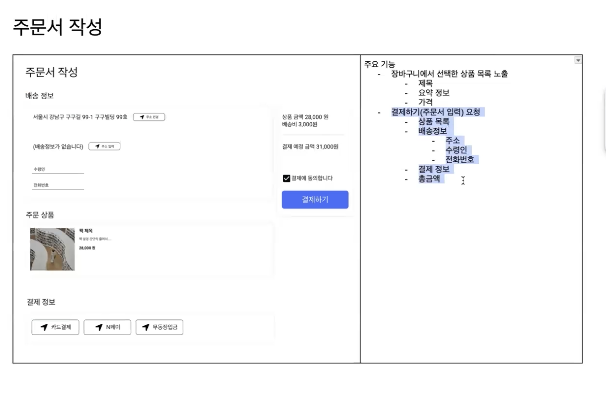
✅ 진짜 주문(결제) API 설계
// 결제하기 = 주문하기 = 주문 등록 = 데이터베이스 주문 insert = 장바구니에서 주문된 상품은 delete
- Method : POST
- URL : /orders
- HTTP status code : 성공 200
- Request Body :
{
items : [{
cartItemId : 장바구니 도서 id, // 주문된 상품 삭제 위해 추가
bookId : 도서 id,
count : 수량
},
{
cartItemId : 장바구니 도서 id,
bookId : 도서 id,
count : 수량
}]
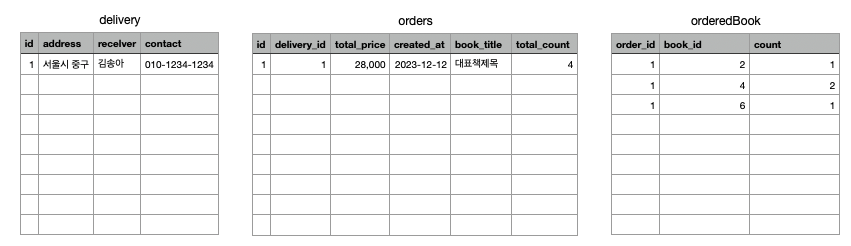
delivery : {
address : "주소"
receiver : "이름"
contact : "010-1234-1234"
}
totalPrice : "총 금액"
}- Response Body :
✅ 주문 목록 조회 API 설계
- Method : GET
- URL : /orders
- HTTP status code : 성공 200
- Request Body :
- Response Body :
[
	{
    	order_id : 주문 id,
    	created_at : "주문 일자",
        delivery : {
        	address : "주소",
            receiver : "이름",
            contact : "연락처"
        },
        bookTitle : "대표 책 제목",
        totalPrice : 결제 금액,
        totalCount : 총 수량
    },
...
]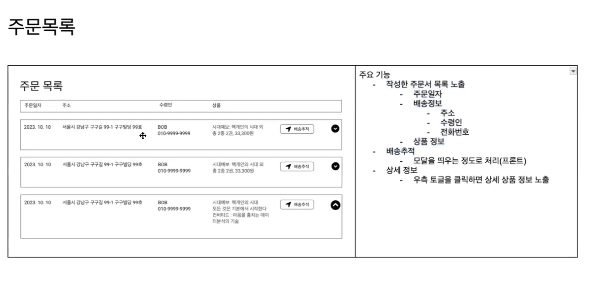
✅ 주문 상세 상품 조회(토글 클릭 시) API 설계
// 어떤 책들이 담겨있는지 조회(orderedBook 테이블 조회)
- Method : GET
- URL : /orders/{orderId}
- HTTP status code : 성공 200
- Request Body :
- Response Body :
[
	{
    	bookId : "도서 id"
        bookTitle : "도서 이름"
        author : "작가명",
        price : 가격,
        count : 수량
    },
    {
    	bookId : "도서 id"
        bookTitle : "도서 이름"
        author : "작가명",
        price : 가격,
        count : 수량
    },
...
]
2 프로젝트 구현 시작
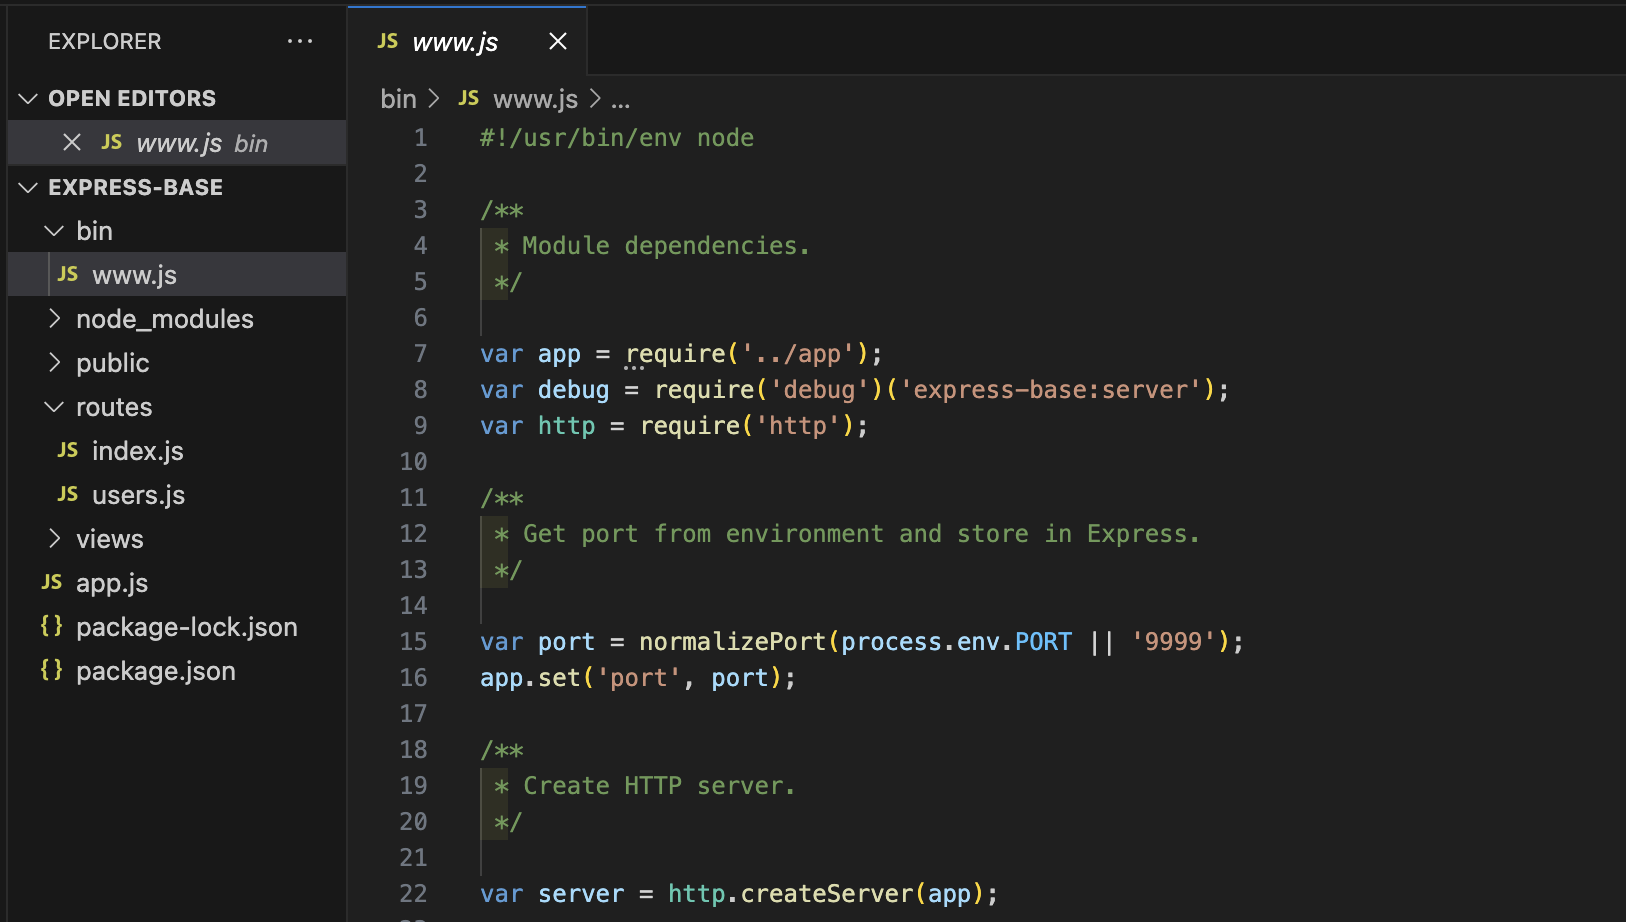
2-1 express-generator와 우리 프로젝트 구조 비교
1️⃣ express-generator 프로젝트 구조
-
bin/www : 포트번호 등과 같은 웹 서버를 구축하는데 필요한 설정 데이터가 정의되어 있는 파일
-> .env 파일과 같이 설정 값을 가지고 에러처리, 기타 추가 설정을 해주는 파일 -
node_modules : Node.js, Express에 필요한 모든 모듈들이 설치되는 폴더
-
public : javascripts, stylesheets -> 정적(ex. 로고, 회사소개 페이지...) 파일
cf. 동적 : 사람마다 다른 데이터 -
routes : 각 경로를 담당하는 모듈들이 들어있는 폴더 = 라우팅 로직을 구현하는 모듈들
: 클라이언트에서 어떤 요청을 주냐에 따라서 어떤 로직을 수행할 지 파일별로 분할해서 관리하는 정도
cf. 자바의 controller 역할 -
views : 클라이언트에게 html코드로 "화면을 보내는 파일"
-
app.js : 서버의 시작점 -> URL에 따라서 라우팅을 해줌
-
package.json : 이 프로젝트에 설치된 모듈 이름, 버전, 등등 정보들이 작성되어 있는 파일
2-2 프로젝트 셋팅 + app.js 구현
1️⃣ 필요한 모둘을 설치하자
- 이전에 미니프로젝트에서 사용한 모듈을 참고하여 재설치 해준다.
{
  "dependencies": {
    "dotenv": "^16.4.5",
    "express": "^4.21.0",
    "express-validator": "^7.2.0",
    "jsonwebtoken": "^9.0.2",
    "mysql2": "^3.11.3"
  }
}
2️⃣ app.js를 만들자
- app.js의 기본 틀을 잡고 포트넘버는 env에서 가져온다.
// express 모듈
const express = require('express');
const app = express();

// dotenv 모듈
const dotenv = require('dotenv');
dotenv.config();

app.listen(process.env.PORT);- .env
PORT = 99992-3 users.js 기본 모듈화
1️⃣ router를 추가해보자
// express 모듈
const express = require('express');
const app = express();

// dotenv 모듈
const dotenv = require('dotenv');
dotenv.config();

app.listen(process.env.PORT);


const userRouter = require('./routes/users')
app.use("/", userRouter)
2️⃣ users.js의 틀 잡기
const express = require("express");
const router = express.Router();

router.use(express.json()); // POST를 사용하면 값을 json형태로 받아오기 때문에 추가

// 회원가입
router.post('/join', (req,res) => {
  res.json('회원가입');
});

// 로그인
router.post('/login', (req,res) => {
  res.json('로그인');
});

// 비밀번호 초기화 요청
router.post('/reset', (req,res) => {
  res.json('비밀번호 초기화 요청');
});

// 비밀번호 초기화
router.put('/reset', (req,res) => {
  res.json('비밀번호 초기화');
});

module.exports = router;
2-4 books, likes, carts, orders 기본 모듈화
1️⃣ app.js에 모듈화한 코드들을 사용할 수 있도록 넣어보자
- API 설계대로 URL을 만들고 넣어보자
// express 모듈
const express = require('express');
const app = express();

// dotenv 모듈
const dotenv = require('dotenv');
dotenv.config();

app.listen(process.env.PORT);


const userRouter = require('./routes/users')
const bookRouter = require('./routes/books')
const likeRouter = require('./routes/likes')
const cartRouter = require('./routes/cart')
const orderRouter = require('./routes/orders')


app.use("/users", userRouter)
app.use("/books", bookRouter)
app.use("/likes", likeRouter)
app.use("/cart", cartRouter)
app.use("/orders", orderRouter)
2️⃣ 코드가 너무 기니 블로그에 적기보다는 깃허브를 활용해보자
- 각 모듈에 대한 코드는 여기서 확인
- 코드에 핵심적인 내용은 없으니 별 다른 내용은 적지 않겠음
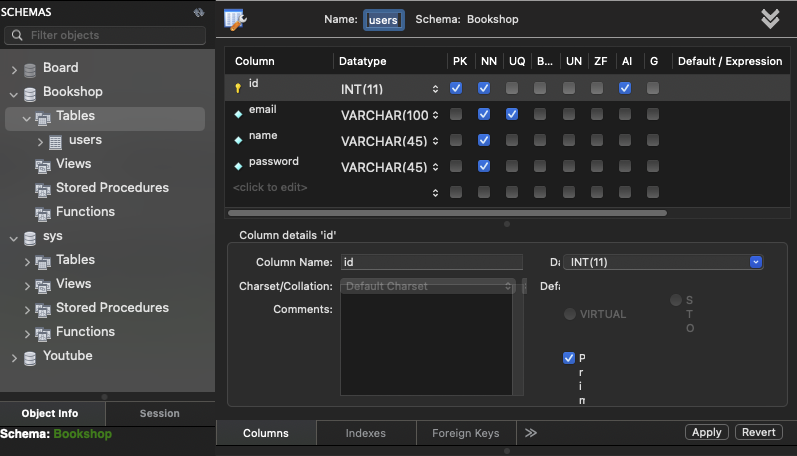
2-5 dbdiagram users, workbench create
1️⃣ dbdiagram을 만들어보자
- dbdiagram의 장점 중 하나로 mysql로 연동이 쉽다는 장점이 있다.
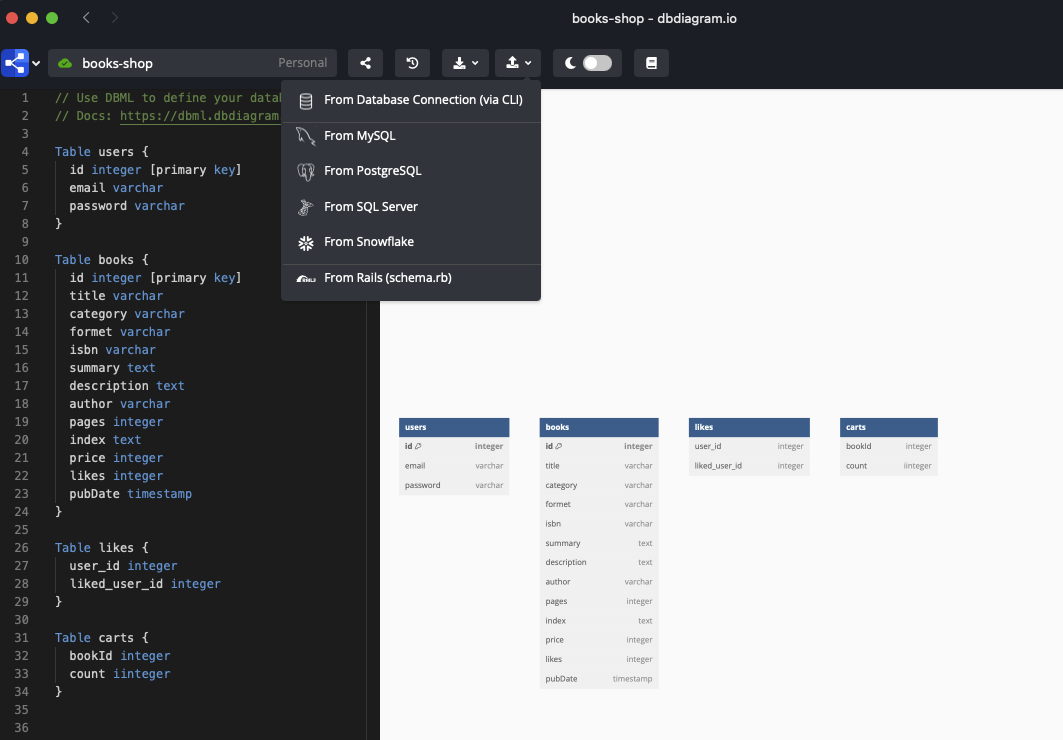
2️⃣ 워크브렌치에서도 테이블을 만들어보자
- API설계에 따라 테이블을 만들자