다음의 상태를 관리하고 렌더링에 사용해봅시다.
// copyList, 각 copy는 content,created,source로 구성됩니다.
  [{
    content:
      "Lorem Ipsum is simply dummy text of the printing and typesetting industry",
    created: new Date("2022-12-27T08:00:00"),
    source: "https://www.lipsum.com/",
  },
  {
    content:
      "The Date() constructor can create a Date instance or return a string representing the current time.",
    created: new Date("2022-12-31T13:00:00"),
    source:
      "https://developer.mozilla.org/en-US/docs/Web/JavaScript/Reference/Global_Objects/Date/Date",
  }]
store 생성
stores/copyStore.ts 파일을 만들어줍니다.

// stores/copyStore.ts
import { createStore } from "@/modules/broadcast";
import Copy from "@/types/Copy";

/**
 * 스토어 생성, state와 actions을 넣어줍니다.
 */
export default createStore({
  state: {
    copyList: [
      {
        content:
          "Lorem Ipsum is simply dummy text of the printing and typesetting industry",
        created: new Date("2022-12-27T08:00:00"),
        source: "https://www.lipsum.com/",
      },
      {
        content:
          "The Date() constructor can create a Date instance or return a string representing the current time.",
        created: new Date("2022-12-31T13:00:00"),
        source:
          "https://developer.mozilla.org/en-US/docs/Web/JavaScript/Reference/Global_Objects/Date/Date",
      },
    ],
  },
  actions: {
    addCopy(copy: Copy) {
      /**
       * 한가지 유의할 점, array의 push,pop등의 변화는 추적하지 못한다는 점,
       * Array를 상속하는 별도의 Array를 구현해서 추적할 수 있을 것 같기는 한데,
       * 좀 오버하는 것 같아서 일단은 아래와 같은 방식으로 상태 변화를 알 수 있게
       * 해줍니다. 더 좋은 방법이 있다면 알아봐야겠네요.
       */
      this.copyList = [...this.copyList, copy];
    },
  },
});
background 구현
background에서 store를 불러와 BroadcastingStation을 만들어줍니다.
import copyStore from "@/stores/copyStore";
import { BroadcastingStation } from "@/modules/broadcast";
import RUNTIME_MESSAGE from "./constants/RUNTIME_MESSAGE";

/**
 * BroadcastingStation을 만들어줍니다.
 */
const broadcastingStation = new BroadcastingStation("copy", copyStore);

/**
 * 처음 BroadcastingStation의 ChannelAddress를 view에 알려줘야하기 때문에
 * runtime.onMessage에 broadcastingStation.channelAddress을 반환할
 * 핸들러를 하나 추가합니다.
 */
chrome.runtime.onMessage.addListener((message, _, sendResponse) => {
  switch (message) {
    case RUNTIME_MESSAGE.GET_CHANNEL_ADDRESS: {
      const channelAddress = broadcastingStation.channelAddress;
      sendResponse(channelAddress);

      return false;
    }
  }

  return true;
});
view(CopyList) 구현
이전에 만든 CopyList 컴포넌트를 수정해서 Copy mock을 사용할 수 있게 합시다.
import { LitElement, css, html } from "lit";
import { customElement, state } from "lit/decorators.js";
import Messenger from "@/classes/Messenger";
import type Copy from "@/types/Copy";
import RUNTIME_MESSAGE from "@/constants/RUNTIME_MESSAGE";
import { type ChannelAddress, Radio, Action } from "@/modules/broadcast";

import "@/components/FilledCard";

@customElement("copy-list")
export default class CopyList extends LitElement {
  /**
   * 상태 변화를 구독할 Radio 저장
   */
  @state()
  copyRadio!: Radio;

  /**
   * 렌더링에 사용할 copyList
   */
  @state()
  copyList: Copy[] = [];

  constructor() {
    super();
    this.#created();
  }
  render() {
    /**
     * 상태 변화를 확인하기 위해 addCopy 메소드를 추가했습니다.
     * copyList의 copy별로 content,created,source를 출력합니다.
     */
    return html`
      <button @click=${() => this.#addCopy()}>add copy</button>
      <ul class="copy-list">
        ${this.copyList.map(
          (copy) =>
            html` <li>
              <filled-card class="card">
                <div>
                  <p>${copy.content}</p>
                  <p>${copy.created}</p>
                  <p>${copy.source}</p>
                </div>
              </filled-card>
            </li>`
        )}
      </ul>
    `;
  }

  async #created() {
	/**
     * Radio를 생성하기 위해 BroadcastingStation의 ChannelAddress를 읽어옵니다.
     */
    const channelAddress = (await Messenger.sendMessage(
      RUNTIME_MESSAGE.GET_CHANNEL_ADDRESS
    )) as ChannelAddress;
	/**
     * Radio를 생성합니다. 이때 BroadcastingStation의 sender를 receiver로,
	 * receiver를 sender로 연결해줘야합니다.
	 *
	 * 두 번째 인자는 initializer로 초기 state를 가져와 view를 렌더링합니다.
     */
    this.copyRadio = new Radio(
      {sender:channelAddress.receiver,receiver:channelAddress.sender},
      (initialState: Record<string, any>) => {
        this.copyList = initialState.copyList;
      }
    );
	/**
	 * newState를 받았을 때 view를 갱신하도록 리스너를 추가합니다.
	 */
    this.copyRadio.$subscribe((newState: Record<string, any>) => {
       this.copyList = [...newState.copyList];
    });

  }

  /**
   * addCopy를 통해 새 copy를 스토어에 추가합니다.
   */
  #addCopy() {
    const newCopy:Copy = {
      content:this.copyList.length+'',
      created:new Date(),
      source:'localhost'
    }
    const addCopyAction = new Action('addCopy',newCopy);
    this.copyRadio.broadcastAction(addCopyAction)
  }

  static styles = css`
    :host {
      max-width: 1280px;
      margin: 0 auto;
      padding: 2rem;
      text-align: center;
    }

    ul {
      list-style: none;
      padding: 0;
    }
    ul > li {
      margin-bottom: 0.5rem;
    }
  `;
}
결과
npm run build로 빌드한 결과를 extension에 올립니다.
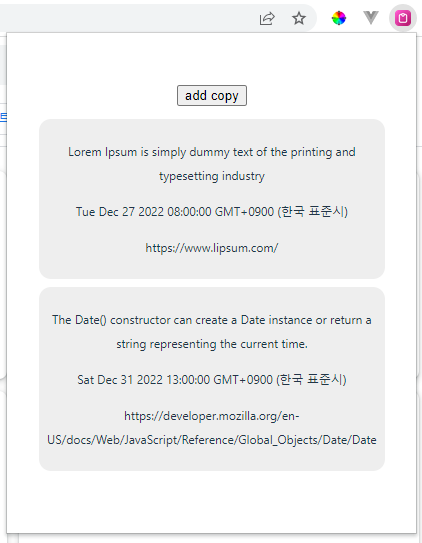
처음 DISCOVER 패킷이 전송되면서 background에 있는 store의 초기 상태를 CopyList로 읽어온 뒤, view를 렌더링한 것을 확인할 수 있습니다.
addCopy를 눌러 copy를 스토어에 추가하면
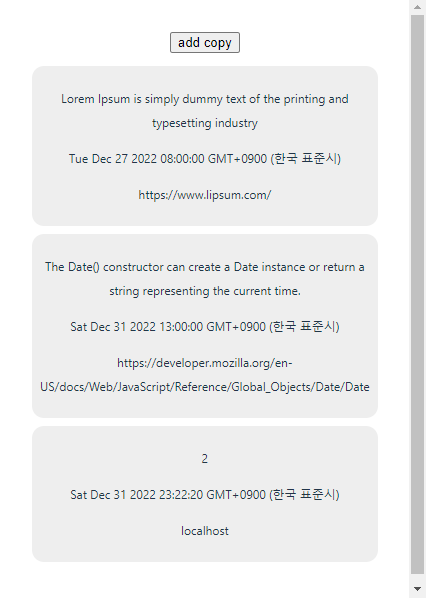
content가 2인 copy가 추가된 것을 확인할 수 있습니다.

공부,번역하고 정리하는 곳