indexed DB에 저장한 내용을 불러와서 클립보드에 저장하는 부분까지 작성해보겠습니다.
리스트 불러오기
web component를 사용해 각 copy를 view에 대응시켜보겠습니다.
popup html 작성
<!--popup/index.html-->
<html>
  <head>
    <link href="/assets/css/theme.css" rel="stylesheet"></link>
  </head>
  <body>
    <h1 id="title">Copy Stack</h1>
    <hr/>
    <div id="item-list"></div>
    <!--웹컴포넌트에서 사용할 템플릿-->
    <template id="copied-item">
      <style>
          .container {
            padding-bottom:0.25rem;
            margin-bottom:0.5rem;
            border-bottom:1px solid black;
          }
      </style>
      <div class="container">
        <div class="content"></div>
        <button class="copy">copy</button>
        <button class="delete">delete</button>
      </div>
    </template>
    <!--웹컴포넌트를 불러옴-->
    <script
      type="text/javascript"
      src="/components/CopiedItem.js"
    ></script>
    <!--background와 통신할 popup.js 호출-->
    <script src="popup.js"></script>
  </body>
</html>
CopiedItem 컴포넌트 생성
// components/CopiedItem.js
class CopiedItem extends HTMLElement {
  #data = null;

  constructor(data) {
    super();
    this.#data = data;
  }

  connectedCallback() {
    this.render(this.#data);
  }

  render(data) {
    const $template = document.getElementById("copied-item");
    const $container = document.importNode($template.content, true);
    const $content = $container.querySelector(".content");
    const $copyButton = $container.querySelector(".copy");
    const $deleteButton = $container.querySelector(".delete");

    $copyButton.addEventListener("click", async () => {
      // 클릭시 copy를 클립보드로 복사하는 내용을 추가할 예정
    });
    $deleteButton.addEventListener("click", () => {
      // 클릭시 선택한 copy를 삭제하는 내용을 추가할 예정
    });

    // Blob인 경우 이미지 타입이, Text인 경우 텍스트 내용이 출력되도록 함
    if (data.content instanceof Blob) {
      $content.textContent = data.content.type;
    } else {
      $content.textContent = data.content;
    }

    this.appendChild($container);
  }
}

customElements.define("copied-item", CopiedItemElement);
데이터 요청 만들기
//popup/popup.js

// 데이터를 받기 위해 연결한 Channel
const channel = new BroadcastChannel("MY_BROADCAST");
channel.onmessage = (msg) => {
  if (msg.data.action === "CONTENT_LIST") {
    render(msg.data.payload);
  }
};

// popup 돔 생성시 데이터 요청
window.onload = async () => {
  await chrome.runtime.sendMessage({
    action: "GET_CONTENT_LIST",
  });
};

// 렌더링
function render(contentList) {
  const $itemList = document.getElementById("item-list");
  $itemList.innerHTML = "";
  const $list = contentList.reduce(($fragment, item) => {
    // 각 Copy에 대응되는 CopiedItem 컴포넌트 생성
    const $copiedItem = new CopiedItem(item);
    $fragment.appendChild($copiedItem);

    return $fragment;
  }, document.createDocumentFragment());

  $itemList.appendChild($list);
};
// scripts/background.js
import itemModel from "/scripts/itemModel.js";
// popup과 같은 이름의 채널 생성
const channel = new BroadcastChannel("MY_BROADCAST");
chrome.runtime.onMessage.addListener((message, sender, sendResponse) => {
if(message.action === 'GET_CONTENT_LIST') {
itemModel.getAll().then((itemList) => {
// 불러온 copy 리스트를 channel을 통해 전송
channel.postMessage({
action: "CONTENT_LIST",
payload: itemList,
});
sendResponse(true);
});
return true;
}
}); 처음 popup이 생성되면 background로 GET_CONTENT_LIST 요청을 보내고
background에선 indexedDB를 읽고 itemList를 MY_BROADCAST 채널을 통해 전달해줍니다.
popup에선 다시 MY_BROADCAST 를 통해 itemList를 전달받아 render를 수행합니다.

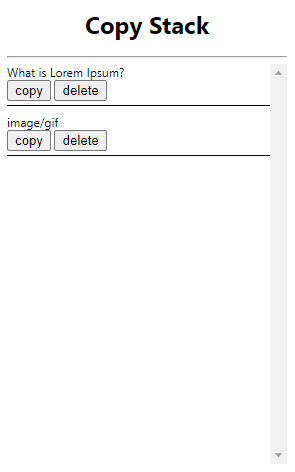
indexed DB의 두 데이터에 대한 view가 생성된 것을 볼 수 있습니다. Blob 데이터의 경우 타입을 출력하고, Text 데이터인 경우 텍스트 내용을 출력합니다.
copy 로직 작성
copy가 동작하게 하기 위해 CopiedItem.js의 내용을 일부 수정합니다.
// components/CopiedItem.js

class CopiedItem extends HTMLElement {
	// 내용 생략

  render(data) {
    const $template = document.getElementById("copied-item");
    const $container = document.importNode($template.content, true);
    const $content = $container.querySelector(".content");
    const $copyButton = $container.querySelector(".copy");
    const $deleteButton = $container.querySelector(".delete");

    $copyButton.addEventListener("click", async () => {
      /*
       * !데이터를 클립보드에 붙여 넣는 함수 추가!
       */
      await toClipboard(data.content);
    });
    $deleteButton.addEventListener("click", () => {
      /*
       * !클릭시 선택한 copy를 삭제하는 내용을 추가할 예정
       */
    });

    /*
     * Blob인 경우 이미지 타입이, Text인 경우 텍스트 내용이 출력되도록 함
     */
    if (data.content instanceof Blob) {
      $content.textContent = data.content.type;
    } else {
      $content.textContent = data.content;
    }

    this.appendChild($container);
  }
}

async function toClipboard(data) {
  /*
   * Blob 데이터인 경우 ClipboardItem을 만들어줘야한다.
   */
  if (data instanceof Blob) {
    window.navigator.clipboard.write([
      new ClipboardItem({
        ['image/png']: data,
      }),
    ]);

    return;
  }
 /*
  * text 데이터인 경우 단순히 writeText를 통해 클립보드에 작성할 수 있다.
  */
  window.navigator.clipboard.writeText(data);
}
text 데이터는 clipboard.writeText를 통해 클립보드에 작성할 수 있지만 이미지의 경우 ClipboardItem을 만들어 clipboard.write를 사용해야 합니다.
클립보드에 넣을 수 있는 이미지는 png뿐이므로 png형으로 ClipboardItem을 만들어줘야 합니다. png 외의 이미지는 png로 변환해 줘야 합니다.
convert2png 만들기
Blob을 확인해 png가 아니면 png로 만들어주는 로직을 작성해봅시다.
async function convert2png(blob) {
  // 이미 png이면 그대로 반환
  if (blob.type === "image/png") return blob;

  // png가 아니라면 img 태그를 만들어 그 안에 이미지를 로드한다.
  const $img = await new Promise((resolve) => {
    const _$img = document.createElement("img");
    _$img.crossOrigin = "Anonymous";
    _$img.src = URL.createObjectURL(blob);
    _$img.addEventListener("load", () => {
      resolve(_$img);
    });
  });

  // 다시 생성한 img 태그를 canvas 태그에 그리고 toBlob을 이용해 Blob으로 만들어준다.
  const $canvas = document.createElement("canvas");
  $canvas.width = $img.width;
  $canvas.height = $img.height;

  const ctx = $canvas.getContext("2d");
  ctx.drawImage($img, 0, 0);

  return await new Promise((resolve) => {
    $canvas.toBlob((blob) => {
      resolve(blob);
    }, "image/png");
  });
}convert2png를 적용해 toClipboard 함수를 수정해줍니다.
async function toClipboard(data) {
  if (data instanceof Blob) {
    const pngBlob = await convert2Png(data);
    window.navigator.clipboard.write([
      new ClipboardItem({
        [pngBlob.type]: pngBlob,
      }),
    ]);

    return;
  }

  window.navigator.clipboard.writeText(data);
}
copy 버튼이 잘 작동합니다.
delete 로직 작성
이번엔 기존의 Copy를 삭제하는 로직을 추가합니다.
// components/CopiedItem.js

class CopiedItem extends HTMLElement {
	// 내용 생략

  render(data) {
	// 내용 생략

    $deleteButton.addEventListener("click", async () => {
      // 삭제 요청
      const isSuccess = await chrome.runtime.sendMessage({
        action: "DELETE_ITEM",
        payload: data.id
      });

      // 화면 갱신
      if (isSuccess) {
        await chrome.runtime.sendMessage({
          action: "GET_CONTENT_LIST",
        });
      }

    });

	// 내용 생략
  }
}
// background.js
...
chrome.runtime.onMessage.addListener((message, sender, sendResponse) => {
// DELETE_ITEM 요청이 들어오면 itemModel에서 아이템 삭제
if(message.action === "DELETE_ITEM") {
itemModel
.remove(message.payload)
.then((isSuccess) => sendResponse(isSuccess));
return true;
}
});
삭제도 잘 작동 합니다.
마치며
이것으로 원하는 기능을 전부 구현 가능하다는 것을 확인했습니다. 이제 본격적으로 아키텍처를 설계하고 기술 스택을 선택하면 될 것 같습니다.