
flutter web을 github Page에 배포하기
flutter web을 이용해 개발 중인 토이프로젝트를 배포하기 위한 스터디 (with github action)
Goal
- flutter를 github page를 통해 배포하기
- 스터디 한 내용을 문서화 하기
github action에서 사용 할 토큰 발급
github action을 이용하여 배포를 할 것이기 때문에 먼저 action에서 사용할 키를 발급받아야 한다.
settings에서 제일 하단에 있는 Developer Settings에서 발급을 받을 수 있다. 작성일 기준으로 Personal access tokens를 발급받는 방법을 2가지 제공하고 있다.
- Fine-grained tokens (Beta)
- Tokens (classic)
필자는 2번을 선택하였으며 이유는 1번 방법이 베타이기도 하고 웹을 한번 배포하고 토큰에 대한 신경을 쓰고 싶지 않은데 1번의 경우 만료일이 없는 토큰을 제공하지 않기 떄문이다.
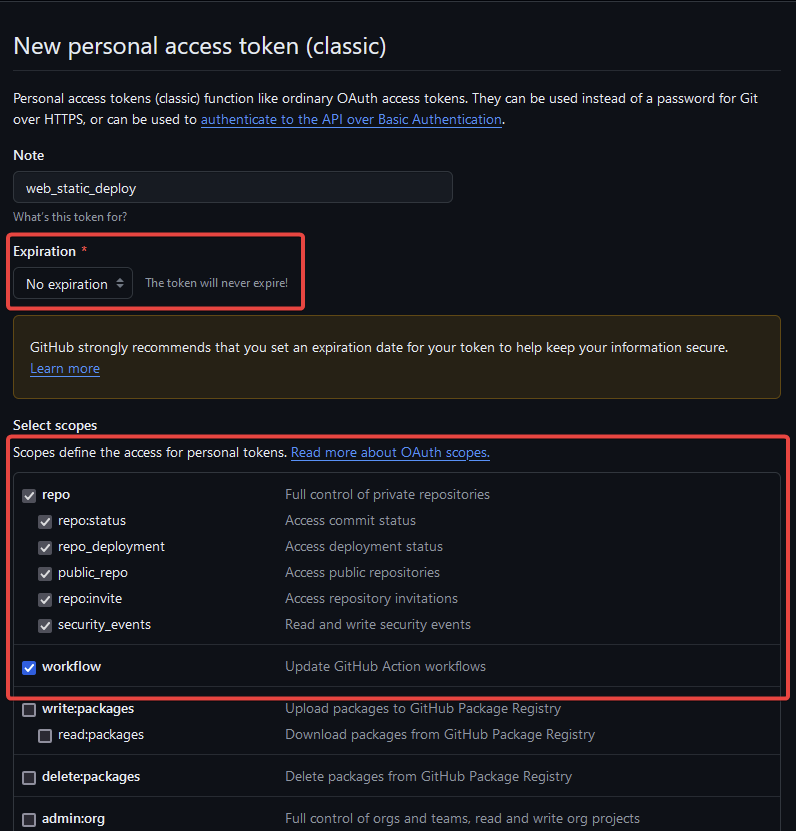
토큰 발급
Tokens에 들어가서 우측 상단에 있는 Generate new token을 누르면 아래와 같은 화면을 볼 수 있다.
이 때 중요한 것은 action을 통해 배포할 때 만료일을 No expiration으로 설정 후 해당 토큰의 권한을 설정할 수 있는데 배포를 위해 repo, workflow 두 개를 선택 후 만들면 된다.
생성 후 발급되는 토큰은 잘 메모해두자!
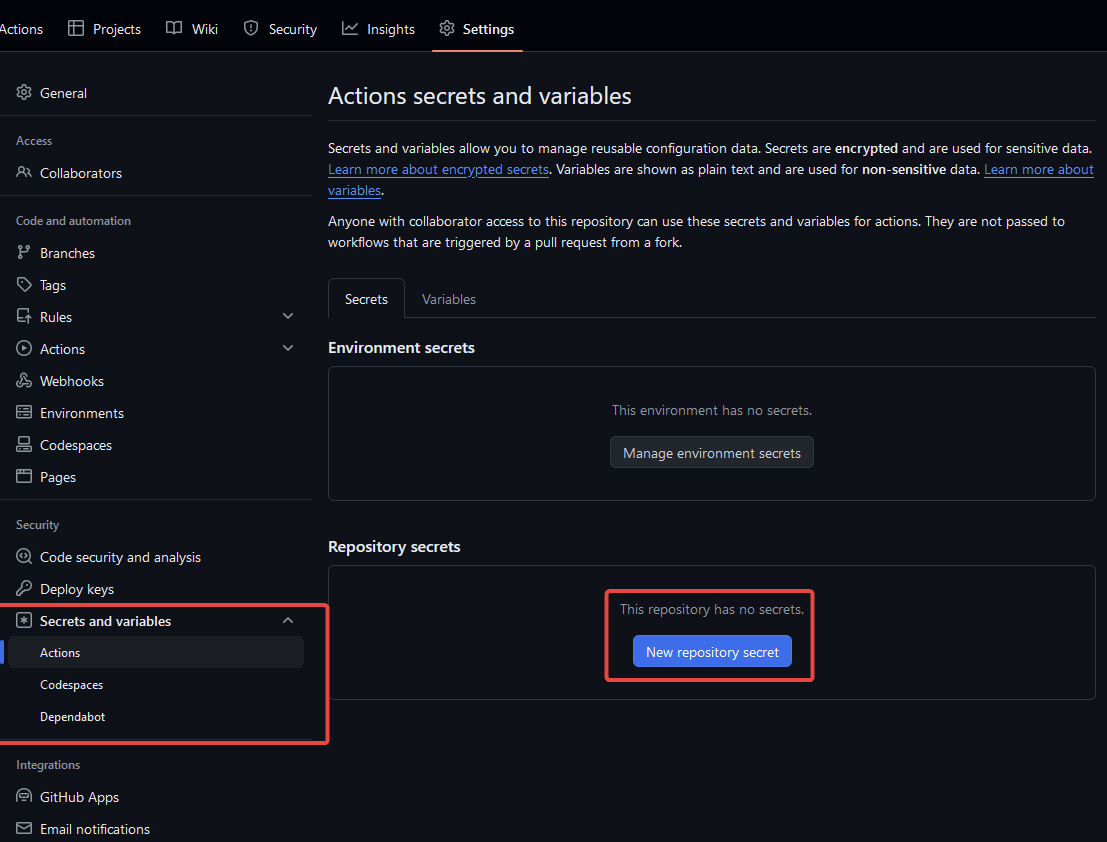
repository 토큰 설정
생성 된 토큰을 배포할 repository에 정의해주면 토큰 발급이 끝나게 된다. 배포 할 repository로 이동하여 아래에 버튼을 눌러 이전에 발급한 토큰을 정의하면 된다.
추가할 때 이름은 action을 작성할 때 사용 될 예정이다.
action 작성하기
github action은 위치가 정해져있다. 프로젝트의 root에서 .github 디렉토리를 만들고 하위에 workflows를 작성한 후 하위로 action 파일들을 작성해나가면 된다. (이름은 크게 중요하지 않음.)
// ex
.github
    ㄴ workflows
        ㄴ web_static_deploy.yml
flutter web을 배포하기 위한 스크립트는 아래와 같다.
name: deploy flutter web to github pages

# 1
on:
  push:
    branches:
      - main

jobs:
  deploy:
    runs-on: ubuntu-latest
    steps:
      # 1
      # https://github.com/marketplace/actions/checkout
      - name: Checkout
        uses: actions/checkout@v4

      # 2
      # https://github.com/marketplace/actions/flutter-action
      - name: Setup flutter
        uses: subosito/flutter-action@v2
        with:
          channel: stable
          flutter-version: 3.19.0

      # 3
      - name: Build web
        run: flutter build web --base-href "/${{ github.event.repository.name }}/"

      # 4
      # https://github.com/marketplace/actions/github-pages-action
      - name: Deploy to github pages
        uses: peaceiris/actions-gh-pages@v3
        with:
          github_token: ${{ secrets.STATIC_DEPLOY_KEY }}
publish_dir: ./build/web-
action에서 배포 대상의 repository의 코드를 가져온다.
-
action에서 flutter를 사용하기 위해 flutter를 설치한다.
-
설치한 flutter를 이용하여 repository의 코드를 build 한다. 이 때 빌드 옵션으로
--base-href옵션을 줄 수 있다. -
github page에 배포를 진행한다.
flutter base href 설정하기
flutter web 프로젝트에 index.html을 보면 아래와 같이 되어있는 부분을 확인해보자.
<!--
If you are serving your web app in a path other than the root, change the
href value below to reflect the base path you are serving from.
The path provided below has to start and end with a slash "/" in order for
it to work correctly.
For more details:
* https://developer.mozilla.org/en-US/docs/Web/HTML/Element/base
This is a placeholder for base href that will be replaced by the value of
the `--base-href` argument provided to `flutter build`.
-->
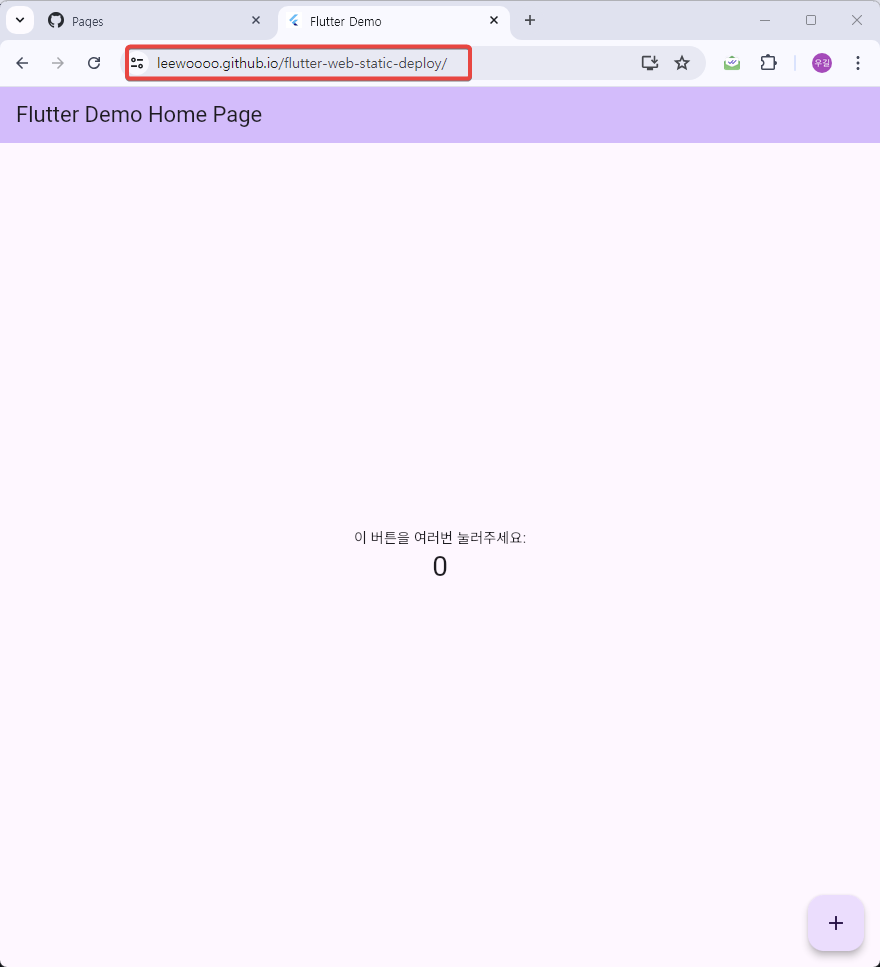
<base href="$FLUTTER_BASE_HREF" />직역을 하자면 web을 호스팅 할 때 서버의 root가 아닌 경우 href를 수정하라는 내용이다. github page로 배포 되는 web의 root 주소는 https://${Owner}.github.io/${Repository}와 같이 생겼다.
그렇기 때문에 href를 <base href="/${repository명}/">과 같이 수정해줘야 한다.
하지만 해당 부분을 web build 할 때 정의하여 사용할 수 있다. action 작성하기에서 작성했던 것 처럼 --base-href "/${{ github.event.repository.name }}/"와 같이 작성해주면 빌드 시 index.html에 <base href="/${repository명}/"> 부분에 정의된 것을 볼 수 있다.
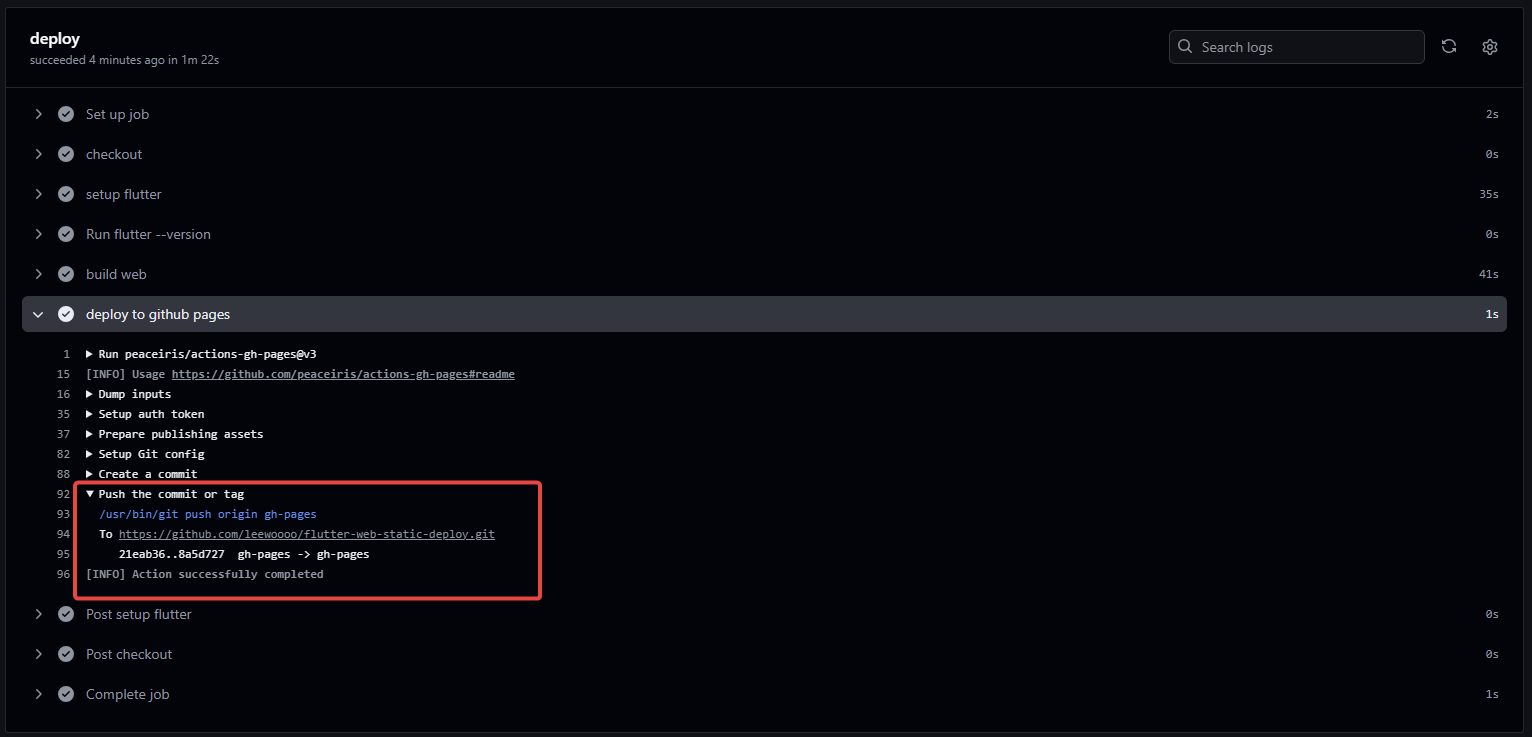
action 확인하기.
action이 성공적으로 돌면 자동으로 gh-pages라는 브랜치에 현재 내용들을 커밋 후 푸쉬하는 것을 볼 수 있다.
repository 설정하기
action이 끝나면 배포가 성공한 줄 알았지만 한 단계 더 남아있었다. repository의 설정에 Pages의 사이드 메뉴에가서 해당 branch로 github pages를 배포하겠다고 설정해주어야 한다.
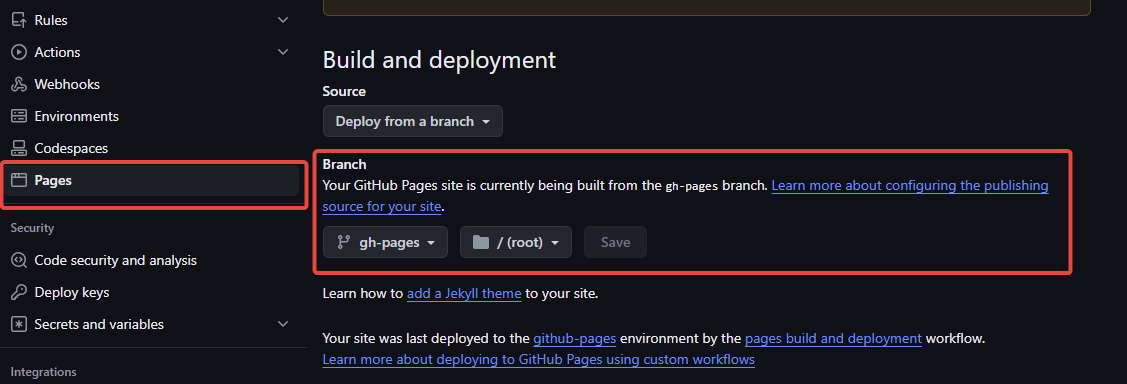
위와 같이 설정하면 action이 하나 더 실행되는데 해당 action이 끝나면 최종적으로 배포가 완료된다.
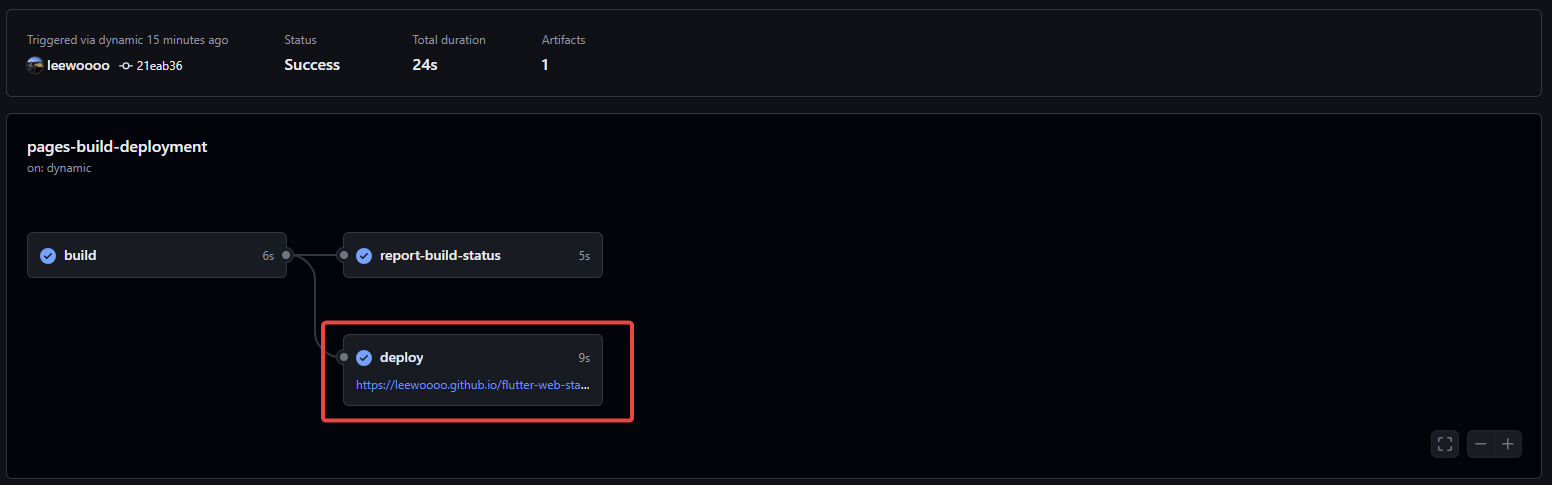
결과
REFERENCES