기존 방식
그동안 여러 프로젝트를 했지만, 각 프로젝트를 할 때 마다의 아쉬웠던 점은 예외 처리에 관한 부분이었다.
예시로, 넘블 인스타그램 프로젝트에서 작성했던 형식은 다음과 같다.
// Controller
@PostMapping("/{user_id}")
public ResponseEntity<?> followRequest(@PathVariable Long user_id) {
    try {
        followService.addFollow(user_id, userUtil.getLoggedInUser());
        return ResponseEntity.status(HttpStatus.OK).build();
    } catch (ExitedUserException |
             SelfFollowAPIException |
             NotSearchedTargetException |
             ExitedTargetUserException |
             AlreadyFollowException e) {
        ExceptionResponse exceptionResponse = new ExceptionResponse(e.getMessage());
        return ResponseEntity.status(HttpStatus.BAD_REQUEST).body(exceptionResponse);
    }
}

// Service
public void addFollow(Long userId, User sender) {

    if (!sender.isActivated()) {
        throw new ExitedUserException("탈퇴했기에 권한이 없습니다.");
    }

    if (sender.getId().equals(userId)) {
        throw new SelfFollowAPIException("자기 자신과는 팔로우 API가 이뤄질 수 없습니다.");
    }

    User receiver = userRepository.findById(userId)
            .orElseThrow(() -> new NotSearchedTargetException("사용자가 없습니다."));

    if (!receiver.isActivated()) {
        throw new ExitedTargetUserException("탈퇴한 유저라 불가능합니다.");
    }

    if (followRepository.findBySender_IdAndReceiver_Id(sender.getId(), receiver.getId()) != null) {
        throw new AlreadyFollowException("이미 팔로우가 맺어져 있습니다.");
    }

    Follow newFollow = Follow.builder()
            .sender(sender)
            .receiver(receiver)
            .build();

    followRepository.save(newFollow);
}

// ExceptionResponse
@Getter
@Setter
@AllArgsConstructor
public class ExceptionResponse {

    private String message;
}
문제점
이 방식의 문제점은 다음과 같다.
- 컨트롤러 단에서 예외를 빠뜨릴 수도 있다.
- 컨트롤러 단에서 예외 응답 시
ExceptionResponse를 설정하는 부분을 매번 해야 하고, 예외에 따라ResponseEntity의status를 다르게 한다면try-catch가 더 길어진다. - 컨트롤러 단에서
try-catch에 의해 코드가 오염되었다. - 서비스 단에서 예외를 작성할 때, 같은 예외임에도 메시지를 서비스 단에서 작성할 수 있기 때문에 간혹 다른 메시지가 작성될 우려가 있다.
이런 문제를 해결하고자 스프링에서 지원하는 예외 처리 및 응답에 관한 부분을 학습해야겠다고 느꼈고, 그것이 바로 ControllerAdvice와 ExceptionHandler이다.
ExceptionHandler
먼저, ExceptionHandler부터 보자.
정의
ExceptionHandler는 비즈니스 로직이 던진 예외에 반응하는 핸들러 메서드이다.
위치
사용 가능한 위치는 특정 컨트롤러 클래스 내부에 작성하거나, @ControllerAdvice 컴포넌트 내부에 작성할 수 있다. 전자의 경우에는 해당 컨트롤러 안에서만 사용되며, 후자의 경우에는 프로젝트 전체에서 사용된다.
예시
사용 예시는 다음과 같다.
@ExceptionHandler
public ResponseEntity<APIErrorResponse> general(RuntimeException e) {
    return ResponseEntity.internalServerError().build();
}

@ExceptionHandler(RuntimeException.class)
public ResponseEntity<APIErrorResponse> general(RuntimeException e) {
    return ResponseEntity.internalServerError().build();
}

@ExceptionHandler(RuntimeException.class)
public ResponseEntity<APIErrorResponse> general(Exception e) {
    return ResponseEntity.internalServerError().build();
}

@ExceptionHandler({RuntimeException.class, IOException.class})
public ResponseEntity<APIErrorResponse> general(Exception e) {
    return ResponseEntity.internalServerError().build();
}- 1번의 경우에는
RuntimeException및 하위 예외를 감지했을 때 실행된다. - 2번의 경우에는 정확히
RuntimeException예외를 감지했을 때 실행된다. - 3번의 경우에는
Exception중RuntimeException예외를 감지했을 때 실행된다. 즉 2번과 유사하다. - 4번의 경우에는
Exception중RuntimeException,IOException예외를 감지했을 때 실행된다.
ControllerAdvice
다음으로는 ControllerAdvice를 보자.
정의
위에서도 말했듯이, ExceptionHandler를 글로벌하게 사용하고 싶을 때 활용된다.
종류
- 뷰와 관련되었을 때는
@ControllerAdvice를 사용한다. - JSON과 관련되었을 때는
@RestControllerAdvice(@ControllerAdvice+@ResponseBody)를 사용한다.
속성
value==basePackagesbasePackages: 적용 범위를 문자열을 이용해 특정 패키지로 지정basePackageClasses: 적용 범위를 대표 클래스 한 개 (아무거나)를 이용해 특정 패키지로 지정basePackages를 type-safe하게 사용하기 위해 제공하는 옵션 (클래스 이름이 달라졌을 때 추적 계속 할 수 있게 하기 위함)
assignableTypes: 적용 범위를 특정 클래스에 할당할 수 있는 컨트롤러로 지정annotations: 적용 범위를 특정 어노테이션을 사용한 컨트롤러로 지정 (ex:@RestControllerAdvice(annotations = RestController.class))@RestControllerAdvice(annotations = RestController.class)등과 같이 작성하면, JSON 응답을 하는@RestController가 붙은 어노테이션들에 한해서만 ControllerAdvice를 적용하므로 이는 JSON과 관련된 형태임이 이미 정해졌다. 그렇기 때문에 이 때@ControllerAdvice를 사용해도 무방하다. 그렇지만 의미를 확고히 하기 위해@RestControllerAdvice를 사용하기도 한다.
Spring MVC에서 내부적으로 발생하는 예외들도 커스텀하게 설정할 수 있는 방법이 있는데,
@ControllerAdvice클래스에서ResponseEntityExceptionHandler를 상속받아handleExceptionInternal를 오버라이드하면 된다. 그런데 이러한 예외 (ex:HttpMediaTypeNotSupportedException등)는 비즈니스와 관련된 부분이 아니기도 하고, 발생 가능성이 낮은 예외기도 해서 후순위로 이해해야 할 것 같다. 무엇보다 직접HttpMediaTypeNotSupportedException같은 예외를 던졌을 때 커스텀 설정을 한 대로 잘 나오긴 하지만, 포스트맨 등에서 직접 요청할 때는 기본 예외가 그대로 나와있는 문제가 있는데 좀 더 파악해야 할 듯 싶다.
실제 적용
사람마다 원하는 API 응답 스타일이 다르긴 하지만, 나는 앞으로 프로젝트를 할 때 이러한 형태로 나오게끔 하고 싶다.
// 성공 시
{
"success": true,
"status": "OK",
"path": "/api/member/1",
"data": {
"id": 1,
"nickname": "john"
}
}
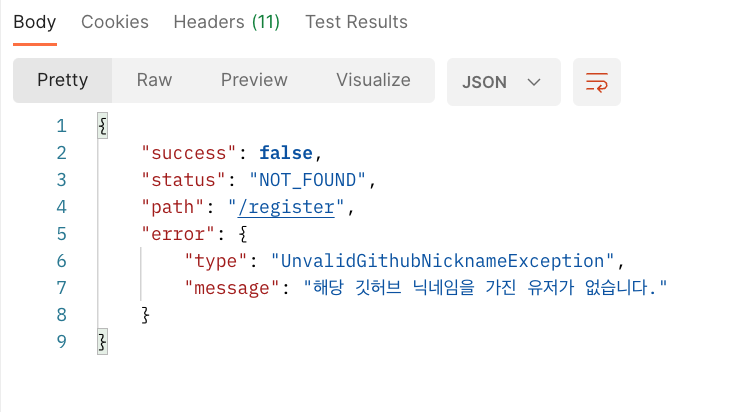
// 예외 발생 시
{
"success": false,
"status": "NOT_FOUND",
"path": "/api/member/12",
"error": {
"type": "MemberNotFoundException",
"message": "해당 사용자가 없습니다."
}
}이렇게 표현하기 위해, 다음과 같이 진행하였다.
1️⃣ 스프링 기본 Whitelabel Error Page 옵션 OFF
일단 예외 처리를 커스텀하게 진행하기 위해서는, 스프링에서 기본적으로 제공하는 Whitelabel Error Page를 꺼야 한다. application.yml 또는 application.properties에서 server.error.whitelabel.enabled=false를 통해 해당 옵션을 꺼둔다.
2️⃣ ErrorCode 정의
ErrorCode의 역할은, 발생할 수 있는 커스텀 예외의 약어, 상태코드, 메시지를 나열해둘 때 사용하기 위함이다.
@Getter
@RequiredArgsConstructor(access = AccessLevel.PRIVATE)
public enum ErrorCode {

    MEMBER_NOT_FOUND(NOT_FOUND, "해당 사용자가 없습니다."); // 예시

    private final HttpStatus status;
    private final String message;

}
3️⃣ GeneralException 정의
GeneralException은 모든 커스텀 예외가 상속받는 상위 예외이다. GeneralException은 RuntimeException으로부터 상속받는다.
커스텀 예외를 GeneralException으로부터 상속받도록 하는 이유는, ErrorCode를 가지게 하기 위함이다.
@Getter
public class GeneralException extends RuntimeException {

    private final ErrorCode errorCode;

    protected GeneralException(ErrorCode errorCode) {
        super();
        this.errorCode = errorCode;
    }
}
4️⃣ 커스텀 예외 정의
커스텀 예외들은 GeneralException을 상속받도록 한다.
@Getter
public class MemberNotFoundException extends GeneralException {

    private static final ErrorCode errorCode = ErrorCode.MEMBER_NOT_FOUND;

    public MemberNotFoundException() {
        super(errorCode);
    }
}
5️⃣ ApiResponse 정의
ApiResponse는 최종적으로 ResponseEntity의 body로 들어갈 부분을 정의할 곳이다. 다만 응답이 문제 없을 때는 data가, 예외가 발생했을 때는 error가 보이도록 해야 하기 때문에 ApiSuccessResponse와 ApiErrorResponse로 분리한다.
@Getter
@RequiredArgsConstructor(access = AccessLevel.PROTECTED)
public class ApiResponse {

    private final Boolean success;
    private final HttpStatus status;
    private final String path;

    public static ApiResponse of(Boolean success, HttpStatus status, String path) {
        return new ApiResponse(success, status, path);
    }
}
6️⃣ ApiSuccessResponse 정의
ApiSuccessResponse는 제네릭 형태의 data를 담고 있다. 그런데 제네릭을 쓸 때 정적 메서드 팩터리를 쓴다면 주의해야 할 점이 있는 것 같다. 이 점은 제네릭에 대해 더 깊게 알아본 뒤 다시 작성해봐야겠다.
@Getter
public class ApiSuccessResponse<T> extends ApiResponse {

    private final T data;

    private ApiSuccessResponse(HttpStatus status, String path, T data) {
        super(true, status, path);
        this.data = data;
    }

    // 이때 왜 <T><T>로 해야 하는지는 아직 잘 모르겠음. 제네릭에 대해 더 알아봐야 할 듯 함.
    public static <T>ApiSuccessResponse<T> of(HttpStatus status, String path, T data) {
        return new ApiSuccessResponse<>(status, path, data);
    }
}
7️⃣ ErrorDetail 정의
ErrorDetail은 JSON 응답에서 error 부분을 의미한다.
@Getter
@RequiredArgsConstructor(access = AccessLevel.PROTECTED)
public class ErrorDetail {

    private final String type;
    private final String message;

    public static ErrorDetail of(String type, ErrorCode error) {
        return new ErrorDetail(type, error.getMessage());
    }
}
8️⃣ ApiErrorResponse 정의
앞서 정의한 ErrorDetail이 활용된다.
@Getter
public class ApiErrorResponse extends ApiResponse {

    private final ErrorDetail error;

    private ApiErrorResponse(HttpStatus status, String path, String type, ErrorCode error) {
        super(false, status, path);
        this.error = ErrorDetail.of(type, error);
    }

    public static ApiErrorResponse of(HttpStatus status, String path, String type, ErrorCode error) {
        return new ApiErrorResponse(status, path, type, error);
    }
}
9️⃣ ApiExceptionHandler 정의
이제, 모든 GeneralException에 대한 예외 응답을 처리하는 ApiExceptionHandler를 정의해보면 아래와 같다.
@RestControllerAdvice(annotations = RestController.class)
public class APIExceptionHandler {

    @ExceptionHandler
    public ResponseEntity<ApiErrorResponse> general(HttpServletRequest request, GeneralException e) {
        ErrorCode errorCode = e.getErrorCode();
        HttpStatus status = errorCode.getStatus();

        return ResponseEntity
                .status(status)
                .body(ApiErrorResponse.of(
                        status,
                        request.getServletPath(),
                        e.getClass().getSimpleName(),
                        errorCode
                ));
    }
}
컨트롤러 사용 예
컨트롤러에서는 다음과 같이 작성하면 된다.
@RestController
@RequestMapping("/api")
public class Controller {

    @GetMapping("/member/{memberId}")
    public ResponseEntity<ApiSuccessResponse<MemberResponse>> getMemberInfo(HttpServletRequest request, @PathVariable Long memberId) {
        // 이 예외 던지는 것은 서비스 단에서 하겠지만, 실제 사용 예를 보여주기 위해 컨트롤러 단에서 임시 호출
        if (memberId >= 4)
            throw new MemberNotFoundException();

        MemberResponse response = MemberResponse.withIdAndNickname(memberId, "john");
        return ResponseEntity
                .status(HttpStatus.OK)
                .body(ApiSuccessResponse.of(
                        HttpStatus.OK,
                        request.getServletPath(),
                        response
                ));
    }
}
실제 결과
실제 결과는 앞서 작성한 대로 나오게 된다.
달라진 점
- 컨트롤러 단에서
try-catch가 없어졌다. - (실제로는 서비스 단에서) 커스텀 예외를 반환할 때, 메시지를 일일이 작성할 필요가 없어졌다.
- 예외를 반환할 때 실제
ResponseEntity의 상태코드를 컨트롤러에서 결정할 필요가 없어졌다.
느낀 점
원하는 형태로 만들어내긴 했지만, 아직 필요한 공부가 덜 되었다. 그래도 적어도 이전까지 진행하던 방식보다는 확실히 나아진 것 같아 좋다.
- 과연 지금 만들어 낸 API 형식이 팀원들과 프로젝트를 할 때도 쓸만한 API 형태일까?
- 제네릭에 대한 이해가 필요하다.
<T>ApiSuccessResponse<T>가 효율적인 방식인지 생각해보자. - 스프링 MVC 예외를 다루는
ResponseEntityExceptionHandler에 대해서도 공부해보자. - 발생한 경로를 파악하기 위해 컨트롤러와
ExceptionHandler에서HttpServletRequest를 가져야 한다. 이게 올바른 방법일까?
부족하거나 보완할 점이 있다면 댓글 부탁드립니다 😃


유익한 글이었습니다.