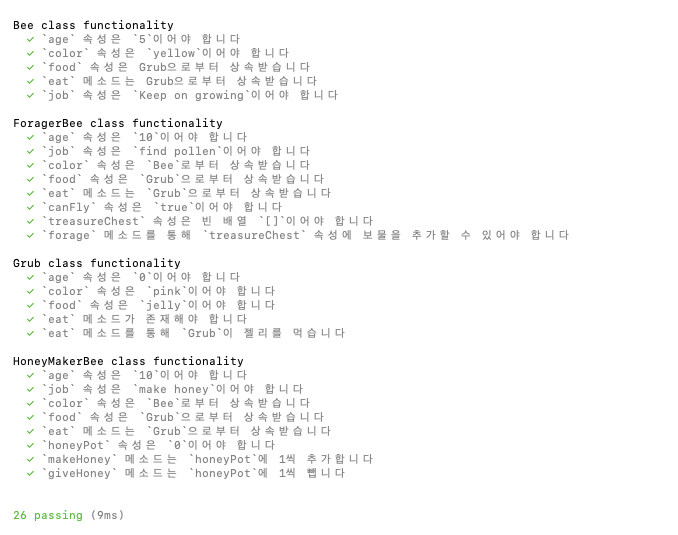
1. 스프린트 내용
Class Structure
├── Grub
│   └── Bee
│       ├── HoneyMakerBee
│       └── ForagerBee
위의 class structure에 기반하여 간단한 객체지향 프로그래밍을 구현해본다.
2. 풀이 과정

통과해야 할 테스트 내용은 위와 같다.
- 먼저, 아래와 같이 class 문법을 이용하여 최상위 class인 Grub에서 속성과 메소드를 추가해주었다.
class Grub {
  // TODO..

  constructor(){ //속성 추가
    this.age = 0;
    this.color = 'pink';
    this.food = 'jelly';
  }

  eat(){ //메소드 추가
    return 'Mmmmmmmmm jelly';
  }
}

module.exports = Grub;- 그 다음 Bee라는 하위 class에서 아래와 같이 속성과 메소드를 추가해주었다. extends 키워드를 사용하여 상속 관계를 먼저 명확히 하였고, constructor 안에서 super() 연산자를 정의하였다. 상위 클래스의 생성자를 호출하며 super()의 매개변수를 통해 상위 클래스의 멤버를 상속받을 수 있는 코드이다. (mdn 참고 내용: https://developer.mozilla.org/ko/docs/Learn/JavaScript/Objects/Inheritance#ecmascript2015클래스)
const Grub = require('./Grub');

class Bee extends Grub {
  // TODO..
  constructor(){
    super();
    this.age = 5;
    this.color = 'yellow';
    this.job = 'Keep on growing';
    // this.food = Grub으로부터 상속받음
  }
  // eat(){
  // //Grub으로부터 상속받음
  // }
}

module.exports = Bee;- 그 다음 ForagerBee라는 하위 class에서도 똑같은 방식으로 상속관계를 명확히 하였다. 새롭게 추가된 forage 메소드는 tresureChest라는 빈배열에 전달인자(treasure)를 추가한다.
const Bee = require('./Bee');

class ForagerBee extends Bee {
  // TODO..
  constructor(){
    super();
    this.age = 10;
    // this.color = bee로부터 상속받음;
    this.job = 'find pollen';
    // this.food = Grub으로부터 상속받음
    this.canFly = true;
    this.treasureChest = [];

  }
  // eat(){
  //   //Grub으로부터 상속받음
  // }
  forage(treasure){
    //'treasureCest 속성에 보물을 추가할 수 있어야 함.
    this.treasureChest.push(treasure); //배열이니까 push 메소드 사용하여 배열요소 추가
  }
}

module.exports = ForagerBee;- Bee의 또 다른 하위 class인 HoneyMakerBee에서도 상속받는 속성과 메소드와 아닌 것을 명확히 구분하고, 추가된 메소드의 기능을 간단히 작성해보았다.
const Bee = require('./Bee');

class HoneyMakerBee extends Bee {
  // TODO..
  constructor(){
    super();
    this.age = 10;
    // this.color = bee로부터 상속받음;
    this.job = 'make honey';
    // this.food = Grub으로부터 상속받음
    this.honeyPot = 0;
  }
  // eat(){
  //   //Grub으로부터 상속받음
  // }
  makeHoney(){
    this.honeyPot+=1
  }
  giveHoney(){
    this.honeyPot-=1
  }
}

module.exports = HoneyMakerBee;
3. 스프린트를 통해 배운 것
- 클래스와 인스턴스라는 용어를 이해할 수 있다.
new키워드의 사용법을 이해할 수 있다.class키워드의 사용법을 이해할 수 있다.- 현실 세계의 모델을 바탕으로 클래스의 메소드와 속성을 디자인할 수 있다.
- 객체 지향 프로그래밍의 상속(Inheritance)의 개념을 이해하고 코드로 작성할 수 있다.
- 상속관계를 가진 현실 세계의 모델을 코드로 작성할 수 있다.
- 클래스 상속의 원리를 이해할 수 있다.
