✅ Process, Thread
1️⃣ Process
- 운영체제로부터 시스템 자원을 할당받는 작업의 단위
- 메모리에 올라와 실행되고 있는 프로그램의 인스턴스(독립적인 개체)
- 각각의 독립된 메모리 영역 (Code, Data, Stack, Heap)을 각자 할당 받음.
- 프로세스끼리는 서로의 변수나 자료구조에 대해 절대 접근할 수 없음
- 만약, A 프로세스가 B 프로세스 자원 접근하려고 하면, 프로세스간 통신(IPC)를 사용해야 함(파일, 소켓 등)
2️⃣ Thread
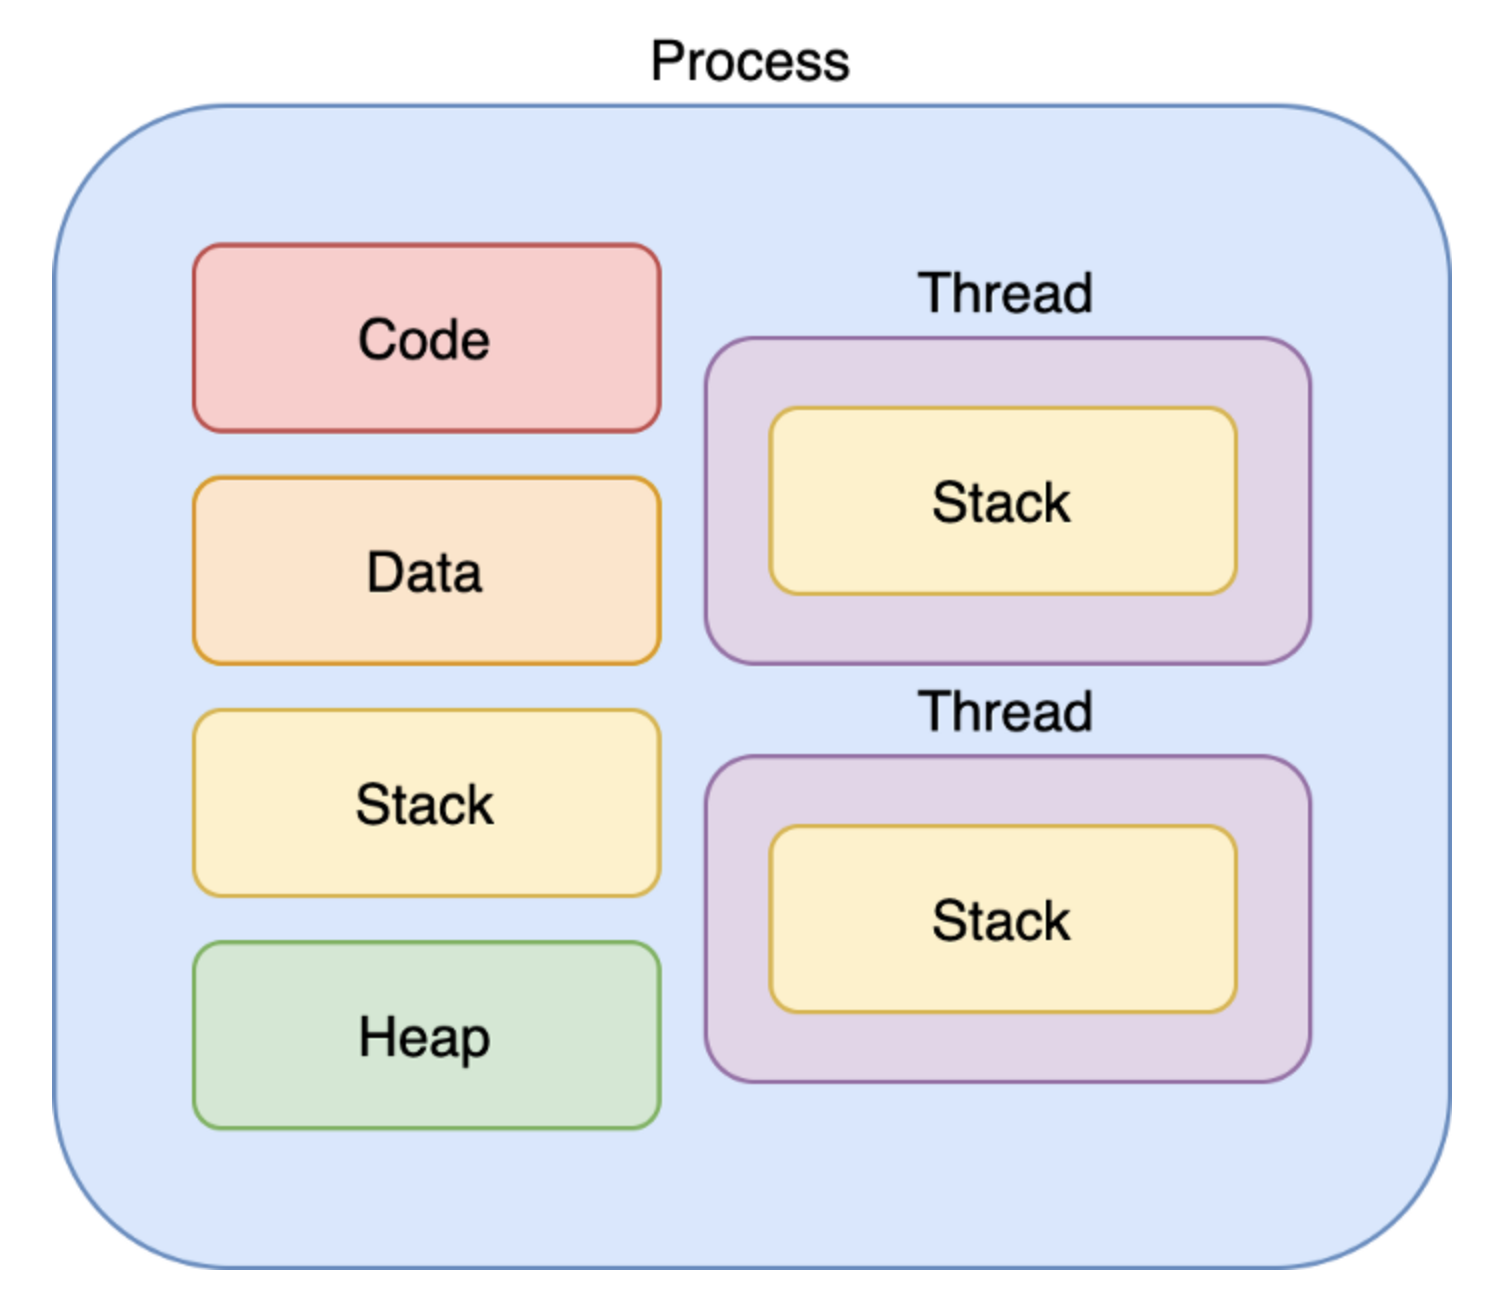
- Thread는 메모리를 서로 공유할 수 있다. 자세히 말하자면 프로세스가 할당받은 메모리 영역 내에서 Stack 형식으로 할당된 메모리 영역은 따로 할당받고, 나머지 Code/Data/Heap 형식으로 할당된 메모리 영역을 공유한다.
***멀티태스킹이 하나의 운영체제 안에서 여러 프로세스가 실행되는 것이라면,
멀티쓰레드는 하나의 프로세스가 여러 작업을 여러 쓰레드를 사용해 동시에 처리하는 것을 의미한다.
3️⃣ 멀티쓰레드의 장점
- Context-Switching 할 때 공유하고 있는 메모리만큼 메모리 자원을 아낄 수 있다.
- thread는 process 내의 Stack 영역을 제외한 모든 메모리를 공유하기 때문에 통신 부담이 적어서 응답 시간이 빠르다.
4️⃣ 멀티쓰레드의 단점
스레드 하나가 프로세스 내 자원을 망쳐버린다면 모든 프로세스가 종료될 수 있다.
자원을 공유하기 때문에 필연적으로 동기화 문제가 발생할 수 밖에 없다. 교착상태가 발생하지 않도록 주의해야 한다.
5️⃣ 동기화 문제
멀티스레드를 사용하면 각각의 스레드 중 어떤 것이 어떤 순서로 실행될지 그 순서를 알 수 없다.
만약 A 스레드가 어떤 자원을 사용하다가 B 스레드로 제어권이 넘어간 후 B 스레드가 해당 자원을 수정했을 때, 다시 제어권을 받은 A 가 해당 자원에 접근하지 못하거나, 바뀐 자원에 접근하게 되는 오류가 발생할 수 있다.
이처럼 여러 스레드가 함께 전역 변수를 사용할 경우 발생할 수 있는 충돌을
동기화 문제라고 한다. 스케줄링은 운영체제가 자동으로 해주지 않기 때문에 프로그래머가 적절한 기법을 직접 구현해야 하므로 프로그래밍할 때 멀티스레드를 사용하려면 신중해야 한다.
✅ sync, async
1️⃣ Synchronous (동기)
- 요청에 대한 응답이 동시에 발생해야 한다. 즉, 내 작업이 끝나기 전까진 다른 작업을 수행하지 못한다.
2️⃣ Asynchronous (비동기)
- 요청에 대한 응답이 동시에 발생하지 않는다. 즉, 내 작업이 끝나기 전에 다음 작업을 실행한다.
- Async작업이 많아지면 여러 가지 작업을 '동시에' 처리 할 수 있어짐
🌟🌟🌟Asynchronous에서는 요청에 대한 응답이 나중에 오기 때문에 보통 Callback 함수로 들어옴
✅ package, bundle
1️⃣ package
- .app, .playground, .plugin, .xcodeproj etc…
- Package는 파인더가 여러 리소스들을 하나의 유닛으로 묶어 사용자에게 디렉토리를 단일 파일처럼 보여지게 함.
- 여러 리소스들을 하나로 압축시키고 연결시키는 작업을 통해 사용자에게 편의성을 제공
- Xcode에서 앱을 하나 만들 때, .xcodeproj 파일이 생성되지만 엄밀히 말하면 이것은 파일이 아닌 디렉토리. 그리고 파인더에 의해 생성되는 패키지.
- Package는 디렉토리이기 때문에 내부 컨텐츠에 접근이 가능
- Package가 Bundle 구조를 가지고 있을 때, Bundle을 통해 접근
여기서 Bundle 구조와 Bundle은 다른 개념
Bundle 구조에서 Bundle은 뒤에서 설명하겠지만 디렉토리이고, Bundle은 Swift3에서 NSBundle의 명칭이 바뀐 용어
NSBundle은 Bundle 디렉토리 안에 포함된 리소스에 쉽게 접근할 수 있도록 도와주는 객체
2️⃣ bundle
- Bundle은 실행가능한 코드들과 해당 코드들이 사용하는 리소스들을 포함하는 디렉토리
main bundle
- Xcode 프로젝트들은 Cmd+R을 통해 빌드할 때, Bundle을 생성
- 모든 프로젝트들은 각 애플리케이션마다 main bundle을 소유합.
Main bundle은 현재 실행중인 코드가 포함된 주요 디렉토리 - 사용자가 앱을 실행하면 main bundle에서 즉시 필요한 코드와 리소스를 찾아 메모리에 로드
- 프로젝트를 빌드할 때 생성되는 Main bundle은 Project Build Configuration의 Signing 옵션에서 Bundle Identifier에 따라 구분
- 같은 Bundle Identifier일 경우, 빌드할 때마다 덮어 씌워지고 다를 경우 새로운 Bundle을 생성
- executable code: ViewController, AppDelegate… 등과 같이 실행 가능한 코드들 .exe 실행파일 형태로 존재. nm 명령어를 통해 터미널에서 확인
- info.plist : 프로젝트의 빌드 세팅을 포함하는 리소스
- images, sound, nib 파일과 같은 리소스
Package는 사용자에게 제공하는 디렉토리.
지금 Mac에서 응용 프로그램을 보면 모두 아이콘들이다. 이는 모두 파인더가 단일 파일인 것처럼 사용자에게 제공하는 것일뿐 실제로는 디렉토리.
단일 파일처럼 취급되는 이유는 일반 사용자가 Package에 부정적인 영향을 줄 수 있는 변경을 방지하기 위해서.
Bundle은 개발자에게 제공되는 디렉토리. 단순히 폴더 역할 뿐만 아니라 위에서 설명한 여러 기능들을 추가로 제공.
🌟 그럼 .app같은 경우엔 왜 같은 의미로 언급되는 것일까? 파인더는 아래의 조건 중 하나라도 해당된다면 디렉토리를 Package로 취급.
- 디렉토리가 .app, .bundle, .framework, plugin 등의 파일 확장자를 가진 파일인 경우
- 디렉토리에 있는 Application이 Package타입을 나타내는 확장자가 있는 경우
위의 이유로 많은 유형의 Bundle이 Package. 따라서 .app은 Package이자 Bundle.
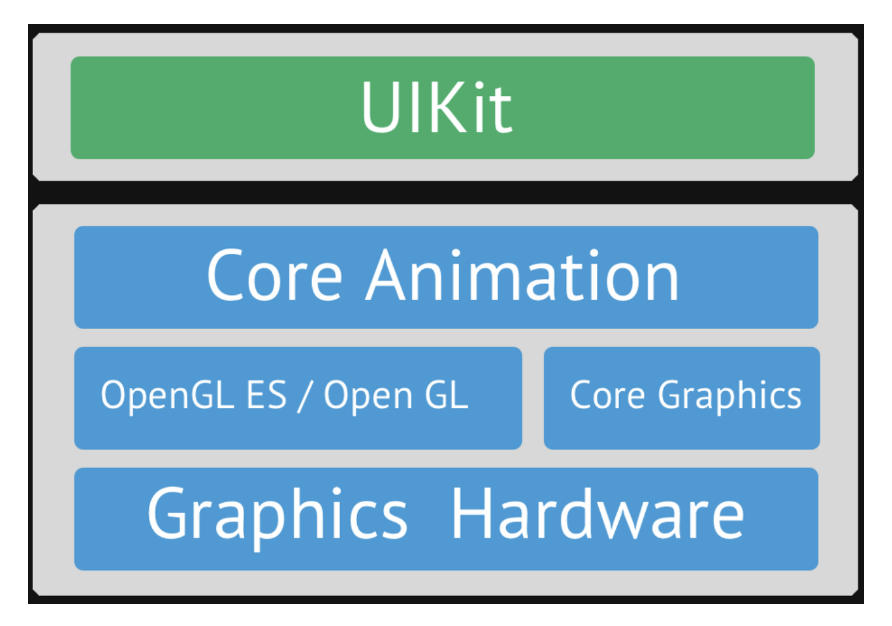
✅ UIView의 Layer
- 참고) view는 UIKit 중 하나이고, layer는 Core Animation중 하나
- UIView에는 layer 프로퍼티가 있다.
- layer는 CALayer의 객체이다. CALayer는 CoreAnimation Layer를 뜻한다.
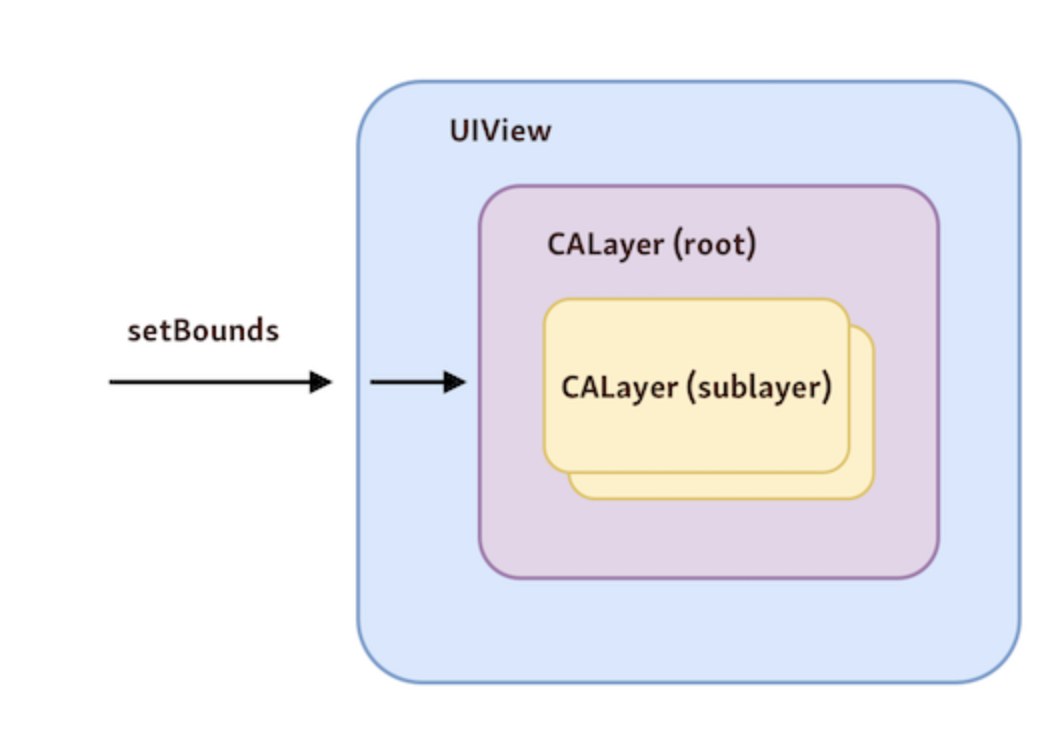
- 뷰를 여러 개 쌓아서 표현하는 것 보다 레이어를 쌓아서 만드는게 퍼포먼스 측면에서 훨씬 가볍다.
- UIView는 많은 것을 처리하지만 그림(이미지)나 애니메이션들은 직접 제어하지 않고, UIView 안의 layer 객체에서 일을 직접 수행한다. backgroundColor 세팅이나 cornerRadius 같은 경우가 있다. view의 backgroundColor를 바꾸어도 결국엔 layer의 background가 바뀐다. 또한 View의 프로퍼티 접근만으로 할 수 없는 부분도 Layer를 통해서는 가능하다.
🌟🌟🌟Core Graphics->Core Animation->UIKIt,AppKit순으로 발전했고 iOS 앱 개발시 해당 프래임워크들을 필요한 기능에 따라 선택적으로 사용할 수 있다. 저수준의 프래임워크일수록 많은 기능을 제공하지만 전체적인 코드량이 많다. 고수준의 프레임 워크일수록 저수준보다 유연성은 떨어지지만 사용이 간편하고 코드가 적다.
✅ UIWindow
- 윈도우는 뷰들을 담는 컨테이너이다.
- 윈도우는 이벤트를 전달해주는 매개체이다.
- iOS 앱은 콘텐츠를 화면에 보여주기 위해서 최소 1개 이상의 윈도우를 가지고 있다. (보통 1개)
- 시스템 윈도우에서 생성된 이벤트들은 Key Window 로 전달이 된다.
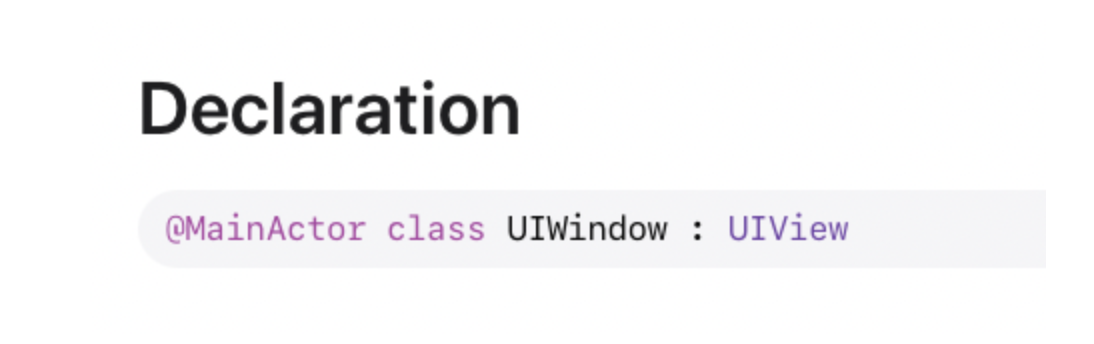
@MainActor라는 어트리뷰트는 Swift 5.5 부터 도입되는 개념으로, 메인 쓰레드에서 실행되는 클래스임을 가리킨다.

1️⃣ window를 언제 사용할까?
-
앱의 콘텐츠를 화면에 보여주기 위하여 Main window 를 제공
-
추가적인 콘텐츠를 보여주기 위해 추가적인 window 를 생성해야 할 때 (external display 를 사용할 경우)
-
만약 스토리 보드를 사용하지 않고 코드로 UI 를 구성한다면, 윈도우를 직접 생성해야한다!
2️⃣ 그럼 SwiftUI에서는 ?
@main
struct Mail: App {
    var body: some Scene {
        WindowGroup { // <-
            MailViewer()
        }
        Settings { // <-
            SettingsView()
        }
    }
}
-
Scene은 뷰 계층에서 가장 root에 해당되며, 시스템에 의해 라이프 사이클을 가지고 있는 형태
-
Scene타입에서만 WindowGroup, Settings 등을 사용
-
WindowGroup 개념
- Window라는 개념은 뷰들의 컨테이너 역할을 하면서 동시에 터치 이벤트와 같은 이벤트를 가장 먼저 수신하여 subview들에게 이벤트를 전달하는(responder chain) 기능
- macOS와 iPadOS와 같이 그룹으로부터 여러개의 window를 띄울 수 있는 형태일때 WindowGroup을 여러개 정의하여 사용
✅ UINavigationController
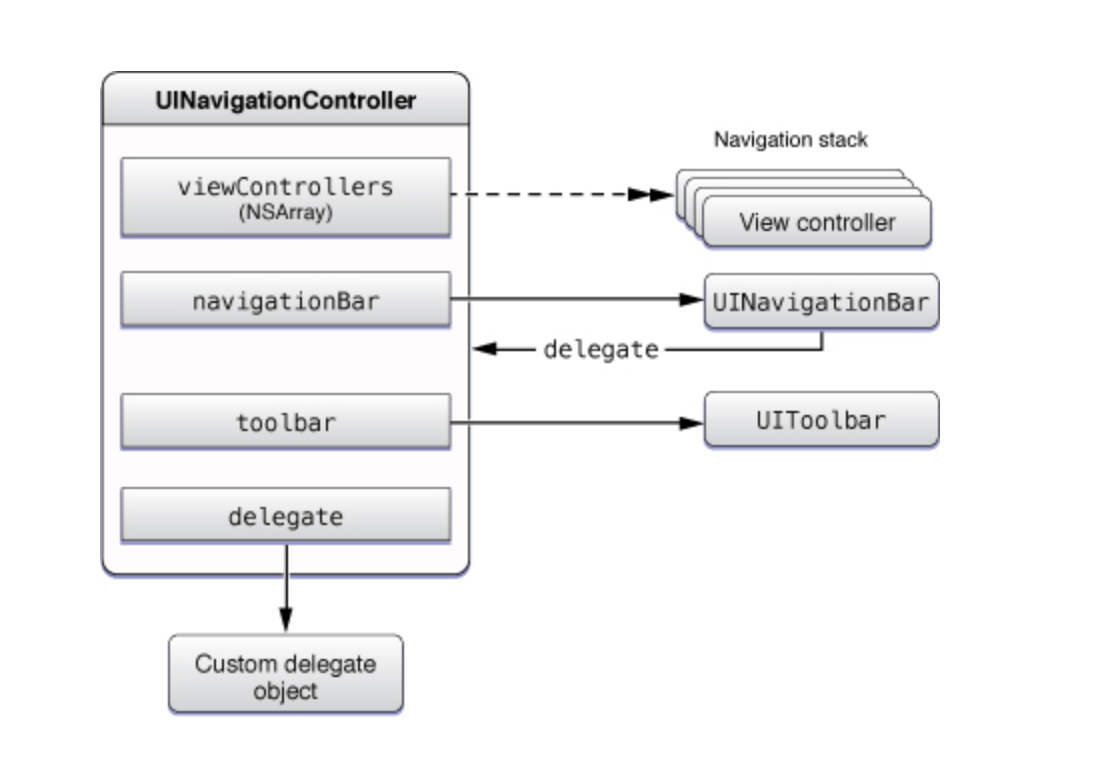
- 네비게이션 컨트롤러는 스택 기반의 인터페이스이기 때문에 최상단의 VC만이 보여지게 된다. -> Push or Pop으로 Visible managing
1️⃣ push
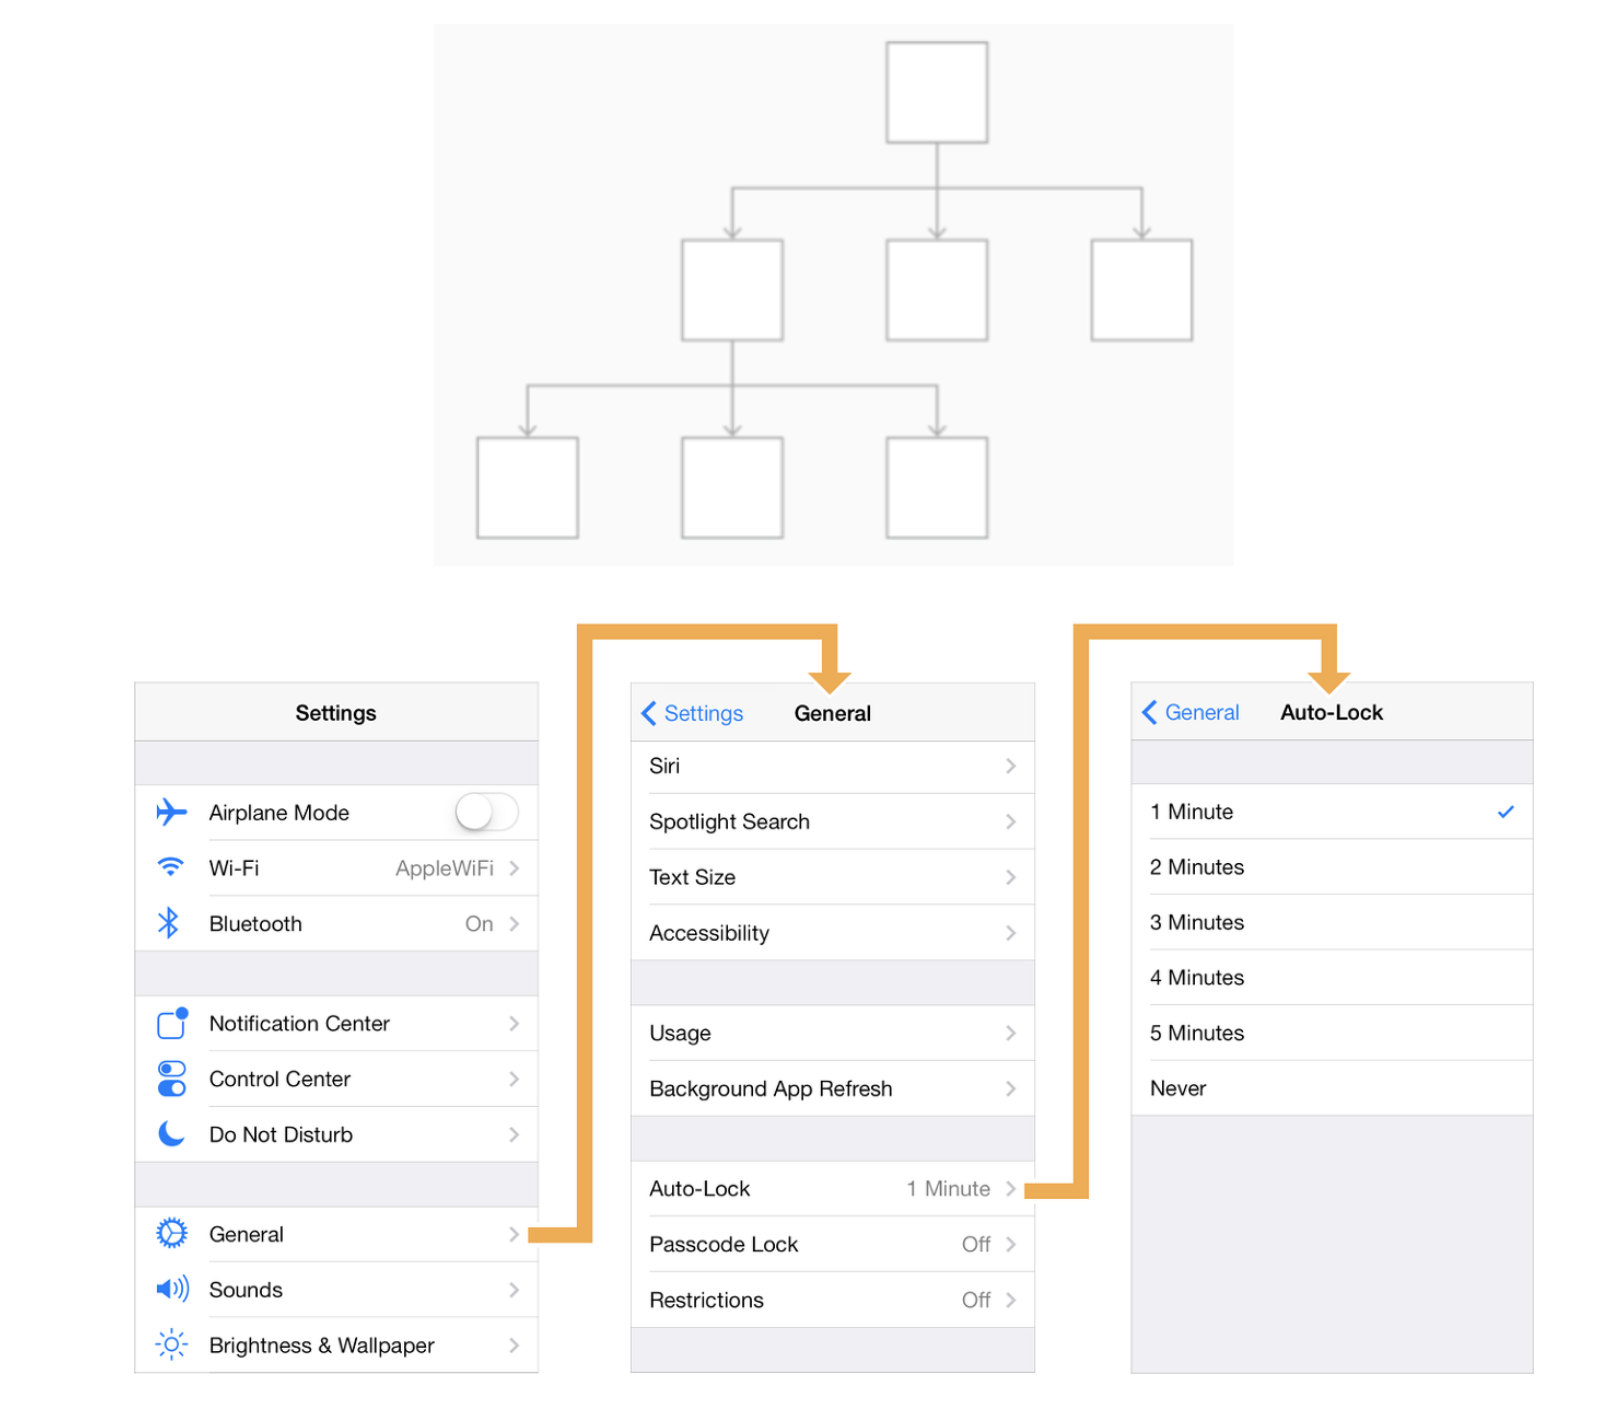
- 처음 보이는 [Setting 컨트롤러]는 Root View 컨트롤러.
- [Setting 컨트롤러]에서 General을 선택하면, 대리자를 통하여 재정의한 push 동작에 의해
- 새로운 [General 뷰 컨트롤러]를 생성하고 [Setting 뷰 컨트롤러] 위에다 쌓는 형식
- 내비게이션 스택은 순서가 필요하니 배열을 사용
- 다음 뷰 컨트롤러로 push이 될 때 기존의 뷰 컨트롤러는 메모리에서 제거되지 않음! (메모리가 제거가 되지 않기 때문에 사용 시 메모리 관리도 생각해야 함!!)
2️⃣ pop
- 뒤로 가기 버튼 또는 왼쪽 가장자리 스와이프 통해 이전 뷰 컨트롤러로 이동
popToRootViewController메서드를 통해 기존에 생성된 모든 내비게이션 스택을 지우고, 한 번에 루트 뷰로 이동- 메모리는 pop 될 때 뷰 컨트롤러 인스턴스가 다른 곳에서 참조되지 않으면, 메모리에서 해제되고, 내비게이션 스택에서 삭제
3️⃣ 구조
viewControllers(NSArray)
- 여러 뷰 컨트롤러들을 관리
- 내비게이션 스택이라는 것을 통해 관리
- 내비게이션 스택은 ViewController들을 배열 형태로 갖고 있다.
- 인덱스 접근을 통해 뷰 컨트롤러의 객체에도 접근이 가능
navigationBar

- 기본 구성 요소 : 뒤로 가기 버튼, 가운데 제목, 선택적으로 생성하는 오른쪽 버튼
- 내비게이션 컨트롤러에서 push를 할 때, push 한 뷰 컨트롤러에서는 따로 설정을 안 해줘도 자동적으로 내비게이션 바가 생성
toolBar
- 화면 하단에 생성됨
- 내비게이션 컨트롤러의 속성 isToolbarHidden은 기본값이 true이므로 false로 변경하면 생성
delegate
- Apple이 개발의 편의를 위하여 모든 Contorller들은 delegate가 선언되어 있음!
- 특정 Event 관련 처리를 위해서 대리자를 미리 만들어 놓은 것!
그렇다면 SwiftUI에서는 ?
NavigationView {
    /* content */
}
.navigationViewStyle(.stack)
NavigationStack {
/* content */
}-
Stack은 항상 제거되지 않은 가장 최근에 추가된 View를 표시하며, RootView는 제거할 수 없다!
-
NavigationView -> NavigationStack 참고 : https://zeddios.tistory.com/1376
✅ Table View
- UIKit
cell
//collection view
class PostCollectionViewCell: UICollectionViewCell {

    @IBOutlet weak var postThumbnailImageView: UIImageView!
    override func awakeFromNib() {
        super.awakeFromNib()
        // Initialization code
    }
    public func get(data: ProfilePostImg) {
        let urlString = data.postImgUrl
        postThumbnailImageView.kf.setImage(with: URL(string: urlString))
    }

}

 class MyPostViewController: BaseViewController {
 	private func setupPostColletionView() {
        postCollectionView.register(UINib(nibName: postCell, bundle: nil), forCellWithReuseIdentifier: postCell)
        postCollectionView.delegate = self
        postCollectionView.dataSource = self
    }
}

extension MyPostViewController : UICollectionViewDelegate {
    func collectionView(_ collectionView: UICollectionView, didSelectItemAt indexPath: IndexPath) {
        collectionView.deselectItem(at: indexPath, animated: true)
        print(indexPath.row)
        let postIdx = posts![indexPath.row].postIdx
        postDataManager.getPostData(postIdx, delegate: self)
    }

}

extension MyPostViewController : UICollectionViewDataSource {
    func collectionView(_ collectionView: UICollectionView, numberOfItemsInSection section: Int) -> Int {
        return posts?.count ?? 0
    }
    func collectionView(_ collectionView: UICollectionView, cellForItemAt indexPath: IndexPath) -> UICollectionViewCell {
        let cell = collectionView.dequeueReusableCell(withReuseIdentifier: postCell , for: indexPath) as! PostCollectionViewCell

        let cellData = posts![indexPath.row]
        cell.get(data: cellData)

        return cell
    }

}

//table view
class RecommendFeedViewController: UIViewController {
    let cellId = "RecommendPostTableViewCell"
    var feedResult : [RecommendFeedResult] = []
    @IBOutlet weak var recommendFeedTableView: UITableView!
    override func viewDidLoad() {
        super.viewDidLoad()
        setUpTableView()
    }
    func setUpTableView() {
        self.recommendFeedTableView.delegate = self
        self.recommendFeedTableView.dataSource = self
        self.recommendFeedTableView.register(UINib(nibName: cellId, bundle: nil), forCellReuseIdentifier: cellId)
    }
}

extension RecommendFeedViewController : UITableViewDelegate, UITableViewDataSource {
    func tableView(_ tableView: UITableView, numberOfRowsInSection section: Int) -> Int {
        return feedResult.count
    }

    func tableView(_ tableView: UITableView, cellForRowAt indexPath: IndexPath) -> UITableViewCell {
        let cell = tableView.dequeueReusableCell(withIdentifier: cellId, for: indexPath) as! RecommendPostTableViewCell
        let cellData = feedResult[indexPath.row]
        cell.get(data: cellData)
        cell.selectionStyle = .none
        return cell
    }
    func tableView(_ tableView: UITableView, heightForRowAt indexPath: IndexPath) -> CGFloat {
        return  (recommendFeedTableView.bounds.height) * 0.8
    }

}
✅ 하나의 View Controller 코드에서 여러 TableView Controller 역할을 해야 할 경우 어떻게 구분해서 구현해야 하는지 설명하시오.
1️⃣ table view로 구별
- tableview 종류로 구별해 cell 생성
@IBOutlet weak var firstTableView: UITableView!
@IBOutlet weak var secondTableView: UITableView!

// data source, delegate 등록
firstTableView.dataSource = self
firstTableView.delegate = self
firstTableView.register(UINib(nibName: cellId, bundle: nil), forCellReuseIdentifier: cellId)

secondTableView.dataSource = self
secondTableView.delegate = self
secondTableView.register(UINib(nibName: cellId, bundle: nil), forCellReuseIdentifier: cellId)

// dataSource의 함수인, cellForRowAt에서, 인자로 받는 tableView로 TableView의 이름을 확인 할 수 있다.
func tableView(_ tableView: UITableView, numberOfRowsInSection section: Int) -> Int {
    if tableView == firstTableView {
        return firstDataArray.count
    } else if tableView == secondTableView {
        return secondDataArray.count
    }
    return 0
}

func tableView(_ tableView: UITableView, cellForRowAt indexPath: IndexPath) -> UITableViewCell {
        switch tableView {
        case firstTableView:
            let cell = firstTableView.dequeueReusableCell(withIdentifier: "firstCell") as! UITableViewCell
            cell.textLabel?.text = data1[indexPath.row]
            return cell

        case secondTableView:
            let cell = secondTableView.dequeueReusableCell(withIdentifier: "secondCell") as! UITableViewCell
            cell.textLabel?.text = data2[indexPath.row]
            return cell

        default:
            return UITableViewCell()
        }
    }
2️⃣ tag로 구별
- tag로 구별해 각 테이블 뷰 헤더 등록
firstTableView.tag = 1
secondTableView.tag = 2


func tableView(_ tableView: UITableView, titleForHeaderInSection section: Int) -> String? {
        if tableView.tag == 1 {
            return "First TableView Header"
        } else {
            return "Second TableView Header"
        }

    }
✅ setNeedsLayout와 setNeedsDisplay의 차이에 대해 설명하시오.
-
uikit 관련
-
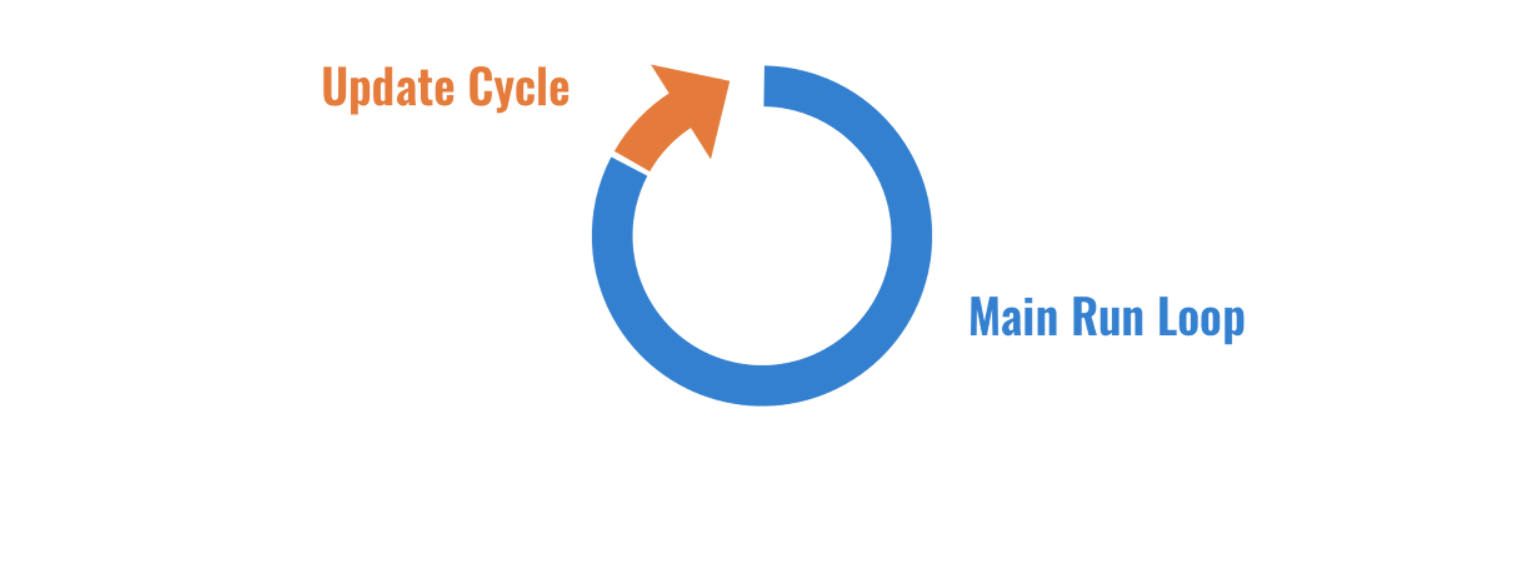
앱이 이벤트 처리를 마치는 시점이 Update Cycle 지점
-
이 시점에서 시스템은 디스플레이 뿐만 아니라 레이아웃과 제약조건을 업데이트
display
- Display: view들에 대한 정보를 갖지 않는 속성들을 포함한다 ex) 색, 이미지, 텍스트, 이미지, Core Graphics 그리기 등등
- setNeedsDisplay함수를 호출하면 이 시점에 View를 다시 그리라고 알려주는 것
- 사실 UI와 직접적인 관련이 있는 프로퍼티가 변경이 되면 이 setNeedsDisplay함수가 저절로 호출된다
class CircleView: UIView {
    private var x: Int = 0 {
        didSet {
            self.setNeedsDisplay()
        }
    }
    private var y: Int = 0 {
        didSet {
            self.setNeedsDisplay()
        }
    }
    private var radius: Int = 0 {
        didSet {
            self.setNeedsDisplay()
        }
    }
}
layout
- Layout: UIView의 Layout는 화면에서 UIView의 크기와 위치를 의미한다 모든 View는 frame을 갖는다. UIView는 시스템에게 UIView의 레이아웃이 변했다고 알려줄 수있는 메서드, View의 레이아웃이 다시 계산되는 시점에 특정한 작업을 실행할 수 있게 오버라이딩 할 수 있는 콜백 메서드도 제공한다
- setNeedsLayout 메소드는 layout의 재설정이 필요하다는 것을 시스템에게 알려줌
- 그러면 setNeedsDisplay의 경우와 마찬가지로 updateCycle에 layout을 업데이트
- setNeedsDisplay가 draw함수를 호출해줘라고 했던 것처럼 setNeedsLayout은 layoutSubviews를 호출해달라고 시스템에게 알린다.
✅ Stack View
1️⃣ 장점
쉽다
복잡한 화면을 오토 레이아웃으로 모두 설정해주기 위해서는 많은 조건들이 필요하다. 하지만 stackview를 쓴다면 주어진 설정값에 맞게 stackview가 자동으로 조건을 조절해주기 때문에 개발자가 직접 설정해줘야하는 조건이 엄청 줄어든다.
빠르다
stackview는 자체 컨텐츠가 없기 때문에 렌더링하는 수고가 들어가지 않는다. 따라서 일반 뷰보다 훨씬 빠르고 가볍다.
뷰를 추가하거나 삭제할 때 편리하다
2️⃣ 단점
성능 문제
- 많은 수의 중첩된 UIStackView는 성능에 영향을 줄 수 있음.
- 내부적으로 많은 제약 조건을 생성하므로, 특히 큰 화면에서 많은 수의 뷰를 다룰 때 주의해야 함
- 반복되는 셀이 존재하는 경우 table view 혹은 collection view를 사용한다.