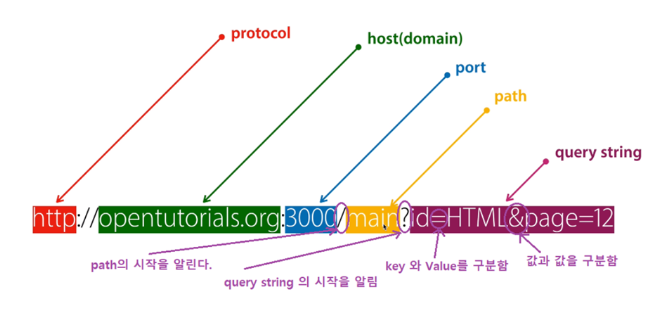
URL구조
프로토콜
https://
중앙 컴퓨터와 단말기 사이에서 데이터 통신을 원활하게 하기 위해 필요한 통신 규약
웹에서는 브라우저와 서버 간에 데이터를 주고받기 위한 방식으로 HTTP 프로토콜을 사용하고 있다.
도메인
www.google.com
IP에 이름을 부여한 도메인 네임이나 서버컴퓨터 IP
엔드포인트(패스)
/search
서버 컴퓨터의 디렉토리, 어떤 파일인지를 나타낸다. (파일 위치와 파일명)
쿼리스트링
?q=폴라리스&ie=UTF-8
웹 서버로 원하는 데이터를 전송할 때 쓰인다.
사진에서는 데이터베이스에 있는 데이터의 id가 HTML이면서 page가 12인 웹 페이지를 말한다.
필요한 데이터를 함께 넘겨 줄 목적으로 사용한다.
형식
?변수=값&변수=값&...
주소에 변수를 담아 서버에 보낼때 사용한다.
EmpController.java
앞서 DB연결 벨로그를 할 당시에 했던 실습 파일에 한 것
그 앞에 spring 이니셜라이즈 생성하기에 실습파일과 똑같은 방식이다.
url에 쿼리스트링을 위해 @RequestParam 어노테이션을 이용해 emp(@RequestParam String firstName) 적어준다.
package com.example.hr1.domain.emp.controller;

import java.util.List;

import org.springframework.beans.factory.annotation.Autowired;
import org.springframework.stereotype.Controller;
import org.springframework.web.bind.annotation.GetMapping;
import org.springframework.web.bind.annotation.PathVariable;
import org.springframework.web.bind.annotation.RequestParam;
import org.springframework.web.servlet.ModelAndView;

import com.example.hr1.domain.emp.dto.EmpDetailDTO;
import com.example.hr1.domain.emp.dto.EmpTableDTO;
import com.example.hr1.domain.emp.service.EmpService;

@Controller
public class EmpController {

    @Autowired
    private EmpService empService;

    @GetMapping("/emp")
    // 여기 변경함.
    public ModelAndView emp(@RequestParam String firstName){
        System.out.println(firstName);
        ModelAndView modelAndView = new ModelAndView();
        List<EmpTableDTO> empTableDTOList = empService.getEmpTableData();
        modelAndView.addObject("empTableDTOList", empTableDTOList);
        modelAndView.setViewName("emp/emp-list");

        return modelAndView;
    }

    @GetMapping("/emp/{employeeId}")
    public ModelAndView empdetail(@PathVariable Integer employeeId){

        System.out.println(employeeId);

        ModelAndView modelAndView = new ModelAndView();
        EmpDetailDTO empDetailDTO = empService.getEmpDetailData(employeeId);
        // List<EmpTableDTO> empDetailDTO = empService.getEmpTableData();
        modelAndView.addObject("empDetailDTO", empDetailDTO);
        modelAndView.setViewName("emp/emp-detail");

        return modelAndView;
    }
}
실행해서 emp뒤에 ?firstName=홍길동을 직접 적어준다.
그래도 실행은 된다.

@RequestParam어노테이션 뒤에 (required = false)를 붙여서 실행해본다.
package com.example.hr1.domain.emp.controller;

import java.util.List;

import org.springframework.beans.factory.annotation.Autowired;
import org.springframework.stereotype.Controller;
import org.springframework.web.bind.annotation.GetMapping;
import org.springframework.web.bind.annotation.PathVariable;
import org.springframework.web.bind.annotation.RequestParam;
import org.springframework.web.servlet.ModelAndView;

import com.example.hr1.domain.emp.dto.EmpDetailDTO;
import com.example.hr1.domain.emp.dto.EmpTableDTO;
import com.example.hr1.domain.emp.service.EmpService;

@Controller
public class EmpController {

    @Autowired
    private EmpService empService;

    @GetMapping("/emp")
    public ModelAndView emp(@RequestParam(required = false) String firstName){
        System.out.println(firstName);
        ModelAndView modelAndView = new ModelAndView();
        List<EmpTableDTO> empTableDTOList = empService.getEmpTableData();
        modelAndView.addObject("empTableDTOList", empTableDTOList);
        modelAndView.setViewName("emp/emp-list");

        return modelAndView;
    }

    @GetMapping("/emp/{employeeId}")
    public ModelAndView empdetail(@PathVariable Integer employeeId){

        System.out.println(employeeId);

        ModelAndView modelAndView = new ModelAndView();
        EmpDetailDTO empDetailDTO = empService.getEmpDetailData(employeeId);
        // List<EmpTableDTO> empDetailDTO = empService.getEmpTableData();
        modelAndView.addObject("empDetailDTO", empDetailDTO);
        modelAndView.setViewName("emp/emp-detail");

        return modelAndView;
    }
}
주소를 입력해 들어가면 앞과 같이 그냥 실행되는 것이 아니라 null이 뜨는 것을 볼 수 있다.
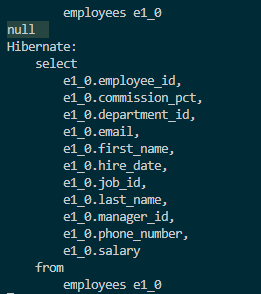
@RequestParam
쿼리스트링을 자바 변수로 받을 수 있다.
꼭 필요한 값이 아니면 false로 한다.
required=false값을 안받으면 기본적으로 null을 받게 된다.
값을 안받았을 때 값을 지정하고 싶으면 아래와 같이 해준다.
defaultValue = "asdf"실습
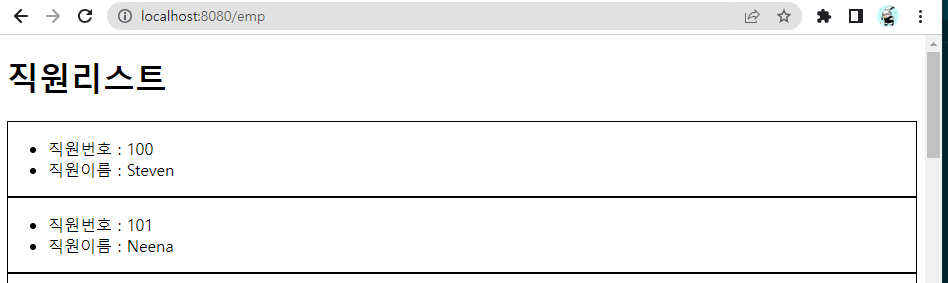
main.html
firstName이 null이면 전체리스트 / 값이 있으면 조건 검색 리스트를 출력해본다.
<!DOCTYPE html>
<html xmlns:th="http://www.thymeleaf.org">
<head>
    <meta charset="UTF-8">
    <meta name="viewport" content="width=device-width, initial-scale=1.0">
    <style>
        .card{
            border: solid 1px;
        }
    </style>
    <title>Document</title>
</head>
<body>
    <h1>직원리스트</h1>
    <div>
        <input id="searchValue" type="text" placeholder="firstName을 입력하세요">
        <button id="searchButton">검색</button>
    </div>
    <div class="card" th:onclick="goDetail([[${dto.employeeId}]])" th:each="dto : ${empTableDTOList}">
        <div>
            <ul>
                <li>직원번호 : <span th:text="${dto.employeeId}"></span></li>
                <li>직원이름 : <span th:text="${dto.firstName}"></span></li>
            </ul>
        </div>
    </div>

    <script>
        const goDetail = (employeeId) => {
            window.location.href = "/emp/" + employeeId;
        }
    </script>
</body>
</html>
타임리프로 값을 받고 스크립트를 작성해준다.
    <script>
        const goDetail = (employeeId) => {
            window.location.href = "/emp/" + employeeId;
        }

        document.querySelector("#searchButton").addEventListener("click", () => {

            alert(document.querySelector("#searchValue").value);

        });


    </script>
실행을 해서 아무 문자나 입력해보면 경고창에 똑같이 뜨는 것을 볼 수 있다.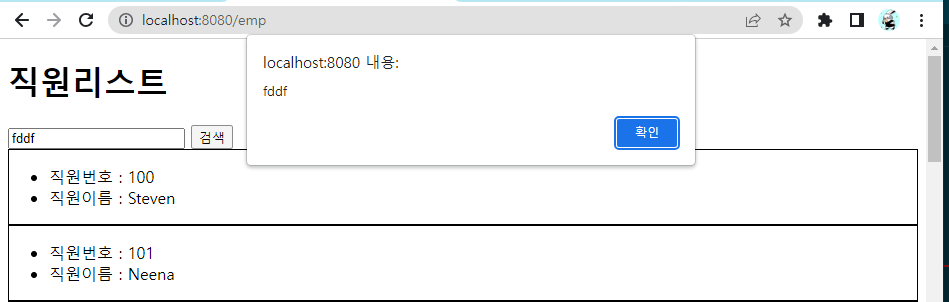
쿼리스트링으로 만들기 위해 다음과 같이 작성해준다.
    <script>
        const goDetail = (employeeId) => {
            window.location.href = "/emp/" + employeeId;
        }

        document.querySelector("#searchButton").addEventListener("click", () => {

            // alert(document.querySelector("#searchValue").value);

            location.href = "/emp" + "?" + "firstName=" + document.querySelector("#searchValue").value;

        });


    </script>
실행해서 아무거나 입력하면 쿼리스트링으로 들어간 것을 볼 수 있다.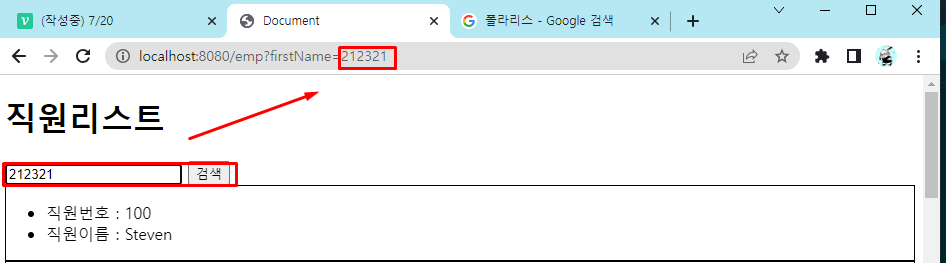
또한 콘솔을 창을 확인해 보면 들어온 것을 볼 수 있다.
EmployeesRepository.java
jpa를 이용해 Repository를 만들어 준다.
package com.example.hr1.model.employees.repository;

import java.util.List;
import java.util.Optional;

import org.springframework.data.jpa.repository.JpaRepository;
import org.springframework.stereotype.Repository;

import com.example.hr1.model.employees.entity.EmployeesEntity;

@Repository
public interface EmployeesRepository extends JpaRepository<EmployeesEntity, Integer> {
    Optional<EmployeesEntity> findByEmployeeId(Integer employeeId);

    List<EmployeesEntity> findByFirstNameContainingIgnoreCase(String firstName); // containing 포함되어 있다라는 뜻 - 포함되어 있는 글자 가져와
}
EmpService.java
만들어준 Repository를 가지고 Service를 만들어 준다.
package com.example.hr1.domain.emp.service;

import java.util.List;
import java.util.Optional;

import org.springframework.beans.factory.annotation.Autowired;
import org.springframework.stereotype.Service;

import com.example.hr1.domain.emp.dto.EmpDetailDTO;
import com.example.hr1.domain.emp.dto.EmpTableDTO;
import com.example.hr1.model.employees.entity.EmployeesEntity;
import com.example.hr1.model.employees.repository.EmployeesRepository;

@Service
public class EmpService {

    @Autowired
    private EmployeesRepository employeesRepository;

    public List<EmpTableDTO> getSearchEmpTableData(String firstName){
        // firstName이 null이면 findAll
        // firstName이 null이 아니면 findByFirstName~
        if (firstName == null) {
            return EmpTableDTO.fromEntityList(employeesRepository.findAll());
        } else {
            return EmpTableDTO.fromEntityList(employeesRepository.findByFirstNameContainingIgnoreCase(firstName));
        }
    }

    public List<EmpTableDTO> getEmpTableData(){
        // List<EmployeesEntity> employeesEntityList = employeesRepository.findAll();
        return EmpTableDTO.fromEntityList(employeesRepository.findAll());
    }

    public EmpDetailDTO getEmpDetailData(Integer employeeId){
        Optional<EmployeesEntity> employeesEntityOptional = employeesRepository.findById(employeeId);

        if (!employeesEntityOptional.isPresent()) {
            throw new RuntimeException("잘못된 요청입니다.");
        }
        return EmpDetailDTO.fromEntity(employeesEntityOptional.get());
    }
}
EmpController.java
만들어진 Service를 이용해 Controller를 수정해준다.
package com.example.hr1.domain.emp.controller;

import java.util.List;

import org.springframework.beans.factory.annotation.Autowired;
import org.springframework.stereotype.Controller;
import org.springframework.web.bind.annotation.GetMapping;
import org.springframework.web.bind.annotation.PathVariable;
import org.springframework.web.bind.annotation.RequestParam;
import org.springframework.web.servlet.ModelAndView;

import com.example.hr1.domain.emp.dto.EmpDetailDTO;
import com.example.hr1.domain.emp.dto.EmpTableDTO;
import com.example.hr1.domain.emp.service.EmpService;

@Controller
public class EmpController {

    @Autowired
    private EmpService empService;

    @GetMapping("/emp")
    public ModelAndView emp(@RequestParam(required = false) String firstName){

        // firstName이 null이면 전체리스트 / 값이 있으면 조건 검색 리스트

        System.out.println(firstName);
        ModelAndView modelAndView = new ModelAndView();
        List<EmpTableDTO> empTableDTOList = empService.getSearchEmpTableData(firstName);
        modelAndView.addObject("empTableDTOList", empTableDTOList);
        modelAndView.setViewName("emp/emp-list");

        return modelAndView;
    }

    @GetMapping("/emp/{employeeId}")
    public ModelAndView empdetail(@PathVariable Integer employeeId){

        System.out.println(employeeId);

        ModelAndView modelAndView = new ModelAndView();
        EmpDetailDTO empDetailDTO = empService.getEmpDetailData(employeeId);
        // List<EmpTableDTO> empDetailDTO = empService.getEmpTableData();
        modelAndView.addObject("empDetailDTO", empDetailDTO);
        modelAndView.setViewName("emp/emp-detail");

        return modelAndView;
    }
}
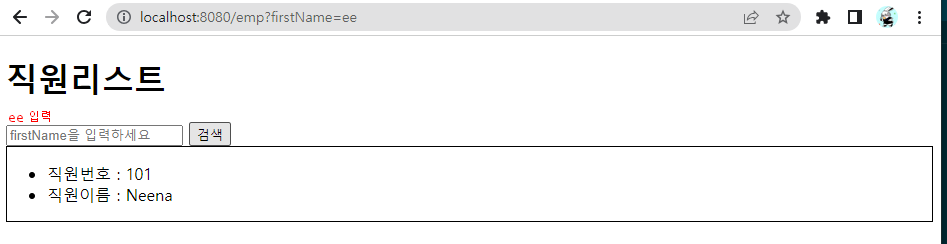
실행해서 "ee"를 입력하면 쿼리스트링에 값이 들어간 것과 "ee"가 들어간 직원들만 나오는 것을 볼 수 있다.
정리
이용자
- /emp 엔트포인트에 접속할건데 firstname이 ne인 사람만 검색해줘
주소창
/emp?firstname=ne
컨트롤러에서
@GetMapping("/emp")
@RequestParam 쿼리스트링을 변수로 바꿔줌
컨트롤러
: 서비스님, 직원dtolist 좀 주세요
서비스
: 리파지토리님, 이름에 ne가 포함된 직원entity리스트 주세요
리파지토리
ne가 포함된 애들 찾았다!
서비스님, 직원entity리스트 드릴게요
서비스
땡큐!! 직원dto리스트를 만들어야지~
컨트롤러님, 직원dto리스트 드릴게요
컨트롤러
요청하신 /emp?firstName=ne 나왔어요
이런 흐름이라고 보면 된다!!