복습
JPA에 대해서 자세하게 설명이 되어있는 사이트이다.
참고문서
spring data jap
기존 실습 파일
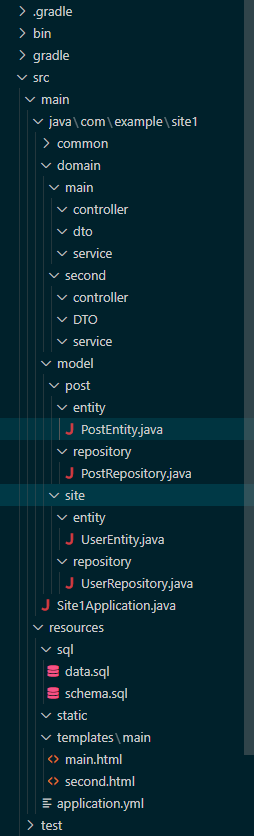
실습했던 site1프로젝트에서 domain안에 있는 java파일을 다 삭제하고 제대로 이해하기 위해 다시 해본다.
프로젝트 구조
main.html
<!DOCTYPE html>
<html xmlns:th="http://www.thymeleaf.org">
<head>
    <meta charset="UTF-8">
    <meta name="viewport" content="width=device-width, initial-scale=1.0">
    <title>Document</title>
</head>
<body>
    <div>
        <h2>유저리스트</h2>
        <ul>
            <!-- 여기 변경해줌 -->
            <li th:each="user : ${dto.userList}">
                <!-- 여기까지 -->
                <span th:text="${user.id}"></span>
            </li>
        </ul>
    </div>
</body>
</html>
second.html
<!DOCTYPE html>
<html xmlns:th="http://www.thymeleaf.org">
<head>
    <meta charset="UTF-8">
    <meta name="viewport" content="width=device-width, initial-scale=1.0">
    <title>Document</title>
</head>
<body>
    <h1>게시글 리스트</h1>
    <!-- 여기변경해줌 -->
    <div th:each="post : ${dto.postList}">
        <!-- 여기까지 -->
        <div>제목 : <span th:text="${post.title}"></span></div>
        <div>내용 : <span th:text="${post.content}"></span></div>
        <div>글쓰이 번호 : <span th:text="${post.userIdx}"></span></div>
        <hr>
    </div>
</body>
</html>
schema.sql
DROP TABLE IF EXISTS `post`;
DROP TABLE IF EXISTS `user`;

CREATE TABLE `user` (
  `idx` int(11) NOT NULL AUTO_INCREMENT,
  `id` varchar(255) NOT NULL,
  `password` varchar(255) NOT NULL,
  PRIMARY KEY (`idx`)
);

CREATE TABLE `post` (
  `idx` int(11) NOT NULL AUTO_INCREMENT,
  `title` varchar(255) NOT NULL,
  `content` varchar(255) NOT NULL,
  `user_idx` int(11) NOT NULL,
  PRIMARY KEY (`idx`),
  KEY `FK8fepup8sn6kmveiiffdcab7sc` (`user_idx`),
  CONSTRAINT `FK8fepup8sn6kmveiiffdcab7sc` FOREIGN KEY (`user_idx`) REFERENCES `user` (`idx`)
);
data.sql
INSERT INTO site.`user`(idx, id, password)
VALUES(1, 'temp', '123'),
    (2, 'sample', '123');


INSERT INTO post (idx, title, content, user_idx)
VALUES (1, '첫번째', '안녕하세요', 1),
    (2, '두번째', '안녕하세요', 1),
    (3, '세번째', '뉴비입니다', 2);
UserEntity.java
package com.example.site1.model.site.entity;

import java.util.List;

import com.example.site1.model.post.entity.PostEntity;

import jakarta.persistence.Column;
import jakarta.persistence.Entity;
import jakarta.persistence.GeneratedValue;
import jakarta.persistence.GenerationType;
import jakarta.persistence.Id;
import jakarta.persistence.OneToMany;
import jakarta.persistence.Table;
import lombok.AllArgsConstructor;
import lombok.Getter;
import lombok.NoArgsConstructor;

@Entity
@Table(name = "user")
@NoArgsConstructor
@AllArgsConstructor
@Getter
public class UserEntity {

    @Id
    @GeneratedValue(strategy = GenerationType.IDENTITY)
    @Column(name = "idx", nullable = false, unique = true)
    private Integer idx;

    @Column(name = "id", nullable = false)
    private String id;

    @Column(name = "password", nullable = false)
    private String password;

    // postentity랑 조인되어 있고, 그 리스트를 가져옴
    // 이렇게 한 이유는 유저가 여러개의 글을 쓸 수 있기 때문에
    // many = post, one = user
    @OneToMany(mappedBy = "userEntity")
    private List<PostEntity> postEntityList;

    @Override
    public String toString() {
        return "UserEntity [idx=" + idx + ", id=" + id + ", password=" + password + "]";
    }

}
PostEntity.java
package com.example.site1.model.post.entity;

import com.example.site1.model.site.entity.UserEntity;

import jakarta.persistence.Column;
import jakarta.persistence.Entity;
import jakarta.persistence.GeneratedValue;
import jakarta.persistence.GenerationType;
import jakarta.persistence.Id;
import jakarta.persistence.JoinColumn;
import jakarta.persistence.ManyToOne;
import jakarta.persistence.Table;
import lombok.AllArgsConstructor;
import lombok.Getter;
import lombok.NoArgsConstructor;

@Entity
@Table(name = "post")
@NoArgsConstructor
@AllArgsConstructor
@Getter
public class PostEntity {

    @Id
    @GeneratedValue(strategy = GenerationType.IDENTITY)
    @Column(name = "idx", nullable = false, unique = true)
    private Integer idx;

    @Column(name = "title", nullable = false)
    private String title;

    @Column(name = "content", nullable = false)
    private String content;

    // userEntity의 idx를 폴인키
    // 조인되어 있는 상태
    // 이렇게 한 이유는 유저가 여러개의 글을 쓸 수 있기 때문에
    // many = post, one = user
    @ManyToOne
    @JoinColumn(name = "user_idx", referencedColumnName = "idx", nullable = false) // 폴인키
    private UserEntity userEntity;
}
Repository 실습
Entity를 참고해서 Repository를 만든다.
JPA Repository 메서드 참고 사이트
https://zara49.tistory.com/130
https://blog.jiniworld.me/128
UserRepository.java
주석을 참고한다.
package com.example.site1.model.site.repository;

import java.util.Optional;

import org.springframework.data.jpa.repository.JpaRepository;
import org.springframework.stereotype.Repository;

import com.example.site1.model.site.entity.UserEntity;


@Repository
public interface UserRepository extends JpaRepository<UserEntity, Integer>{
    // 리파지토리야 유저의 idx를 줄테니까
    // 해당 idx를 가진 UserEntity를 리턴해줘
    // UserEntity findByIdx(Integer idx);

    // 리파지토리야 유저의 idx를 줄테니까
    // 해당 idx를 가진 Optional<UserEntity>를 리턴해줘
    // 리턴 값이 다르더라도 이름이랑 매개변수가 같기 때문에 오버로딩이 안됨
    // 대체적으로 Optional을 쓰는게 좋음
    // null처리를 하게 만들어주기 때문 - null이면 isEmpty()를 써서 널처리를 하게 하니까
    Optional<UserEntity> findByIdx(Integer idx);

    // 리파지토리야 유저의 idx를 줄테니까
    // 해당 id를 가진 UserEntity를 리턴해줘
    UserEntity findById(String id);
}
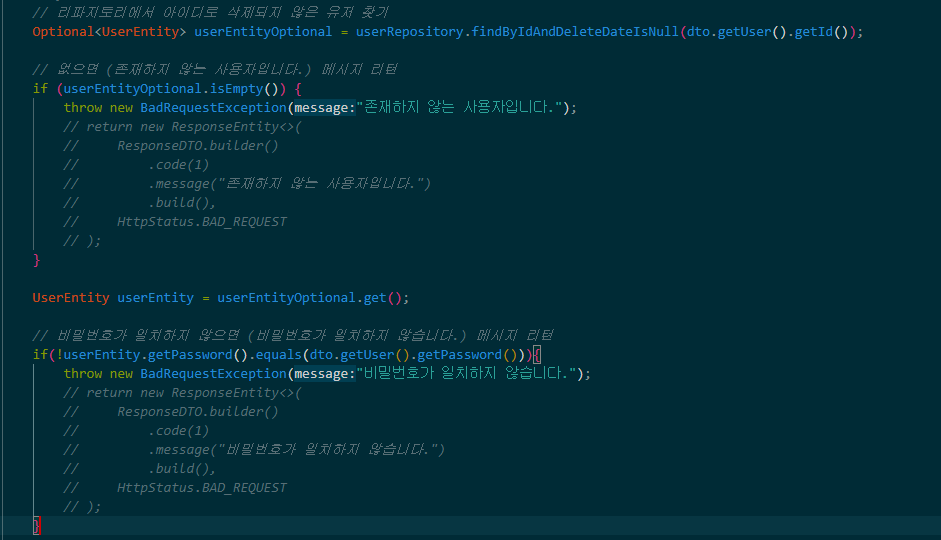
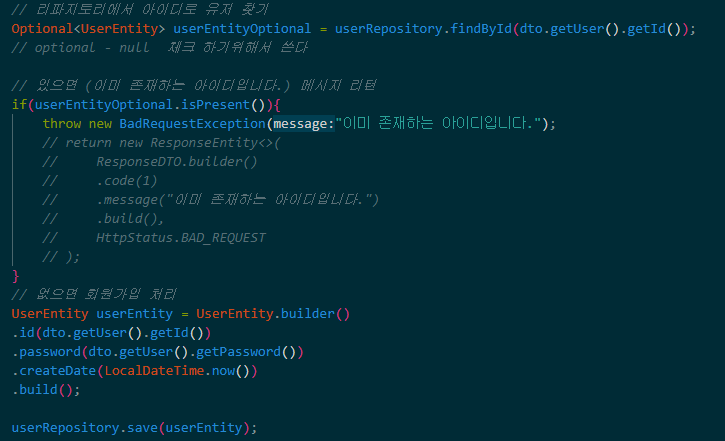
Optional을 쓰는 이유
사람이다 보니까 null처리를 까먹는 경우가 있다.
그래서 Optional을 붙여주면 만약 null처리를 안하고 넘긴다면 userEntityOptional.get()이 null로만 나올 것이다.
그러니 Optional이 적힌 걸 본다면 null처리를 해줘야 하는걸 알게 되니까 사용하는 것이다.예시
// 둘다 같은 값을 출력함
// 그렇지만 Optional을 쓰는게 좋다
UserEntity findByIdx(Integer idx);
Optional<UserEntity> findByIdx(Integer idx);
null처리를 아래처럼 해주는 것이다.
PostRepository.java
주석을 참고한다.
package com.example.site1.model.post.repository;

import java.util.List;
import java.util.Optional;

import org.springframework.data.jpa.repository.JpaRepository;

import com.example.site1.model.post.entity.PostEntity;

public interface PostRepository extends JpaRepository<PostEntity, Integer> {
    // idx로 ,Optional<PostEntity> 찾기
    // title로 List<PostEntity> 찾기
    // content로 List<PostEntity> 찾기
    // user_idx로 List<PostEntity> 찾기

    Optional<PostEntity> findByIdx(Integer idx);

    // 이 방식으로 잘 쓰지 않음
    List<PostEntity> findByTitle(String title);

    // 이 방식으로 잘 쓰지 않음
    List<PostEntity> findByContent(String content);

    List<PostEntity> findByUserEntity_idx(Integer userIdx);

    // title이 포함된 List<PostEntity> 찾기
    // content가 포함된 List<PostEntity> 찾기

    // containing 이 뒤에 %를 붙여주는 것과 같음
    List<PostEntity> findByTitleContaining(String title);

    List<PostEntity> findByContentContaining(String content);

    // title 또는 content가 포함된 List<PostEntity> 찾기
    List<PostEntity> findByTitleContainingOrContentContaining(String title, String content);

    // title과 content가 정확히 일치하는 List<PostEntity> 찾기
    List<PostEntity> findByTitleAndContent(String title, String content);

    // user_idx가 일치하고 content를 포함하고 있는 List<PostEntity> 찾기
    List<PostEntity> findByUserEntity_idxAndContentContaining(Integer userIdx, String content);
}
Service 실습
MainService.java
repository에서 선언했던 걸 가져온다.
여기선 아이디 기준으로 다 가져와서 findAll()을 사용했다.
주석을 참고
package com.example.site1.domain.main.service;

import org.springframework.stereotype.Service;

import com.example.site1.model.site.repository.UserRepository;

import lombok.RequiredArgsConstructor;

@Service
// @Autowired 대신에
@RequiredArgsConstructor
public class MainService {

    private final UserRepository userRepository;

    public void getMainData(){
        // 모든 유저 가져오기
        userRepository.findAll();
    }
}
SecondService.java
SecondRepository에서 만들어 놓은 JPA메소도를 사용한다.
주석을 참고한다.
package com.example.site1.domain.second.service;

import org.springframework.stereotype.Service;

import com.example.site1.model.post.repository.PostRepository;

import lombok.RequiredArgsConstructor;

@Service
@RequiredArgsConstructor
public class SecondService {

    private final PostRepository postRepository;
    public void getSecondData(){
        // 안녕하세요 라는 title을 가진 List<PostEntity> 찾기
        postRepository.findByTitle("안녕하세요");
        // ctrl + alt + v를 해서 뽑아낸다(사용할 경우)
        // List<PostEntity> findByTitle = postRepository.findByTitle("안녕하세요");

        // "안녕" title이 포함된 List<PostEntity> 찾기
        postRepository.findByTitleContaining("안녕");

        // "첫번째"라는 글자가 title 또는 content에 포함된 List<PostEntity> 찾기
        // select * from post where title like '%첫번째%' or content like '%첫번째%';
        postRepository.findByTitleContainingOrContentContaining("첫번째", "첫번째");

        // "두번째"라는 글자가 title과 "반갑습니다"라는 content가 정확히 일치하는 List<PostEntity> 찾기
        postRepository.findByTitleAndContent("두번째", "반갑습니다.");
    }
}
DTO를 이용해서 Service실습
UserDTO.java
다 적을거면 Entity를 사용하면 되지 굳이 DTO를 사용할 이유가 없다.
그러니 main.html에서 보면 id만 필요하기 때문에 id만 적어준다.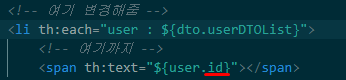
package com.example.site1.domain.main.dto;

import lombok.AllArgsConstructor;
import lombok.Getter;
import lombok.NoArgsConstructor;

@NoArgsConstructor
@AllArgsConstructor
@Getter
public class UserDTO {
    private String id;

}
MainService.java
주석을 참고
package com.example.site1.domain.main.service;

import java.util.ArrayList;
import java.util.List;

import org.springframework.stereotype.Service;

import com.example.site1.domain.main.dto.ResMainDTO;
import com.example.site1.domain.main.dto.UserDTO;
import com.example.site1.model.site.entity.UserEntity;
import com.example.site1.model.site.repository.UserRepository;

import lombok.RequiredArgsConstructor;

@Service
// @Autowired 대신에
@RequiredArgsConstructor
public class MainService {

    private final UserRepository userRepository;

    public void getMainData(){
        // 모든 유저 가져오기
        List<UserEntity> userEntityList = userRepository.findAll();

        // dto를 담을 리스트
        List<UserDTO> userDTOList = new ArrayList<>();

        for(UserEntity userEntity : userEntityList){

            // dto 만들기
            UserDTO userDTO = new UserDTO(userEntity.getId());

            // dto를 리스트에 담기
            userDTOList.add(userDTO);
        }


    }

}
userDTO를 담은 userDTOList를 Controller에게 옮겨줄 파일이 필요하다.
그래서 ResDTO를 만들어준다.
예를 들면 service에서 만든 userDTOList가 자장면이고 그걸 배달하기 위해 담아줄 철가방이 필요한데 그 안에 공간을 만들어주는게 ResDTO다.
ResMainDTO.java
userDTOList가 담길 공간을 만든 것이다.
package com.example.site1.domain.main.dto;

import java.util.List;

import lombok.AllArgsConstructor;
import lombok.Getter;
import lombok.NoArgsConstructor;

@NoArgsConstructor
@AllArgsConstructor
@Getter
public class ResMainDTO {
    private List<UserDTO> userDTOList;
}
mainService.java
ResSecondDTO를 리턴한다.
package com.example.site1.domain.second.service;

import java.util.ArrayList;
import java.util.List;

import org.springframework.stereotype.Service;

import com.example.site1.domain.second.DTO.PostDTO;
import com.example.site1.domain.second.DTO.ResSecondDTO;
import com.example.site1.model.post.entity.PostEntity;
import com.example.site1.model.post.repository.PostRepository;

import lombok.RequiredArgsConstructor;

@Service
@RequiredArgsConstructor
public class SecondService {

    private final PostRepository postRepository;
    public ResSecondDTO getSecondData(){
        // 모든 post 데이터 가져오기 List<PostEntity>
        List<PostEntity> postEntityList = postRepository.findAll();

        // List<PostEntity>반복문 돌려서 PostDTO만들기
        List<PostDTO> postDTOList = new ArrayList<>();

        for (PostEntity postEntity : postEntityList) {
            PostDTO postDTO = new PostDTO(postEntity.getTitle(),postEntity.getContent(),postEntity.getUserEntity().getIdx());

            // List<PostDTO>에 담기
            postDTOList.add(postDTO);
        }

        // ResSecondDTO에 List<PostDTO>담기

        // ResSecondDTO 리턴하기
        ResSecondDTO resSecondDTO = new ResSecondDTO(postDTOList);
        return resSecondDTO;
    }
}
Controller실습
이제 만들었으니 화면에 뿌려본다.
MainService.java
주석을 참고
package com.example.site1.domain.main.controller;
import org.springframework.stereotype.Controller;
import org.springframework.ui.Model;
import org.springframework.web.bind.annotation.GetMapping;
import com.example.site1.domain.main.dto.ResMainDTO;
import com.example.site1.domain.main.service.MainService;
import lombok.RequiredArgsConstructor;
@Controller
@RequiredArgsConstructor
public class MainController {
private final MainService mainService;
@GetMapping("/main")
//모델을 넣어줌
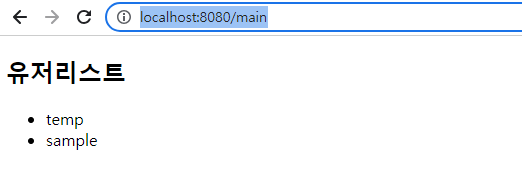
public String getMainPage(Model model){
ResMainDTO dto = mainService.getMainData();
model.addAttribute("dto", dto);
return "main"; // ModelAndView에서 view
}
}
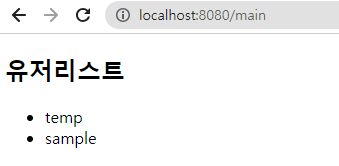
실행해서 mapping주소에 따라 들어가면 아래의 화면과 같이 출력된다.
(우리가 만든 data.sql의 데이터가 들어가있다)
second에서 다시 해보기
main.html의 화면에 뿌려주기 위해 second.html을 위해 똑같이 만들어본다.
PostDTO.java
second.html에서 필요한 title, content, userIdx를 가져온다.
(여기서 user_idx는 폴인키라 entity를 참고해서 하면 된다.)

package com.example.site1.domain.second.DTO;

import lombok.AllArgsConstructor;
import lombok.Getter;
import lombok.NoArgsConstructor;

@NoArgsConstructor
@AllArgsConstructor
@Getter
public class PostDTO {
    private String title;
    private String content;
    // PostUserDTO에서 가져옴
    private Integer userIdx;
}
ResSecondDTO.java
비유하자면 철가방의 공간을 만든거!!
package com.example.site1.domain.main.dto;

import java.util.List;

import lombok.AllArgsConstructor;
import lombok.Getter;
import lombok.NoArgsConstructor;

@NoArgsConstructor
@AllArgsConstructor
@Getter
public class ResMainDTO {
    private List<PostDTO> postDTOList;
}
secondService.java
위의 mainService만들듯이 만들면 된다.
package com.example.site1.domain.second.service;

import java.util.ArrayList;
import java.util.List;

import org.springframework.stereotype.Service;

import com.example.site1.domain.second.DTO.PostDTO;
import com.example.site1.domain.second.DTO.PostUserDTO;
import com.example.site1.domain.second.DTO.ResSecondDTO;
import com.example.site1.model.post.entity.PostEntity;
import com.example.site1.model.post.repository.PostRepository;

import lombok.RequiredArgsConstructor;

@Service
@RequiredArgsConstructor
public class SecondService {

    private final PostRepository postRepository;
    public ResSecondDTO getSecondData(){
        // 모든 post 데이터 가져오기 List<PostEntity>
        List<PostEntity> postEntityList = postRepository.findAll();

        // List<PostEntity>반복문 돌려서 PostDTO만들기
        List<PostDTO> postDTOList = new ArrayList<>();

        for (PostEntity postEntity : postEntityList) {
            PostUserDTO postUserDTO = new PostUserDTO(postEntity.getUserEntity().getIdx());

            // useridx는 title과 content처럼 적으면 안된고 직접 생성해서 해야함(위처럼 뽑아내서)
            PostDTO postDTO = new PostDTO(postEntity.getTitle(),postEntity.getContent(),postEntity.getUserEntity().getUserIdx());

            // List<PostDTO>에 담기
            postDTOList.add(postDTO);
        }

        // ResSecondDTO에 List<PostDTO>담기

        // ResSecondDTO 리턴하기
        ResSecondDTO resSecondDTO = new ResSecondDTO(postDTOList);
        return resSecondDTO;
    }
}
SecondController.java
package com.example.site1.domain.second.controller;

import org.springframework.stereotype.Controller;
import org.springframework.ui.Model;
import org.springframework.web.bind.annotation.GetMapping;

import com.example.site1.domain.second.DTO.ResSecondDTO;
import com.example.site1.domain.second.service.SecondService;

import lombok.RequiredArgsConstructor;

@Controller
@RequiredArgsConstructor
public class SecondController {
    private final SecondService secondService;

    @GetMapping("/second")
    public String getSecondPage(Model model){
        ResSecondDTO dto = secondService.getSecondData();
        model.addAttribute("dto", dto);

        return "second";
    }
}
second.html
<!DOCTYPE html>
<html xmlns:th="http://www.thymeleaf.org">
<head>
<meta charset="UTF-8">
<meta name="viewport" content="width=device-width, initial-scale=1.0">
<title>Document</title>
</head>
<body>
<h1>게시글 리스트</h1>
<div th:each="post : ${dto.postDTOList}">
<div>제목 : <span th:text="${post.title}"></span></div>
<div>내용 : <span th:text="${post.content}"></span></div>
<div>글쓰이 번호 : <span th:text="${post.userIdx}"></span></div>
<hr>
</div>
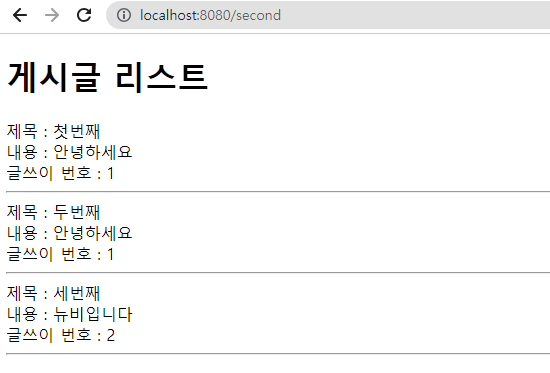
</body>
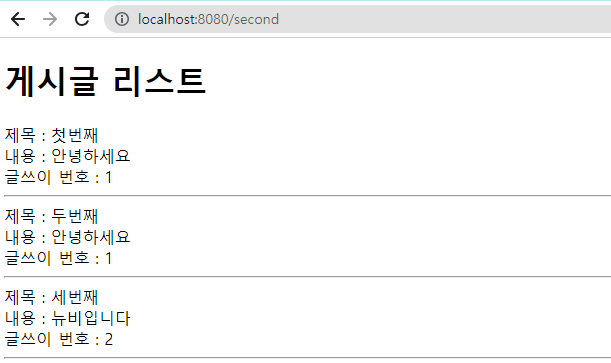
</html>아래와 같이 출력됨
DTO 대신 innerClass사용하기
PostUserDTO
유저의 idx만 가지고 있는 PostUserDTO를 만들어준다.
package com.example.site1.domain.second.DTO;

import lombok.AllArgsConstructor;
import lombok.Getter;
import lombok.NoArgsConstructor;

@NoArgsConstructor
@AllArgsConstructor
@Getter
public class PostUserDTO {
    // 유저의 idx만 가지고 있는 거
    private Integer idx;
}
PostDTO.java
가져와서 적어준다.
package com.example.site1.domain.second.DTO;

import lombok.AllArgsConstructor;
import lombok.Getter;
import lombok.NoArgsConstructor;

@NoArgsConstructor
@AllArgsConstructor
@Getter
public class PostDTO {
    private String title;
    private String content;
    // PostUserDTO에서 가져옴
    private PostUserDTO postUserDTO;
}
SecondService.java
PostUserDTO를 생성해주고 넣어준다.
package com.example.site1.domain.second.service;

import java.util.ArrayList;
import java.util.List;

import org.springframework.stereotype.Service;

import com.example.site1.domain.second.DTO.PostDTO;
import com.example.site1.domain.second.DTO.PostUserDTO;
import com.example.site1.domain.second.DTO.ResSecondDTO;
import com.example.site1.model.post.entity.PostEntity;
import com.example.site1.model.post.repository.PostRepository;

import lombok.RequiredArgsConstructor;

@Service
@RequiredArgsConstructor
public class SecondService {

    private final PostRepository postRepository;
    public ResSecondDTO getSecondData(){
        // 모든 post 데이터 가져오기 List<PostEntity>
        List<PostEntity> postEntityList = postRepository.findAll();

        // List<PostEntity>반복문 돌려서 PostDTO만들기
        List<PostDTO> postDTOList = new ArrayList<>();

        for (PostEntity postEntity : postEntityList) {
        	// PostUserDTO 생성
            PostUserDTO postUserDTO = new PostUserDTO(postEntity.getUserEntity().getIdx());

            // useridx는 title과 content처럼 적으면 안된고 직접 생성해서 해야함(위처럼 뽑아내서)
            PostDTO postDTO = new PostDTO(postEntity.getTitle(),postEntity.getContent(),postUserDTO);

            // List<PostDTO>에 담기
            postDTOList.add(postDTO);
        }

        // ResSecondDTO에 List<PostDTO>담기

        // ResSecondDTO 리턴하기
        ResSecondDTO resSecondDTO = new ResSecondDTO(postDTOList);
        return resSecondDTO;
    }
}
second.html
<!DOCTYPE html>
<html xmlns:th="http://www.thymeleaf.org">
<head>
    <meta charset="UTF-8">
    <meta name="viewport" content="width=device-width, initial-scale=1.0">
    <title>Document</title>
</head>
<body>
    <h1>게시글 리스트</h1>
    <div th:each="post : ${dto.postDTOList}">
        <div>제목 : <span th:text="${post.title}"></span></div>
        <div>내용 : <span th:text="${post.content}"></span></div>
        <div>글쓰이 번호 : <span th:text="${post.postUserDTO.idx}"></span></div>
        <hr>
    </div>
</body>
</html>
이렇게 해도 아래와 같이 출력된다.
그러나 이 방식대로 하게 되면 dto를 유저, 게시글, 코멘트마다 dto를 만들어 줘야하기 때문에 보기에도 안좋고 너무 많아진다.
그래서 innerclass를 사용해서 간편하게 만들어준다.
ResSecondDTO.java
ResSecondDTO안에 PostDTO, PostUserDTO를 이너클래스로 넣어준다.
(어노테이션부터 아래까지만 가져온다!! 주석을 참고)
package com.example.site1.domain.second.DTO;

import java.util.List;

import lombok.AllArgsConstructor;
import lombok.Getter;
import lombok.NoArgsConstructor;

@NoArgsConstructor
@AllArgsConstructor
@Getter
public class ResSecondDTO {
    private List<Post> postList;

    // 이너클래스를 사용한거임
    // PostDTO를 가져온 것
    @NoArgsConstructor
    @AllArgsConstructor
    @Getter
    // 안에서만 사용할거니까 맘대로 이름을 줘도 됨
    // 종속이지만 별개의 관계임
    // static을 붙여줘야함
    public static class Post {
        private String title;
        private String content;
        // PostUserDTO에서 가져옴
        private User User;

		// PostUserDTO를 가져온 것
        // PostUserDTO가 가지고 있는 거니까
        // 얘도 마찬가지
        // 이너클래스로 만들때는 기본적으로 static!!
        @NoArgsConstructor
        @AllArgsConstructor
        @Getter
        public static class User {
            // 유저의 idx만 가지고 있는 거
            private Integer idx;
        }
    }

}
이렇게 이너클래스를 만들면 여러개 DTO들을 만들지 않아도 되고 깔끔해진다.
SecondService.java
DTO가 변경 됐으므로 맞게 변경한다.
package com.example.site1.domain.second.service;

import java.util.ArrayList;
import java.util.List;

import org.springframework.stereotype.Service;

import com.example.site1.domain.second.DTO.ResSecondDTO;
import com.example.site1.model.post.entity.PostEntity;
import com.example.site1.model.post.repository.PostRepository;

import lombok.RequiredArgsConstructor;

@Service
@RequiredArgsConstructor
public class SecondService {

    private final PostRepository postRepository;
    public ResSecondDTO getSecondData(){
        // 모든 post 데이터 가져오기 List<PostEntity>
        List<PostEntity> postEntityList = postRepository.findAll();

        // List<PostEntity>반복문 돌려서 PostDTO만들기
        List<ResSecondDTO.Post> postList = new ArrayList<>();

        for (PostEntity postEntity : postEntityList) {
            ResSecondDTO.Post.User user = new ResSecondDTO.Post.User(postEntity.getUserEntity().getIdx());

            // useridx는 title과 content처럼 적으면 안된고 직접 생성해서 해야함(위처럼 뽑아내서)
            ResSecondDTO.Post post = new ResSecondDTO.Post(postEntity.getTitle(),postEntity.getContent(),user);

            // List<PostDTO>에 담기
            postList.add(post);
        }

        // ResSecondDTO에 List<PostDTO>담기

        // ResSecondDTO 리턴하기
        ResSecondDTO resSecondDTO = new ResSecondDTO(postList);
        return resSecondDTO;
    }
}
second.html
<!DOCTYPE html>
<html xmlns:th="http://www.thymeleaf.org">
<head>
<meta charset="UTF-8">
<meta name="viewport" content="width=device-width, initial-scale=1.0">
<title>Document</title>
</head>
<body>
<h1>게시글 리스트</h1>
<div th:each="post : ${dto.postList}">
<div>제목 : <span th:text="${post.title}"></span></div>
<div>내용 : <span th:text="${post.content}"></span></div>
<div>글쓰이 번호 : <span th:text="${post.User.Idx}"></span></div>
<hr>
</div>
</body>
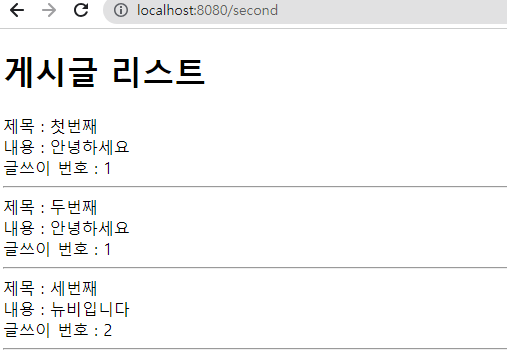
</html>아래와 같이 출력된다.
main의 DTO들도 이렇게 정리해준다!!
main의 DTO들 innerClass만들어주기
ResMainDTO.java
UserDTO를 가져와서 innerClass로 만들어준다.
package com.example.site1.domain.second.controller;

import org.springframework.stereotype.Controller;
import org.springframework.ui.Model;
import org.springframework.web.bind.annotation.GetMapping;

import com.example.site1.domain.second.DTO.ResSecondDTO;
import com.example.site1.domain.second.service.SecondService;

import lombok.RequiredArgsConstructor;

@Controller
@RequiredArgsConstructor
public class SecondController {
    private final SecondService secondService;

    @GetMapping("/second")
    public String getSecondPage(Model model){
        ResSecondDTO dto = secondService.getSecondData();
        model.addAttribute("dto", dto);

        return "second";
    }
}
MainService.java
package com.example.site1.domain.main.service;

import java.util.ArrayList;
import java.util.List;

import org.springframework.stereotype.Service;

import com.example.site1.domain.main.dto.ResMainDTO;
import com.example.site1.model.site.entity.UserEntity;
import com.example.site1.model.site.repository.UserRepository;

import lombok.RequiredArgsConstructor;

@Service
// @Autowired 대신에
@RequiredArgsConstructor
public class MainService {

    private final UserRepository userRepository;
    public ResMainDTO getMainData(){
        // 모든 유저 가져오기
        List<UserEntity> userEntityList = userRepository.findAll();

        // dto를 담을 리스트
        List<ResMainDTO.User> userList = new ArrayList<>();

        for (UserEntity userEntity : userEntityList) {

            // dto 만들기
            ResMainDTO.User user = new ResMainDTO.User(userEntity.getId());

            // dto를 리스트에 담기
            userList.add(user);
        }

        ResMainDTO resMainDTO = new ResMainDTO(userList);
        return resMainDTO;

    }

}
main.html
변경해준다
<!DOCTYPE html>
<html xmlns:th="http://www.thymeleaf.org">
<head>
    <meta charset="UTF-8">
    <meta name="viewport" content="width=device-width, initial-scale=1.0">
    <title>Document</title>
</head>
<body>
    <div>
        <h2>유저리스트</h2>
        <ul>
            <!-- 여기 변경해줌 -->
            <li th:each="user : ${dto.userList}">
                <!-- 여기까지 -->
                <span th:text="${user.id}"></span>
            </li>
        </ul>
    </div>
</body>
</html>
실행하면 아래와 같이 잘 나온다!!