Section 2.
18강. 컨트롤러 만들기
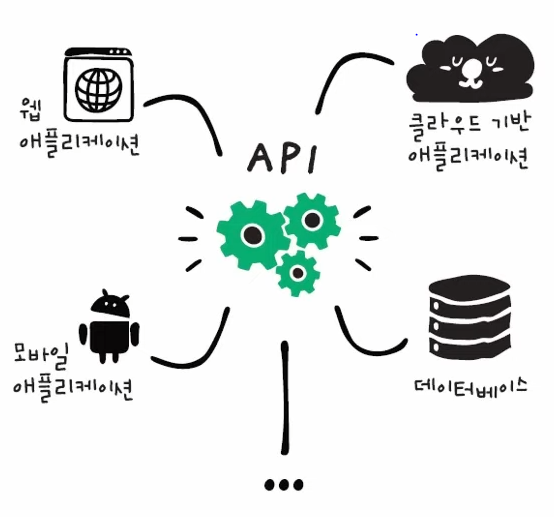
RESTful API
API와 애플리케이션
- 애플리케이션
- 특정 기능을 제공하는 프로그램. 그 자체로 완전한 소프트웨어
- 사용자 인터페이스고 있고, 사용자간에 상호 작용하는 기능을 모두 모함
- ex) sns 애플리케이션
- API
- 애플리케이션 간에 자료를 주고받으며 특정 기능을 실행해주는 코드
- API를 사용하면 시스템끼리 자료를 주고받을 수도 있고, 새로운 애플리케이션을 만들 수도 있음
- ex) sns 애플리케이션에서 사용하는 로그인 API, 게시물 작성 API...
- REST
- HTTP 프로토콜을 활용해서 자료를 주고 받는 API
- 데이터 상태를 주고받을 때 사용하는 것이 REST
- RESTful API
- RESR를 잘 지켜서 개발한 API

RESTful API는 url로 자원을 요청한다는 게 가장 큰 특징이다. 서버에 있는 파일이나 정보에 접근할 때 주소를 사용해서 접근하는 방식이다.
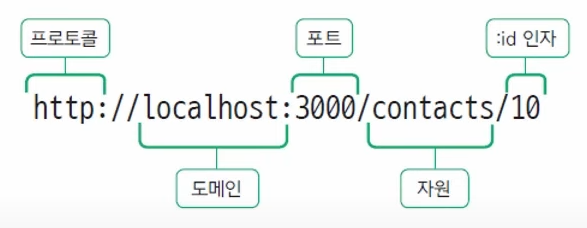
위 문장은 로컬 서버에서 3000번 포트로 접속 할 것이고, contacts라는 경로로 get 방식으로 요청을 하겠다. id값이 10인 정보만 가져와 달라는 뜻이다.
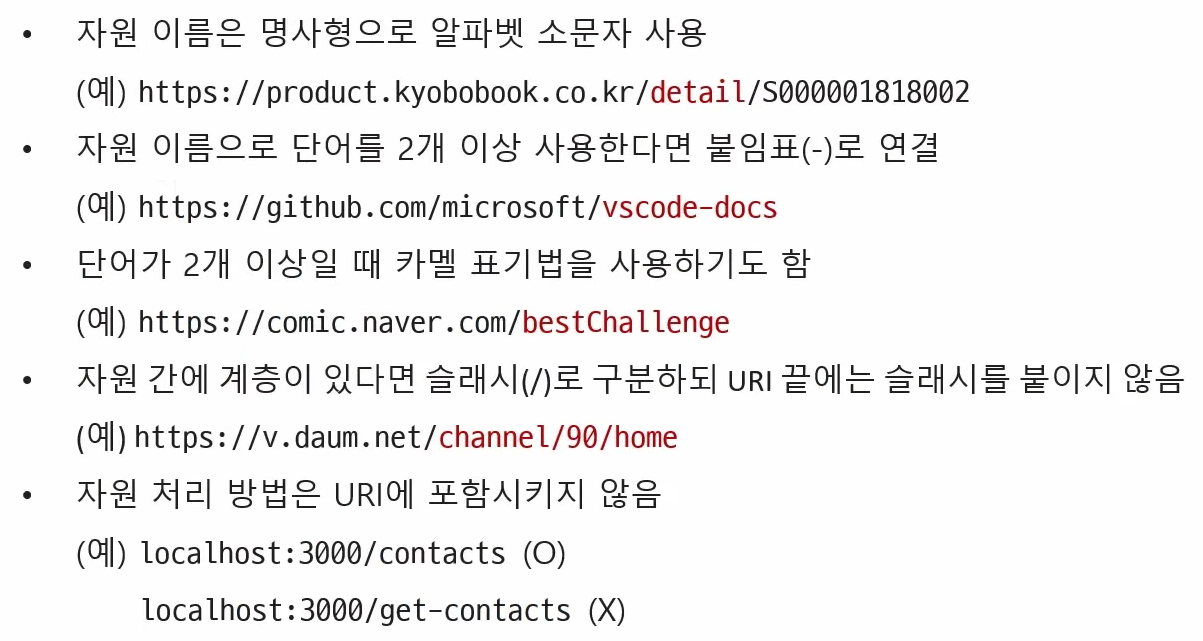
URL을 지정할 때 지키면 좋은 약속
HTTP 요청 방식과 역할
RESTful API에서 요청 방식을 사용하게 되는데, 가장 많이 사용하는 것은 이 4가지 방법이다.
- POST
- GET
- PUT
- DELETE
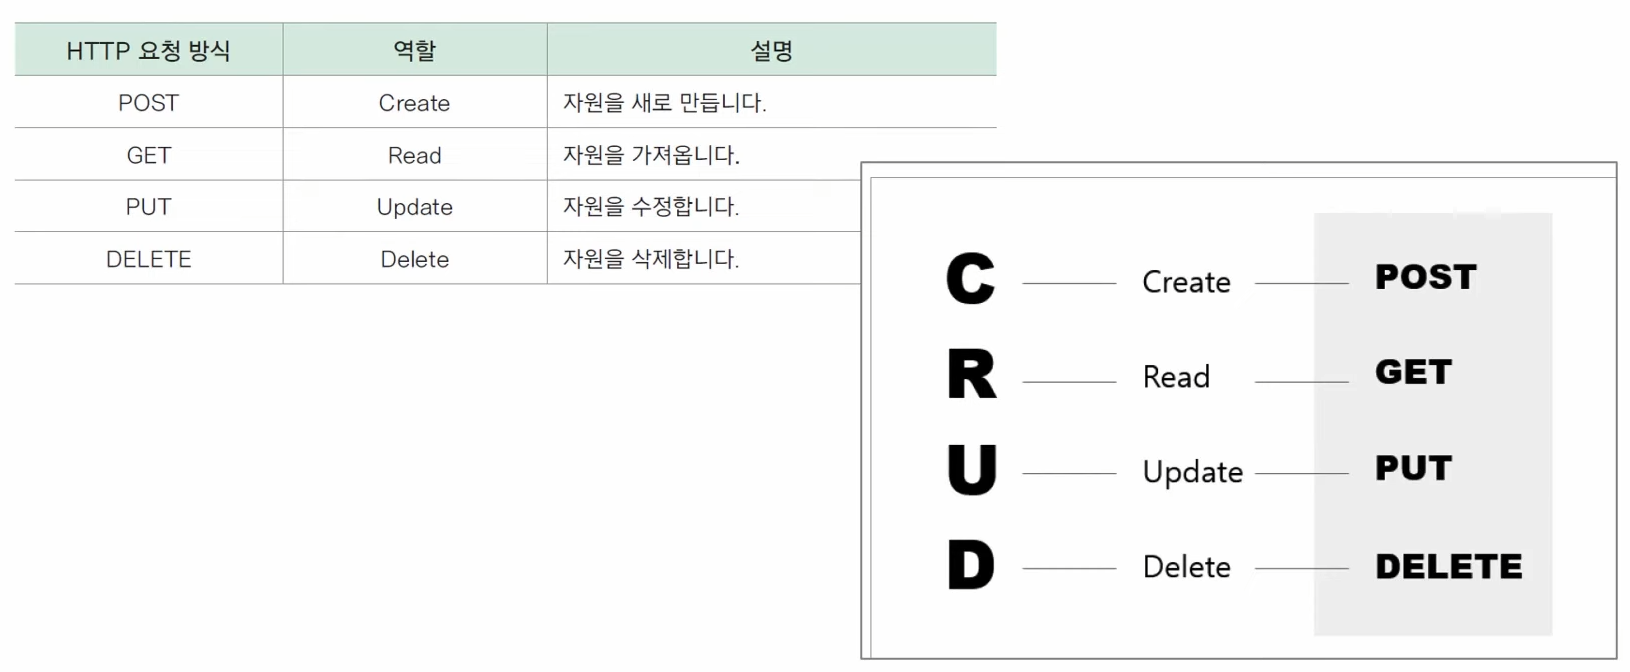
이 역할들의 앞글자만 따서 CRUD라고 부르기도 한다. RESTful API는 위 기능을 하게끔 만들어 주면 된다.
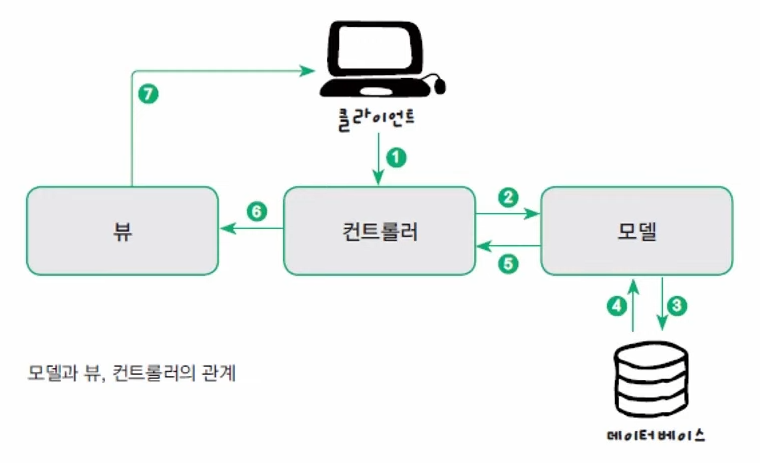
MVC 패턴
CRUD API를 만들기 전에 MVC 패턴이라는 것을 잠깐 살펴보고 가자.
우리가 애플리케이션을 작성할 때 하나의 파일 안에 코드를 작성하게 되면 수천, 수만줄이 된다. 그렇기 때문에 모듈 단위로 쪼개서 파일을 저장하게 되는데 이 때 아무렇게나 자르면 안된다. 코드의 기능, 역할에 따라 여러 파일로 나눈 뒤 연결해서 사용하는 것이다. 이 여러 가지 형태의 쪼개는 방법 중 가장 많이 쓰는 것이 바로 MVC 패턴이다. 모델, 뷰, 컨트롤러 세 영역으로 나누어 쪼개는 방법을 말한다.
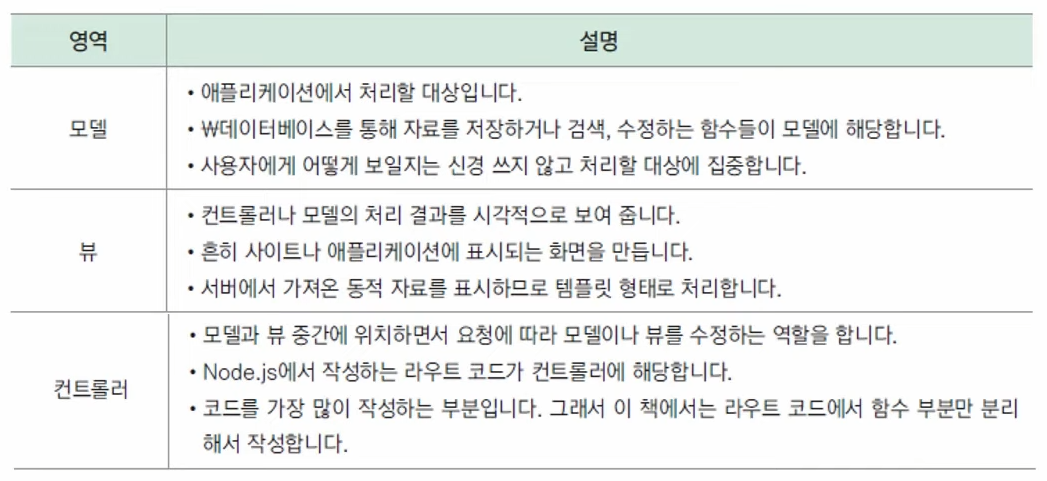
간단하게 눈에 보이는 부분이 뷰, 라우트 코드를 처리하는 부분이 컨트롤러이다.
뷰, 컨트롤러, 모델이 어떤 식으로 정보를 주고받는지 간략하게 확인해보자.

컨트롤러 대신 라우터 미들웨어로 라우트 코드를 처리할 경우
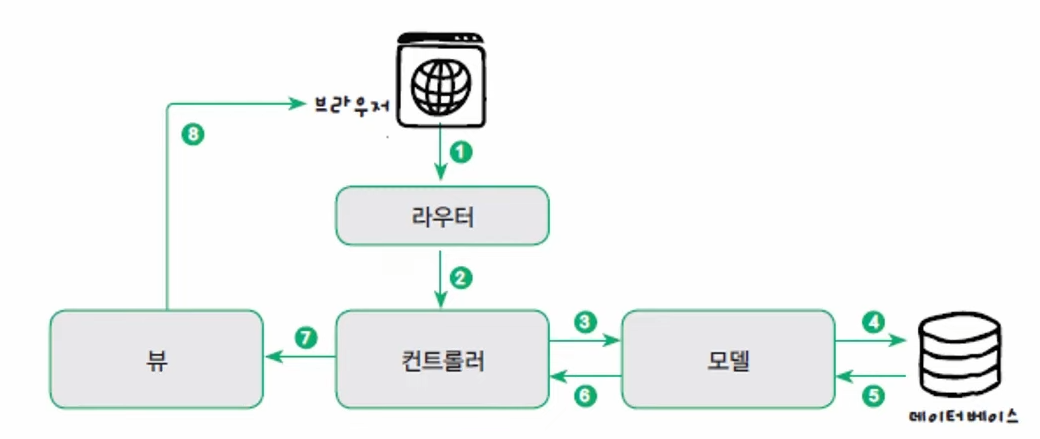
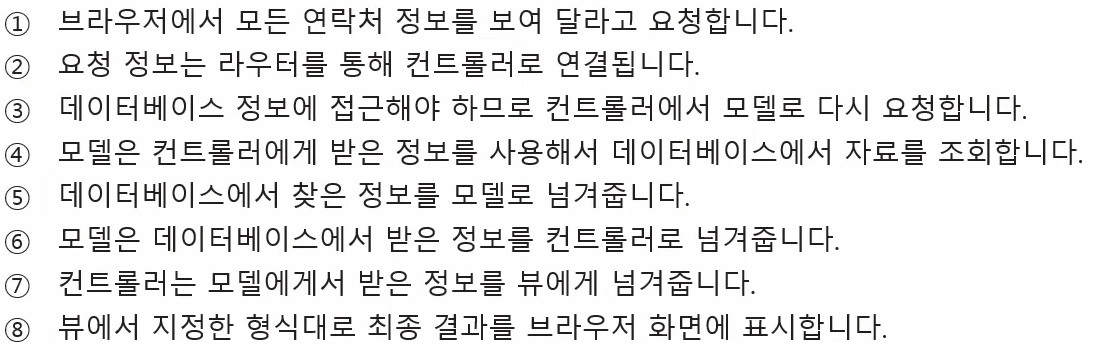
라우터 미들웨어를 거쳐 컨트롤러로 연결하는 방식이다. 앞서 우리는 라우터 미들웨어를 썼기 때문에 라우터 미들웨어에서 컨트롤러 부분만 따로 분리해서 작성해 볼 것이다. 이 경우, 기능을 수정해야 할 때 라우터 부분은 그대로 두고 컨트롤러만 수정 해주면 된다.
컨트롤러 작성
const express = require("express");
const router = express.Router();

router.route("/")
    .get((req,res)=>{
        res.send("Contacts Page");
    })
    .post((req,res)=>{
        console.log(req.body);
        const {name, email, phone} = req.body;
        if(!name || !email || !phone){
            return res.send("필수 값이 입력되지 않았습니다.");
        }
        res.send("Create Contacts");
    });

router.route("/:id")
    .get((req,res)=>{
        res.send(`View Contact for ID : ${req.params.id}`);
    })
    .put((req,res)=>{
        res.send(`Update Contact for ID : ${req.params.id}`);
    })
    .delete((req,res)=>{
        res.send(`Delete Contact for ID : ${req.params.id}`);
    });

module.exports = router;
이렇게 우리가 작성했었던 라우트 코드에서 컨트롤러 함수를 밖으로 빼내어 보겠다.
작업 폴더 안에 controllers 라는 폴더를 만들고, 그 안에 contactController.js 파일을 만들자. 컨트롤러 함수가 여러 개 만들어지므로 기억하기 쉽게 함수마다 주석을 붙이는 것이 좋다.
    .get((req,res)=>{
        res.send("Contacts Page");
    })
이 부분을 빼내어 보자.
contacts 경로로 GET 방식의 요청이 들어오면 어떤 일을 할 것인지 함수를 작성해보자.
// Get all contacts
// GET /contacts

const getAllContacts = async(req,res)=>{
    try{
        res.send("Contacts Page");
    } catch(err){
        res.send(error);
    }
}

module.exports = getAllContacts;
나중에 db와 연동을 해야하기 때문에 비동기로 동작해야 한다. 에러가 생기는지 확인을 위해 try-catch문을 사용했다. 이 함수는 나중에 라우트 코드에서 사용할 것이다. 즉, 모듈로 내보내야 한다.
const getAllContacts = require("../controllers/contactController");그리고 위 코드처럼 경로를 잘 지정하서 모듈을 가져와야 한다. 그렇게 가져온 것을 활용하면
.get(getAllContacts)이렇게 쓸 수 있다.
express-async-handler 모듈
const getAllContacts = async(req,res)=>{
    try{
        res.send("Contacts Page");
    } catch(err){
        res.send(error);
    }
}
여기를 보면 async 안에 try-catch문이 사용되고 있다. 이는 함수가 생성 될 때마다 늘어날 것이다. 만일 단순히 에러가 발생했는지의 여부를 확인하는 거라면 좀 더 간략하게 확인할 수 있는 방법이 있다. async-hander 모듈을 이용하는 것이다.
npm i express-async-handler우선 이렇게 터미널에 입력해서 모듈을 설치하자. 그리고 이렇게 설치한 모듈을 가져오자.
const asyncHandeler = require("express-async-handler");이 모듈은 async를 사용했을 경우에만 쓸 수 있는 모듈이다. try-catch 대신에 asyncHander를 사용해보자. asyncHander로 함수 전체를 묶고 try-catch를 없앨 것이다.
const getAllContacts = asyncHandeler(async(req,res)=>{
    res.send("Contacts Page");
});
훨씬 간단해진 것이 보인다.
전체 코드
const asyncHandeler = require("express-async-handler");

const getAllContacts = asyncHandeler(async(req,res)=>{
    res.send("Contacts Page");
});

module.exports = getAllContacts;
제대로 동작하는지도 확인해보자.
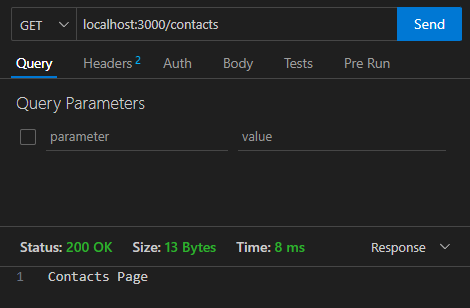
컨트롤러 함수를 밖으로 빼냈는데도 잘 동작하는 것을 확인할 수 있다.
같은 방법으로 post도 옮겨보자.
컨트롤러
// Get all contacts
// GET /contacts

const asyncHandeler = require("express-async-handler");

const getAllContacts = asyncHandeler(async(req,res)=>{
    res.send("Contacts Page");
});

const createContact = asyncHandeler(async(req,res)=>{
    console.log(req.body);
    const {name, email, phone} = req.body;
    if(!name || !email || !phone){
        return res.send("필수 값이 입력되지 않았습니다.");
    }
    res.send("Create Contacts");
});

module.exports = {
    getAllContacts, createContact
};
라우터
const express = require("express");
const router = express.Router();
const {getAllContacts, createContact} = require("../controllers/contactController");

router.route("/")
    .get(getAllContacts)
    .post(createContact);

router.route("/:id")
    .get((req,res)=>{
        res.send(`View Contact for ID : ${req.params.id}`);
    })
    .put((req,res)=>{
        res.send(`Update Contact for ID : ${req.params.id}`);
    })
    .delete((req,res)=>{
        res.send(`Delete Contact for ID : ${req.params.id}`);
    });

module.exports = router;
모듈을 2개 이상 내보낼때는 {} 안에 작성한다.
19강. CURD 코드 작성하기
우리가 만든 컨트롤러 함수를 이용해서 db에 추가, 수정, 삭제하는 CURD 코드를 직접 작성해보도록 하자.
컨트롤러 함수
const asyncHandeler = require("express-async-handler");

// Get all contacts
// GET /contacts
const getAllContacts = asyncHandeler(async(req,res)=>{
    res.send("Contacts Page");
});

// Create contact
// POST /contacts
const createContact = asyncHandeler(async(req,res)=>{
    console.log(req.body);
    const {name, email, phone} = req.body;
    if(!name || !email || !phone){
        return res.send("필수 값이 입력되지 않았습니다.");
    }
    res.send("Create Contacts");
});

// Get contact
// GET /contacts/:id
const getContact = asyncHandeler(async(req,res)=>{
    res.send(`View Contact for ID: ${req.params.id}`);
})

// Update contact
// PUT /contacts/:id
const updateContact = asyncHandeler(async(req,res)=>{
    res.send(`Update Contact for ID: ${req.params.id}`);
})

// Delete contact
// DELETE /contacts/:id
const deleteContact = asyncHandeler(async(req,res)=>{
    res.send(`Delete Contact for ID: ${req.params.id}`);
})

module.exports = {
    getAllContacts,
    createContact,
    getContact,
    updateContact,
    deleteContact
};
이렇게 전 시간에 일부만 만들었던 컨트롤러 함수를 완성했다.
지금은 이 함수에서 send를 통해 간단하게 텍스트만 표현을 하고 있지만 우리는 몽고db에서 직접 자료를 저장하고 가져오거나 수정하는 방법에 대해 살펴 볼 것이다.
데이터베이스 모델에서 사용하는 함수
CRUD 네 가지 기능에 관련된 함수를 살펴보자.
- C : create
- R : find, findOne
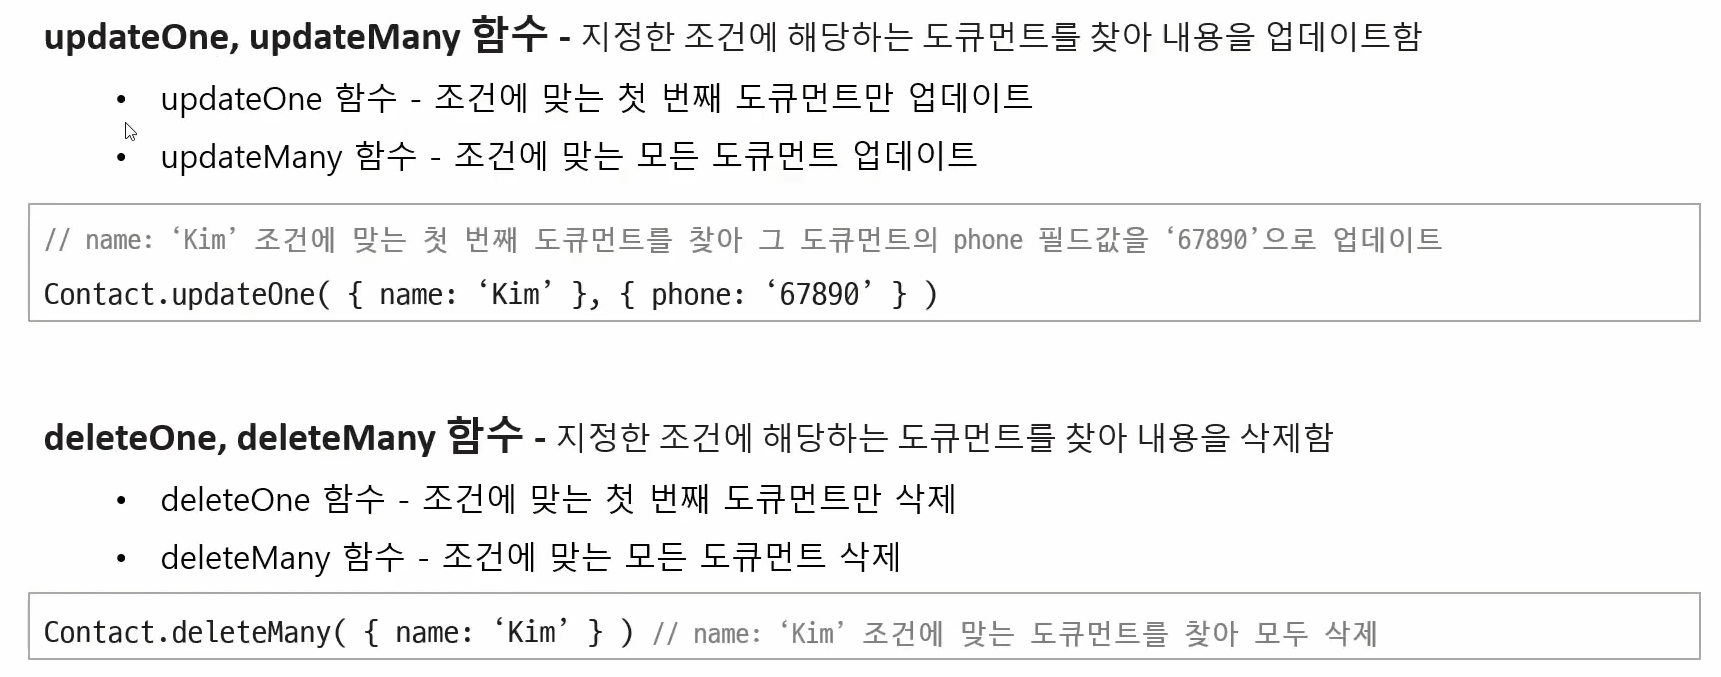
- U : updateOne, updateMany
- D : deleteOne, deleteMany
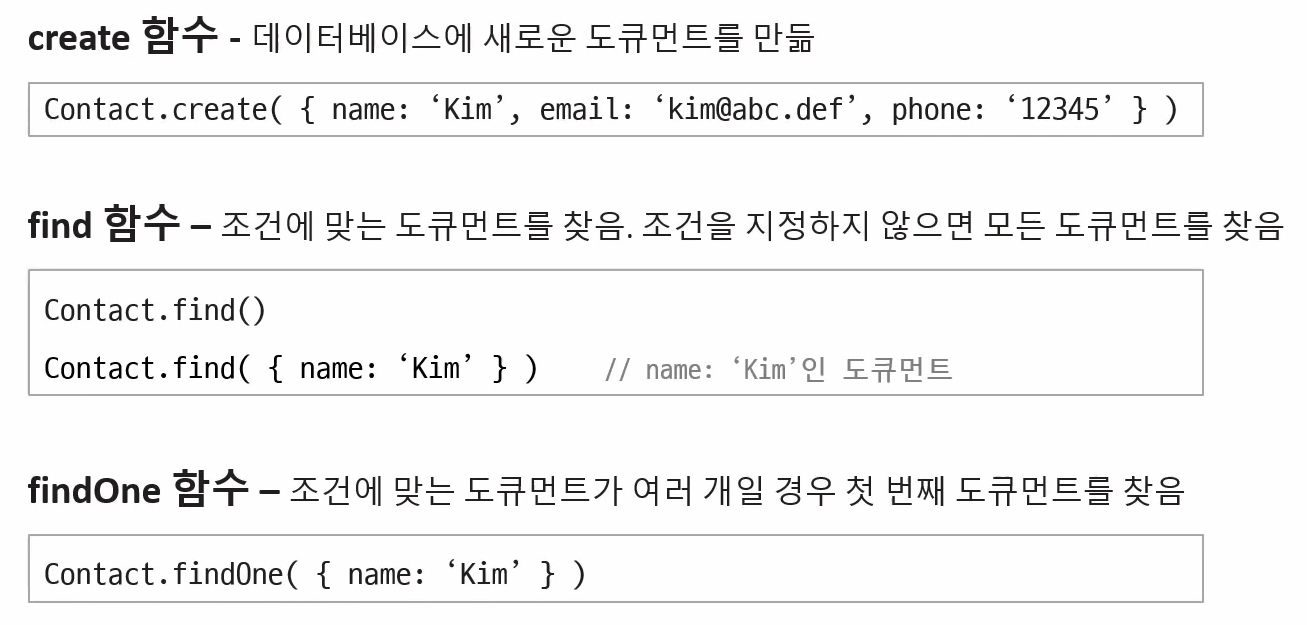
앞의 Contact는 스키마를 이용해서 모델을 만들때의 모델에 해당한다. 이 모델은 여러 개의 도큐먼트를 가지고 있는 컬렉션을 가리키는 것이다.
-
C
create 함수는 Contact에 {} 안의 내용에 해당하는 새로운 도큐먼트를 만든다. -
R
find 함수를 사용하며 {} 안에 조건을 넣지 않으면 해당 컬렉션의 모든 도큐먼트를 가져온다. {} 안에 조건을 넣으면 그 조건에 해당하는 자료를 가져온다. 데이터베이스에 있는 연락처를 모두 가져오고 싶다, 한다면 find 함수를 사용하면 된다.
findOne 함수 역시 {} 안에 조건을 지정하게 되는데 그 조건에 맞는 여러 개의 도큐먼트 중 첫 번째 것만 가져온다. -
U(update)와 D(delete)도 두 가지 함수가 있고 각 역할이 다르다.
findByld 함수
find와 관련해서 몇 가지 함수가 더 있는데 그 중 하나이다.
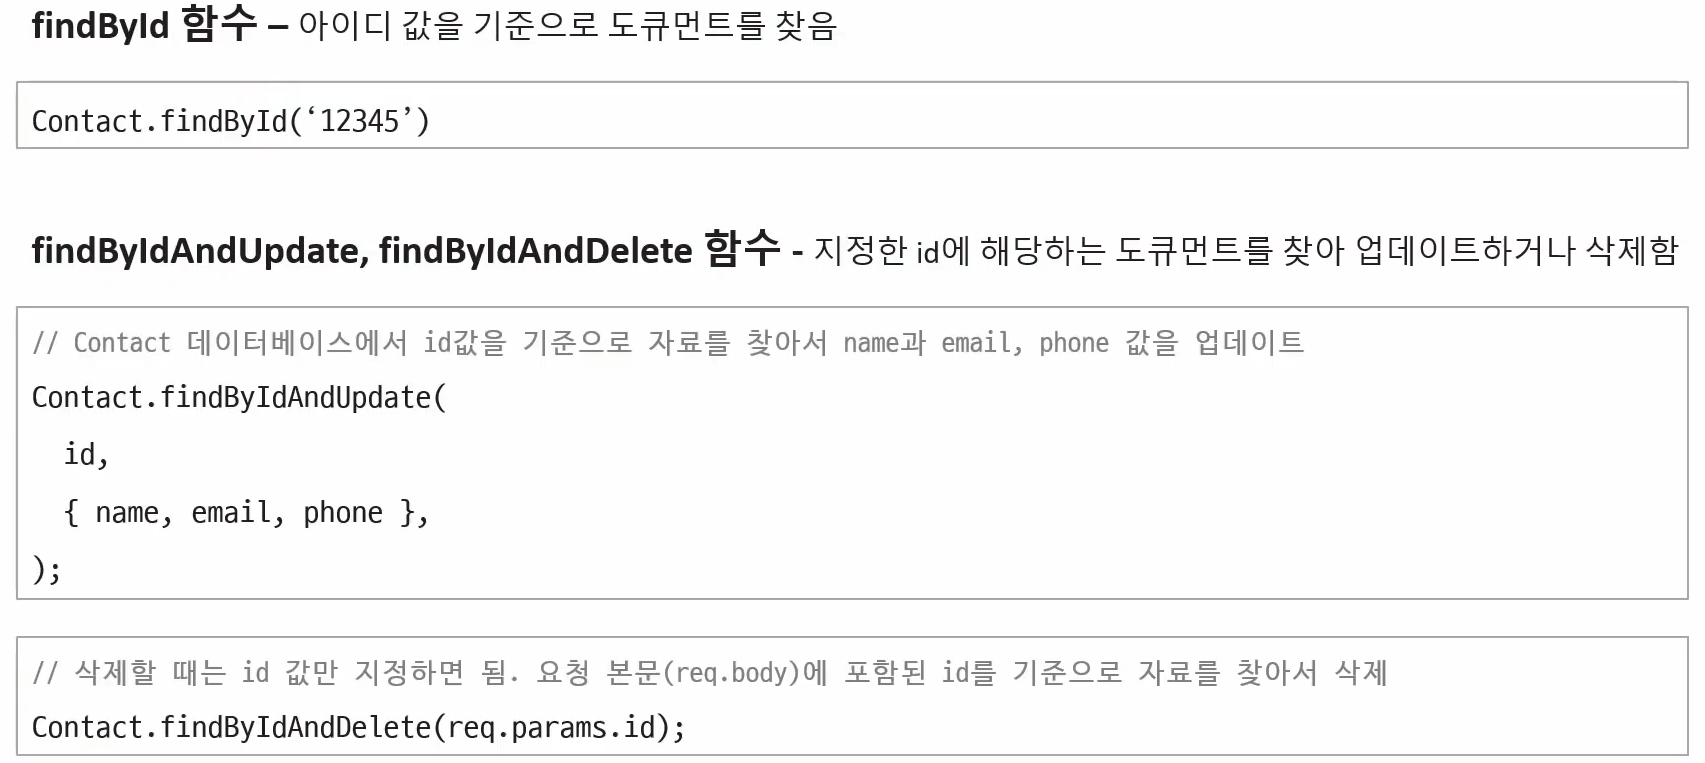
findById는 아이디 값을 기준으로 도큐먼트를 찾아준다.
findByIdAndUpdate와 findByIdAndDelete는 id로 찾은 후 수정, 삭제하는 것까지 한꺼번에 해준다.
이렇게 살펴본 함수들을 이용해 간단한 몇 가지 자료를 몽고 db에 저장하고, 가져오고, 수정하고, 삭제 해보도록 하자.
몽고 db에서 작업을 하려면 일단 몽고 db에서 컬렉션, 모델에 접근할 수 있어야 한다.
const mongoose = require("mongoose");

const contactSchema = new mongoose.Schema({
    name: {
        type: String,
        required: true
    },
    email: {
        type: String,
    },
    phone: {
        type: String,
        required: [true, "전화번호는 꼭 기입해 주세요"]
    }
},
{
    timestamps: true
}
);

const Contact = mongoose.model("Contact", contactSchema);

module.exports = Contact;
우리는 이전에 이 코드를 통해 스키마를 정의했고, 스키마를 사용해 Contact 라는 모델을 만들었다. 이 스키마를 준수하는, 이 규칙에 맞는 도큐먼트를 만들고 그 도큐먼트들을 Contact라는 모델로 바꿔달라는 뜻이다. 이걸 가져와야 우리는 mongoose 작업을 할 수 있다.
contactController.js
먼저 모듈을 가지고 와야 한다.
const Contact = require("../models/contactModel");새로운 연락처를 추가하는 것이기 때문에 post에서 해줘야 한다.
const createContact = asyncHandeler(async(req,res)=>{
    console.log(req.body);
    const {name, email, phone} = req.body;
    if(!name || !email || !phone){
        return res.send("필수 값이 입력되지 않았습니다.");
    }
    const contact = await Contact.create({
        name, email, phone
    });
    res.send("Create Contacts");
});
Contact라는 모델에 create 함수를 써서 지금 입력한 내용을 추가 할 것이다. 즉 name, email, phone 자료를 contact라는 이름으로 할당하는 것이다.
이렇게 하면 몽고 db의 Contact 모델에 name, email, phone이 저장된다.
전체 코드
const asyncHandeler = require("express-async-handler");
const Contact = require("../models/contactModel");

// Get all contacts
// GET /contacts
const getAllContacts = asyncHandeler(async(req,res)=>{
    res.send("Contacts Page");
});

// Create contact
// POST /contacts
const createContact = asyncHandeler(async(req,res)=>{
    console.log(req.body);
    const {name, email, phone} = req.body;
    if(!name || !email || !phone){
        return res.send("필수 값이 입력되지 않았습니다.");
    }
    const contact = await Contact.create({
        name, email, phone
    });
    res.send("Create Contacts");
});

// Get contact
// GET /contacts/:id
const getContact = asyncHandeler(async(req,res)=>{
    res.send(`View Contact for ID: ${req.params.id}`);
})

// Update contact
// PUT /contacts/:id
const updateContact = asyncHandeler(async(req,res)=>{
    res.send(`Update Contact for ID: ${req.params.id}`);
})

// Delete contact
// DELETE /contacts/:id
const deleteContact = asyncHandeler(async(req,res)=>{
    res.send(`Delete Contact for ID: ${req.params.id}`);
})

module.exports = {
    getAllContacts,
    createContact,
    getContact,
    updateContact,
    deleteContact
};
이제 thunder client를 통해 실행해보자.
POST를 요청하도록 설정 후 req.body에서 입력받을 것이기 때문에 body, json에서 내용을 작성하자.
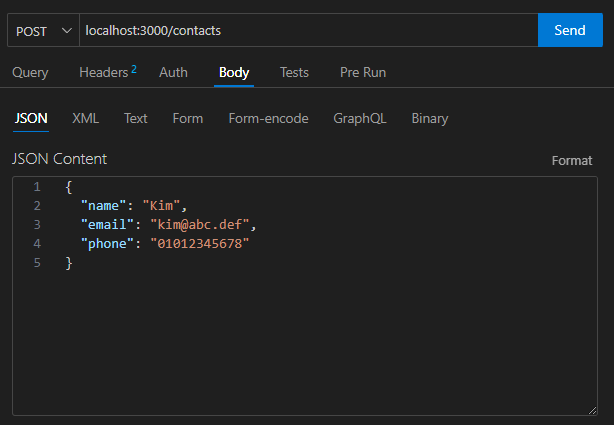
작성 후 send를 누르고 몽고 db로 가보자.
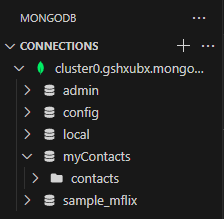
이렇게 myContacts 데이터베이스 안에 contacts가 생성된 것을 확인할 수 있다.
const Contact = mongoose.model("Contact", contactSchema);이는 우리가 이렇게 스키마를 만들 때 모델링을 하며 이름을 Contact라고 주었었는데 이 모델 이름이 db의 컬렉션 이름으로 사용되는 것이다.
모델명은 대문자로 시작하고 단수형으로 쓰이나, 컬렉션이 만들어질 때는 소문자가 되고 뒤에 s가 붙은 복수형이 된다.
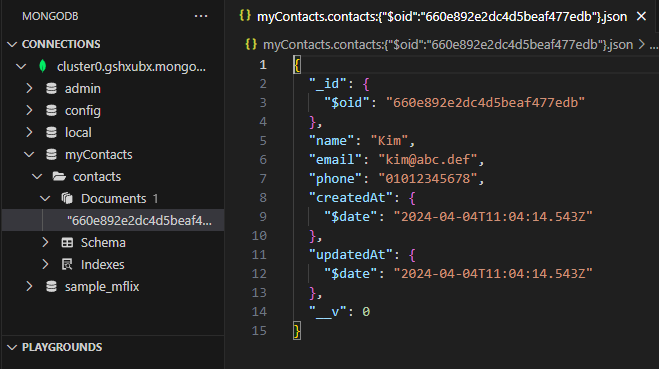
contacts 안의 documents를 눌러보면 방금 우리가 요청 본문에 넣었던 json 파일이 저장된 것을 확인할 수 있다.
name, email, phone 그리고 우리가 이전에 스키마를 정의할 때 넣었던 timestamps에 의해 만들어진 날짜와 시간이 함께 들어간 것이 보인다.
이제 body 부분에 자료를 몇 개 더 넣어줘보자.
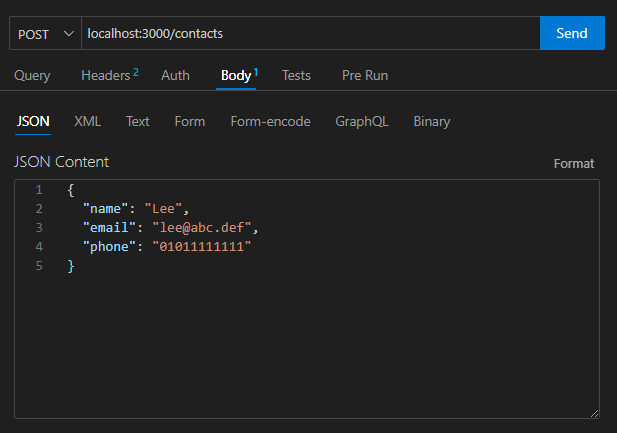

그 후 myContacts 부분을 우클릭하고 [Refresh] 하자.
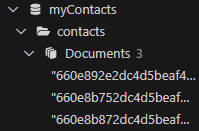
documents 안에 입력한 여러 자료가 들어간 것을 확인할 수 있다.
이제 자료가 채워졌으니 controller 파일을 채워보자.
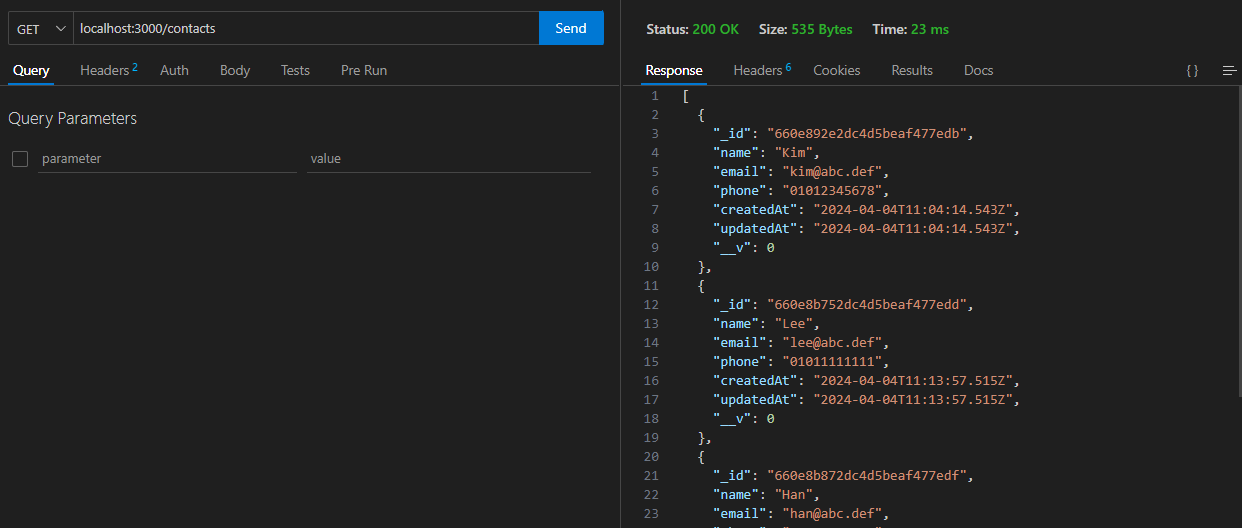
getAllContacts : 모든 자료 가져오는 부분
const getAllContacts = asyncHandeler(async(req,res)=>{
    const contacts = await Contact.find();
    res.send(contacts);
});
find 함수 사용하고 안에 아무런 조건을 주지 않으면 모든 자료를 가져온다.
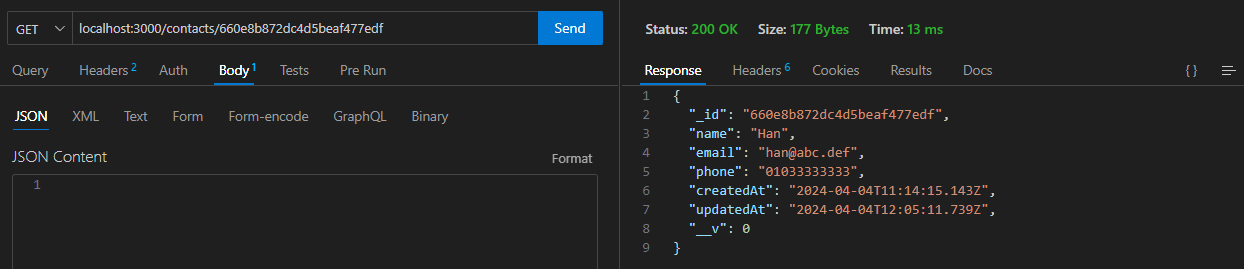
getContact : id 값에 따라 해당 연락처 하나만 가져오는 부분
const getContact = asyncHandeler(async(req,res)=>{
    const contact = await Contact.findById(req.params.id);
    res.send(contact);
})
findById를 통해 요청 본문의 id 패러미터 값을 가져와서 id 값을 기준으로 자료를 찾는다.
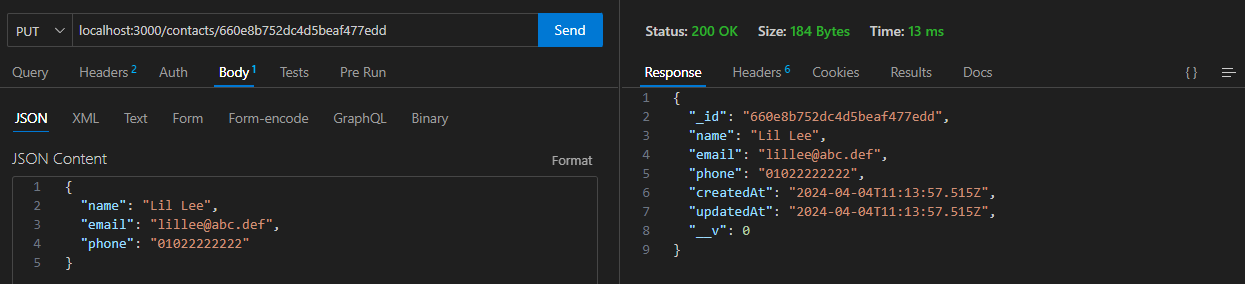
updateContact : 몽고db의 자료 수정
const updateContact = asyncHandeler(async(req,res)=>{
    const id = req.params.id;
    const {name, email, phone} = req.body;
    const contact = await Contact.findById(id);
    if (!contact){
        throw new Error("Contact not found.");
    }

    contact.name = name;
    contact.email = email;
    contact.phone = phone;

    contact.save();

    res.json(contact);
})- id 값을 가져와 그에 해당하는 연락처를 찾고, 요청 본문에 입력한 새 내용으로 교체해주면 된다.
- Contact에서 findById 함수를 이용해 요청 본문의 id값과 같은 연락처를 찾고 그걸 contact 변수에 할당한다.
- 만일 id값에 해당하는 contact가 없으면 에러 메세지를 보낼 것이다.
- 연락처를 찾았다면 요청 본문에서 가져온 값을 기존 값에 넣어준다.
- 그 후 수정한 내용을 db에 저장하려면 save 함수를 사용해야 한다.
- 마지막으로 화면에 결과를 표시하겠다.
deleteContact
위와 같은 방법으로 하면 된다.
const deleteContact = asyncHandeler(async(req,res)=>{
    const id = req.params.id;

    const contact = await Contact.findById(id);
    if (!contact){
        throw new Error("Contact not found.");
    }
    // 여기까진 update와 거의 동일

    await Contact.deleteOne();
    res.send("Deleted");
})
해당 id를 찾으면 deleteOne이란 함수를 통해 삭제해준다.
contactController.js 수정한 전체 코드
const asyncHandeler = require("express-async-handler");
const Contact = require("../models/contactModel");

// Get all contacts
// GET /contacts
const getAllContacts = asyncHandeler(async(req,res)=>{
    const contacts = await Contact.find();
    res.send(contacts);
});

// Create contact
// POST /contacts
const createContact = asyncHandeler(async(req,res)=>{
    console.log(req.body);
    const {name, email, phone} = req.body;
    if(!name || !email || !phone){
        return res.send("필수 값이 입력되지 않았습니다.");
    }
    const contact = await Contact.create({
        name, email, phone
    });
    res.send("Create Contacts");
});

// Get contact
// GET /contacts/:id
const getContact = asyncHandeler(async(req,res)=>{
    const contact = await Contact.findById(req.params.id);
    res.send(contact);
})

// Update contact
// PUT /contacts/:id
const updateContact = asyncHandeler(async(req,res)=>{
    const id = req.params.id;
    const {name, email, phone} = req.body;
    const contact = await Contact.findById(id);
    if (!contact){
        throw new Error("Contact not found.");
    }

    contact.name = name;
    contact.email = email;
    contact.phone = phone;

    contact.save();

    res.json(contact);
})

// Delete contact
// DELETE /contacts/:id
const deleteContact = asyncHandeler(async(req,res)=>{
    const id = req.params.id;

    const contact = await Contact.findById(id);
    if (!contact){
        throw new Error("Contact not found.");
    }
    // 여기까진 update와 거의 동일

    await Contact.deleteOne();
    res.send("Deleted");
})

module.exports = {
    getAllContacts,
    createContact,
    getContact,
    updateContact,
    deleteContact
};
이제 몽고 db에서 제대로 동작하는지 테스트해 보자.
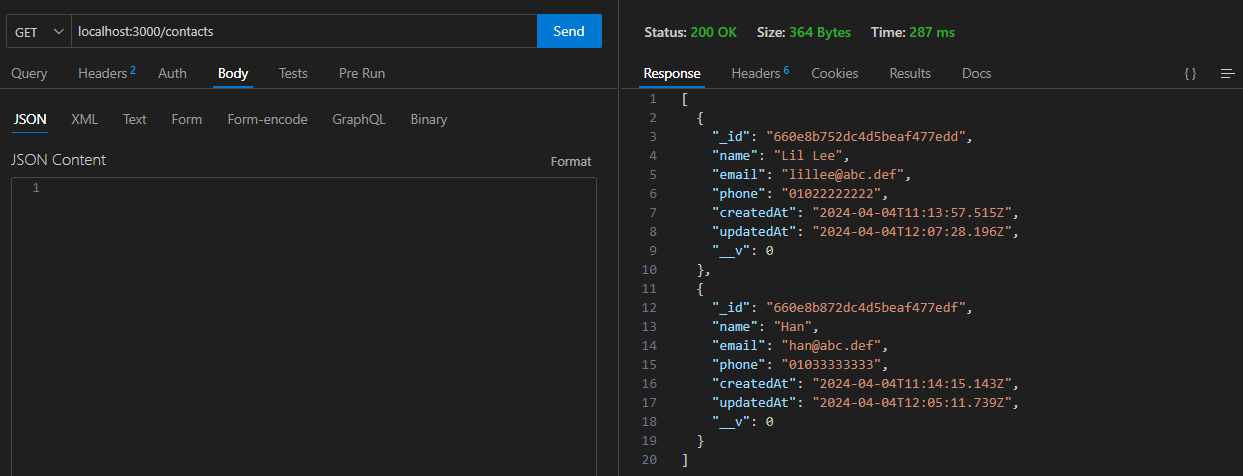
GET : 모든 연락처를 가져와보자.
GET : 특정 id에 해당하는 연락처를 가져와보자.
도큐먼트에서 id 부분을 복사하자.
PUT : 수정(업데이트)해보자.
DELETE : 삭제해보자.

잘 삭제된것을 확인할 수 있다.
문제 해결
라우터 코드를 수정하지 않으면 예상과 다른 결과가 나온다. 꼭 개인적으로 수정하자.
const express = require("express");
const router = express.Router();
const {getAllContacts, createContact, getContact, updateContact, deleteContact}
= require("../controllers/contactController");

router.route("/")
    .get(getAllContacts)
    .post(createContact);

router.route("/:id")
    .get(getContact)
    .put(updateContact)
    .delete(deleteContact);

module.exports = router;