Lifecycle
클래스형 컴포넌트를 공부하면서 가장 중요하다고 생각됐고 실제로 중요한것이 바로 이 Lifecycle이 아닌가싶다.
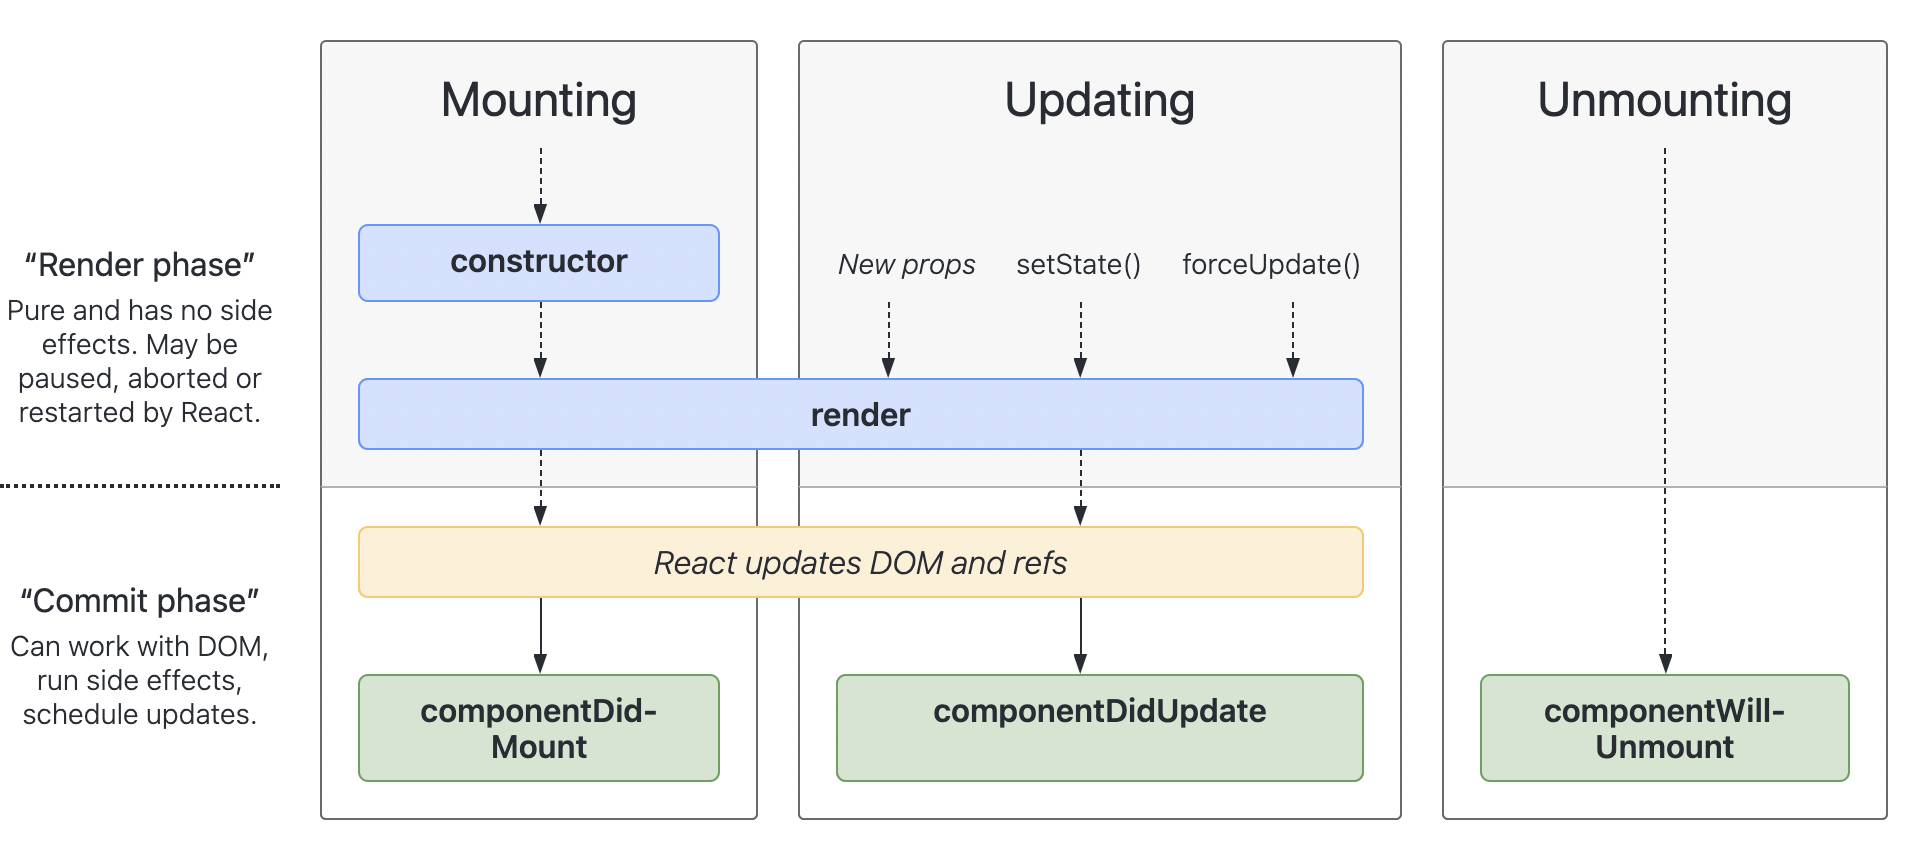
Lifecycle은 단어 그대로 생명주기를 나타내는데, 클래스형 컴포넌트에는 Mount, Update, Unmount에 따라 사용되는 Lifecycle 메서드가 있다. Lifecycle 유형이 아래의 것만 있는게 아닌 덜 일반적인 유형이라는 것도 있는데, 내가 실제로 테스트를 통해 이해한 것들만 정리해보았다.
유형
Mount
Constuctor
constructor(props) {
  super(props);
  this.state = {
    value: ""
  };
  this.handleClick = this.handleClick.bind(this);
}constructor는 this.state에 객체를 할당하여 지역 state를 초기화 하거나 인스턴스에 이번트 처리 메서드를 바인딩 한다.
render
render() {
   return (
      <div>안녕하세요</div>
   )
}render는 mount시에만 사용되는 메서드는 아니지만 mount시에도 사용되어서 넣어보았다.
render는 클래스 컴포넌트에서 반드시 선언해야하는 메서드이다. 보통 같은 구조를 하고 있고, 리턴에는 우리가 생성할 구조를 JSX 형태로 return 한다.
componentDidMount
componentDidMount는 컴포넌트가 마운트된 직후 render를 거쳐 바로 호출된다. 가장 적절하게 사용 가능한것은 외부에서 데이터를 불러올때가 아닐까 싶다.
Update
update 시점의 기준은 새로운 props를 받거나 setState를 통해 state의 값이 변경되면 render -> dom update -> componentDidUpdate의 순으로 이루어진다.
componentDidUpdate
componentDidUpdate(prevProps) {
  // 전형적인 사용 사례 (props 비교를 잊지 마세요)
  if (this.props.userID !== prevProps.userID) {
    this.fetchData(this.props.userID);
  }
}componentDidUpdate는 update가 되는 시점에 호출이 된다고 써있듯이 componentDidUpdate에서 state를 조건문으로 감싸지 않고 호출하면 값이 변경될때마다 계속 호출이되서 무한 반복이 일어날수도 있다.
여기선 이전과 현재의 props를 비교해서 네트워크 요청을 보내는 작업같은것을 하면 좋다.
Unmount
componentWillUnmount
componentWillUnmount는 컴포넌트가 마운트 해제되어 제거되기 직전에 호출된다. 여기서는 clearTimeout, 네트워크 요청 취소, componentDidMount 내에서 생성된 구독 해제 등 필요한 모든 정리 작업을 수행하면 된다.
참고로 마운트가 해제되고 나면 절대로 다시 마운트 되지 않는다
직접 코드로 이해해본 Lifecycle
import React from 'react';

class App extends React.Component {
  constructor() {
    super();
    this.state = {
      inputValue: 'default',
    };
    console.log(`Constructor: ${this.state.inputValue}`);
  }

  componentDidMount() {
    console.log(`componentDidMount: ${this.state.inputValue}`);
  }

  componentDidUpdate() {
    console.log(`componentDidUpdate: ${this.state.inputValue}`);
  }

  onChange = (e) => {
    this.setState({
      [e.target.name]: e.target.value,
    });
  };

  render() {
    console.log(`render: ${this.state.inputValue}`);
    return (
      <div>
        <input
          type="text"
          name="inputValue"
          value={this.state.inputValue}
          onChange={this.onChange}
        />
      </div>
    );
  }
}

export default App;
위 움짤의 순서처럼 처음 새로고침을 하고 Mount가 일어나는 시점에 Constructor, render, componentDidMount순으로 호출이 되고, input의 값을 바꾸는 시점에 state값이 변화하면서 update가 일어나 render, componentDidUpdate가 호출된다.
책과 글로봤을땐 너무 막연했는데, 간단한 코드라도 짜면서 해보니까 이해가 되서 역시 줄줄 읽는거보다는 실습이 최고인것 같다.
출처
https://ko.reactjs.org/docs/react-component.html#constructor
https://projects.wojtekmaj.pl/react-lifecycle-methods-diagram/