Table of Contents
1. ref는 어떤 상황에서 사용해야 할까?
2. ref 사용
3. 컴포넌트에 ref 달기
⚠️ 이 장에서는 Hook 없이 Class 형 Component 에서 ref를 쓰는 법만 소개한다.
0. ref 란?
리액트 프로젝트 내부에서 DOM에 이름을 다는 방법 (similar to id in HTML)
리액트 내에서 id 사용을 지양해야 하는 이유
JSX 내에서 DOM 에 id를 달면 해당 DOM을 렌더링할 때 그대로 전달된다. 하지만 특수한 경우가 아니면 사용을 권장하지 않는다. 예를 들어 같은 컴포넌트를 여러 번 사용한다고 가정 했을 때 HTML에서 DOM의 id는 unique해야 하는데, 이런 상황에서는 중복 id를 가진 DOM이 여러개 생긴다.
id는 전역적으로 작동하는 반면 ref는 전역적으로 작동하지 않고 컴포넌트 내부에서만 작동하기 때문에 이런 문제가 생기지 않는다.
대부분은 id를 사용하지 않고도 원하는 기능을 구현할 수 있지만, 다른 라이브러리나 프레임워크를 함께 id를 사용해야 하는 상황이 발생할 수 있음. 이런 상황에서는 컴포넌트를 만들 때마다 id 뒷부분에 추가 텍스트를 붙혀서 (e.g. button01) 중복 id가 발생하는 것을 방지해야 함.
1. ref는 어떤 상황에서 사용해야 할까?
A: DOM을 꼭 직접적으로 건드려야 할 때
리액트에서 대부분의 작업은 굳이 DOM에 접근하지 않아도 state로 구현할 수 있다. 그런데 아주 가끔 state만으로 해결할 수 없는 기능이 있다. 예시로
- 특정 input에 포커스 주기
- 스크롤 박스 조작하기
- canvas 요소에 그림 그리기
등이 있는데 이를 위해 ref 를 사용한다.
2. ref 사용
A. 콜백 함수를 통한 ref 설정
<input ref={(ref) => {this.myinput=ref}} />기본 사용 방법: 콜백 함수
1. ref를 달고자 하는 요소에 ref라는 콜백 함수를 props로 전달.
2. 이 콜백 함수는 ref값을 parameter로 전달받는다.
3. 그리고 함수 내부에서 파라미터로 받은 ref를 컴포넌트의 맴버 변수로 설정
4. this.myinput은 input element의 DOM을 가리킨다.
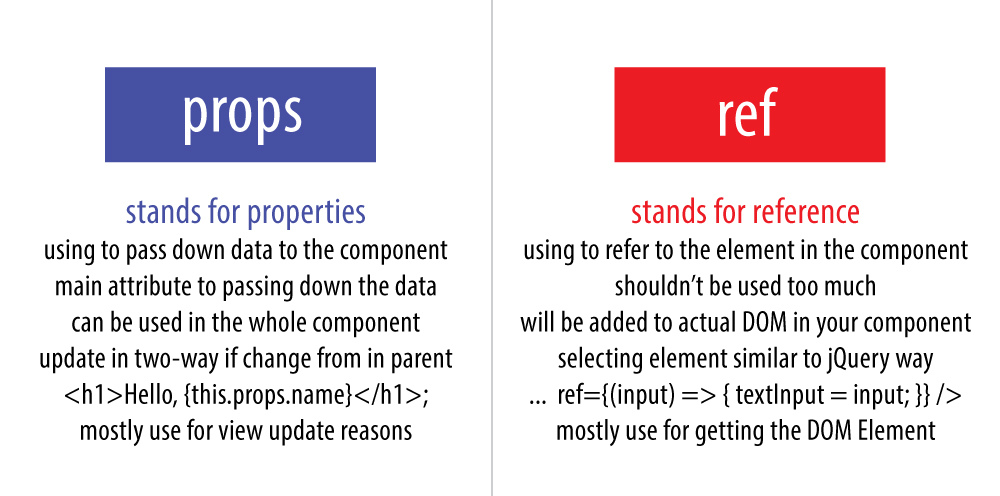
RECALL: props
<MyComponent age={13}>리액트</MyComponent>
B. createRef 를 통한 ref 설정
class ValidationSample extends Component {
	pupu = React.createRef();

	handleButtonClick = () => {
      this.pupu.current.focus();
	}
    render() {
      return (
        <div>
          <input
            ref={this.pupu}/>
        </div>
      )
    }
}
export default ValidationSample;
3. 컴포넌트에 ref 달기
사용법
<MyComponent ref={(ref) => (this.scrollBox = ref)} />이렇게 하면 MyComponent 의
- member function
- member variable
에 접근이 가능하다.
e.g.) myComponent (instance of MyComponent class), handleClick (member function of MyComponent class), myComponent.input (member variable of MyComponent class)
⚠️ 아래 예시에서 App component 를 class형이 아닌 function형 으로 만들면 오류가 난다.
// App.js
import logo from "./logo.svg";
import "./App.css";
import ScrollBox from "./ScrollBox";
import { Component } from "react";

class App extends Component {
  render() {
    return (
      <div>
        <ScrollBox ref={(ref) => (this.scrollBox1 = ref)} /> // 첫 번째 스크롤 박스
        <ScrollBox ref={(ref) => (this.scrollBox2 = ref)} /> // 두 번째 스크롤 박스
        <button onClick={() => this.scrollBox1.scrollToBottom()}> // 첫 번째 스크롤 박스가 맨 아래로 내려감
          TotheBottom
        </button>
      </div>
    );
  }
}
export default App;
// ScrollBox.js
import React, { Component } from "react";
class ScrollBox extends Component {
scrollToBottom = () => {
const { scrollHeight, clientHeight } = this.box;
/* 위 코드는 비구조화 할당 문법을 사용. Equivalent to
const scrollHeight = this.box.scrollHeight;
const clientHeight = this.box.clientHeigth;
*/
this.box.scrollTop = scrollHeight - clientHeight;
};
render() {
const style = {
border: "1px solid black",
height: "300px",
width: "300px",
overflow: "auto",
position: "relative",
};
const innerStyle = {
width: "100%",
height: "650px",
background: "linear-gradient(white, black)",
};
return (
<div
style={style}
ref={(ref) => {
this.box = ref;
}}
> // 최상위 DOM에 ref 달아줌; scrollToBotton 함수 안에서 쓰기 위해
<div style={innerStyle} />
</div>
);
}
}
export default ScrollBox;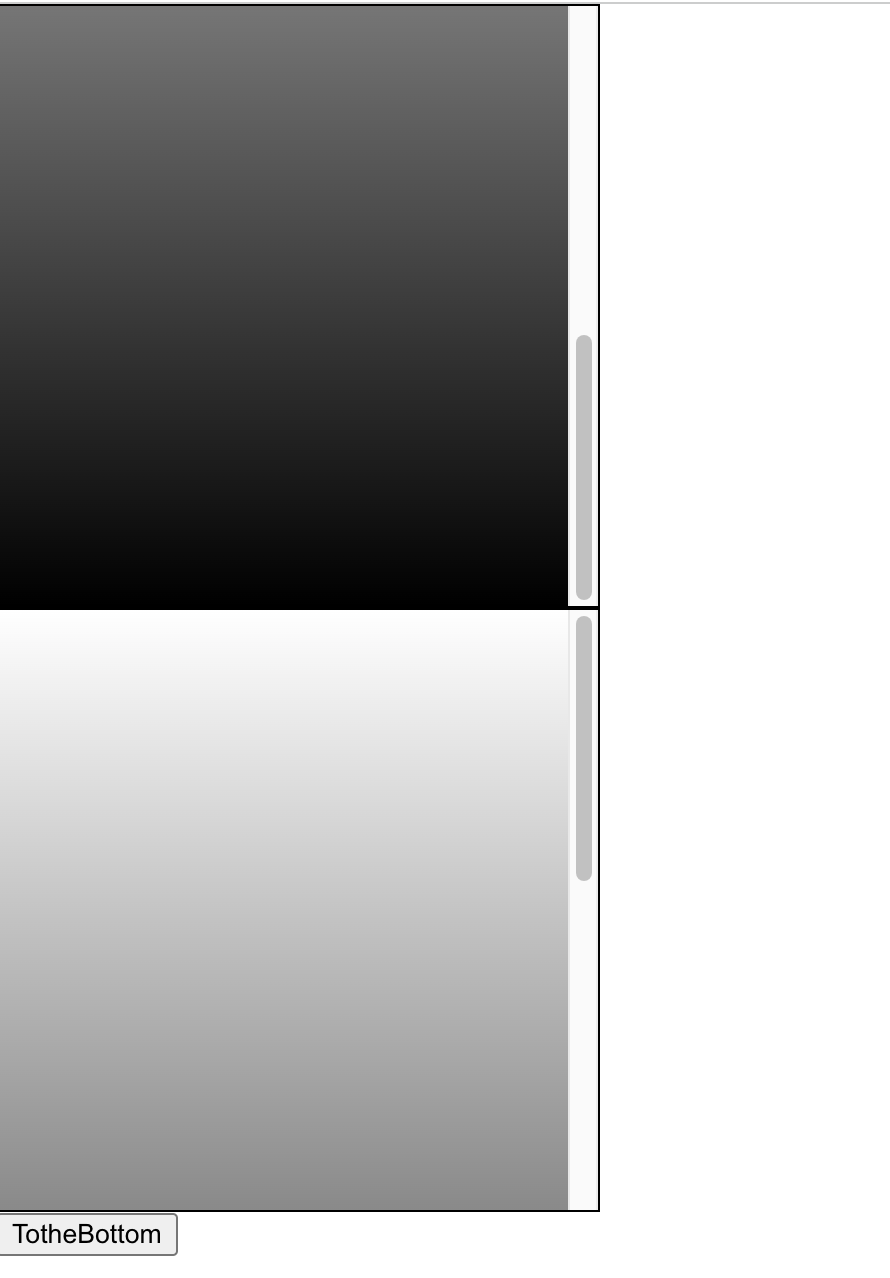
본 후기는 [한글과컴퓨터x한국생산성본부x스나이퍼팩토리] 한컴 AI 아카데미 (B-log) 리뷰로 작성 되었습니다.
#한컴AI아카데미 #AI개발자 #AI개발자교육 #한글과컴퓨터 #한국생산성본부 #스나이퍼팩토리 #부트캠프 #AI전문가양성 #개발자교육 #개발자취업