아래 코드는 react-redux, redux를 typescript를 사용하여 작성하는 간단한 예제이다. Udemy 강의에서 배운내용입니다.
깃헙 코드 : github source
Intro
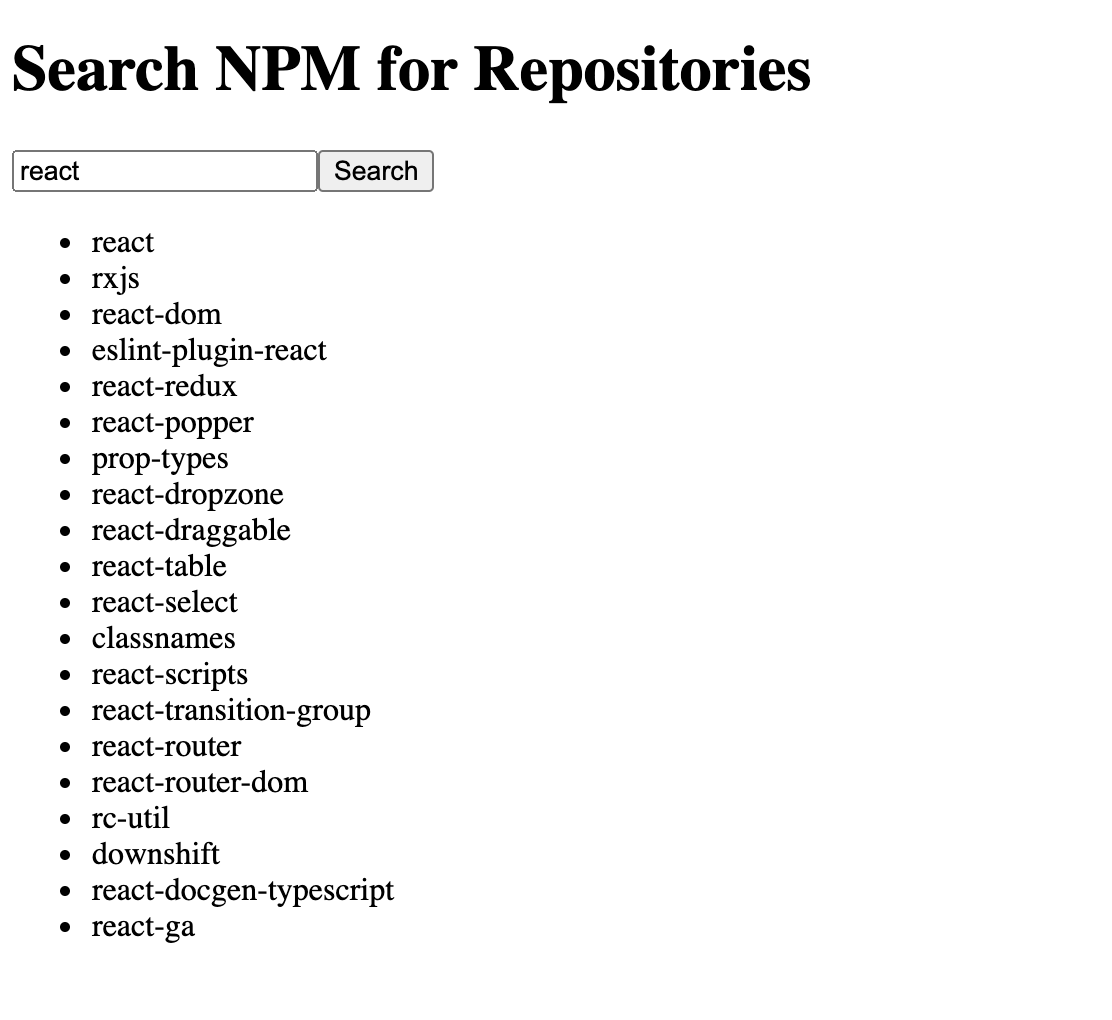
결과 이미지
간단 설명 : 단어검색으로 아래 API를 사용하여 text 파라미터로 조회한 데이터를 보여주는 예제입니다.
GET / https://registry.npmjs.org/-/v1/search?text=redux
디렉토리 구조
// #1. 디렉토리 구조 (tree src -L 1)
src
├── components
├── hooks
├── index.tsx
└── redux

// #2. 디렉토리, 파일 구조 (tree src)
src
├── components
│   ├── App.tsx	// redux Provider 작성
│   └── SearchRepositoriesList.tsx // 화면에 보이는 컴포넌트
├── hooks
│   ├── useActions.ts	// dispatch용도의 custom hooks
│   └── useTypedSelector.ts	// useSelector에 reducer type을 정의한 custom hooks
├── index.tsx	// webpack entry point
└── redux
    ├── action-creators
    │   └── index.ts	// data를 fetching하는 logic 및 dispatch(action) 작성
    ├── action-types
    │   └── index.ts	// action type에 대한 MACRO_CASE을 enum으로 작성
    ├── actions
    │   └── index.ts	// action interface 정의
    ├── index.ts	// re-export 작성 (store, action-creators, reducers)
    ├── reducers
    │   ├── index.ts	// combineReducer, RootState 작성
    │   └── repositoriesReducers.ts	// reducer 작성
    └── store.ts	// redux store
Code
Components
화면에 랜더링하는 컴포넌트들을 여기에 작성한다.
App.tsx
typescript를 특별히 사용하는 곳이 없다.
store 연결만 해준다.
import { Provider } from "react-redux"
import SearchRepositoriesList from "../components/SearchRepositoriesList"
import { store } from "../redux"

const App: React.FC = () => {
  return (
    <Provider store={store}>
      <h1>Search NPM for Repositories</h1>
      <SearchRepositoriesList />
    </Provider>
  );
}

export default App;
SearchRepositoriesList.tsx
화면에 보이는 컴포넌트 (search 역할)
import { useState } from 'react';
import { useActions } from '../hooks/useActions';
import { useAppSelector } from '../hooks/useTypedSelector';

const SearchRepositoriesList: React.FC = () => {
  const [term, setTerm] = useState('');
  const { data, loading, error } = useAppSelector((state) => state.repositories); // type을 붙인 custom useSelector를 사용한다.
  const { searchRepositories } = useActions();
  const onSubmit: React.FormEventHandler<HTMLFormElement> = (e) => {
    e.preventDefault();

    searchRepositories(term); // submit시에 특정 action을 dispatch한다.
  }

  return (
    <div>
      <form onSubmit={onSubmit}>
        <input value={term} onChange={(e) => setTerm(e.target.value)} />
        <button>Search</button>
      </form>
      <ul>{!loading && data.map((name) => <li key={name}>{name}</li>)}</ul>
      {error && <h3>{error}</h3>} // error 테스트는 개발자도구 Network 탭에서 offline으로 설정하여 테스트한다.
    </div>
  );
}

export default SearchRepositoriesList;
hooks
custom hooks를 작성한다.
useActions.ts
bindActionCreators는 action-creators와 dispatch를 연결시켜주는 역할을 한다. 반드시 써야하는 것은 아니지만, 컴포넌트(components/SearchRepositoriesList.tsx)에서 dispatch(action)을 간결하게 사용하기 위해서 사용한다.
import { useDispatch } from "react-redux";
import { bindActionCreators } from "redux";
import { actionCreators } from "../redux";

export const useActions = () => {
  const dispatch = useDispatch();

  return bindActionCreators(actionCreators, dispatch);
}
useTypedSelector.ts
useSelector의 state는 reducer의 내부 구조를 알지 못한다. 그래서 useSelector에 state 타입(여기서는 RootState)이 정의된 custom useSelector를 만들어서 컴포넌트(components/SearchRepositoriesList.tsx)에서 사용한다.
Redux-Docs 내용을 참고하자.
import { useSelector, TypedUseSelectorHook } from "react-redux";
import { RootState } from "../redux";

export const useAppSelector: TypedUseSelectorHook<RootState> = useSelector; // TypedUseSelectorHook은 generic type을 받는다.
위에서 useSelector를 assign하고 TypedUseSelectorHook에 Generic Type을 받는 것은 아래 예시 코드와 비교하면 이해하기 쉽습니다.
// 간단 예시 !!
interface Obj<T> {
    name: T;
}

interface State {
    state: {
        data: string,
        loading: boolean,
    }
}

const obj: Obj<State> = {name: {
    state: {
        data: 'abcd',
        loading: false,
    }
}}
redux
action, action-creators, reducers, action-type-names 에 대해 작성한다.
action-creators/index.ts
실제 데이터 fetch 로직이 들어간 부분이다.
Dipatch<T>로 generic type이다. dispatch되는 action을 정확히 정의해주기 위해서 actions/index.ts에 따로 정의하였다.
import axios, { AxiosError } from "axios";
import { ActionType } from "../action-types";
import { Dispatch } from "redux";
import { Action } from "../actions";

export const searchRepositories = (term: string) => {
  return async (dispatch: Dispatch<Action>) => {
    dispatch({ // 검색 시 (onSubmit에서 처리) 액션
      type: ActionType.SEARCH_REPOSITORIES,
    });

    try {
      const { data } = await axios.get(
        "https://registry.npmjs.org/-/v1/search",
        {
          params: {
            text: term,
          },
        }
      );

      const names = data.objects.map((results: any) => results.package.name);
      dispatch({ // 성공 시 액션
        type: ActionType.SEARCH_REPOSITORIES_SUCCESS,
        payload: names,
      });
    } catch (err: AxiosError | unknown) { // error 타입을 정의한다. 기본적으로 unknown은 추가해야 ts에러가 발생하지 않는다.
      if (axios.isAxiosError(err)) { // type-guard로 axios관련 Error만 처리한다.
        dispatch({ // 실패 시 액션
          type: ActionType.SEARCH_REPOSITORIES_ERROR,
          payload: err.message,
        });
      } else { // 나머지 에러를 처리한다.
        console.log("Not AxiosError");
        console.dir(err);
      }
    }
  };
};
action-types/index.ts
string type은 enum으로 따로 정의해둔다.
  export enum ActionType {
    SEARCH_REPOSITORIES = "search_repositories",
    SEARCH_REPOSITORIES_SUCCESS = "search_repositories_success",
    SEARCH_REPOSITORIES_ERROR = "search_repositories_error",
}
actions/index.ts
사용하는 action들에 대한 타입 정의를 한다.
여기서 정의한 Action은 action-creators에서 Dispatch<Action>으로 들어가게 된다.
import { ActionType } from '../action-types';

interface SearchRepositoriesAction {
  type: ActionType.SEARCH_REPOSITORIES,
}

interface SearchRepositoriesSuccessAction  {
  type: ActionType.SEARCH_REPOSITORIES_SUCCESS,
  payload: string[],
}

interface SearchRepositoriesErrorAction {
  type: ActionType.SEARCH_REPOSITORIES_ERROR,
  payload: string,
}

export type Action =
  | SearchRepositoriesAction
  | SearchRepositoriesSuccessAction
  | SearchRepositoriesErrorAction;
reducers/index.ts
reducer을 모두 combineReducers에 넣어준다.
combineReducers로 만들어진 reducer 타입을 export한다. (RootState는 hooks/useTypedSelector.ts에서 useSelector의 타입 정의에 사용된다.)
import { combineReducers } from "redux";
import repositoriesReducer from "./repositoriesReducers";

const reducers = combineReducers({
  repositories: repositoriesReducer,
})

export type RootState = ReturnType<typeof reducers>;

export default reducers;
reducers/repositoriesReducers.ts
reducer에서 state는 interface와 initial에 대해서 정의하고, action은 interface에 대해서만 정의한다. action의 interface는 union형태로 actions/index.ts에서 정의한다.
import { Action } from '../actions';
import { ActionType } from '../action-types';

interface RepositoriesState {
  loading: boolean,
  error: string | null,
  data: string[],
}

const initialState = {
  loading: false,
  error: null,
  data: [],
}

const reducer = (
  state: RepositoriesState = initialState,
  action: Action
): RepositoriesState => {
  switch (action.type) {
    case ActionType.SEARCH_REPOSITORIES:
      return { loading: true, error: null, data: [] };
    case ActionType.SEARCH_REPOSITORIES_SUCCESS:
      return { loading: false, error: null, data: action.payload };
    case ActionType.SEARCH_REPOSITORIES_ERROR:
      return { loading: false, error: action.payload, data: [] };
    default:
      return state;
  }
};

export default reducer;
index.ts
typescript에서는 re-export를 할 수 있다. 다른 디렉토리에서 사용할 수도 있는 것들은 모두 여기서 다시 export를 해준다.
여기서는 redux 디렉토리내에 있는 것들을 export 한다.
Typescript Docs를 참고하자.
export * from './store';
export * as actionCreators from './action-creators';
export * from './reducers';
store.ts
Typescript를 사용에 특별한 내용은 없다.
import { createStore, applyMiddleware } from 'redux';
import thunk from 'redux-thunk';
import reducers from './reducers';

export const store = createStore(reducers, {}, applyMiddleware(thunk));
index.ts
entry point 이다.
import ReactDOM from "react-dom";
import App from "./components/App";

ReactDOM.render(<App />, document.querySelector("#root"));
Ref
https://www.udemy.com/course/react-and-typescript-build-a-portfolio-project/