프로젝트 생성
iOS - App
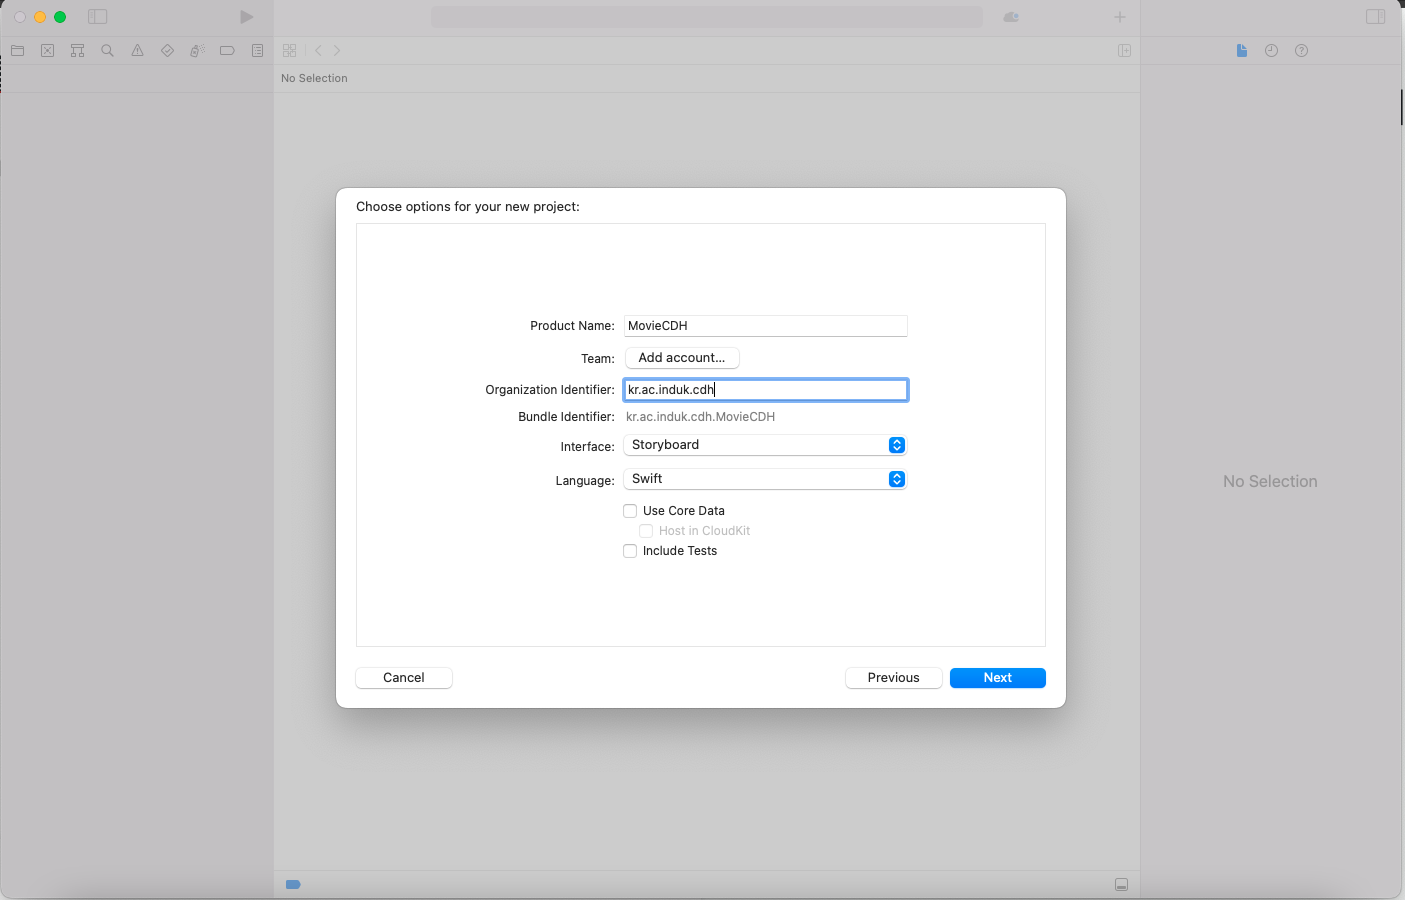
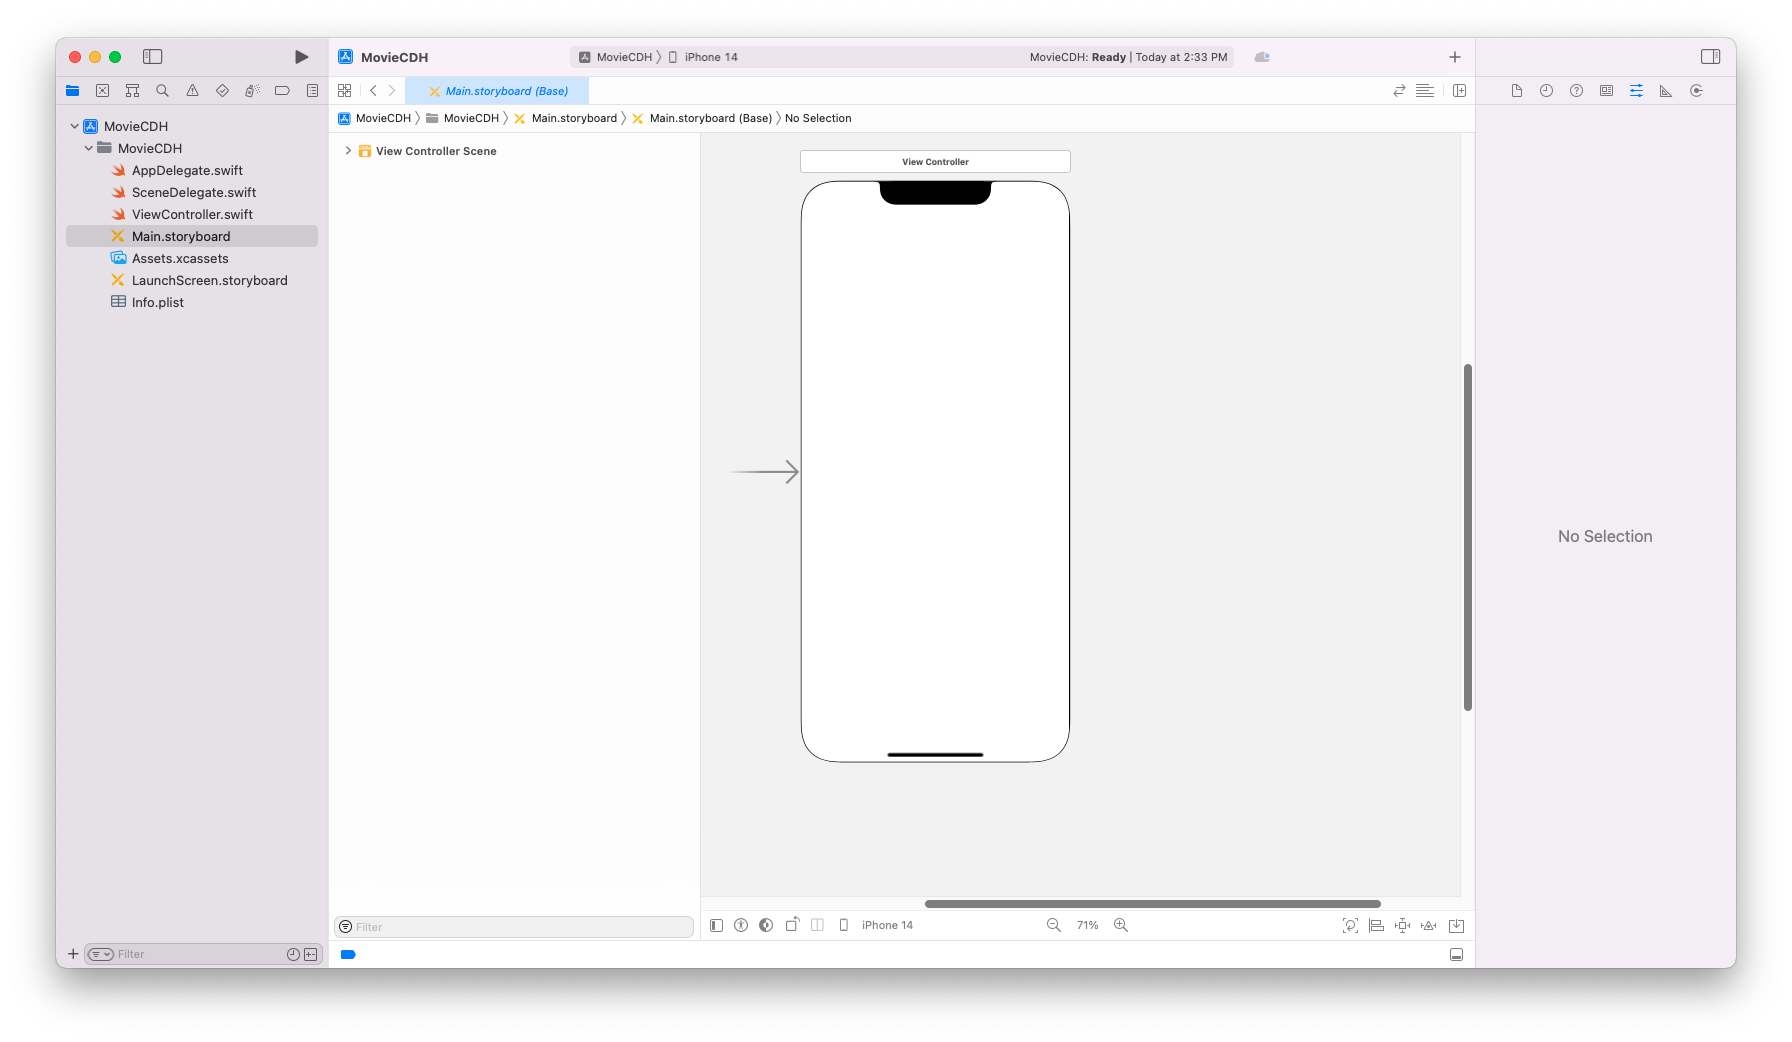
Table View 화면 가득 채우기
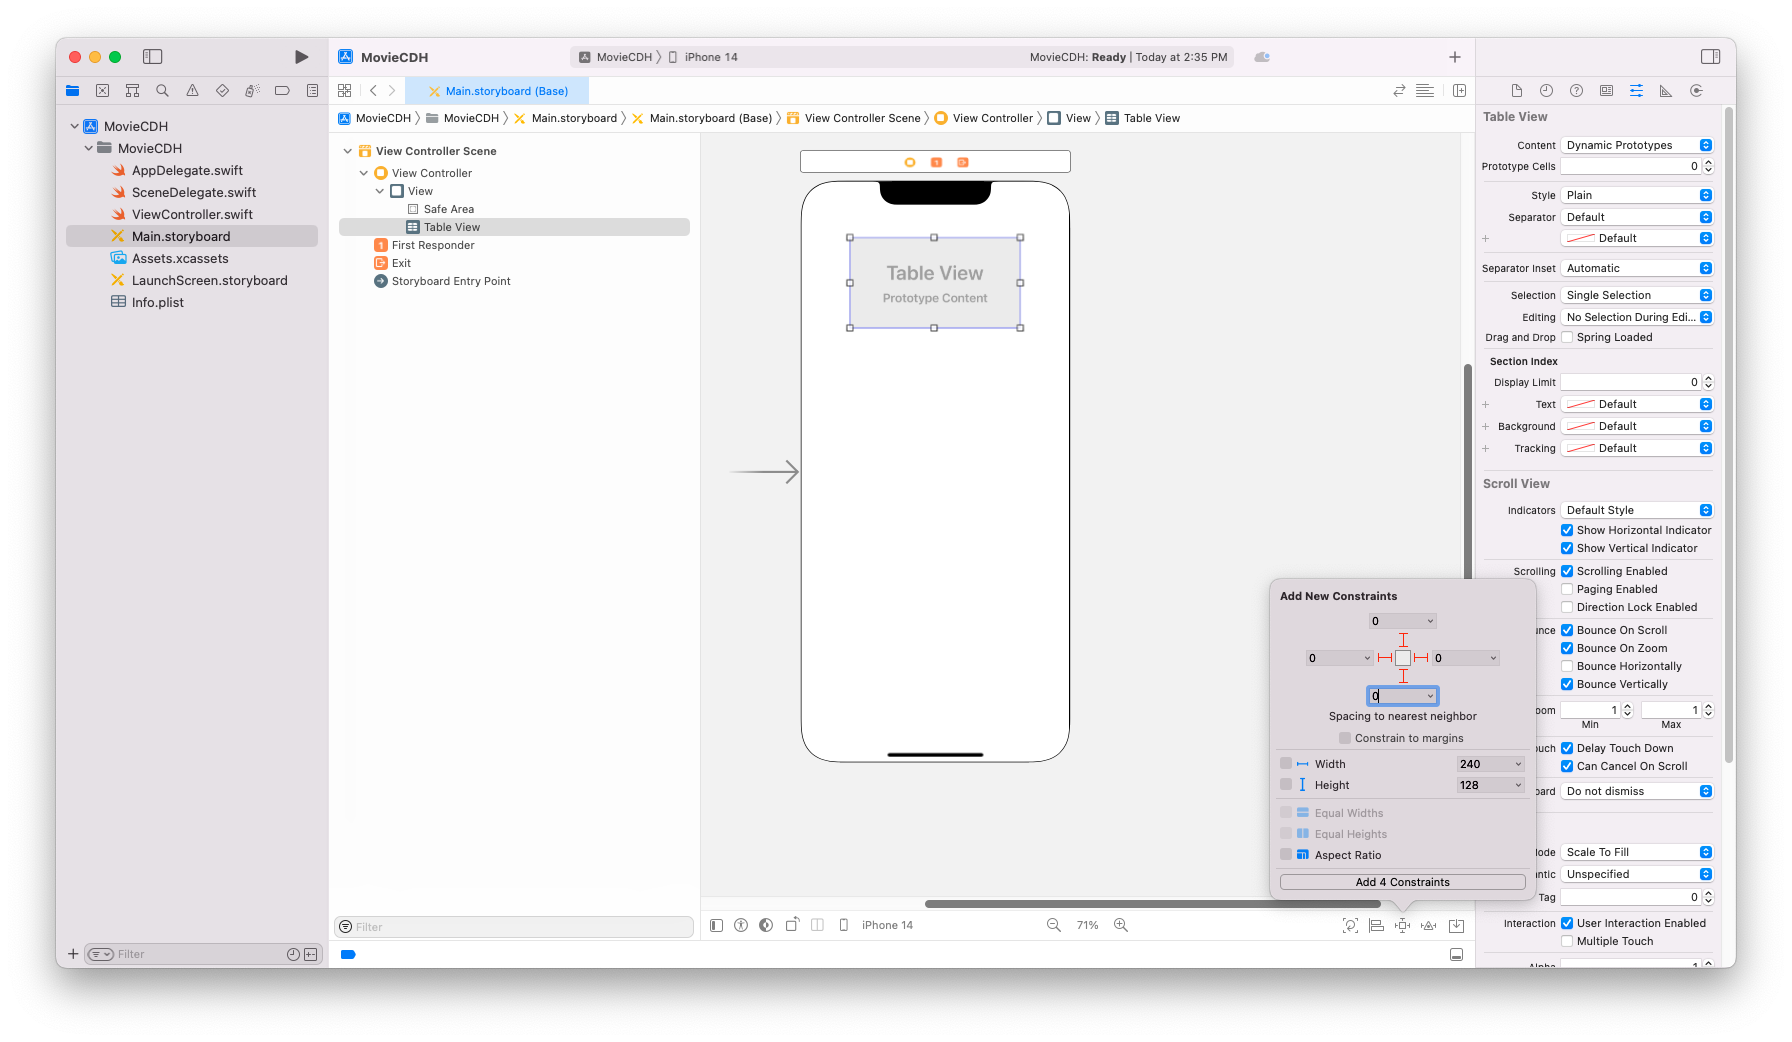
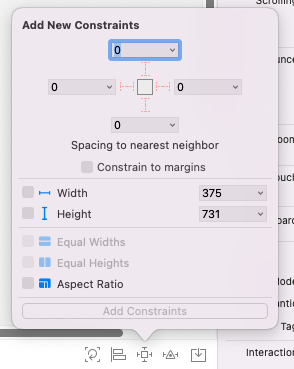
Add New Constraints 의 4면을 0으로 맞춘 후
Constrain to margis를 해제하기
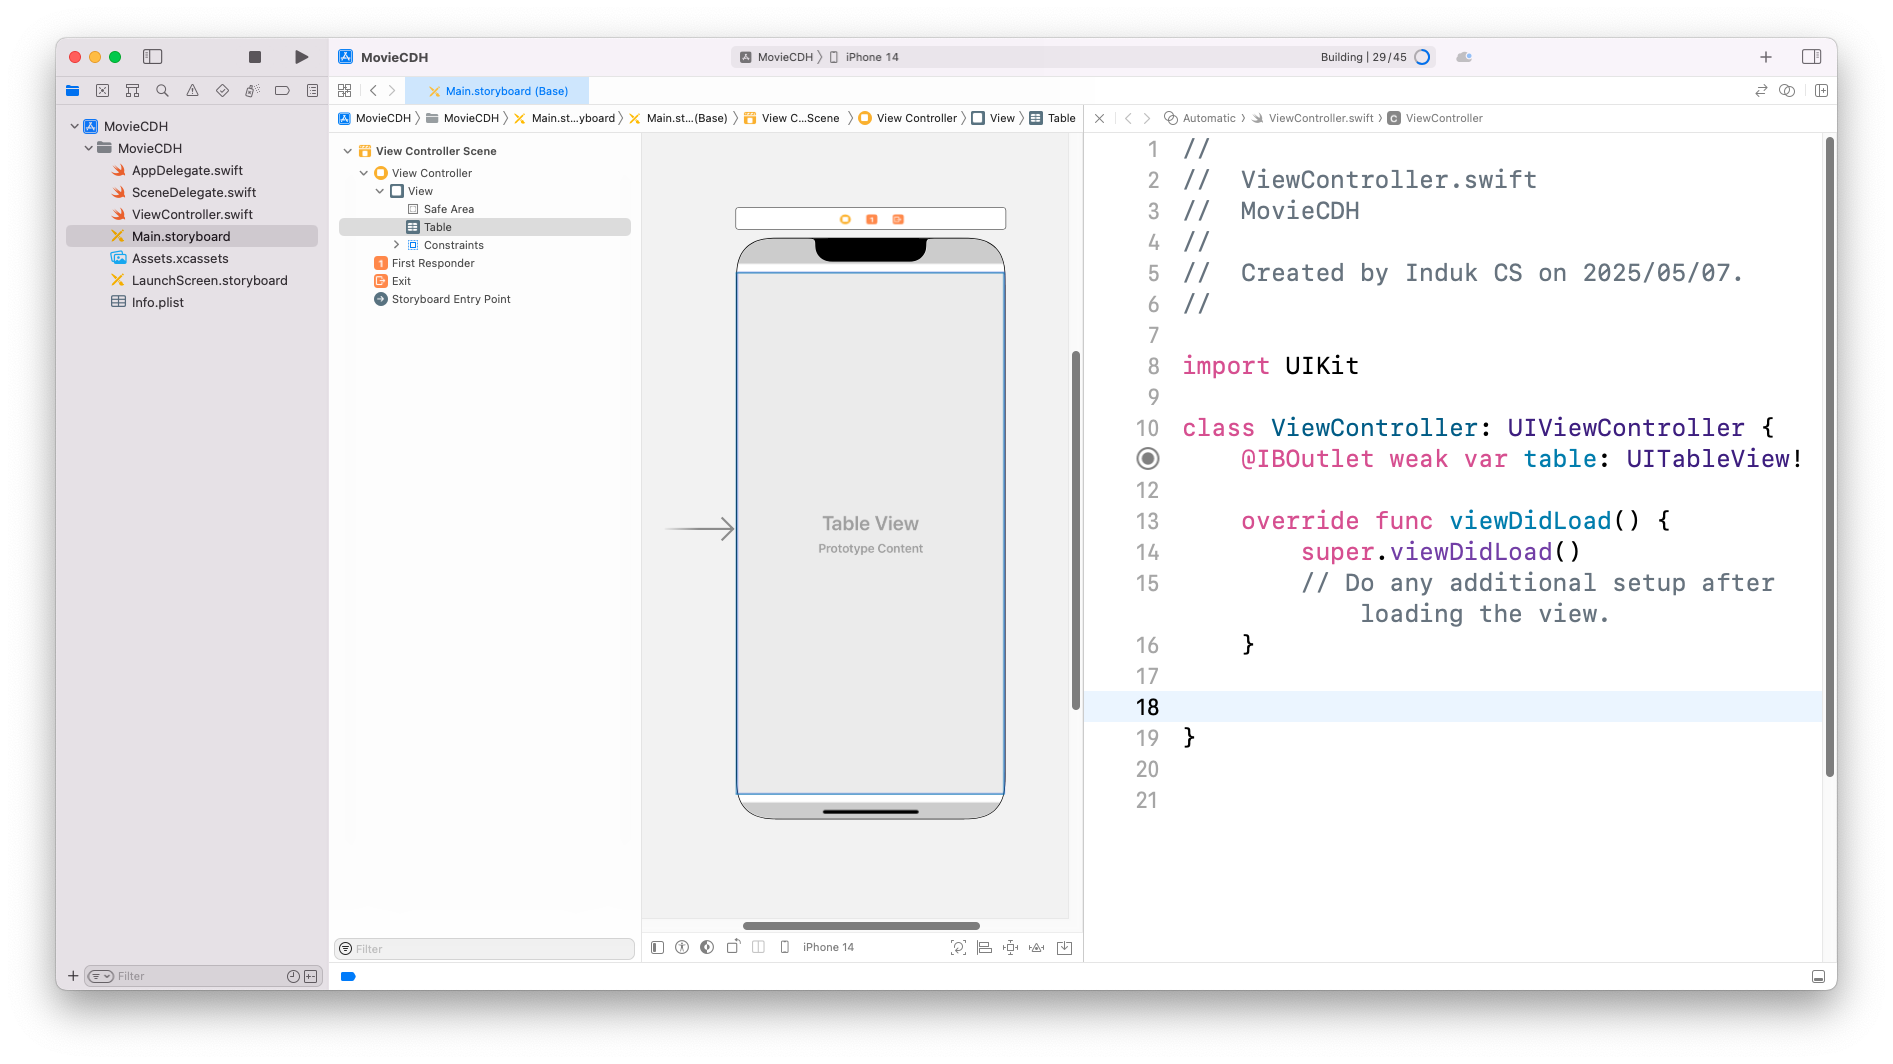
어시스턴트 에디터 켜서 Table View와 연동
DataSource 를 채택하게 되면 두 가지 필수 메서드를 작성해야 한다
- 사진에서는 Fix 사용
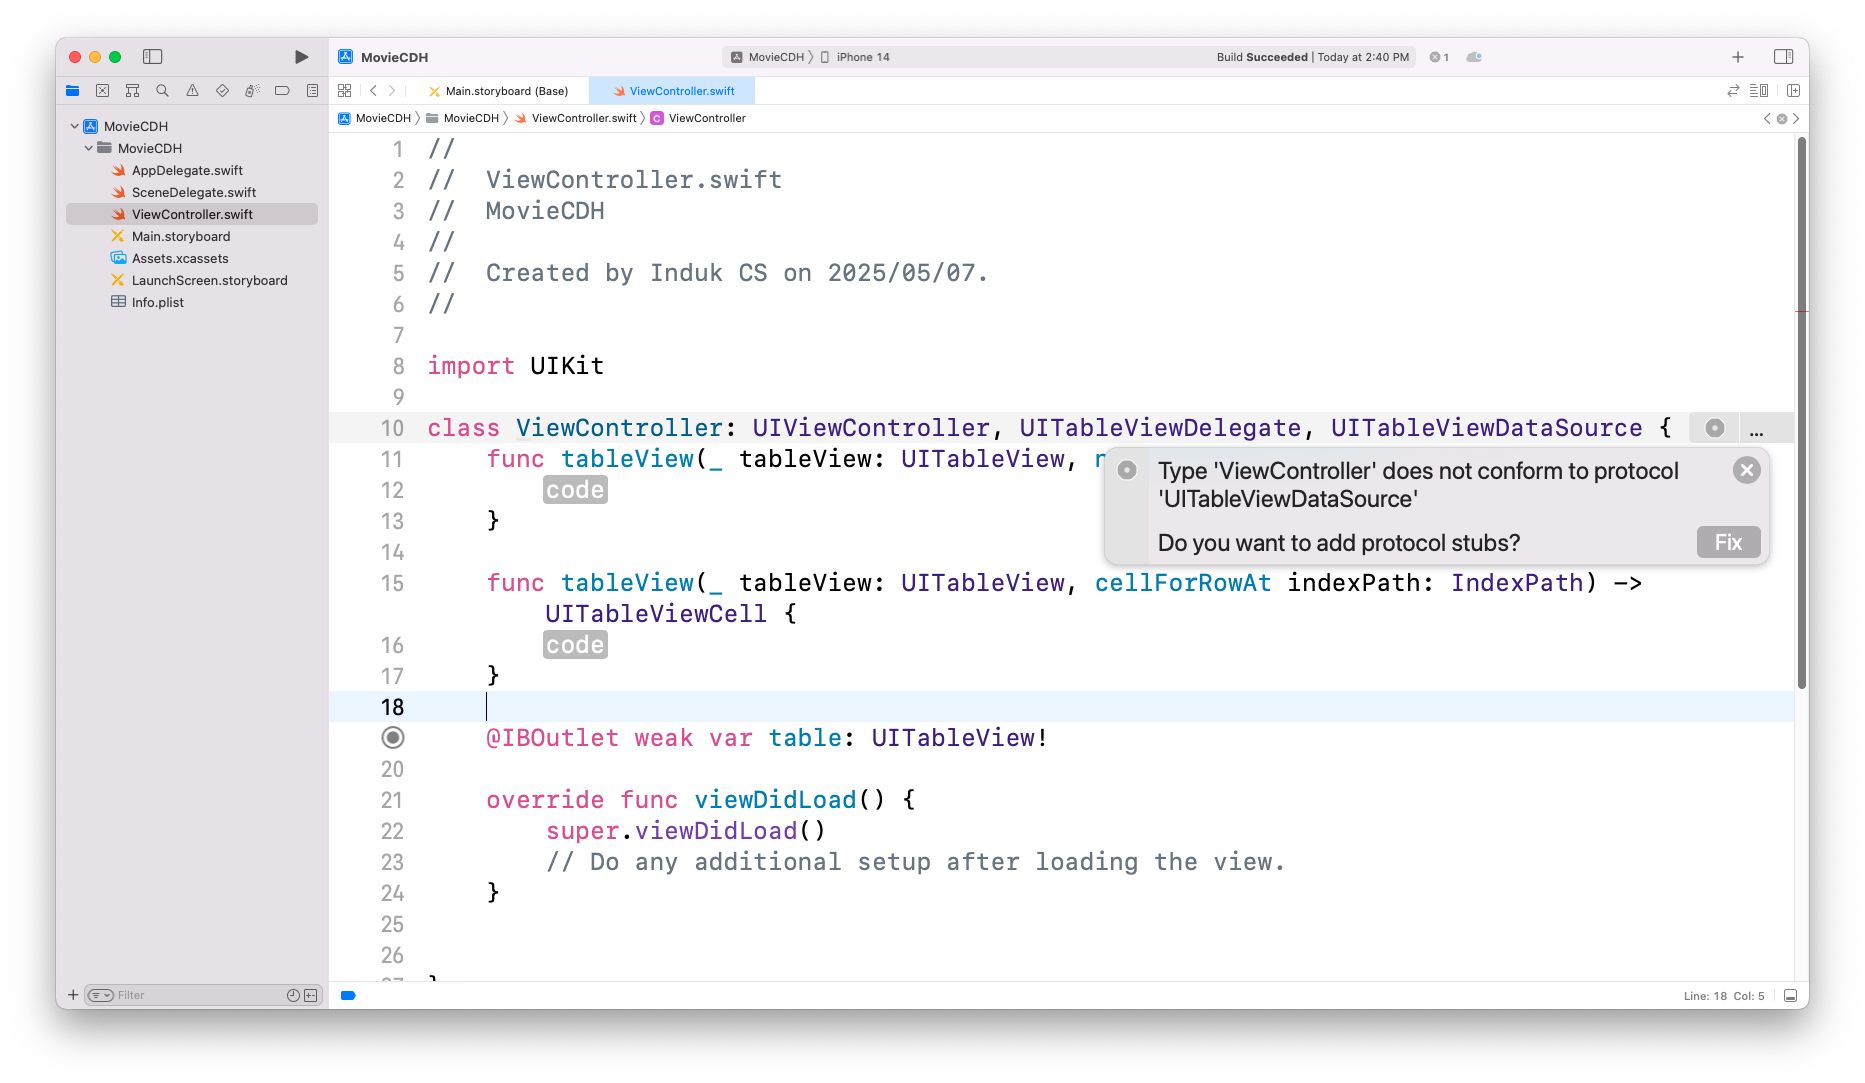
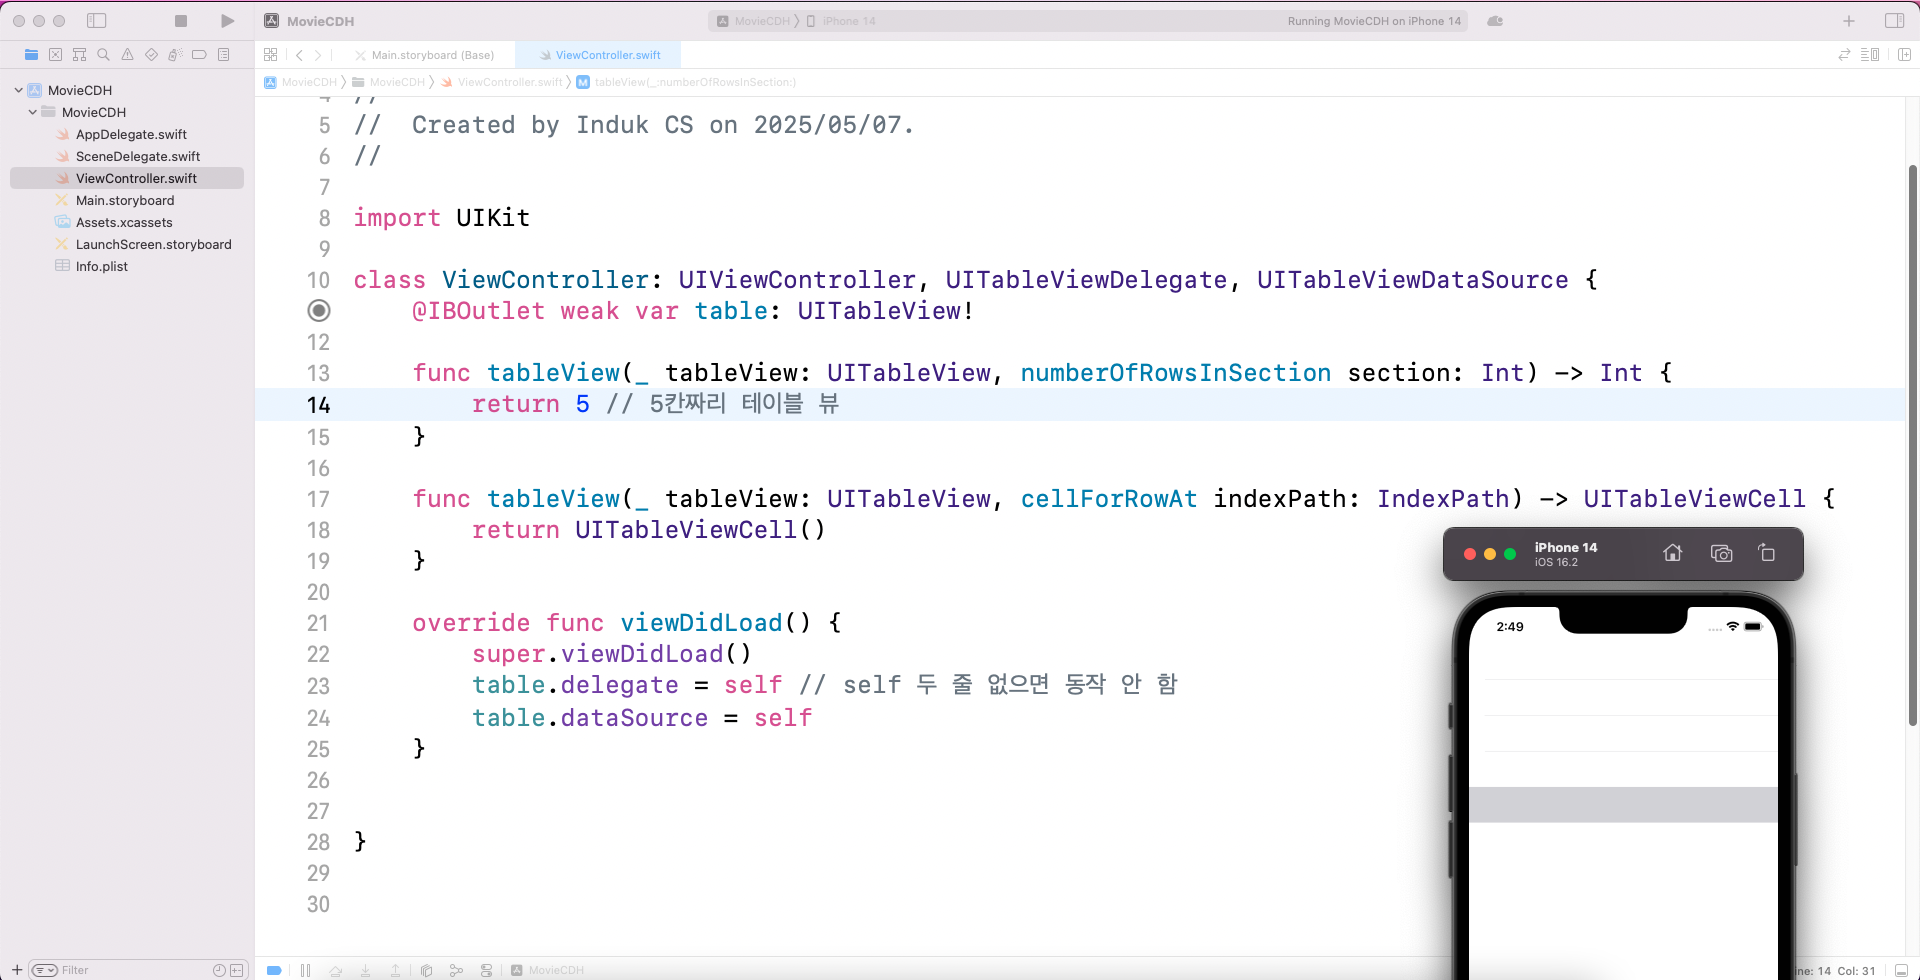
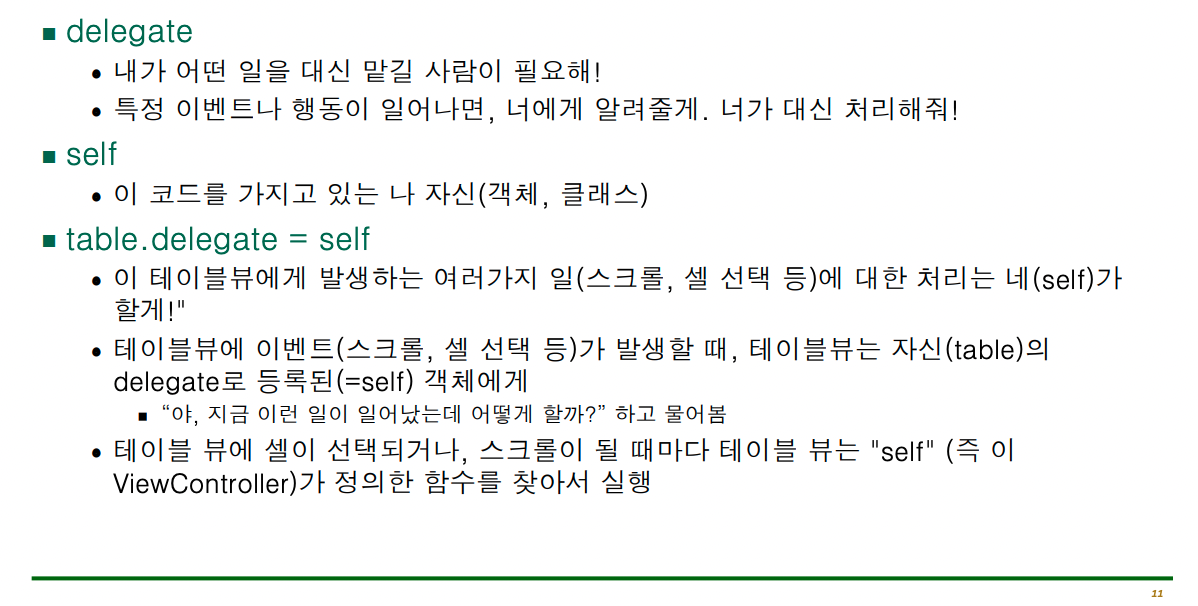
table.delegate = self
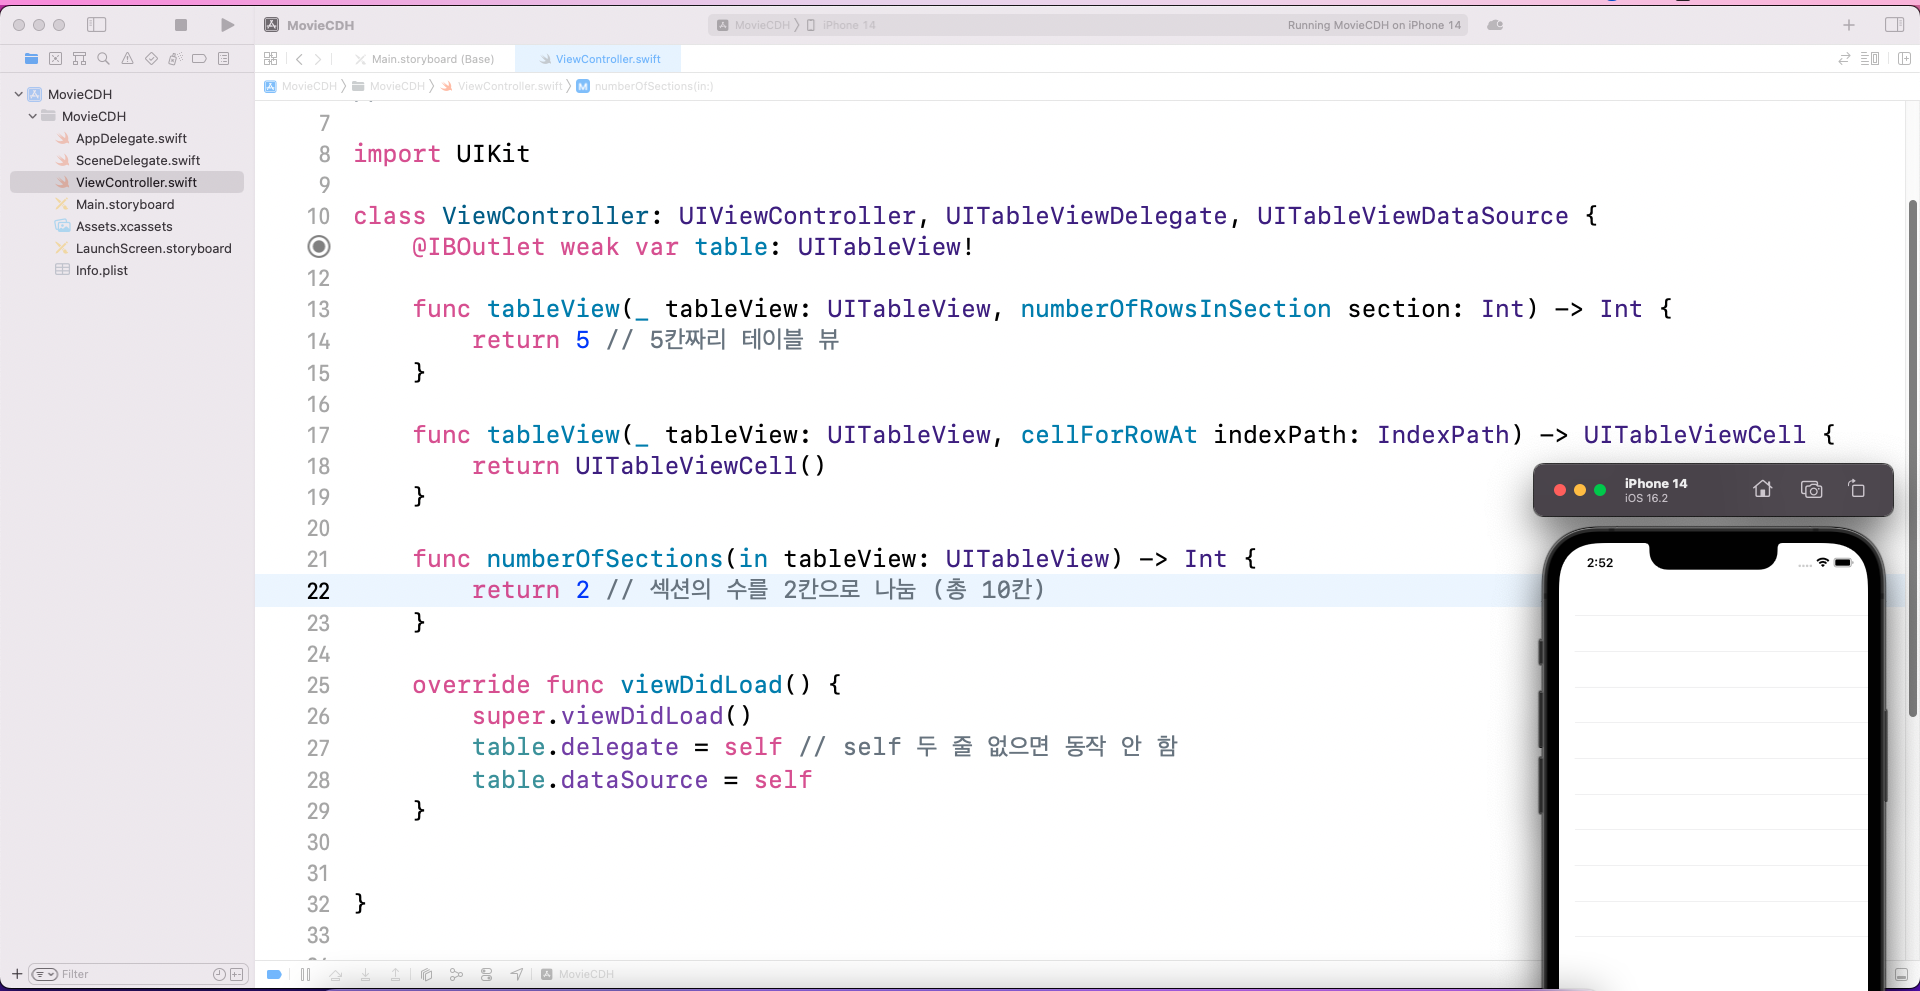
section의 수 지정 : 필수메서드 아님(지정 안 하면 1)
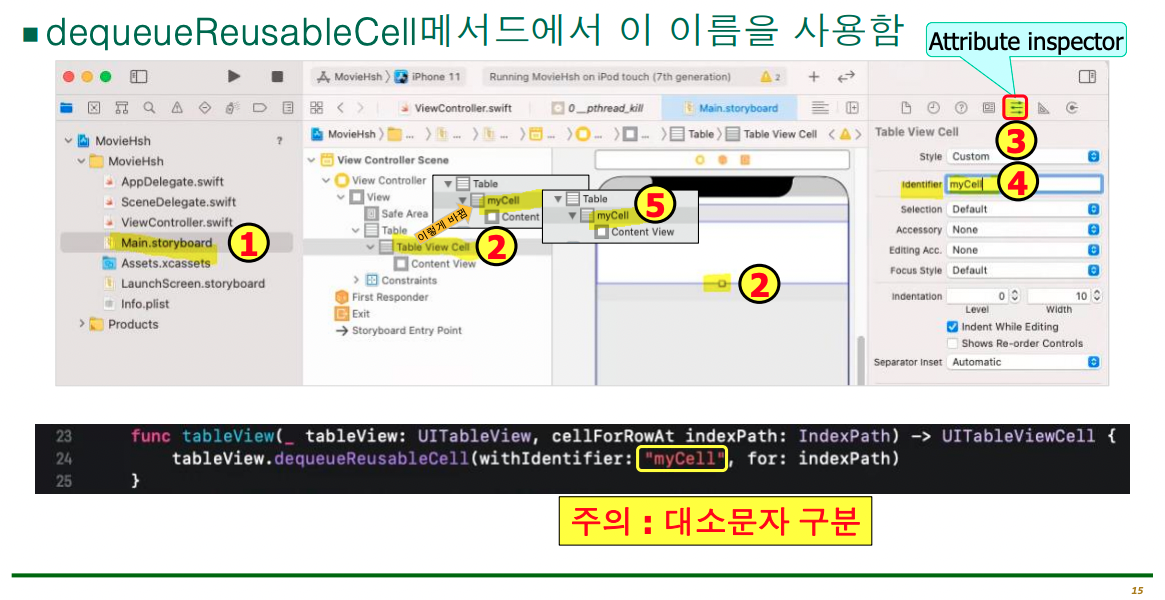
cell을 직접 만들면 identifier 필요: myCell
아래는 실습
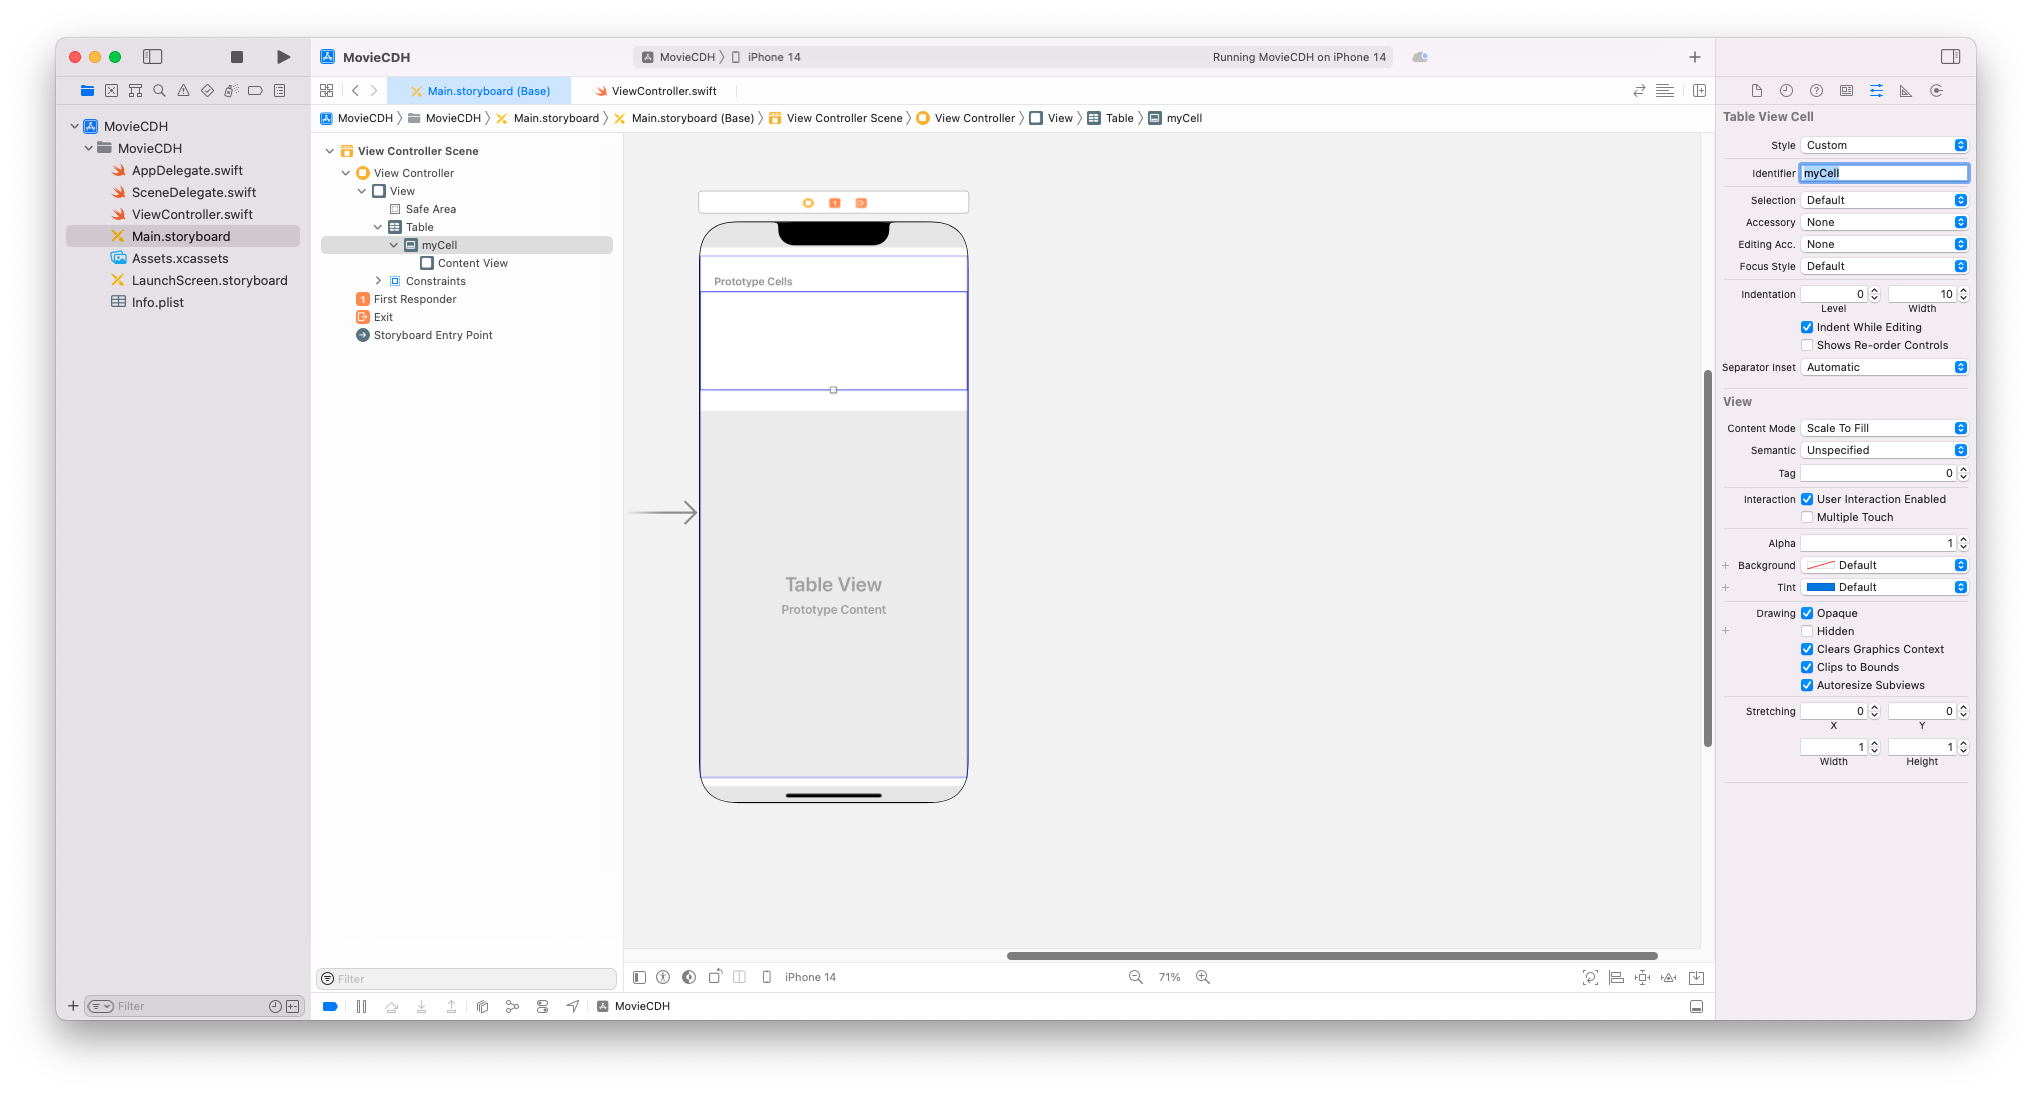
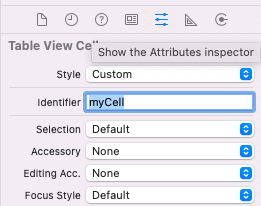
cell을 관리할 MyTableViewCell 클래스 만들기
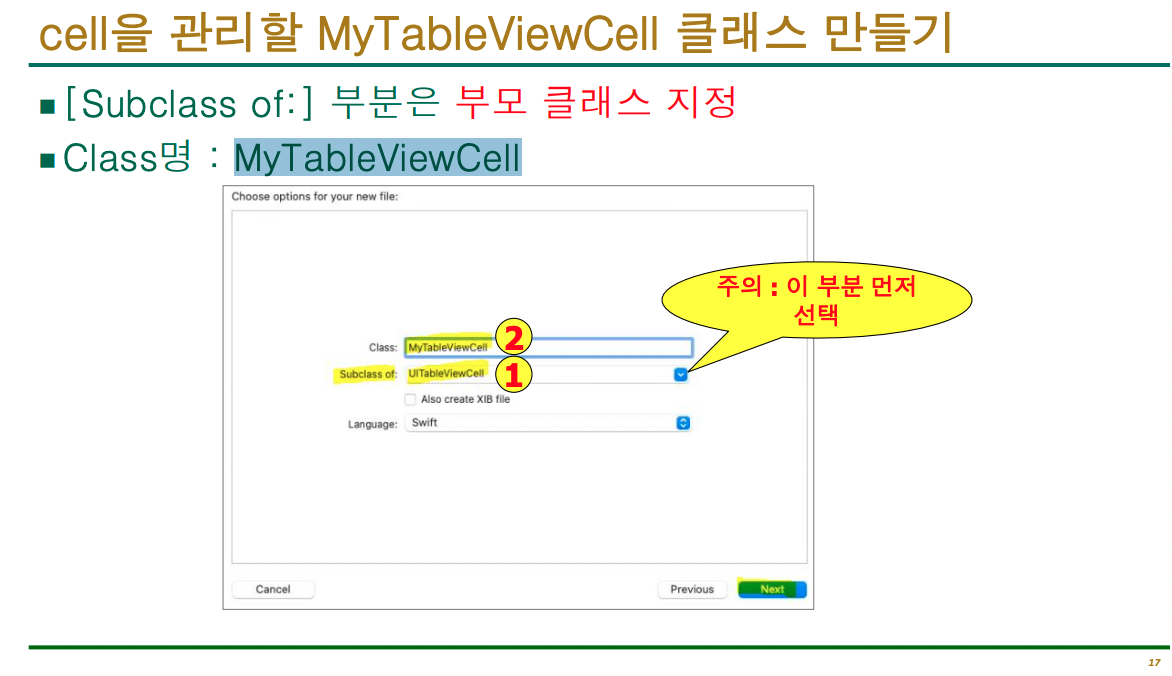
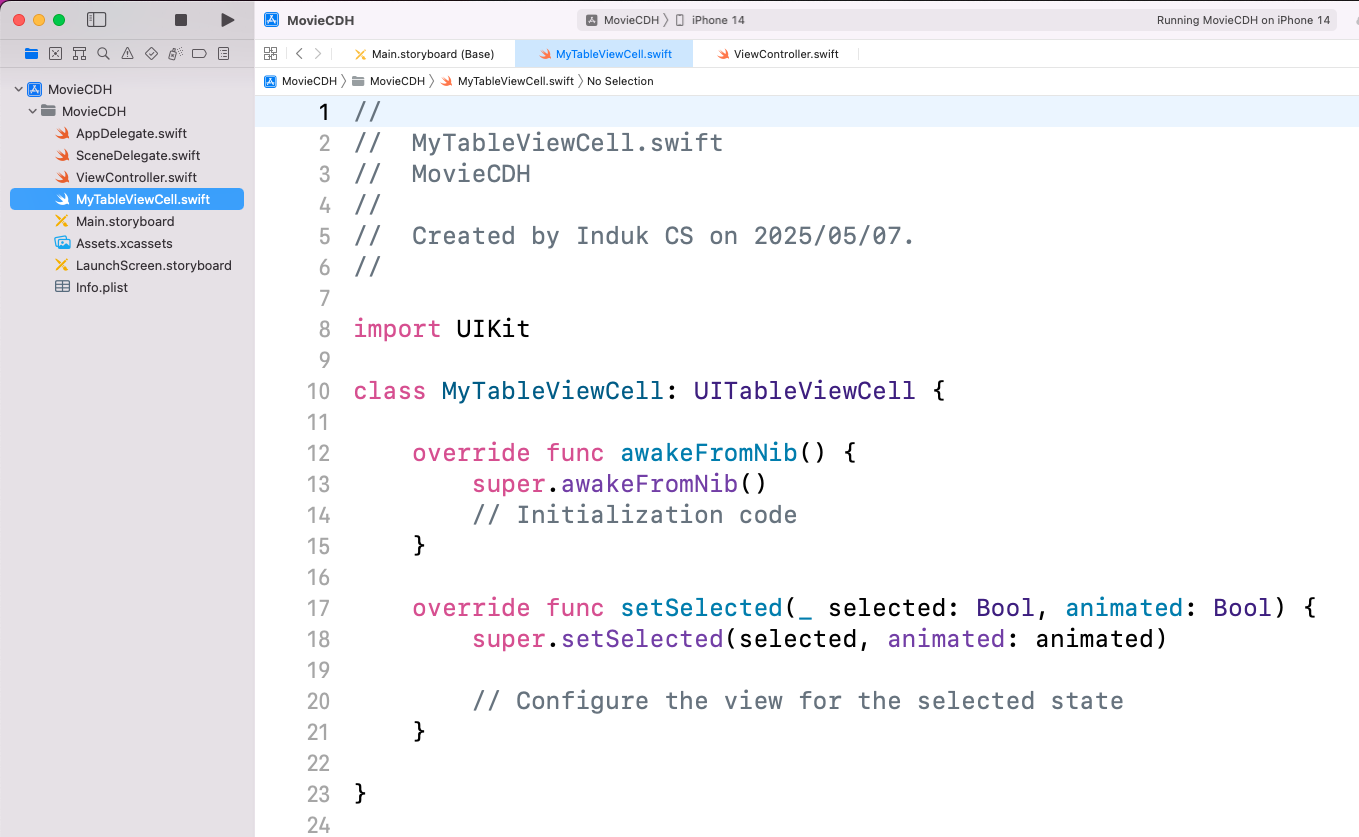
myCell과 관리할 클래스(myTableViewCell) 연결
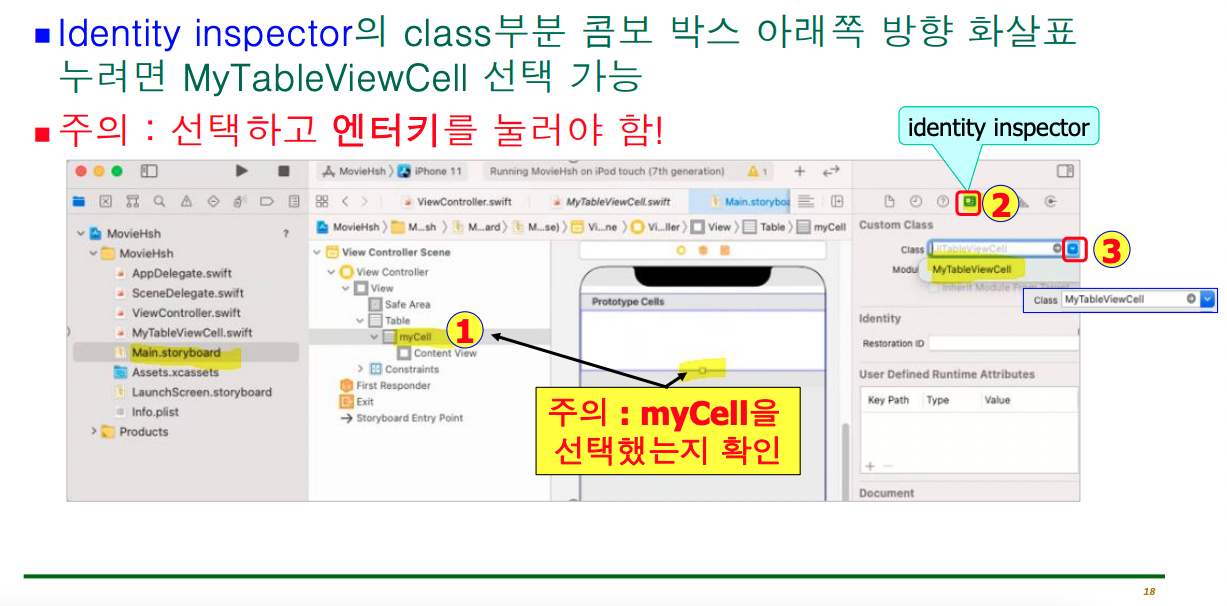
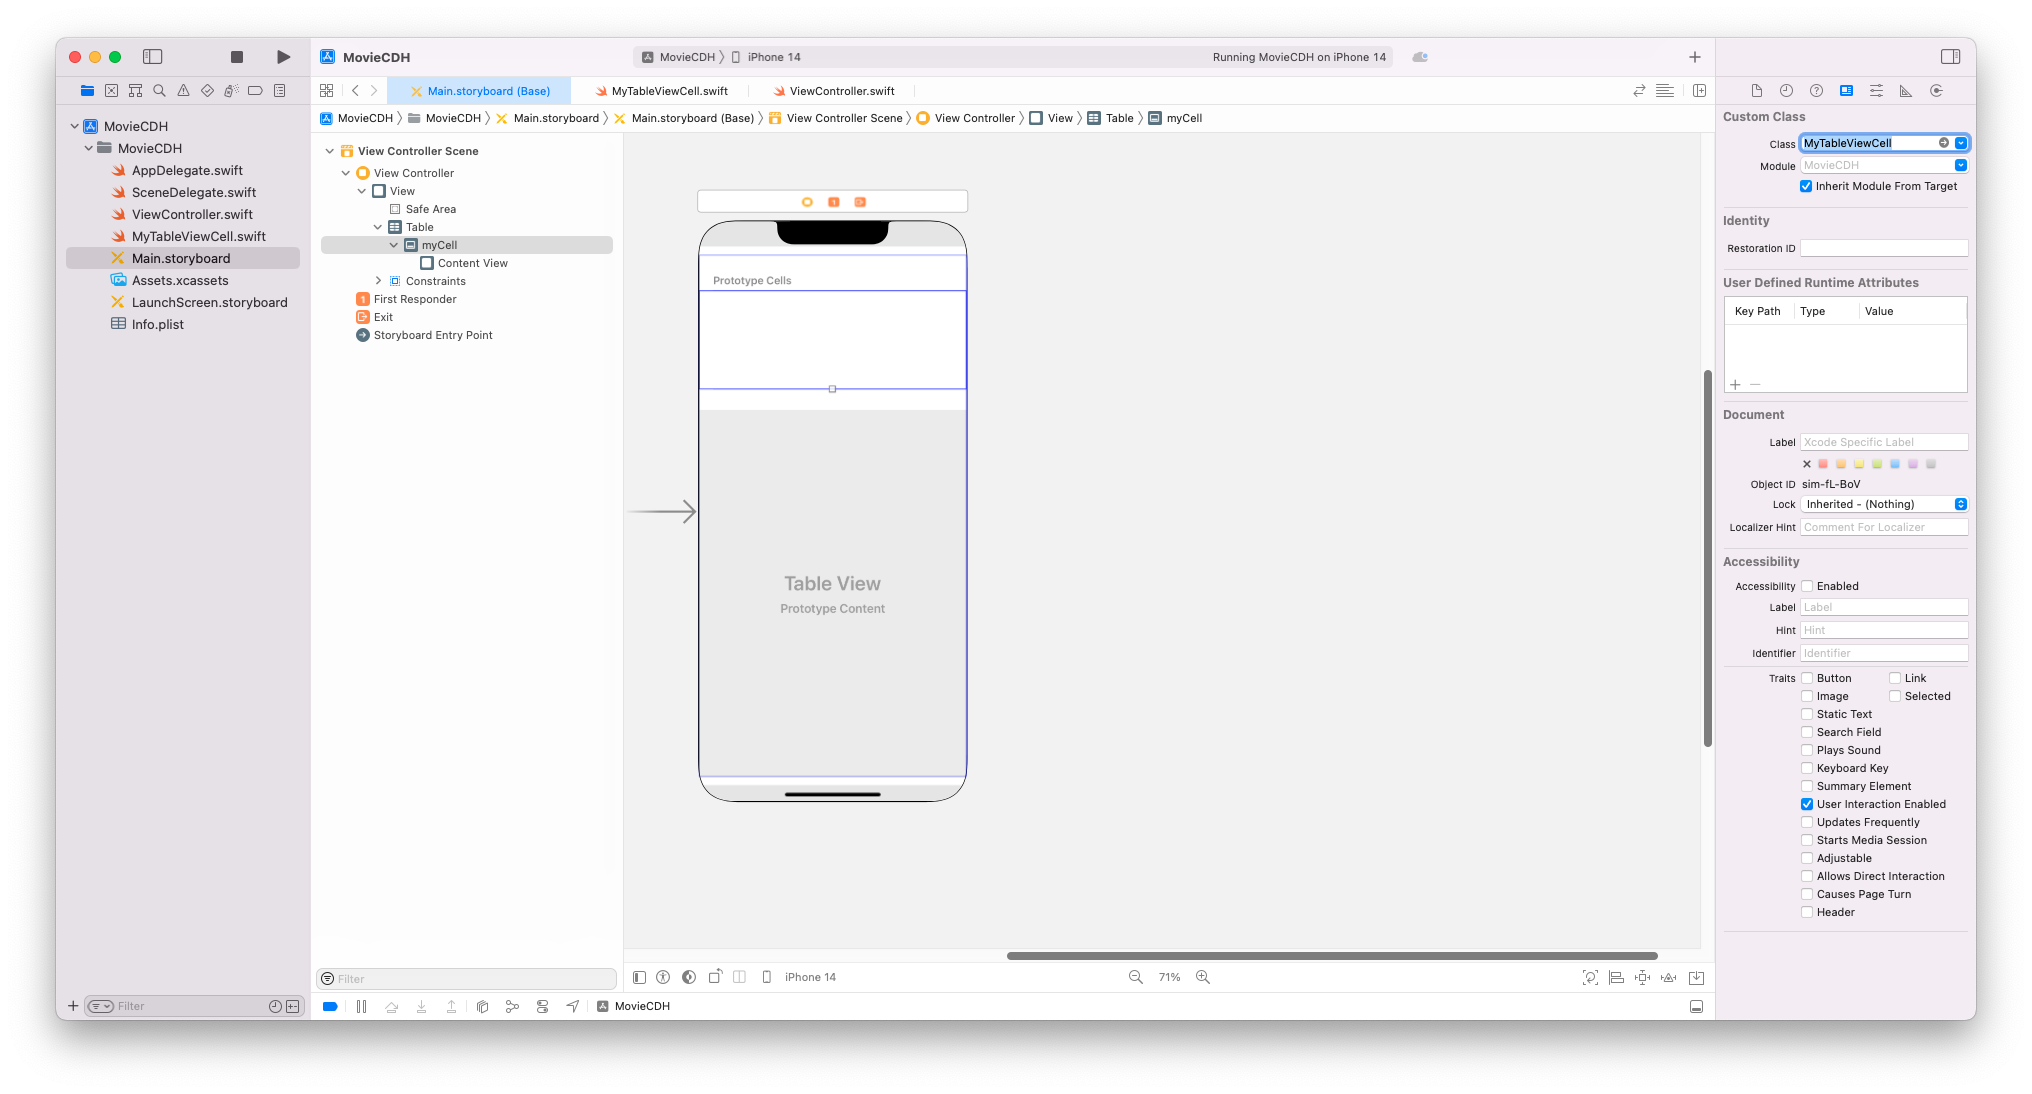
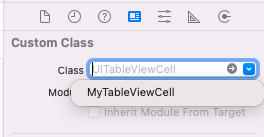
- 수정하기
myCell의 content view에 Label추가하고 Constraints설정
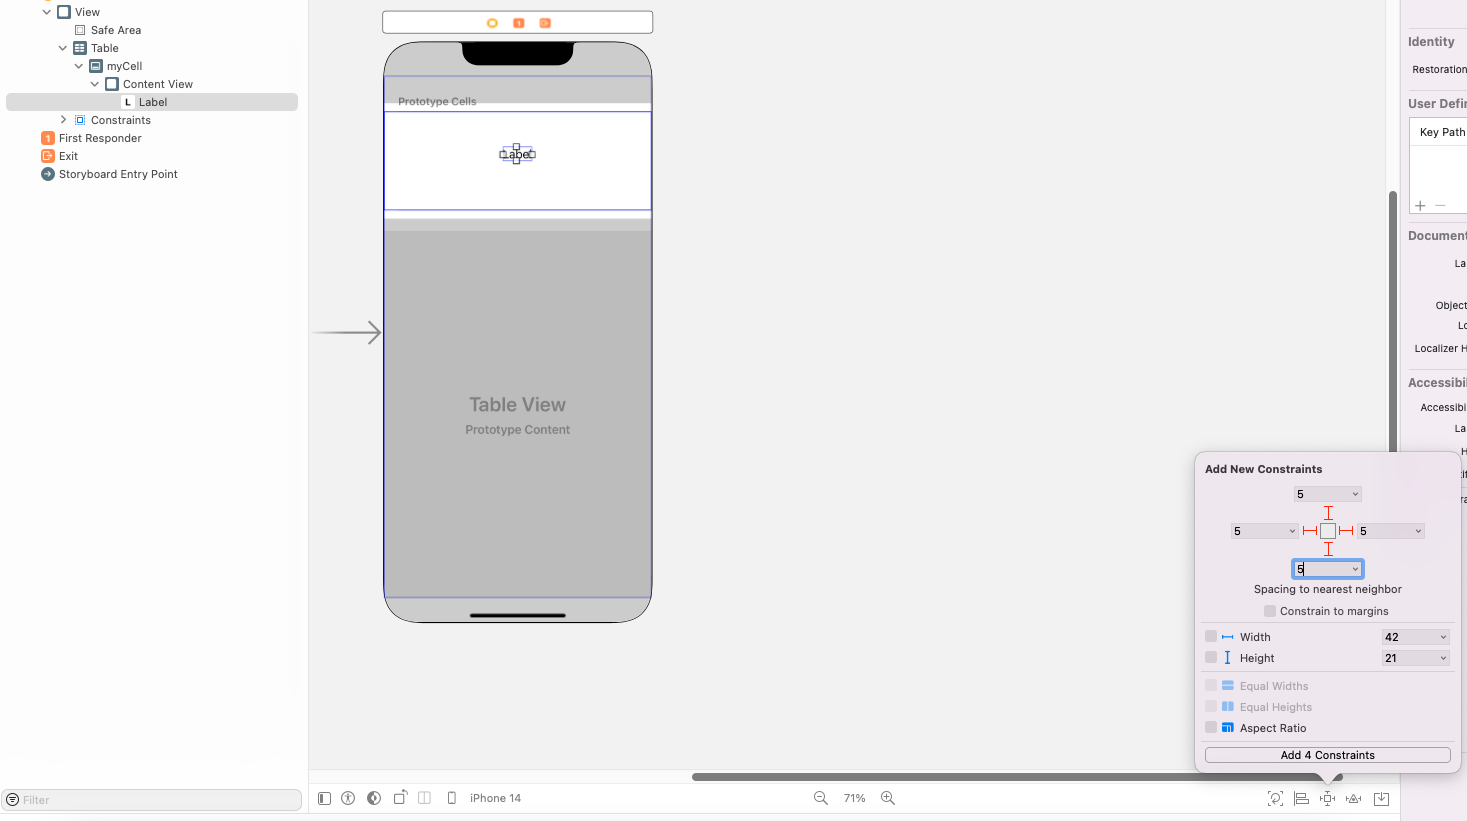
label 의 Constraints 를 5point로 지정
Label 디자인
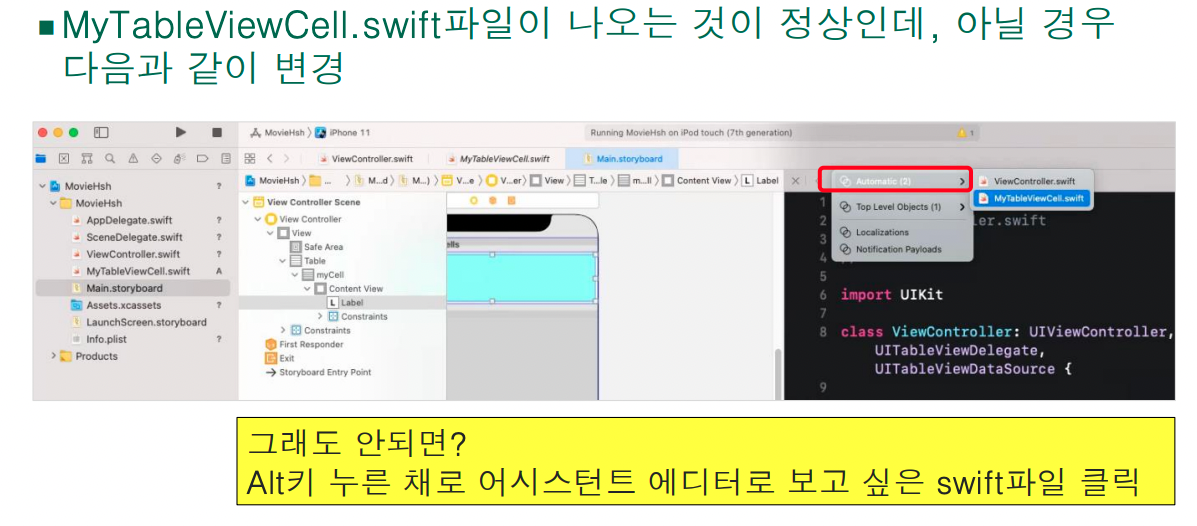
원하는 파일이 아닐 경우 Automatic에서 변경
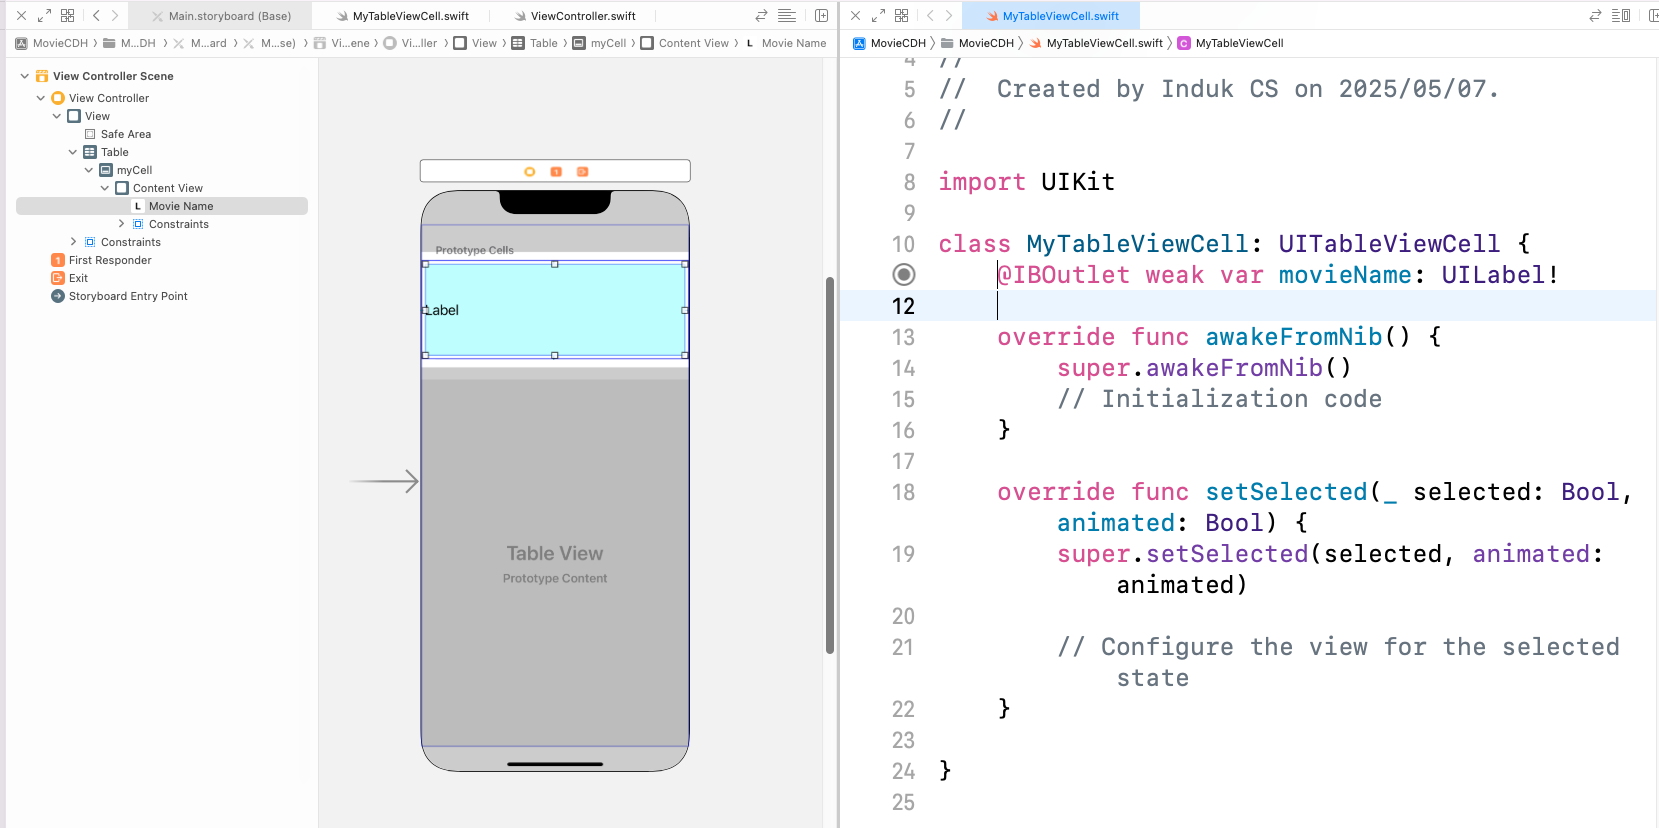
label에 outlet지정 : movieName
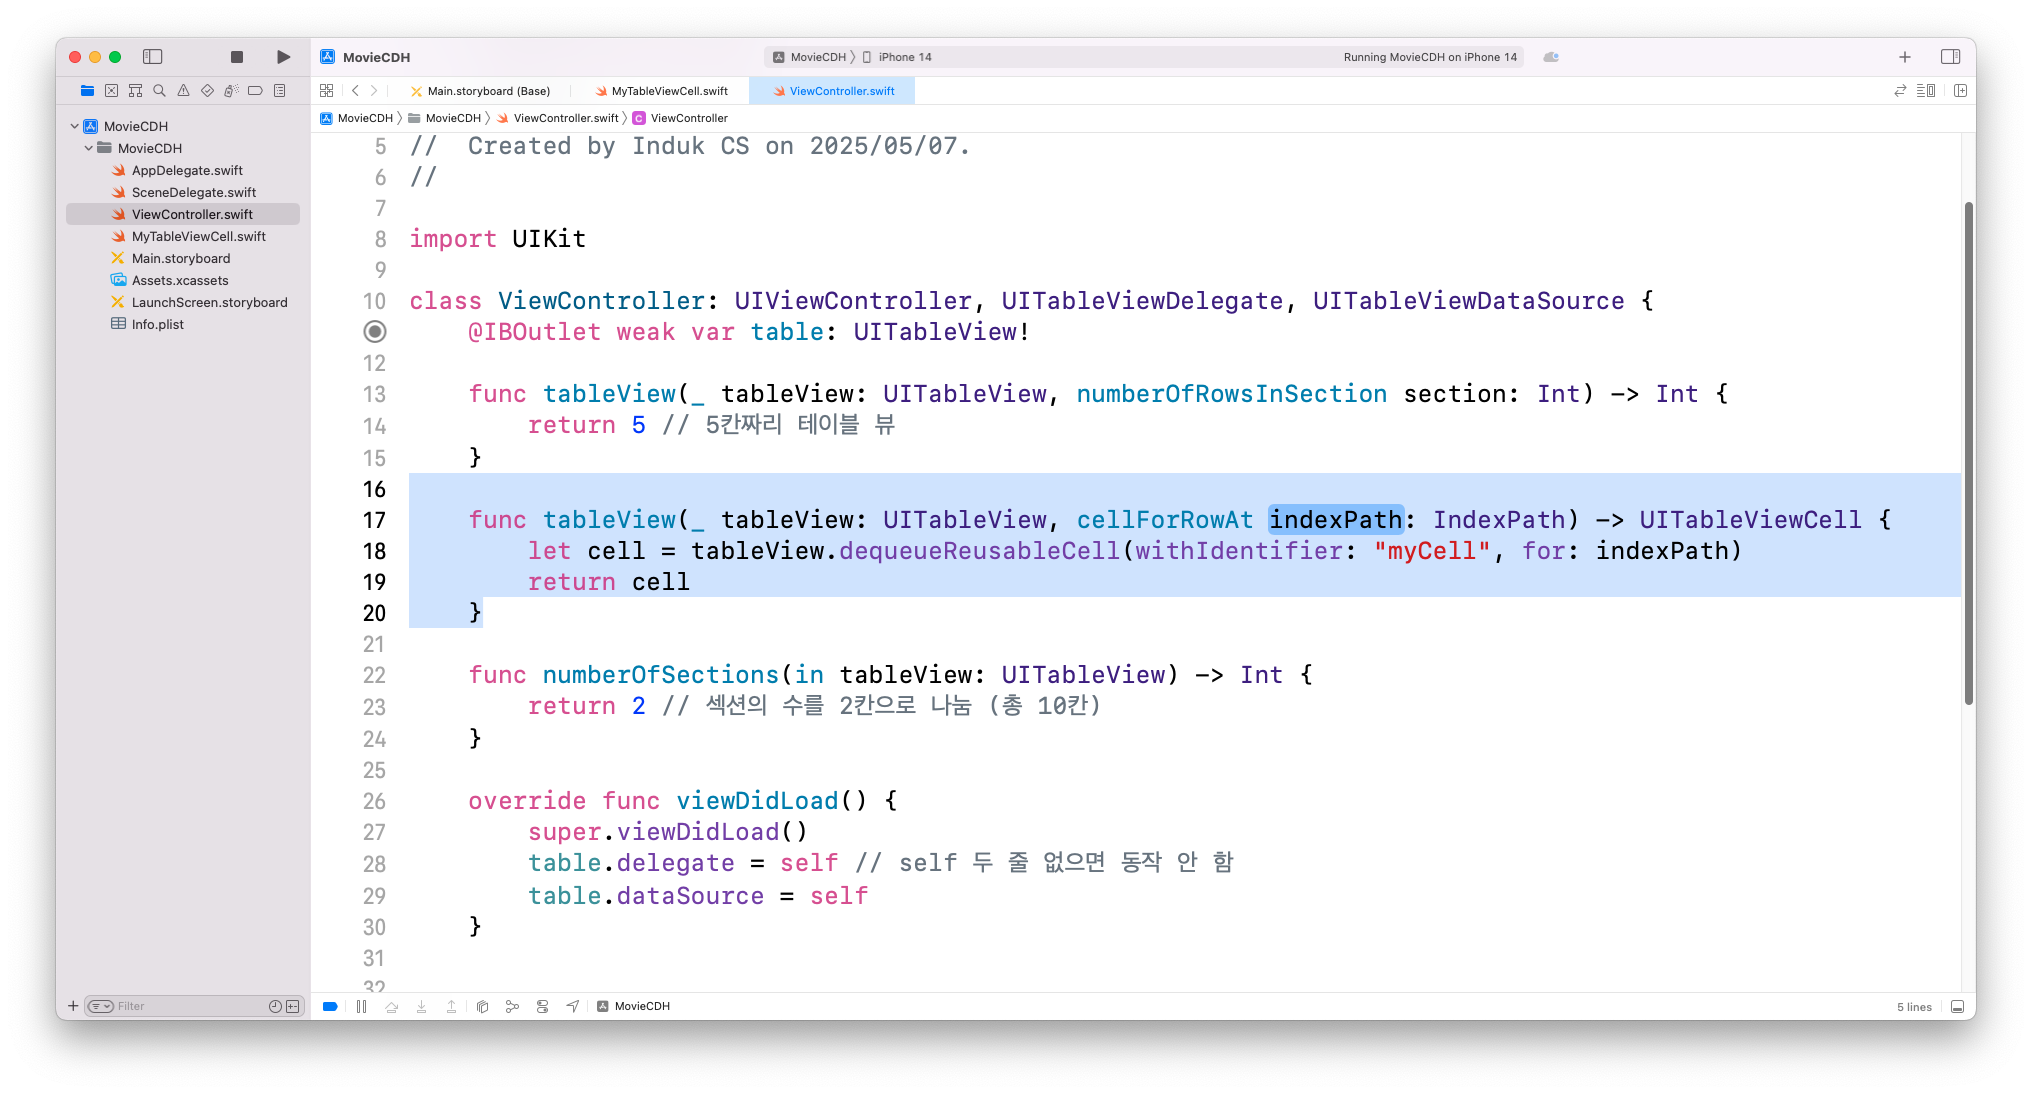
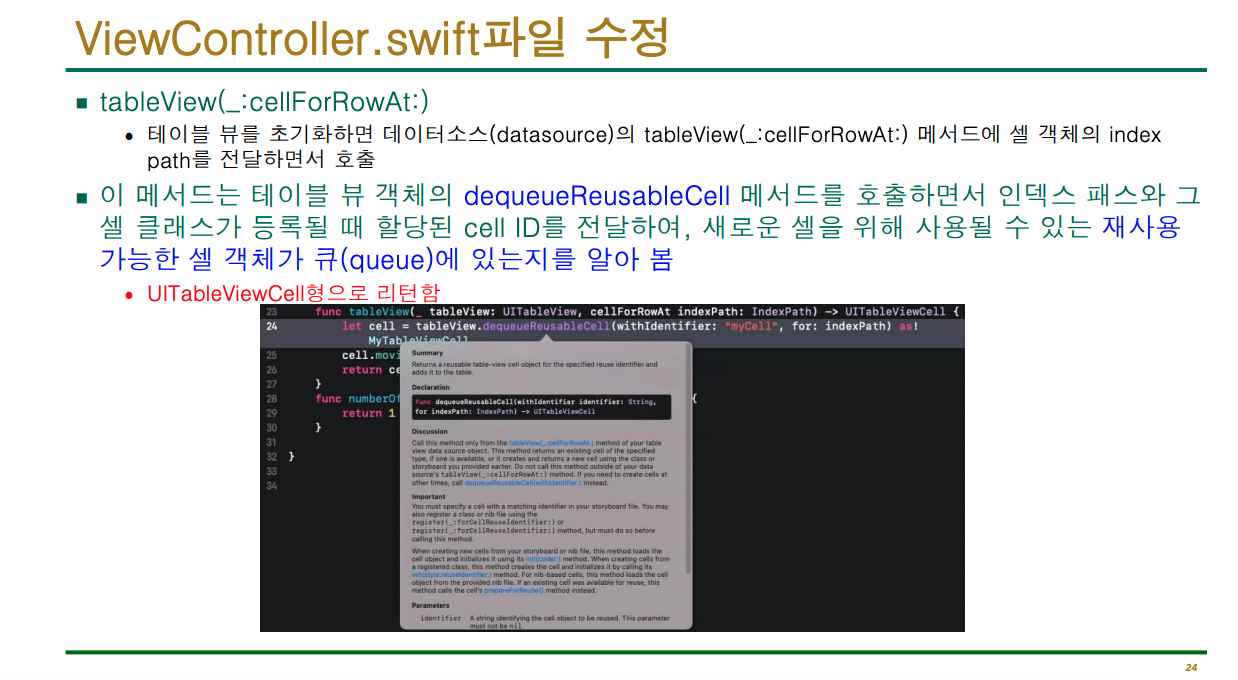
ViewController.swift 수정 (Label)
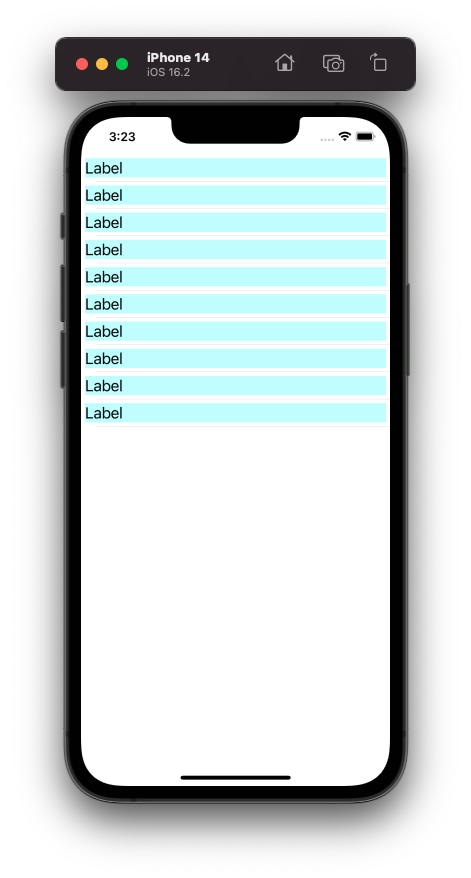
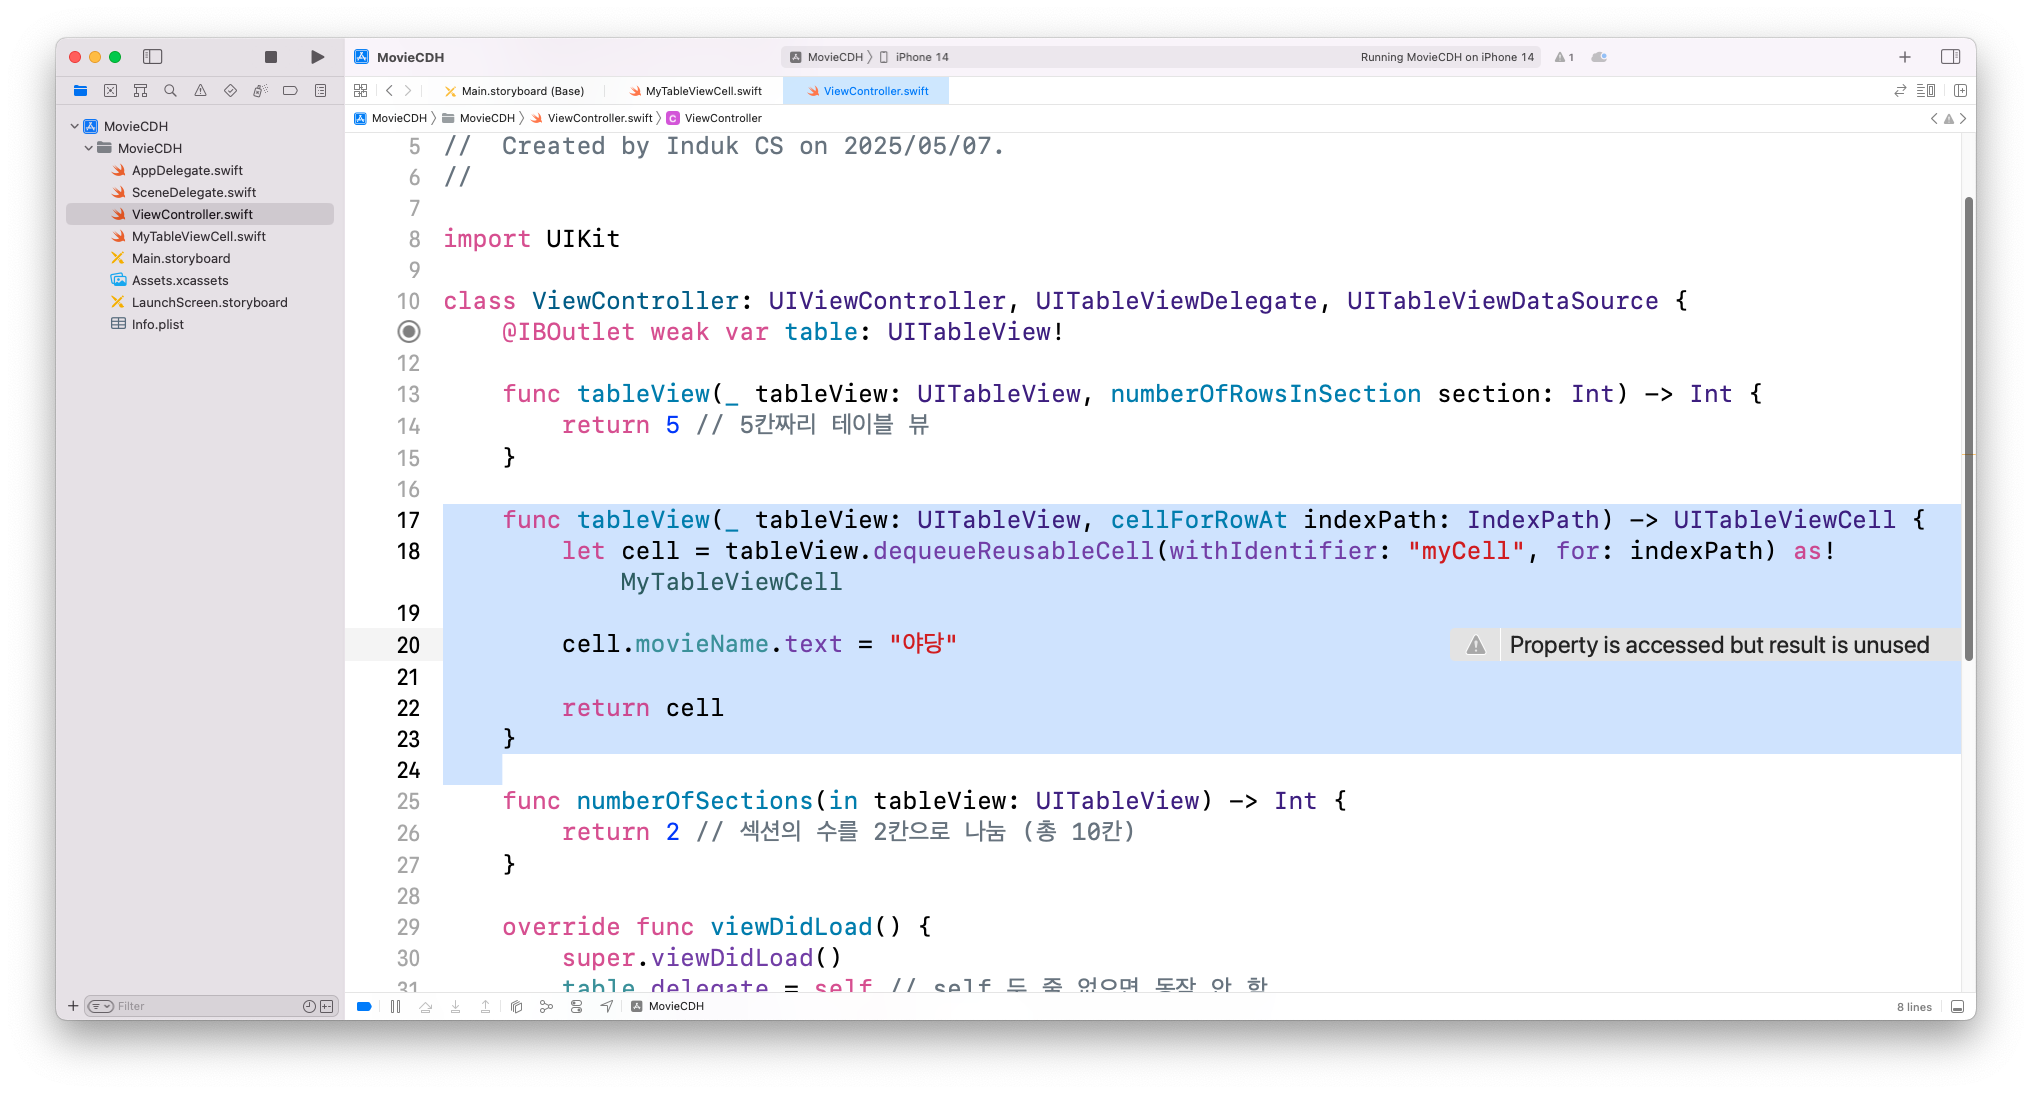
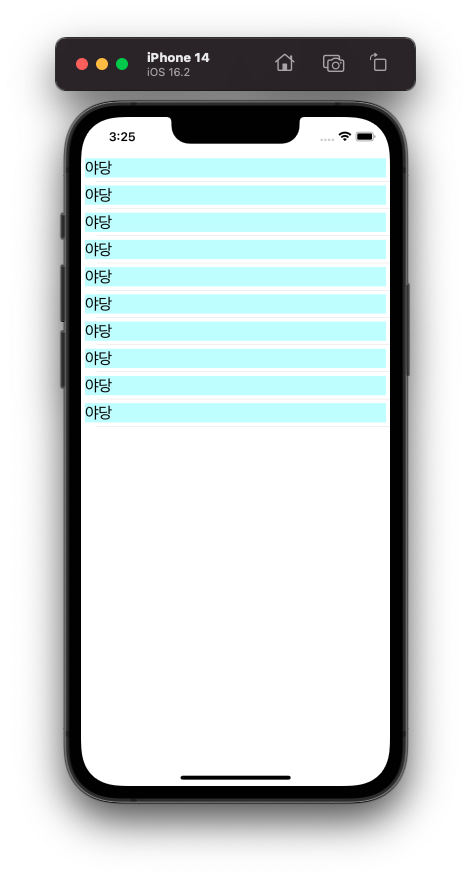
이름을 "야당"으로 변경
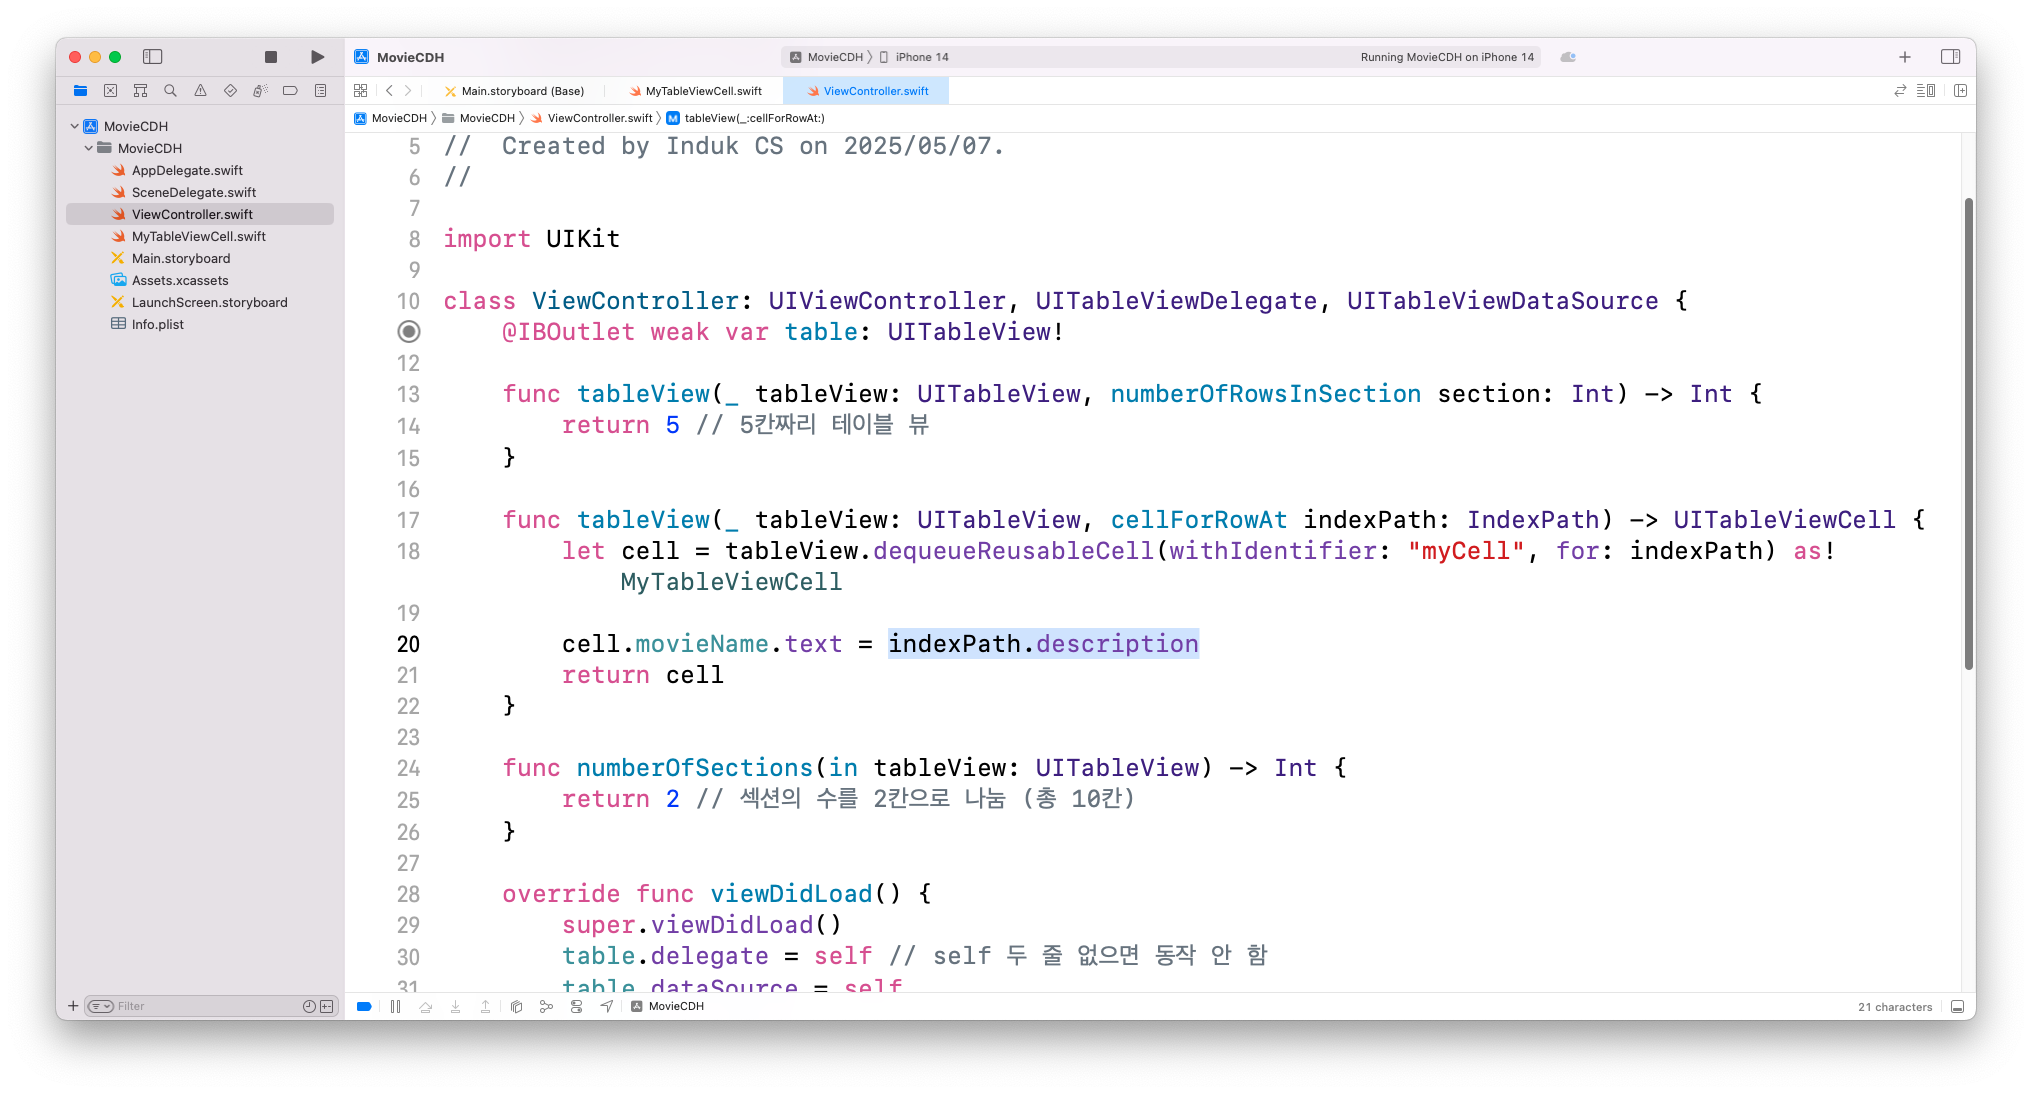
indexPath.description
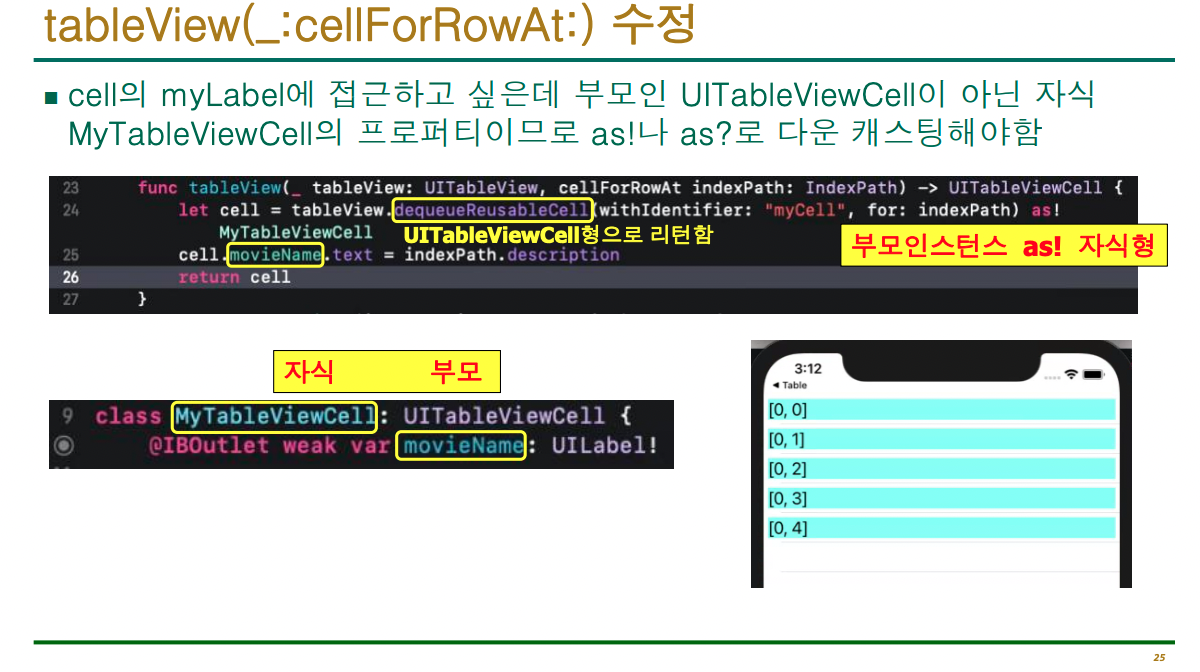
cellForRowAt 수정
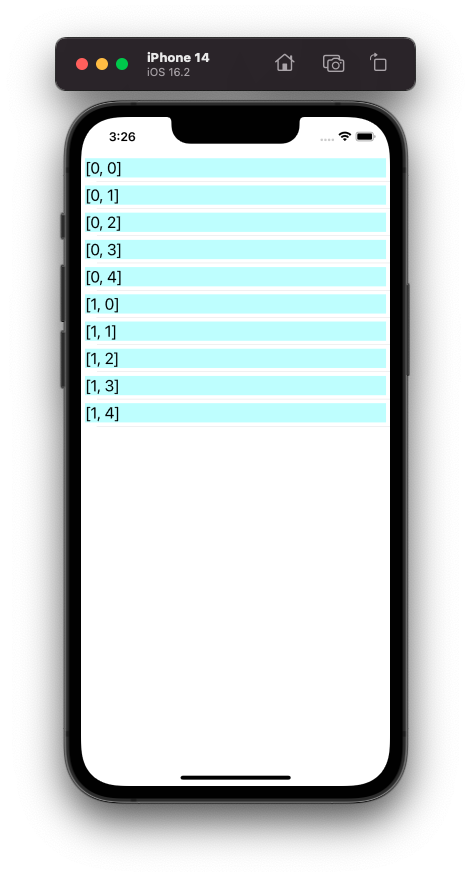
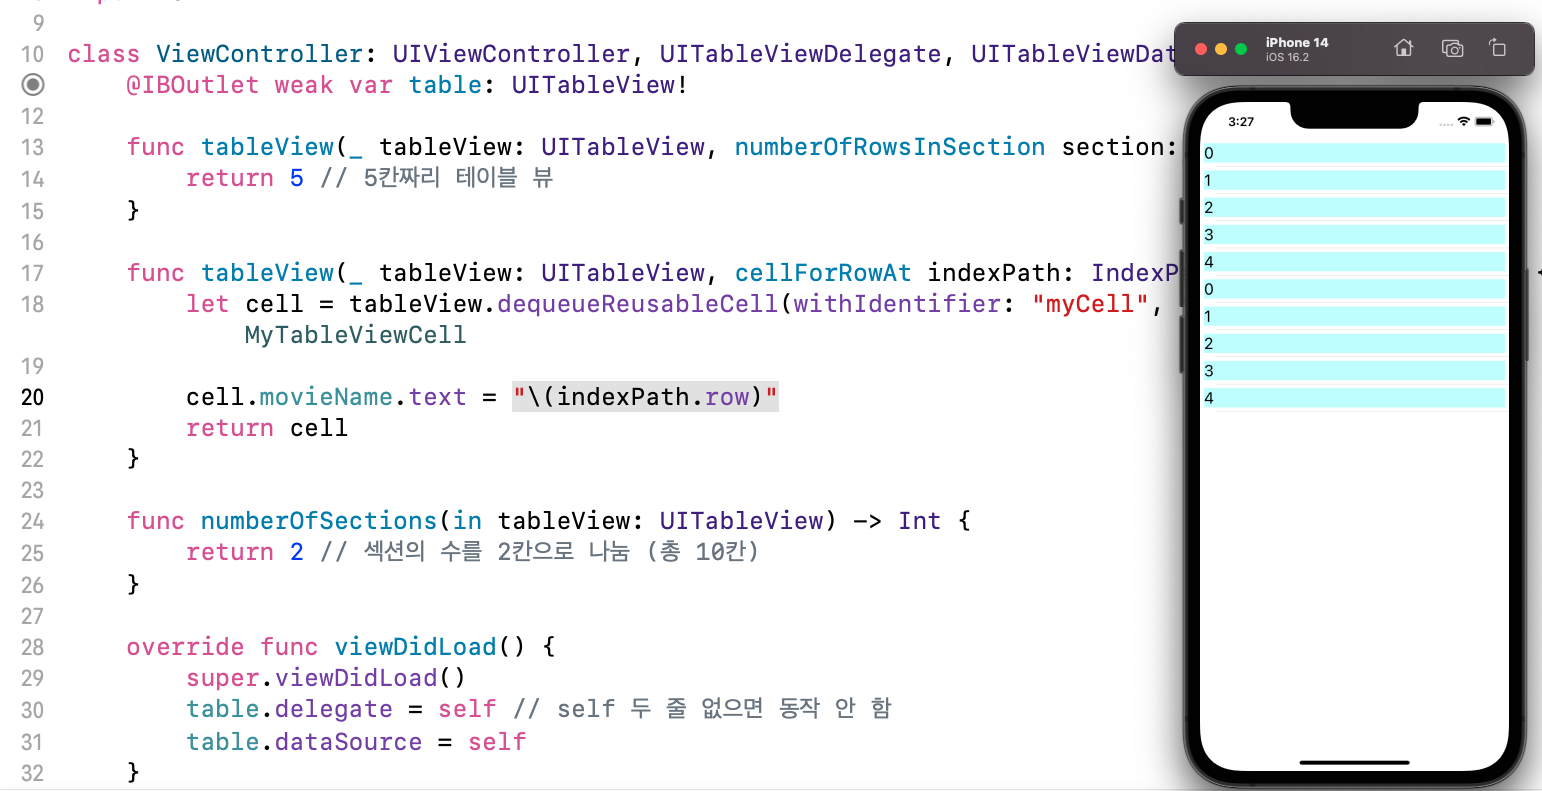
배열 생성 후 불러오기
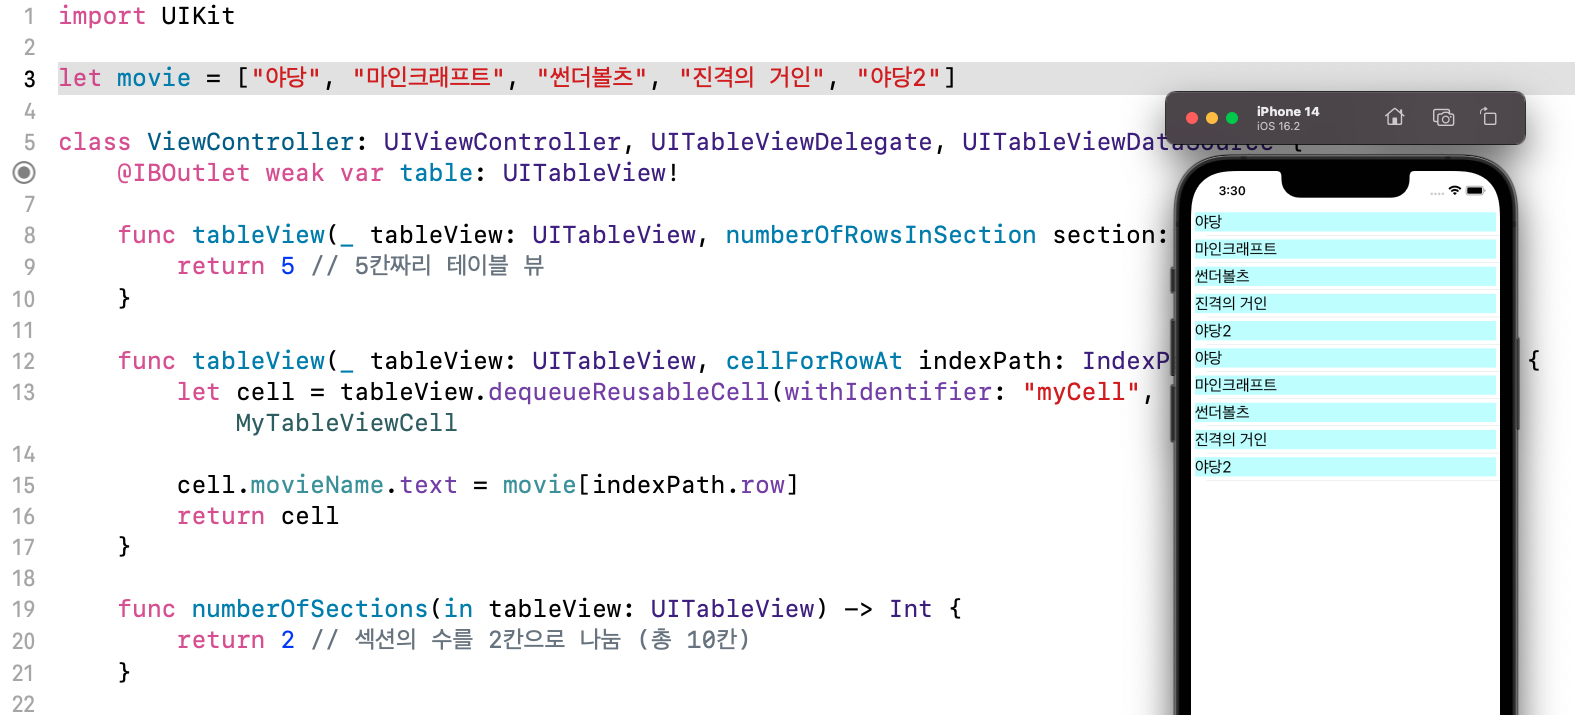
배열 만들고 배열값 불러오기
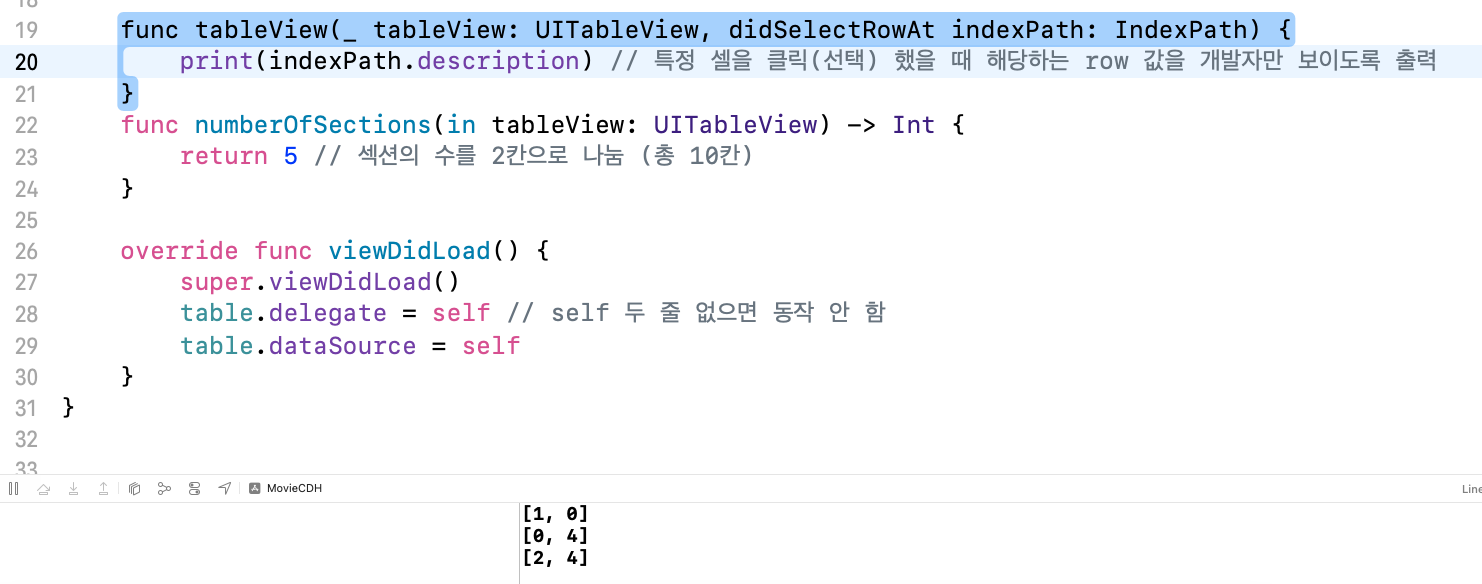
분리

중간 정리 코드
import UIKit

let movie = ["야당", "마인크래프트", "썬더볼츠", "진격의 거인", "야당2"]

class ViewController: UIViewController, UITableViewDelegate, UITableViewDataSource {
    @IBOutlet weak var table: UITableView!

    func tableView(_ tableView: UITableView, numberOfRowsInSection section: Int) -> Int {
        return 5 // 5칸짜리 테이블 뷰
    }

    func tableView(_ tableView: UITableView, cellForRowAt indexPath: IndexPath) -> UITableViewCell {
        let cell = tableView.dequeueReusableCell(withIdentifier: "myCell", for: indexPath) as! MyTableViewCell // 다운캐스팅

        cell.movieName.text = movie[indexPath.row]
        print(indexPath.description) // 추가 (현재 보이는 셀들의 인덱스를 개발자만 보이도록 출력)
        return cell
    }

    func tableView(_ tableView: UITableView, didSelectRowAt indexPath: IndexPath) {
        print(indexPath.description) // 특정 셀을 클릭(선택) 했을 때 해당하는 row 값을 개발자만 보이도록 출력
    }
    func numberOfSections(in tableView: UITableView) -> Int {
        return 5 // 섹션의 수를 2칸으로 나눔 (총 10칸)
    }

    override func viewDidLoad() {
        super.viewDidLoad()
        table.delegate = self // self 두 줄 없으면 동작 안 함
        table.dataSource = self
    }
}
Open API 기반 iOS앱 개발 3
네트워킹 단계
1. URL 만들기
- URL(string: String)
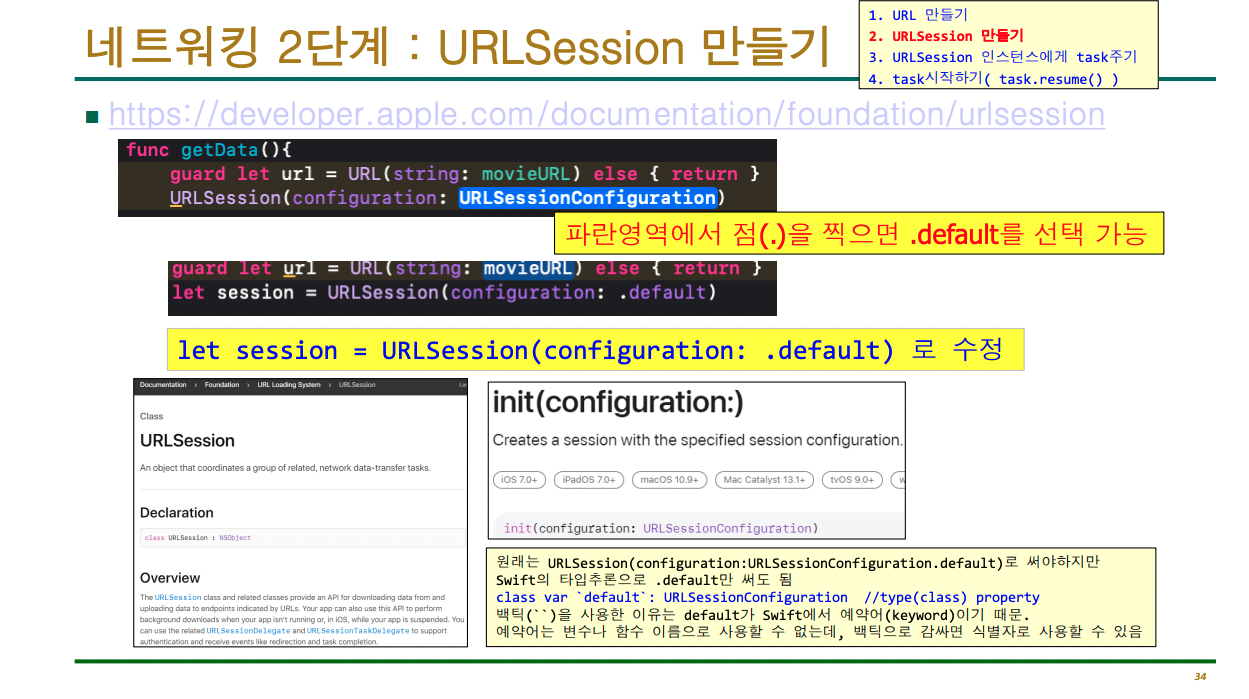
2. URLSession 만들기
- URLSession(configuration: URLSessionConfiguration)
3. URLSession 인스턴스에게 task주기
- URLSession인스턴스.dataTask(with:completionHandler:)
4. task시작하기
- URLSessionTask인스턴스.resume()
movieURL지정과 데이터 가져올 메서드 지정하고 호출
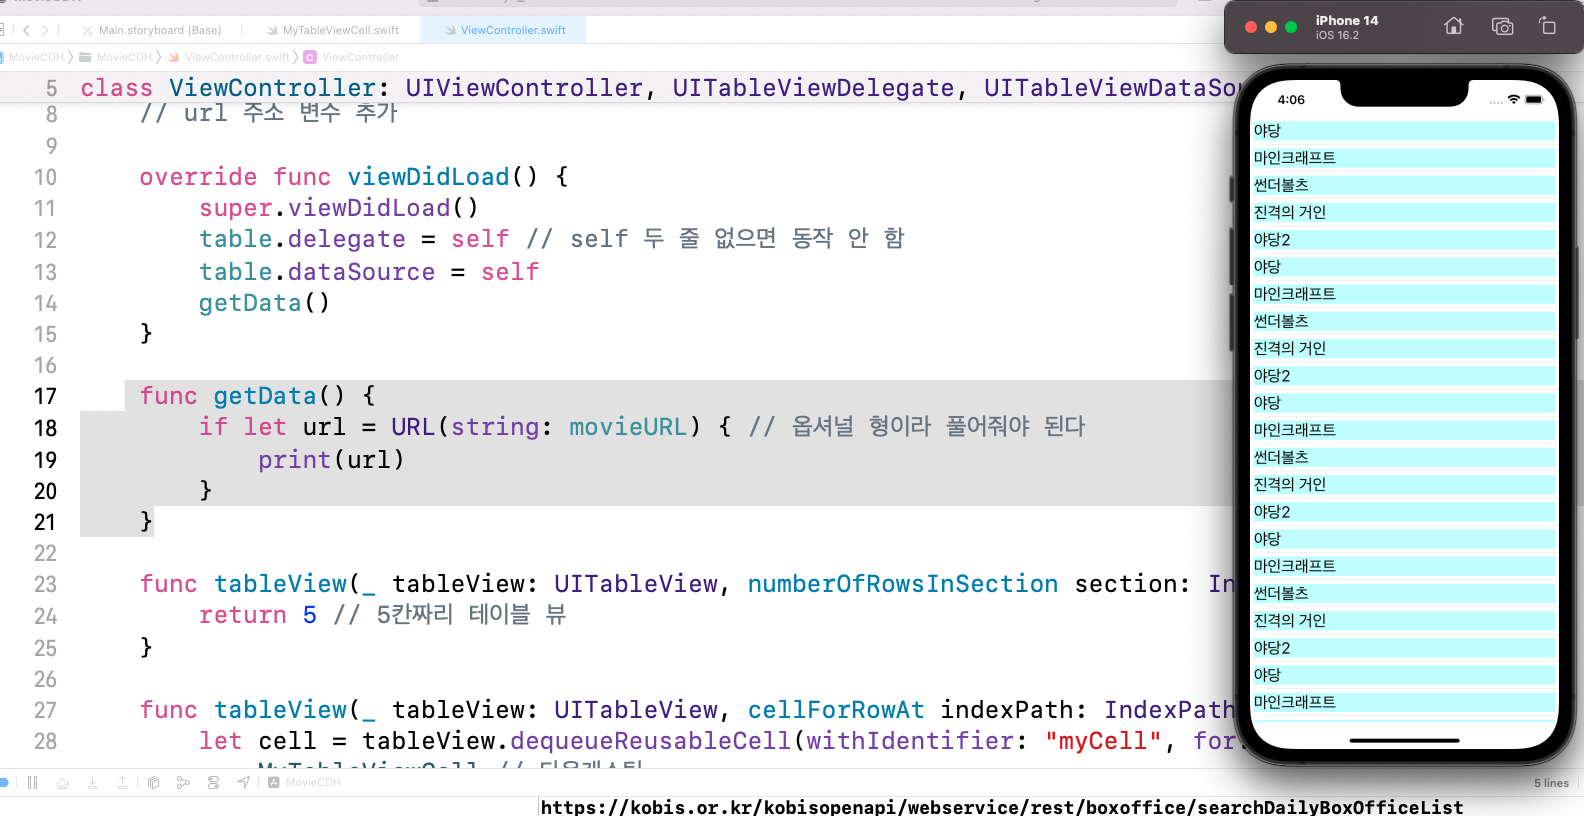
중간 정리 코드2
import UIKit

let movie = ["야당", "마인크래프트", "썬더볼츠", "진격의 거인", "야당2"]

class ViewController: UIViewController, UITableViewDelegate, UITableViewDataSource {
    @IBOutlet weak var table: UITableView!
    let movieURL = "https://kobis.or.kr/kobisopenapi/webservice/rest/boxoffice/searchDailyBoxOfficeList.json?key=자신의 키&targetDt=20250506"
    // url 주소 변수 추가

    override func viewDidLoad() {
        super.viewDidLoad()
        table.delegate = self // self 두 줄 없으면 동작 안 함
        table.dataSource = self
        getData()
    }

    func getData() {
        let url = URL(string: movieURL) // 옵셔널 형이라 풀어줘야 된다
        print(url)
    }

    func tableView(_ tableView: UITableView, numberOfRowsInSection section: Int) -> Int {
        return 5 // 5칸짜리 테이블 뷰
    }

    func tableView(_ tableView: UITableView, cellForRowAt indexPath: IndexPath) -> UITableViewCell {
        let cell = tableView.dequeueReusableCell(withIdentifier: "myCell", for: indexPath) as! MyTableViewCell // 다운캐스팅

        cell.movieName.text = movie[indexPath.row]
        // print(indexPath.description) // 추가 (현재 보이는 셀들의 인덱스를 개발자만 보이도록 출력)
        return cell
    }

    func tableView(_ tableView: UITableView, didSelectRowAt indexPath: IndexPath) {
        print(indexPath.description) // 특정 셀을 클릭(선택) 했을 때 해당하는 row 값을 개발자만 보이도록 출력
    }
    func numberOfSections(in tableView: UITableView) -> Int {
        return 5 // 섹션의 수를 2칸으로 나눔 (총 10칸)
    }


}
옵셔널 형을 풀어주는 가장 간단한 방법
if let

네트워킹 1단계 : URL 만들기
https://developer.apple.com/documentation/foundation/url
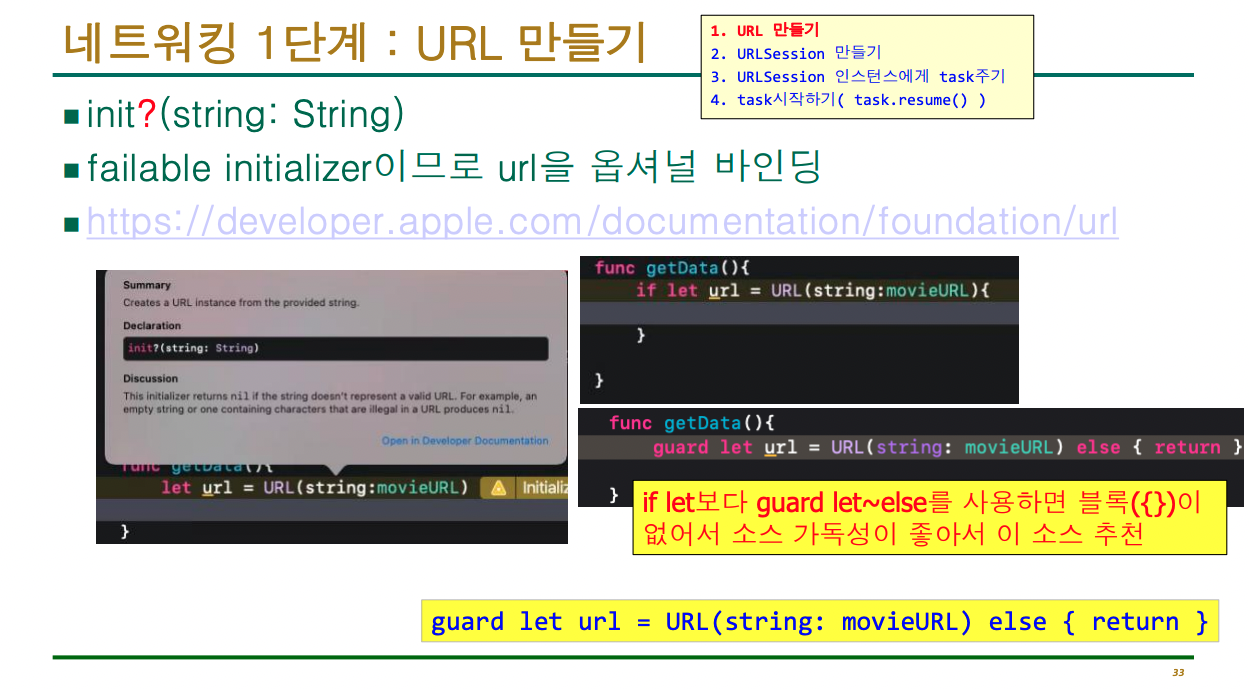
guard let ( + else)
guard let 이 가독성이 가장 좋다 (추천)
else 일 경우를 먼저 작성하고, 블록 바깥쪽에서 url 의 옵셔널 형이 풀려서 출력된다
네트워킹 2단계 : URLSession 만들기
https://developer.apple.com/documentation/foundation/urlsession
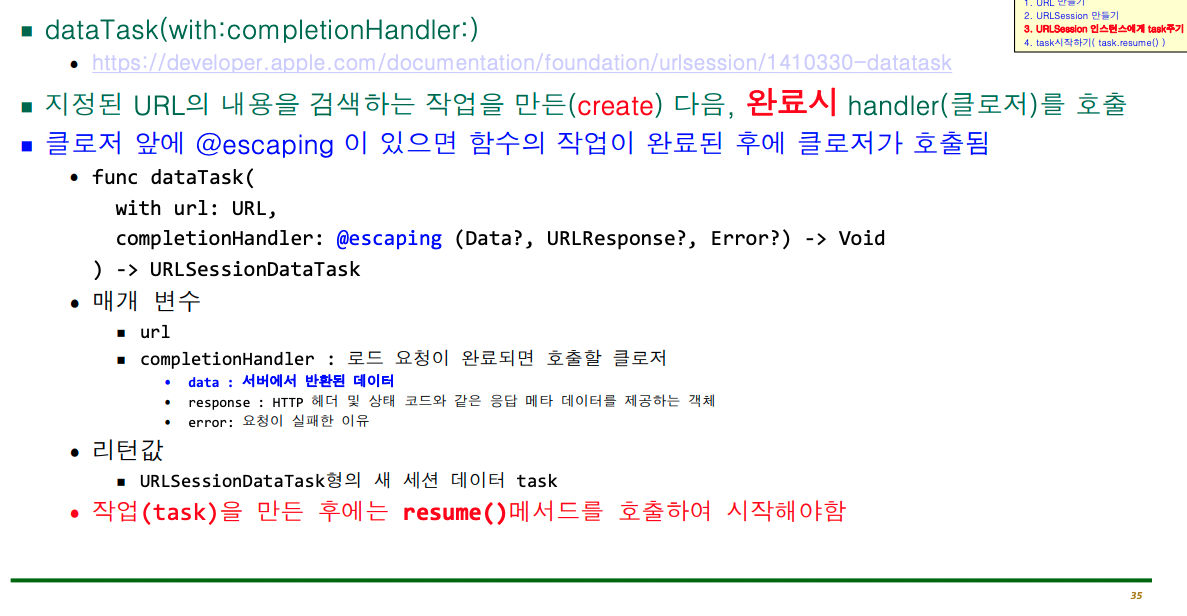
네트워킹 3단계 : URLSession 인스턴스에게 task주기

후행 클로저 자동 작성
- Enter 키를 누르면 자동으로 후행 클로저 스타일로 변환해준다
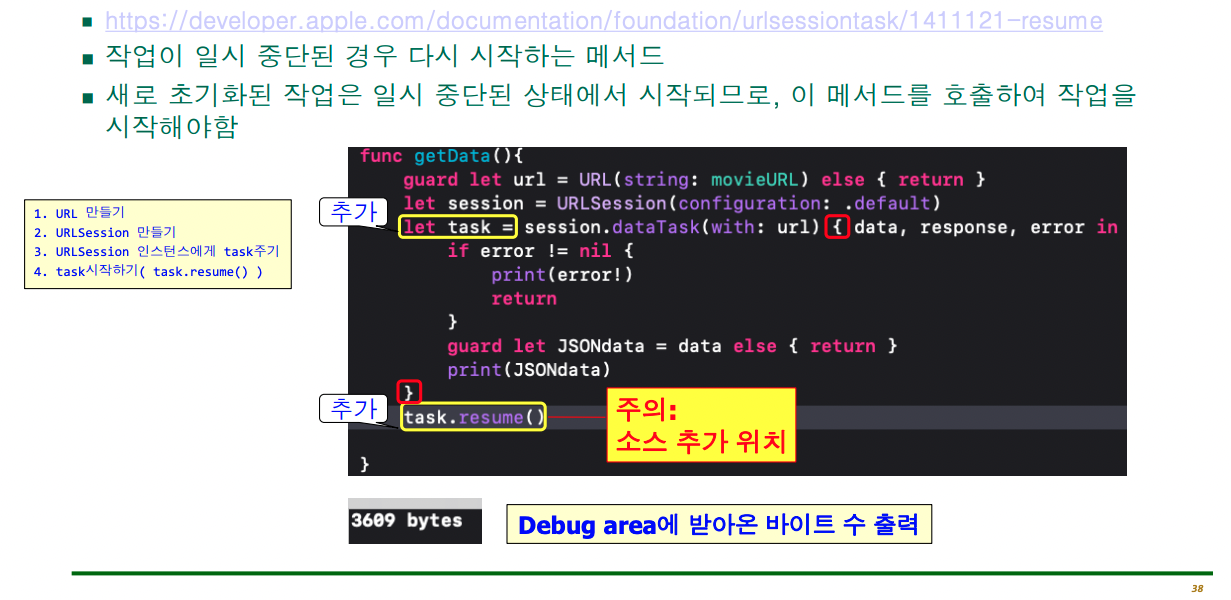
Enter 키 입력 후
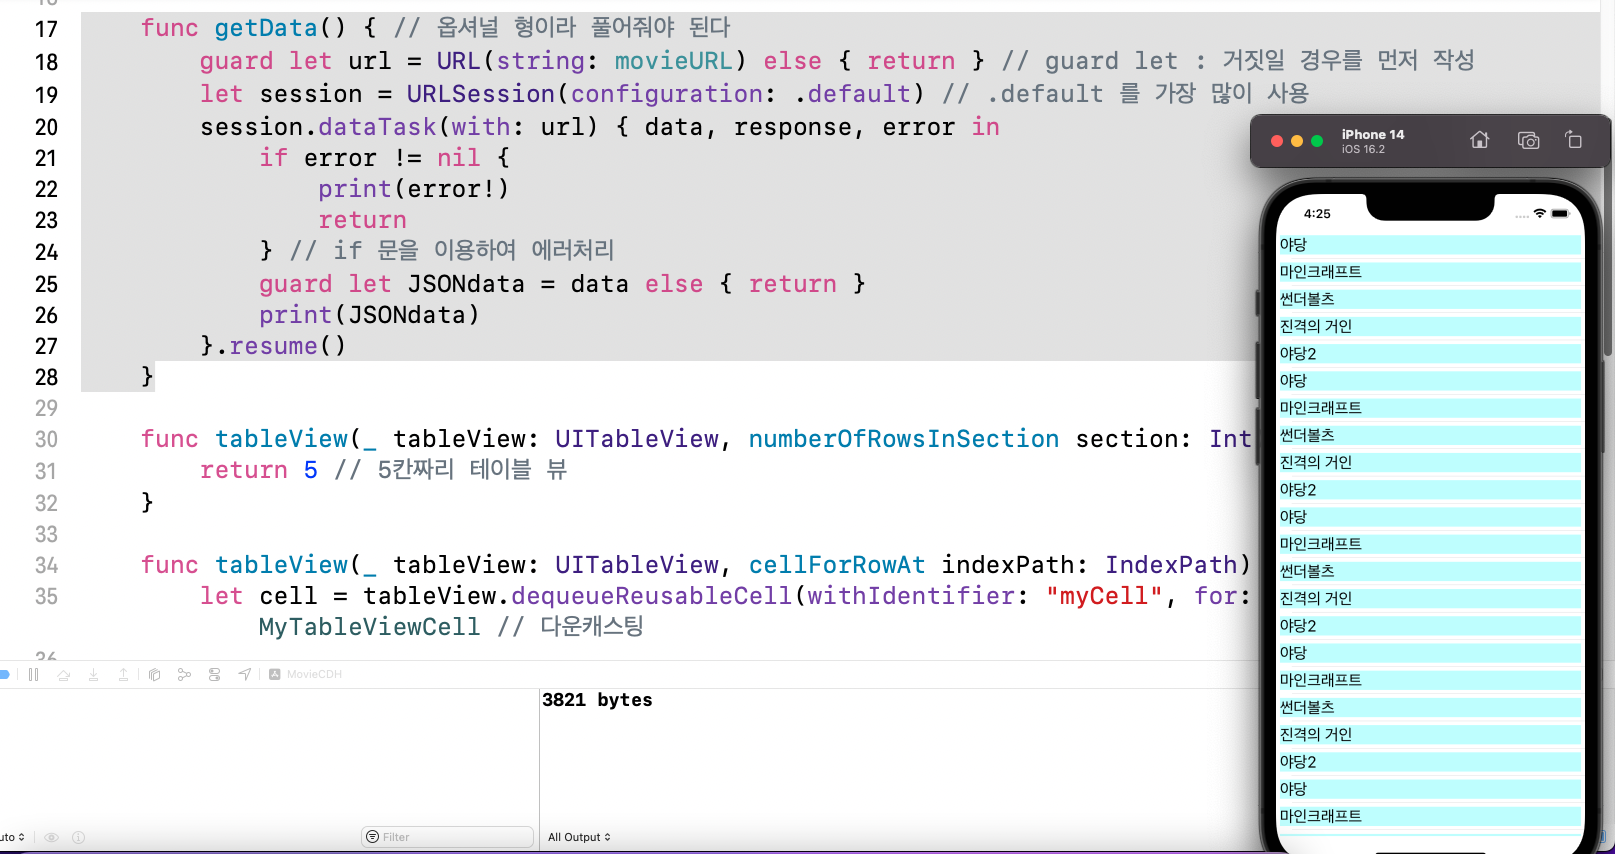
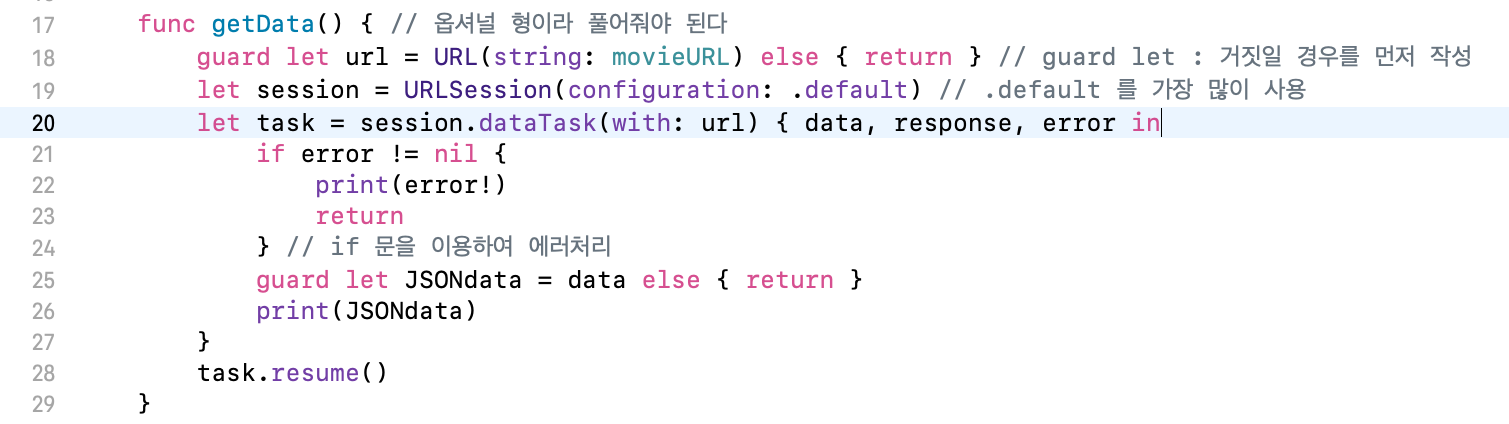
네트워킹 4단계 : task를 resume()
3821 bytes 출력됨
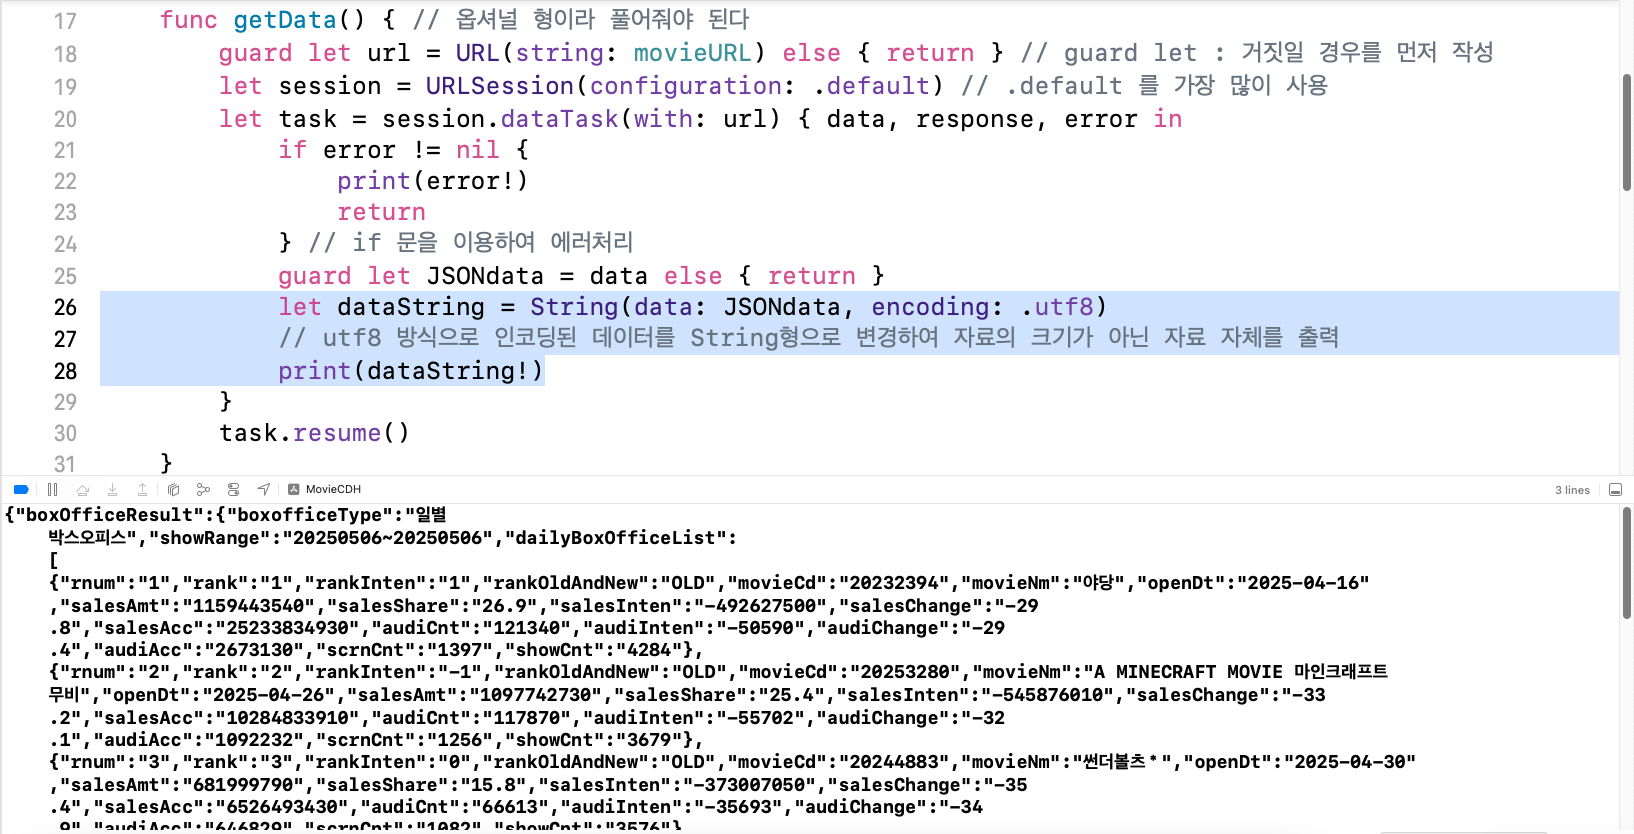
아래는 변수에 대입 후 변수를 출력
data를 String형식으로 찍어 보기
- 웹에서 사용하는 utf8 방식으로 인코딩 되어있는 바이너리 데이터(JSONdata)를 사람이 읽을 수
있는 문자열(String)로 바꾸기
최종 코드 (10주차)
import UIKit

let movie = ["야당", "마인크래프트", "썬더볼츠", "진격의 거인", "야당2"]

class ViewController: UIViewController, UITableViewDelegate, UITableViewDataSource {
    @IBOutlet weak var table: UITableView!
    let movieURL = "https://kobis.or.kr/kobisopenapi/webservice/rest/boxoffice/searchDailyBoxOfficeList.json?key=자신의 키(영진위API)&targetDt=20140506"
    // url 주소 변수 추가

    override func viewDidLoad() {
        super.viewDidLoad()
        table.delegate = self // self 두 줄 없으면 동작 안 함
        table.dataSource = self
        getData()
    }

    func getData() { // 옵셔널 형이라 풀어줘야 된다
        guard let url = URL(string: movieURL) else { return } // guard let : 거짓일 경우를 먼저 작성
        let session = URLSession(configuration: .default) // .default 를 가장 많이 사용
        let task = session.dataTask(with: url) { data, response, error in
            if error != nil {
                print(error!)
                return
            } // if 문을 이용하여 에러처리
            guard let JSONdata = data else { return }
            let dataString = String(data: JSONdata, encoding: .utf8)
            // utf8 방식으로 인코딩된 데이터를 String형으로 변경하여 자료의 크기가 아닌 자료 자체를 출력
            print(dataString!)
        }
        task.resume()
    }

    func tableView(_ tableView: UITableView, numberOfRowsInSection section: Int) -> Int {
        return 5 // 5칸짜리 테이블 뷰
    }

    func tableView(_ tableView: UITableView, cellForRowAt indexPath: IndexPath) -> UITableViewCell {
        let cell = tableView.dequeueReusableCell(withIdentifier: "myCell", for: indexPath) as! MyTableViewCell // 다운캐스팅

        cell.movieName.text = movie[indexPath.row]
        // print(indexPath.description) // 추가 (현재 보이는 셀들의 인덱스를 개발자만 보이도록 출력)
        return cell
    }

    func tableView(_ tableView: UITableView, didSelectRowAt indexPath: IndexPath) {
        print(indexPath.description) // 특정 셀을 클릭(선택) 했을 때 해당하는 row 값을 개발자만 보이도록 출력
    }
    func numberOfSections(in tableView: UITableView) -> Int {
        return 5 // 섹션의 수를 2칸으로 나눔 (총 10칸)
    }


}
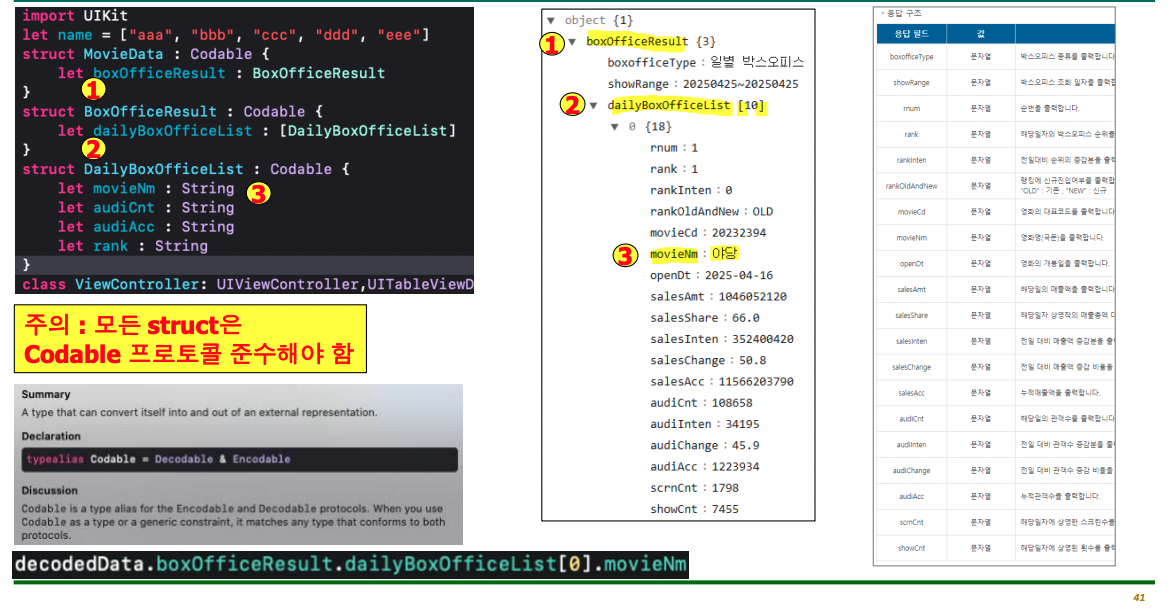
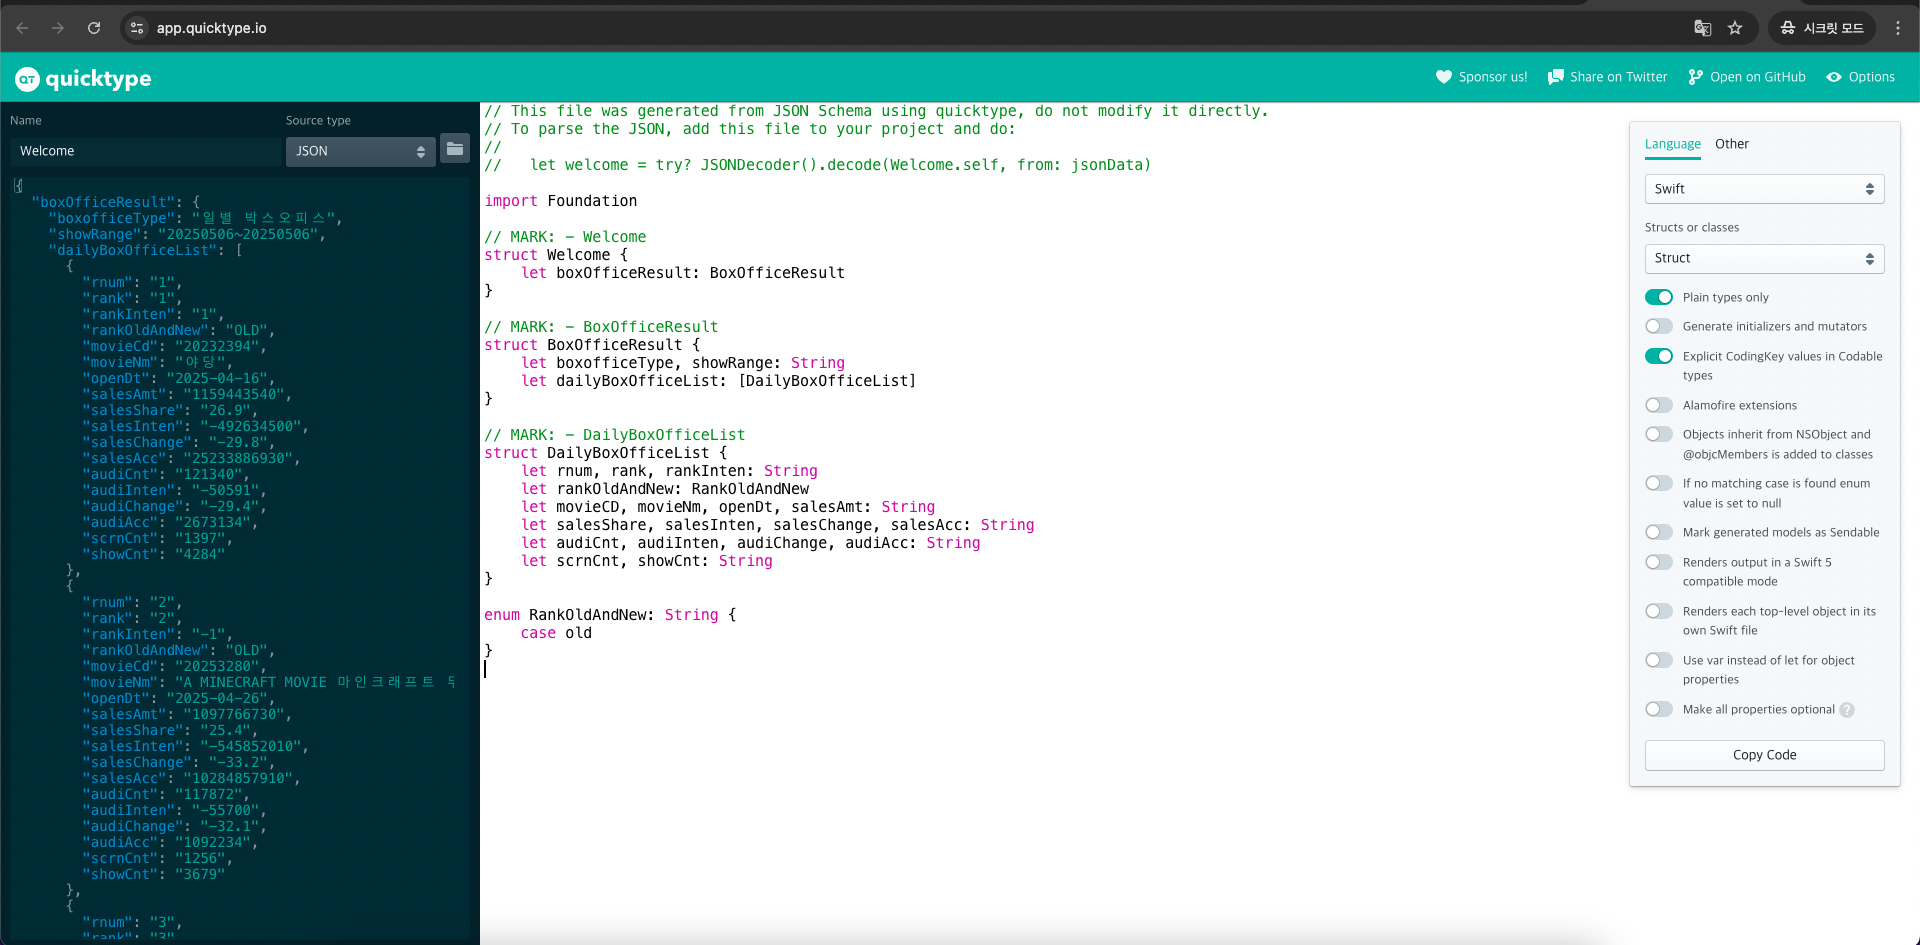
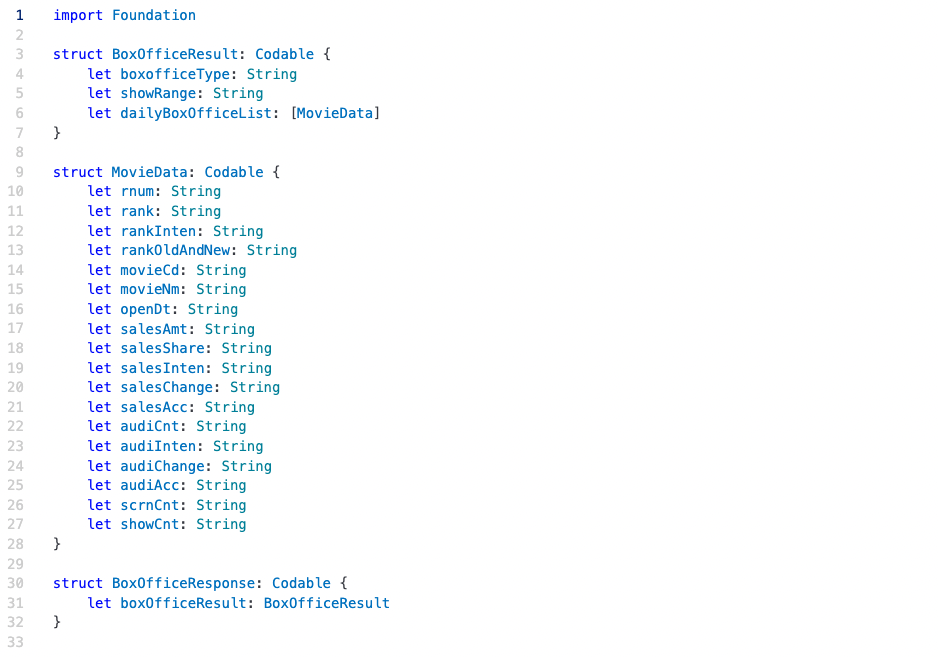
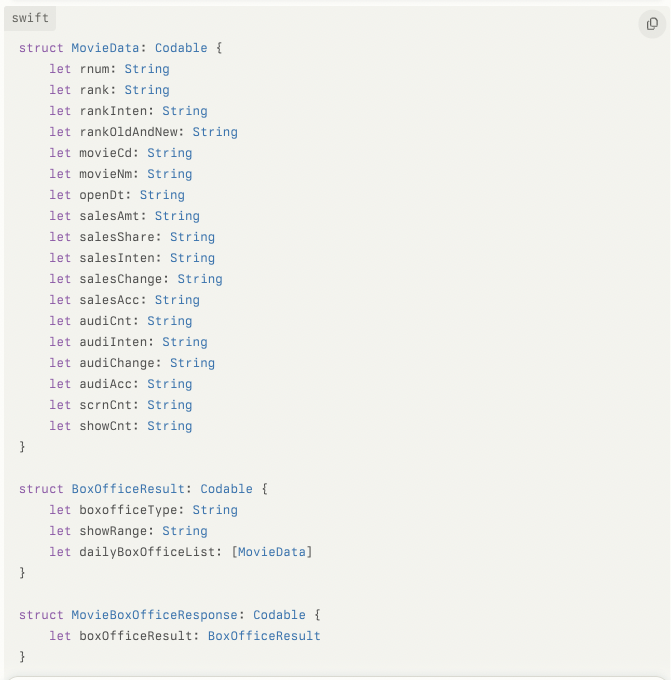
파싱을 쉽게 하기 위한 MovieData형 구조체 만들기
퀵타입 (quicktype) : JSON 데이터의 데이터 모델 만들기
// This file was generated from JSON Schema using quicktype, do not modify it directly.
// To parse the JSON, add this file to your project and do:
//
//   let welcome = try? JSONDecoder().decode(Welcome.self, from: jsonData)

import Foundation

// MARK: - Welcome
struct Welcome {
    let boxOfficeResult: BoxOfficeResult
}

// MARK: - BoxOfficeResult
struct BoxOfficeResult {
    let boxofficeType, showRange: String
    let dailyBoxOfficeList: [DailyBoxOfficeList]
}

// MARK: - DailyBoxOfficeList
struct DailyBoxOfficeList {
    let rnum, rank, rankInten: String
    let rankOldAndNew: RankOldAndNew
    let movieCD, movieNm, openDt, salesAmt: String
    let salesShare, salesInten, salesChange, salesAcc: String
    let audiCnt, audiInten, audiChange, audiAcc: String
    let scrnCnt, showCnt: String
}

enum RankOldAndNew: String {
    case old
}
생성형 AI 활용하기
- 질문 : 파싱을 쉽게 하기 위한 MovieData형 구조체를 Swift로 만들어 줘
ChatGPT
Perplexity