프로토콜(protocol)과 Delegate
Delegate나 DataSource를 사용하는 UI 컴포넌트
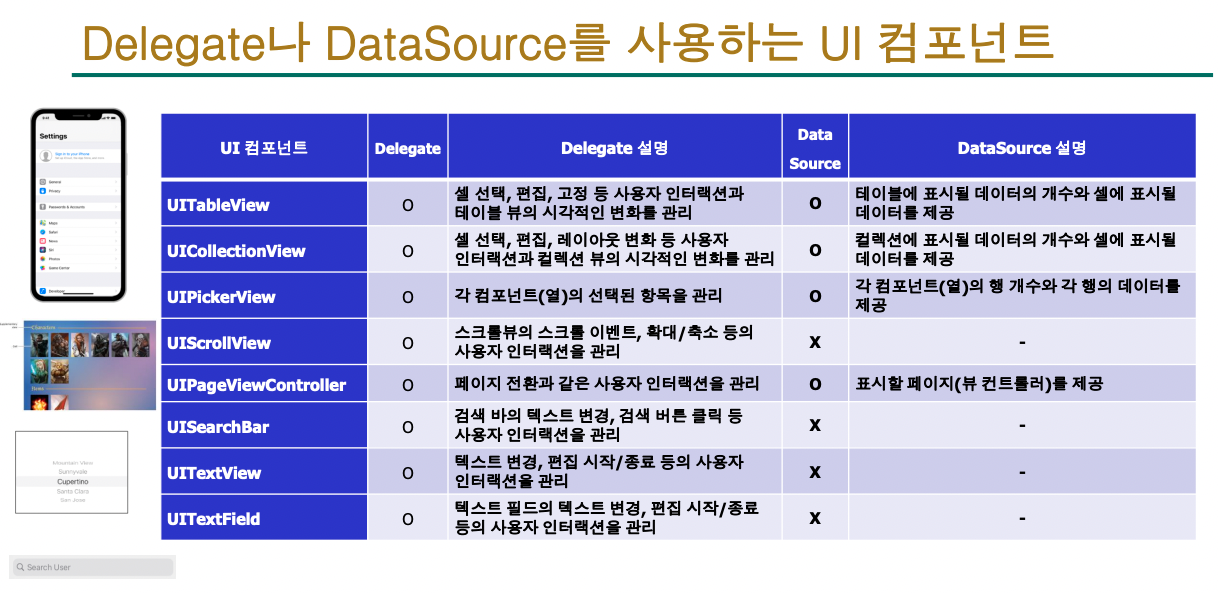
- Swift에서 Table 뷰는 UITableView로, 데이터를 행 단위로 표시하며 부모-자식 관계는 상속(Inheritance)으로 구현된다
- 부모 클래스는 하나만 상속 가능하고, 자식 클래스는 여러 개일 수 있으며 프로토콜(Protocol)을 채택(Adoption)해 기능을 확장한다 (상속 X)
TableView의 DataSource : UITableViewDataSource프로토콜
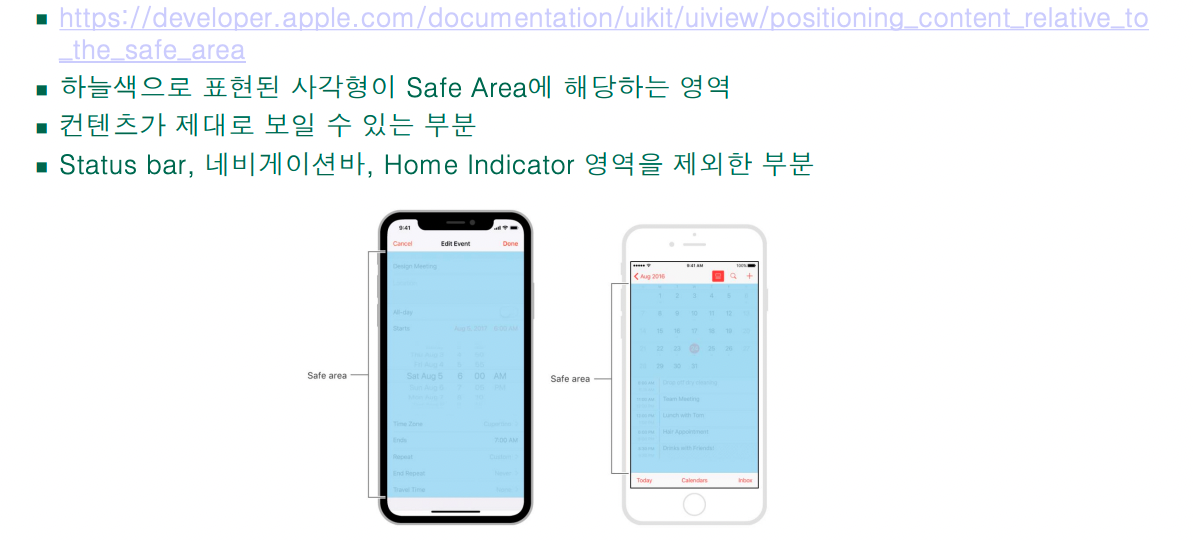
https://developer.apple.com/documentation/uikit/uitableviewdatasource
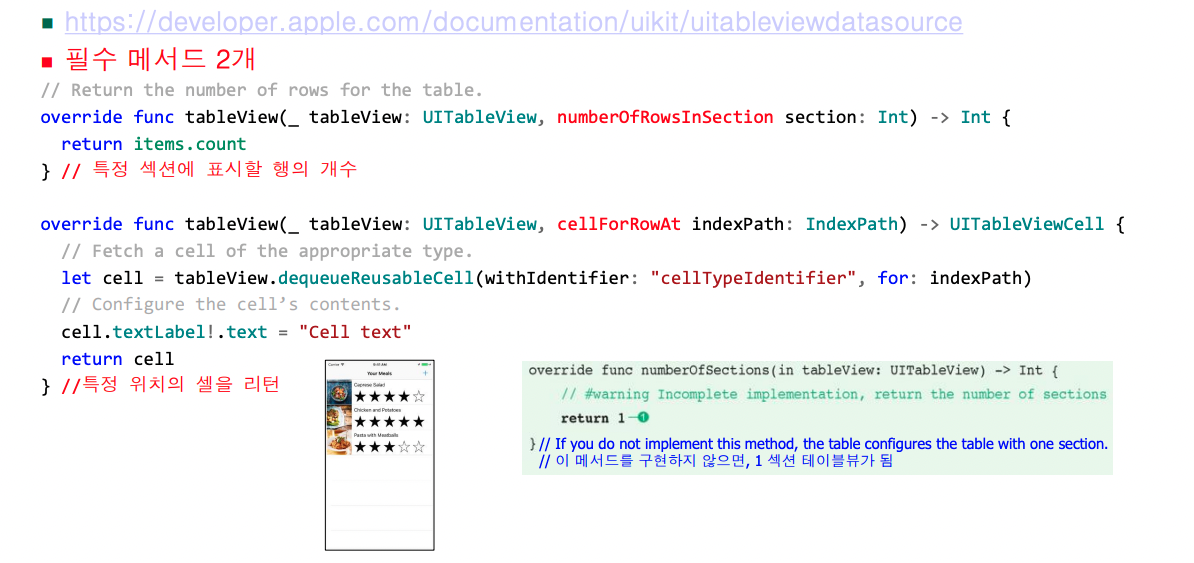
TableView의 DataSource 프로토콜을 채택하면 2개의 필수 메서드가 있다
TableView의 Delegate: UITableViewDelegate프로토콜
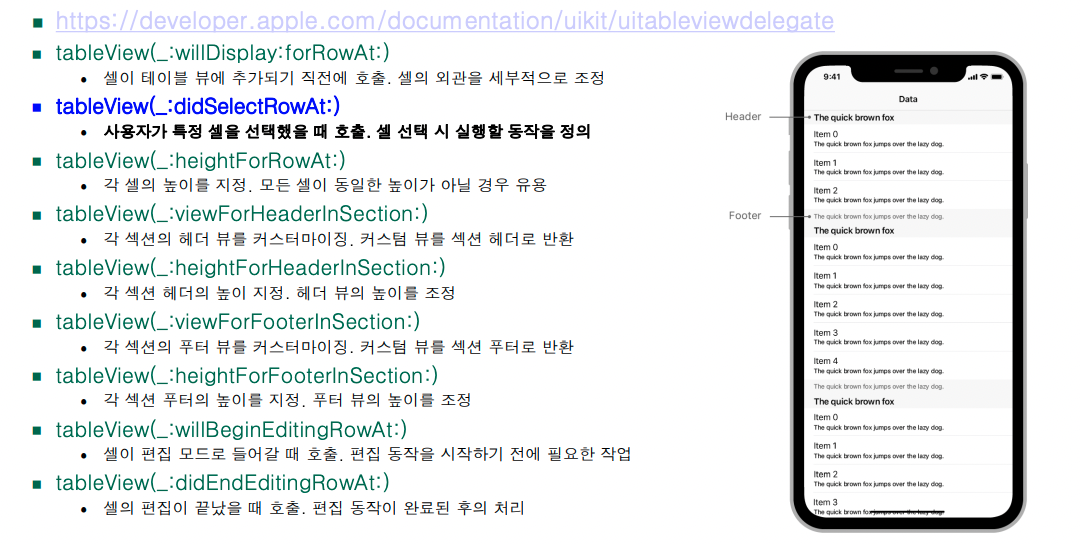
UITableView는 Delegate 패턴을 사용해 데이터 관리와 사용자 상호작용을 처리하며, UITableViewDelegate 프로토콜을 채택한다
UIViewController vs UIViewTableController
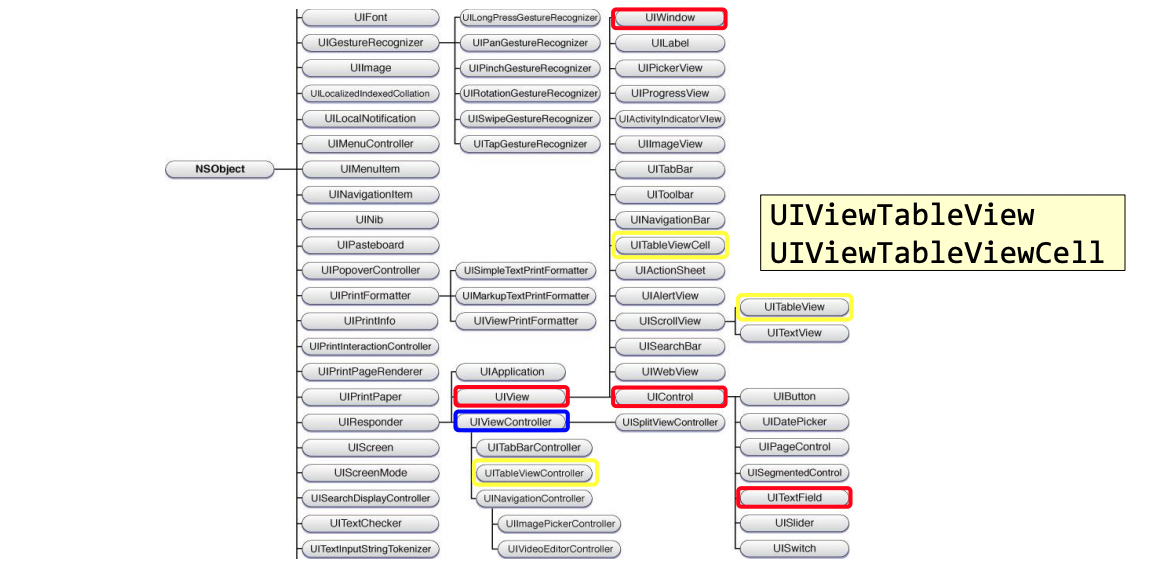
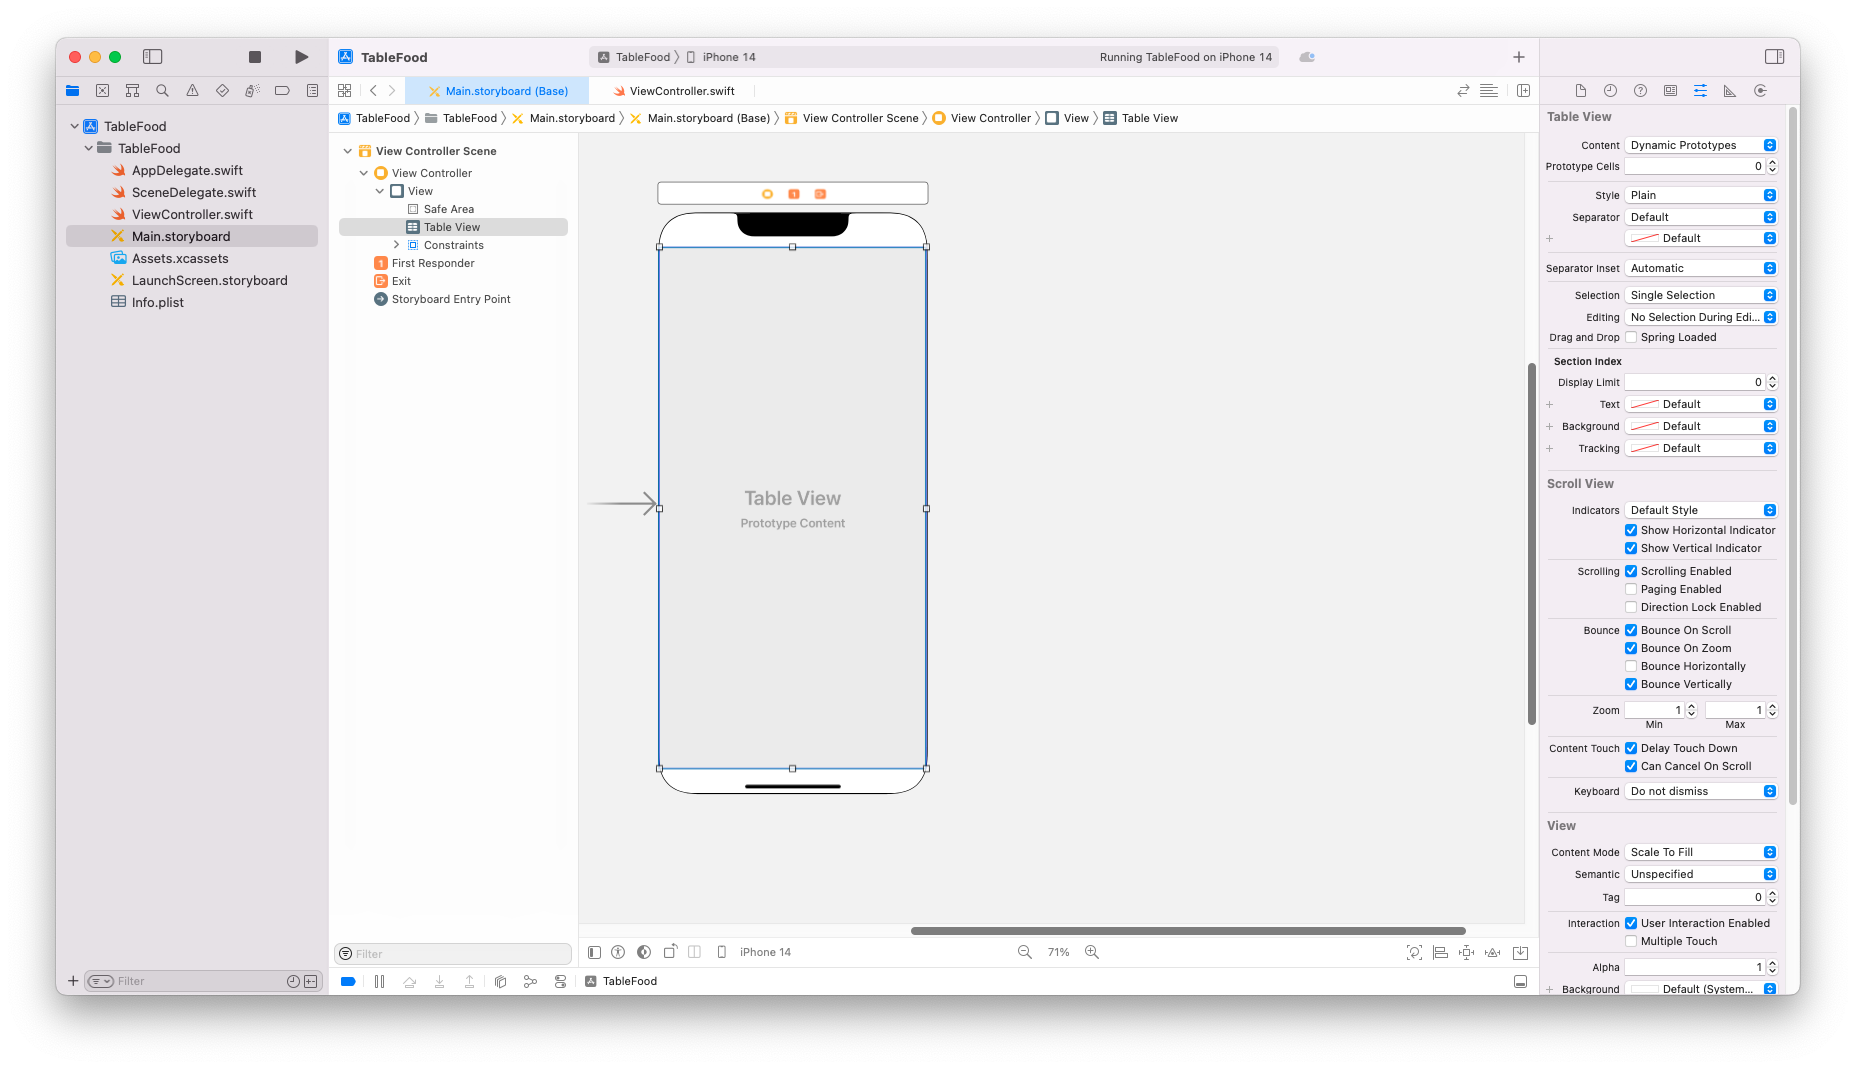
TableView 에서 사용하는 UIView
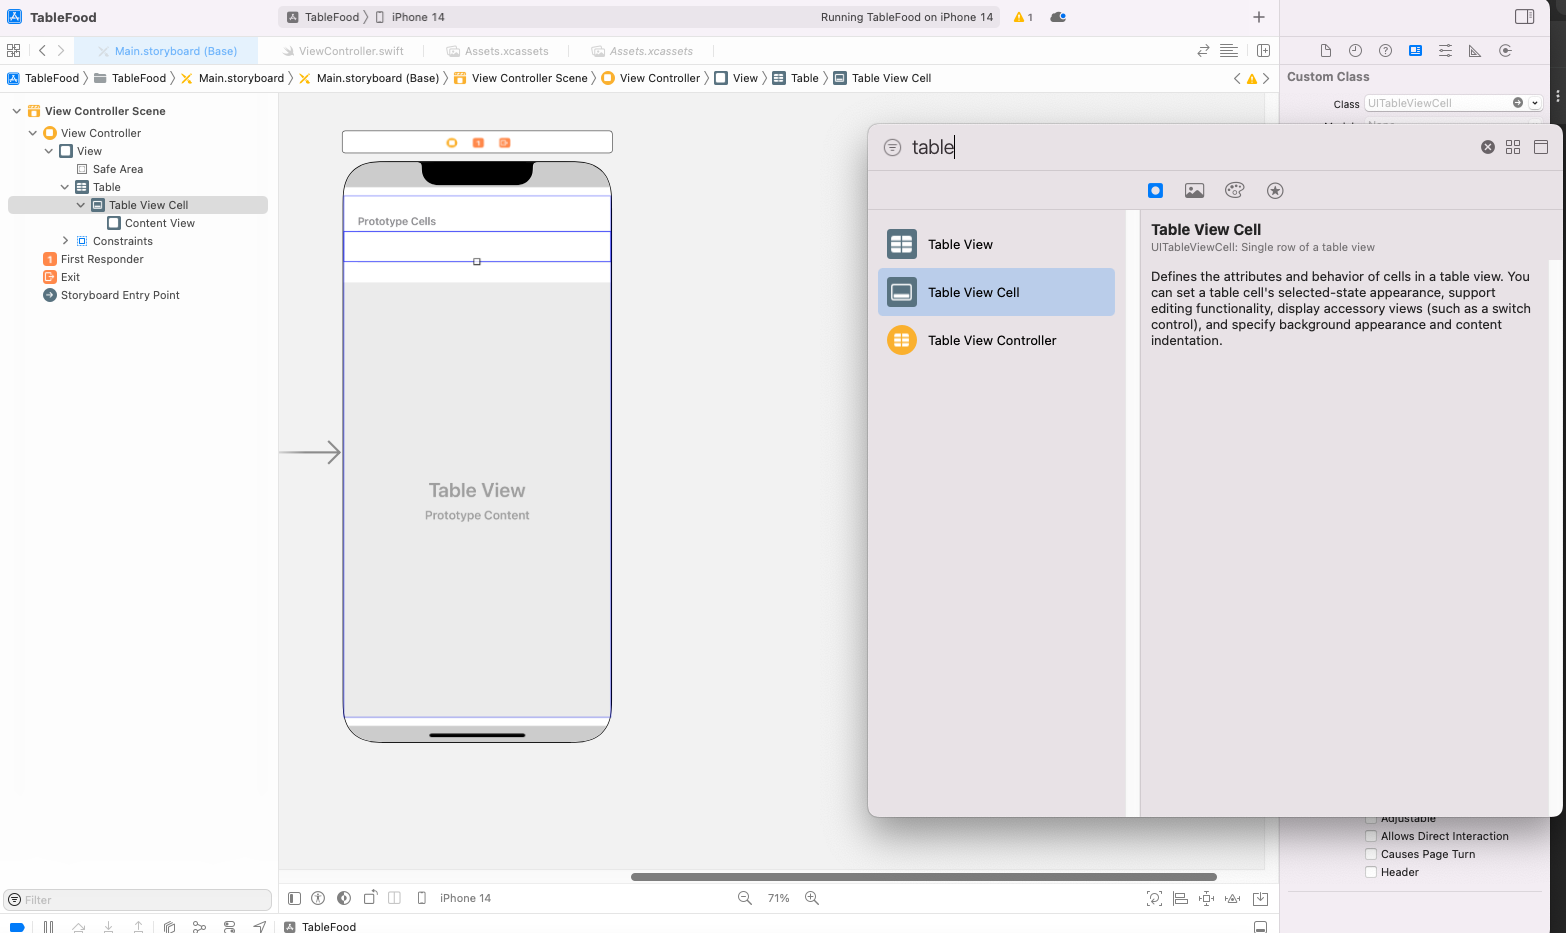
화면 구성 변경하기
Table View Controller
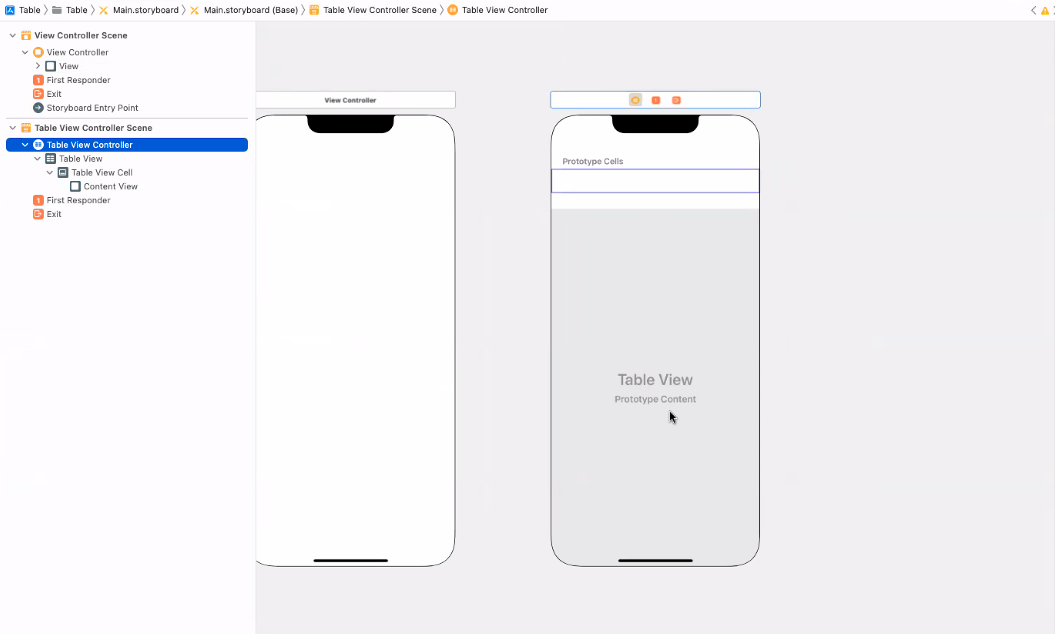
Table View Controller 를 선택(추가)하면 Table View와 Table View Cell 둘 다 자동으로 들어가 있다.
Pin Tool로 Add New Constraints : Table View를 화면 전체를 채움
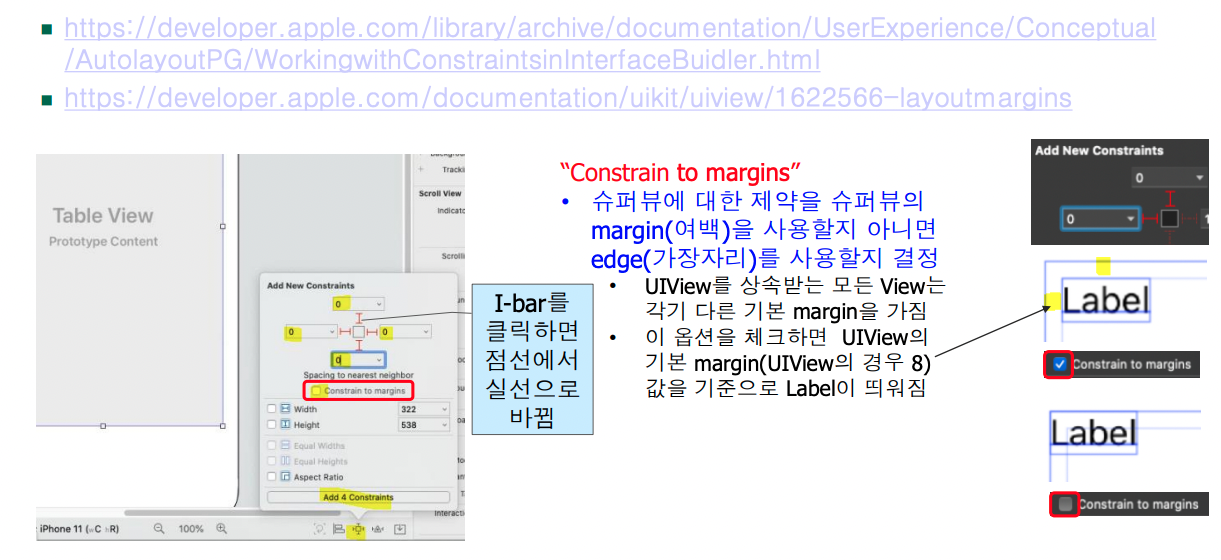
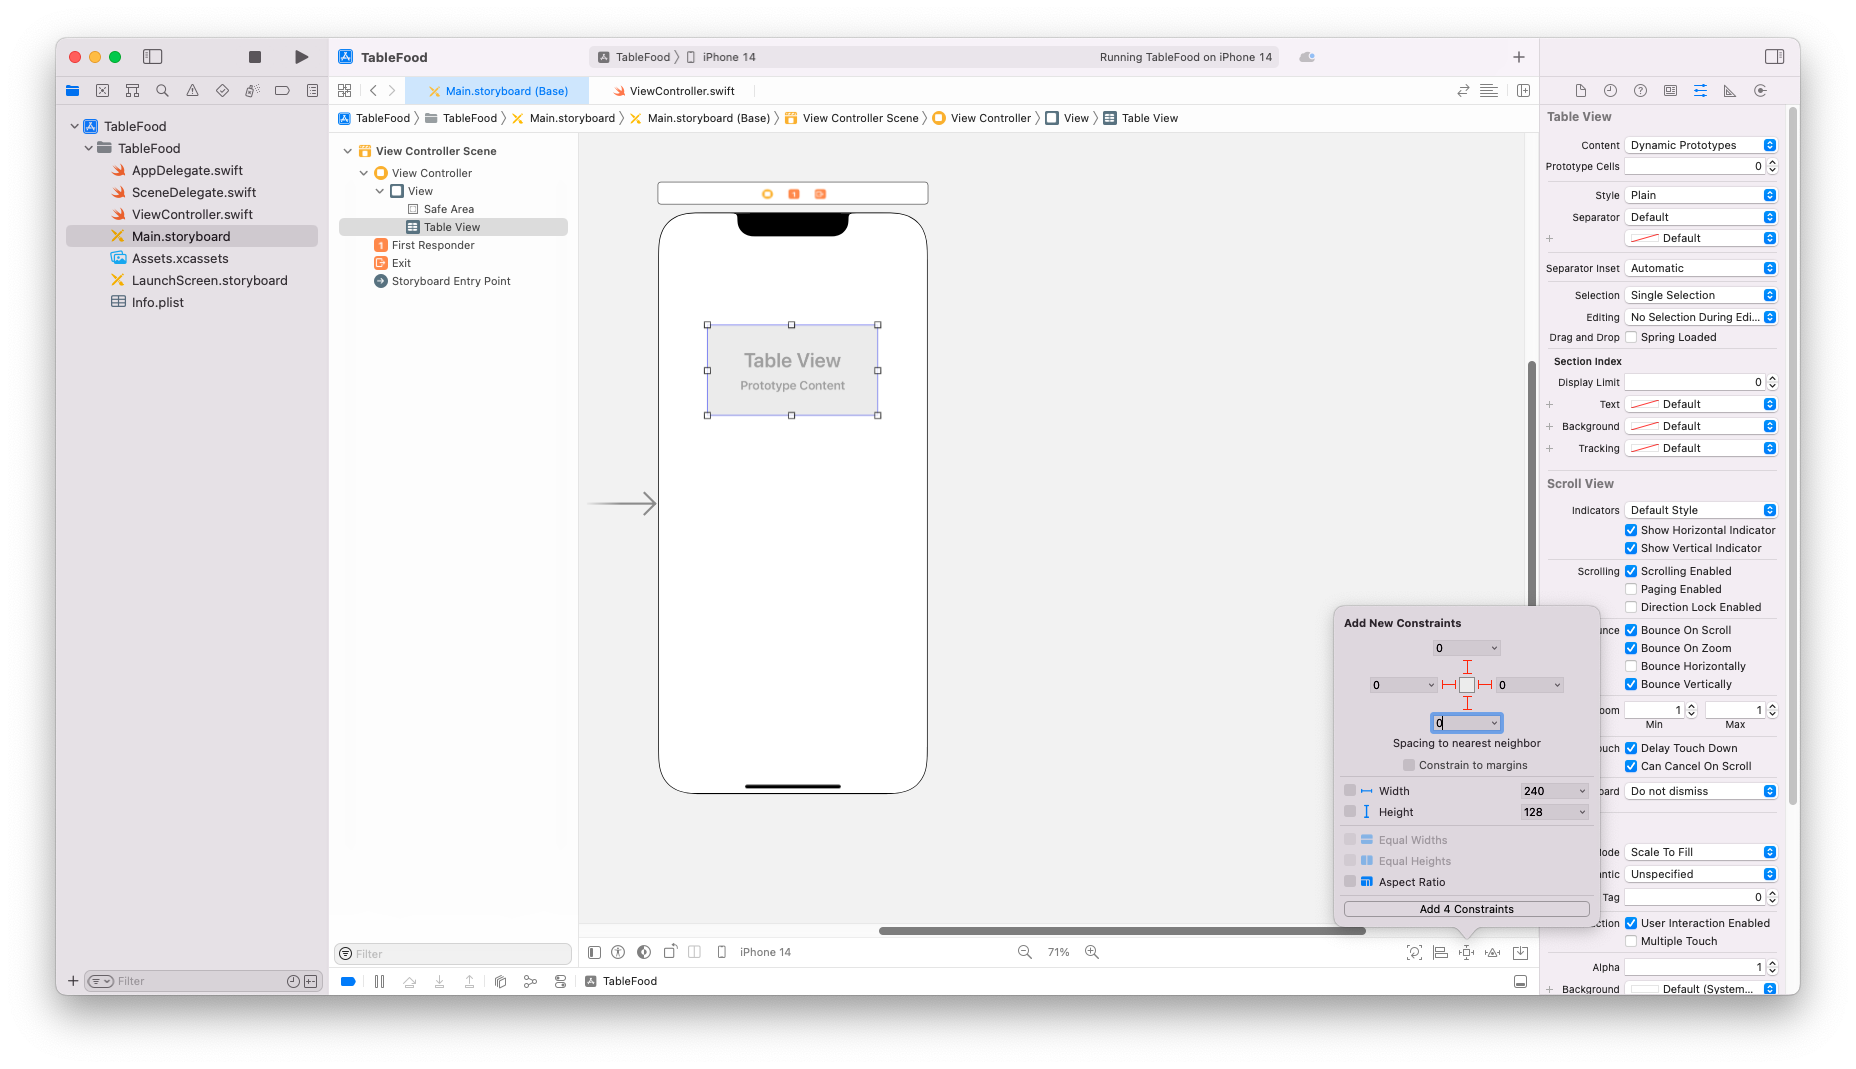
Table View 를 화면에 가득 채우려면 Constrains 값을 0으로 맞춘 후, Constrain to margins 의 속성을 해제해준다 (체크되어있다면 약간의 여백이 생긴다)
Safe Area
완성된 constraints : leading과 trailing
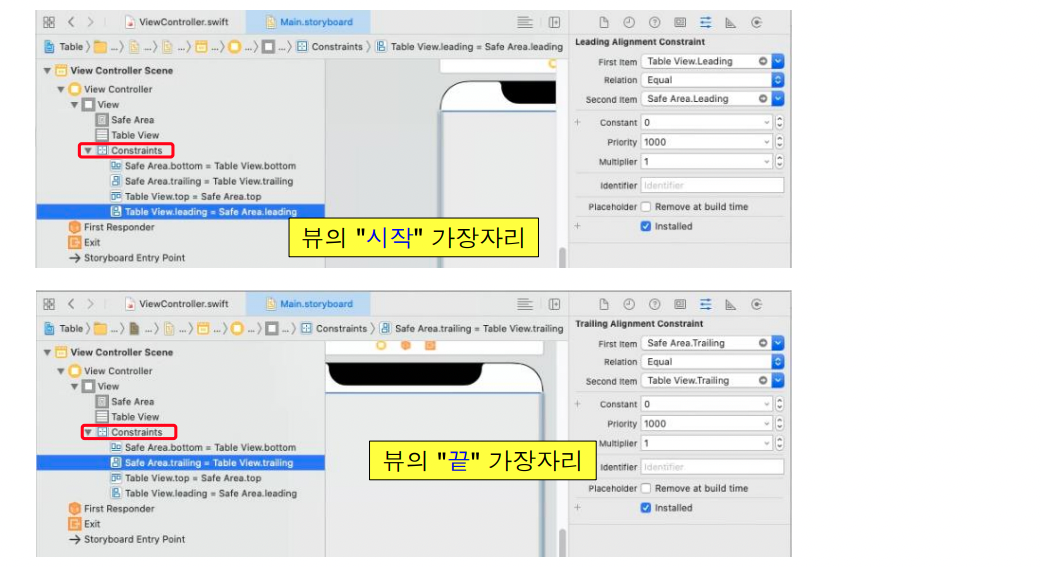
leading : 시작
trailing : 끝
(글의 시작이 오른쪽인 나라가 있기 때문에 이런 표현을 쓴다)
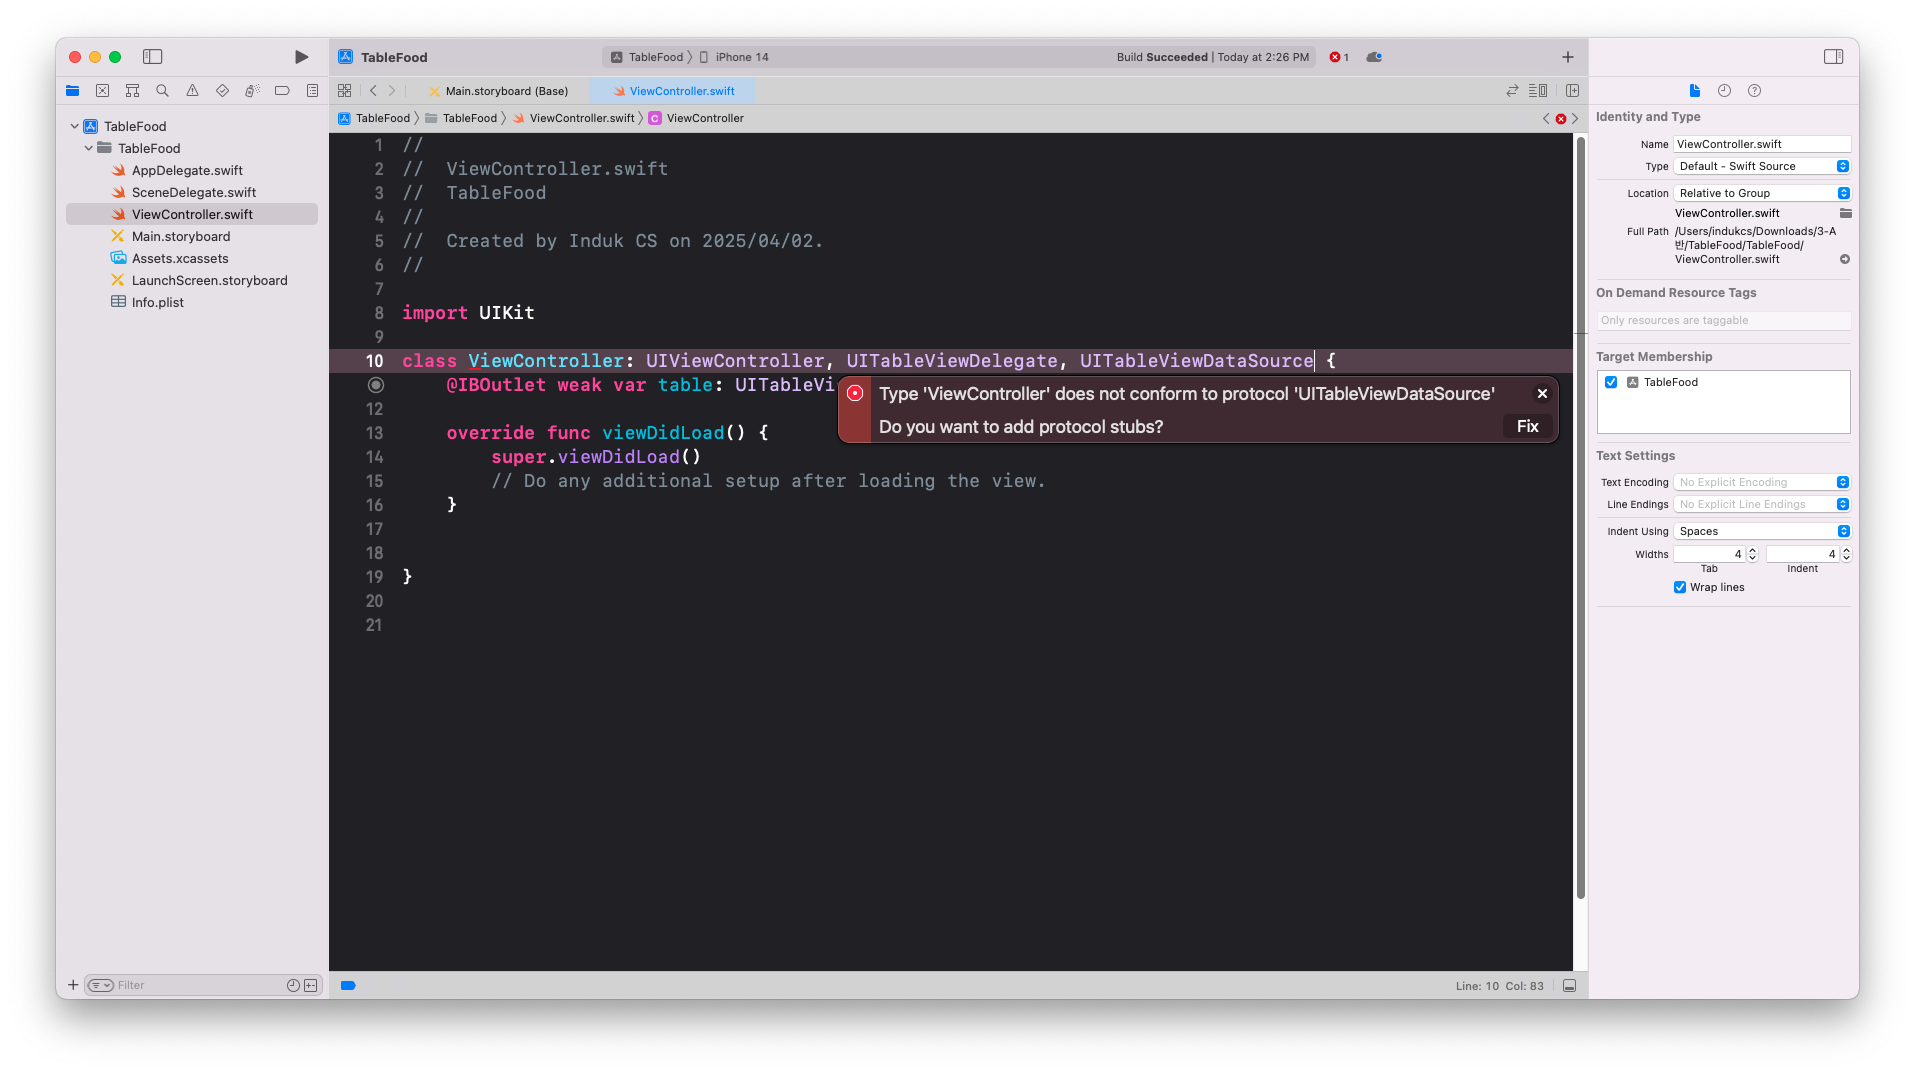
Assistant editor로 storyboard와 소스 연결

테이블뷰는 2개의 protocol 도움을 받아서 하므로 채택
테이블뷰 관련 delegate, datasource 그림 그리기

섹션은 테이블 뷰의 개수, row(행, 셀, cell 이라고도 함)는 칸의 개수
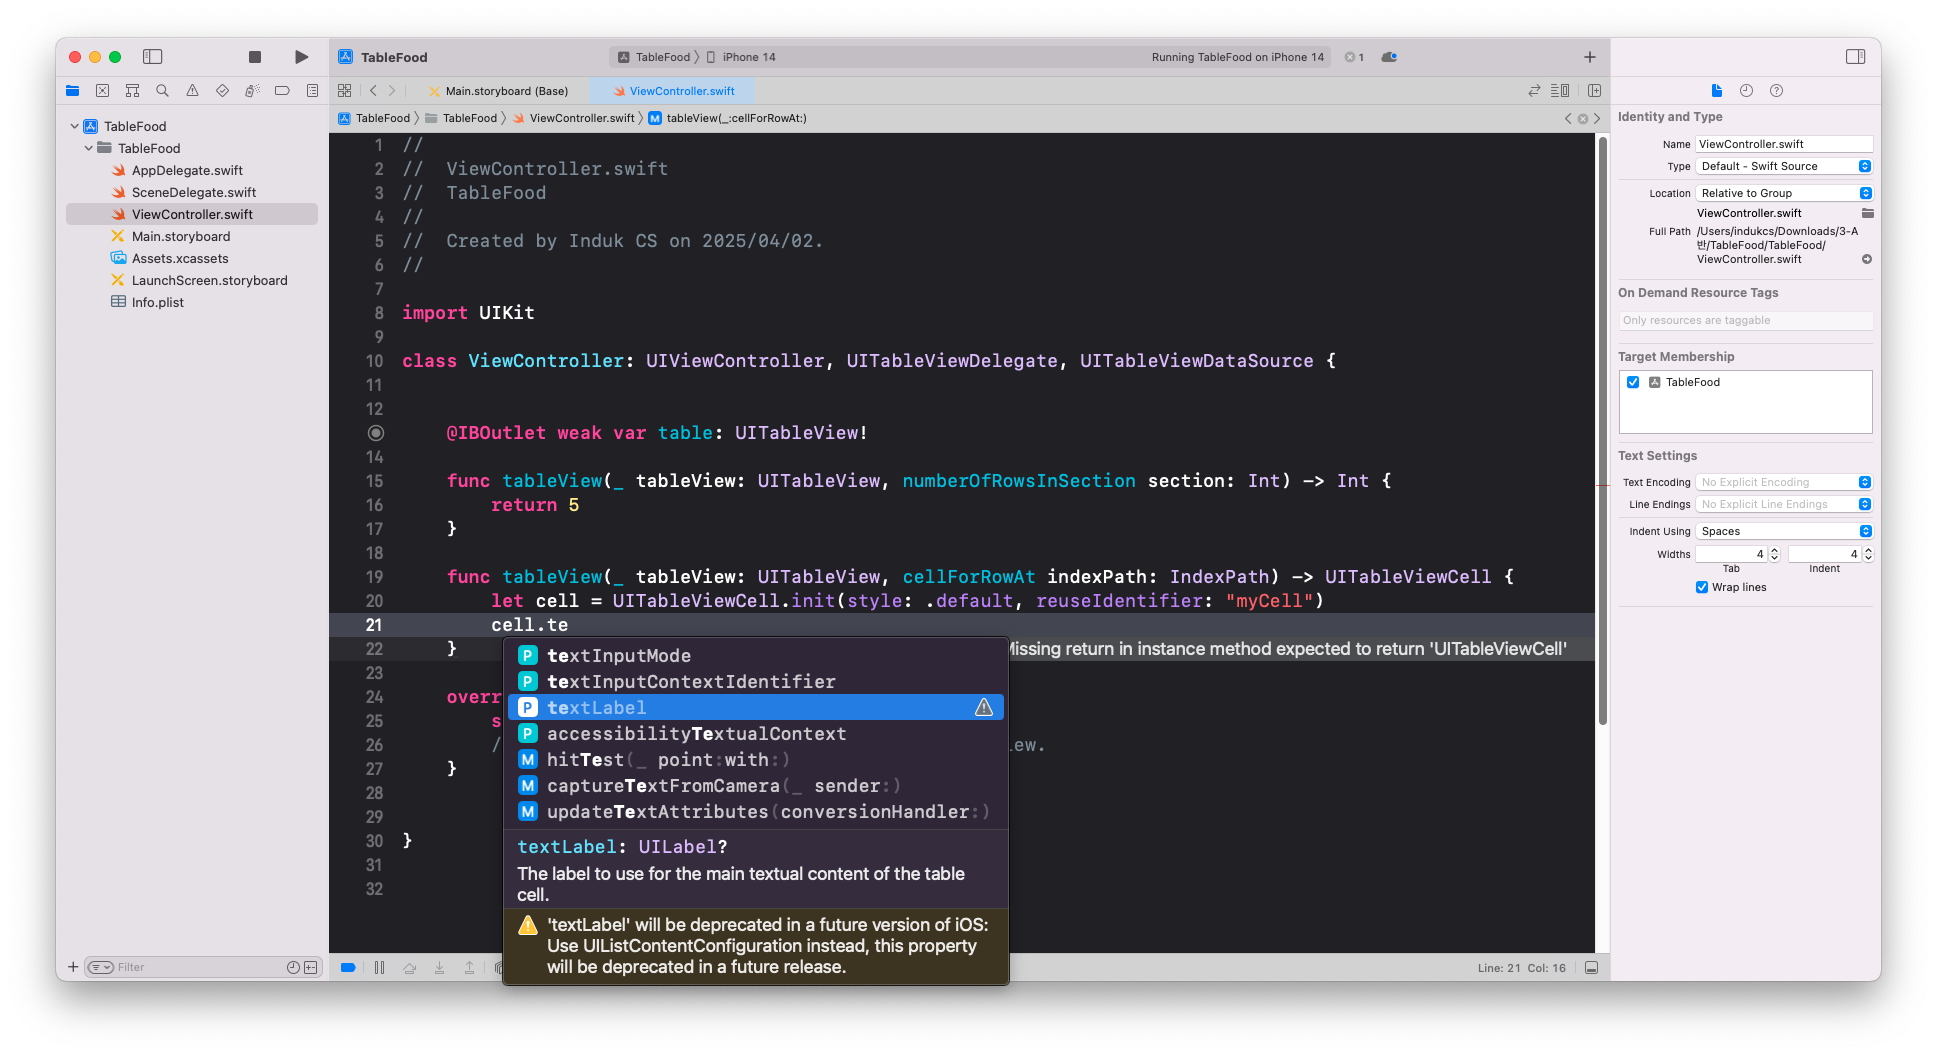
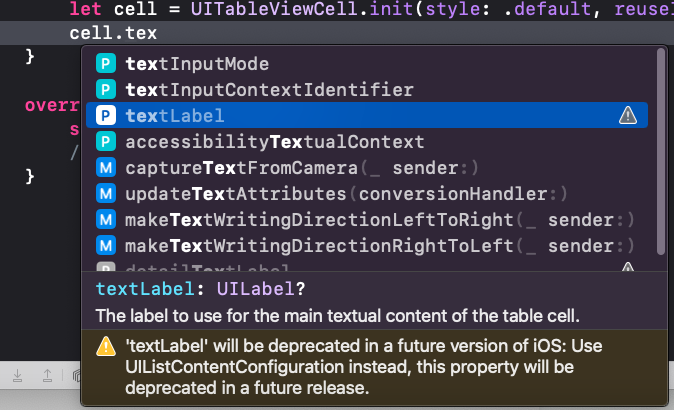
열거형 UITableViewCell.CellStyle

textLabel
indexPath
//
// ViewController.swift
import UIKit
class ViewController: UIViewController, UITableViewDelegate, UITableViewDataSource {
@IBOutlet weak var table: UITableView!
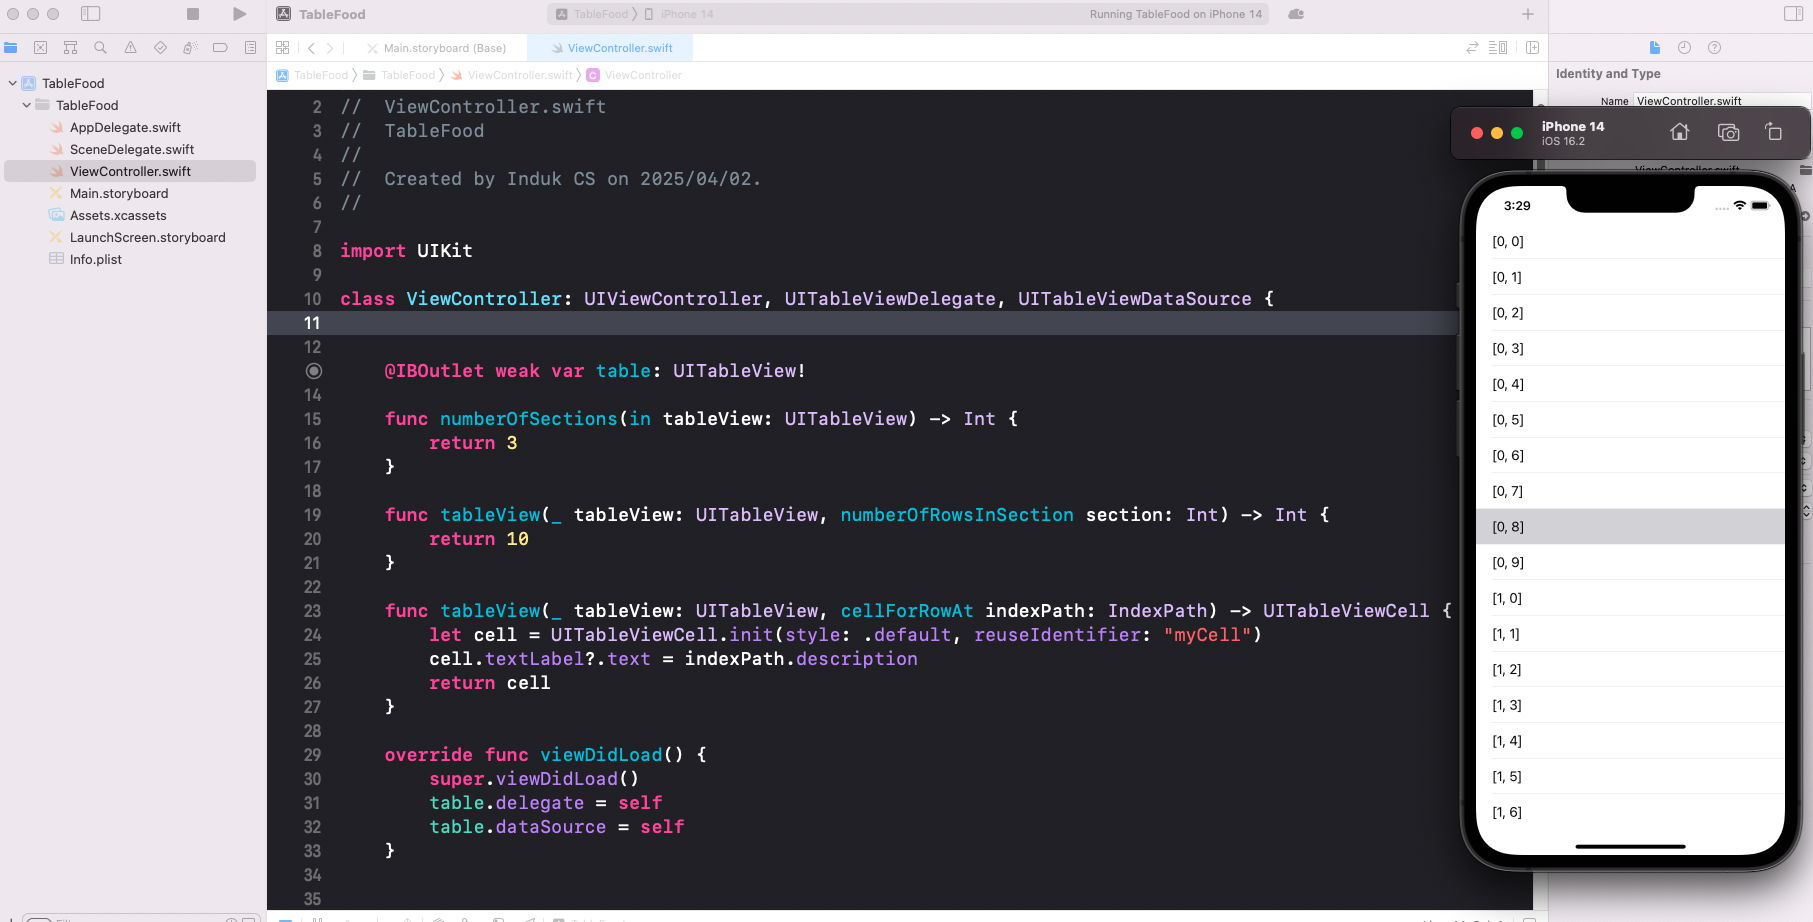
func numberOfSections(in tableView: UITableView) -> Int {
return 3
}
func tableView(_ tableView: UITableView, numberOfRowsInSection section: Int) -> Int {
return 10
}
func tableView(_ tableView: UITableView, cellForRowAt indexPath: IndexPath) -> UITableViewCell {
let cell = UITableViewCell.init(style: .default, reuseIdentifier: "myCell")
cell.textLabel?.text = indexPath.description
return cell
}
override func viewDidLoad() {
super.viewDidLoad()
table.delegate = self
table.dataSource = self
}
}
indexPath.description: 섹션과 행 정보를 "[section, row]" 문자열로 반환.
indexPath.row: 현재 섹션 내 행의 인덱스(정수)를 반환.
detailedTextLabel

import UIKit

class ViewController: UIViewController, UITableViewDelegate, UITableViewDataSource {


    @IBOutlet weak var table: UITableView!

    func numberOfSections(in tableView: UITableView) -> Int {
        return 3
    }

    func tableView(_ tableView: UITableView, numberOfRowsInSection section: Int) -> Int {
        return 10
    }

    func tableView(_ tableView: UITableView, cellForRowAt indexPath: IndexPath) -> UITableViewCell {
        let cell = UITableViewCell.init(style: .subtitle, reuseIdentifier: "myCell")
        cell.textLabel?.text = "\(indexPath.description)"
        cell.detailTextLabel?.text = indexPath.description
        return cell
    }

    override func viewDidLoad() {
        super.viewDidLoad()
        table.delegate = self
        table.dataSource = self
    }


}
Image 추가
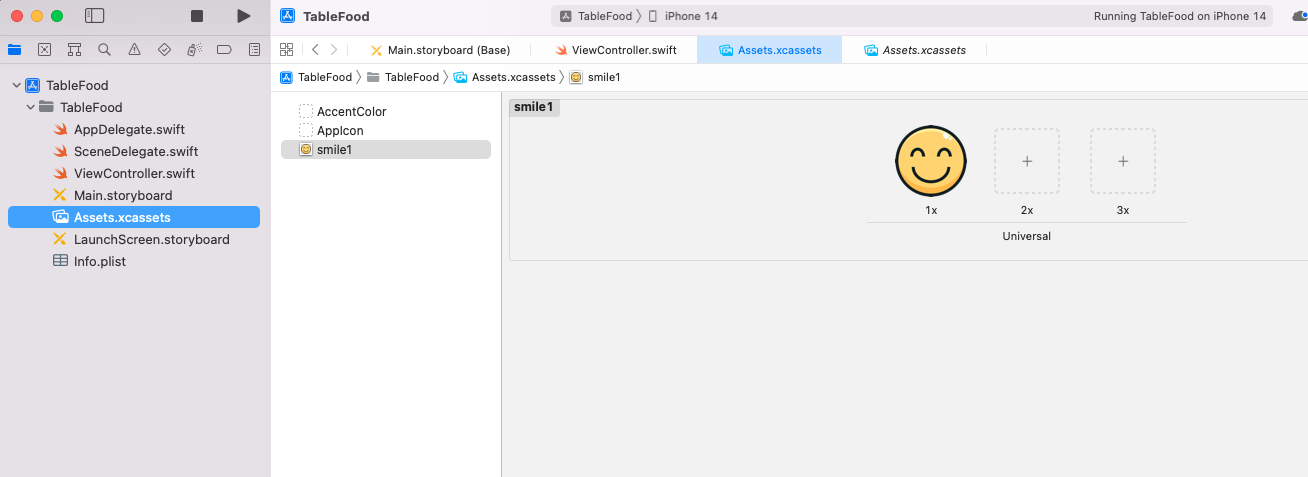
Assets 에 웃는 이미지 추가
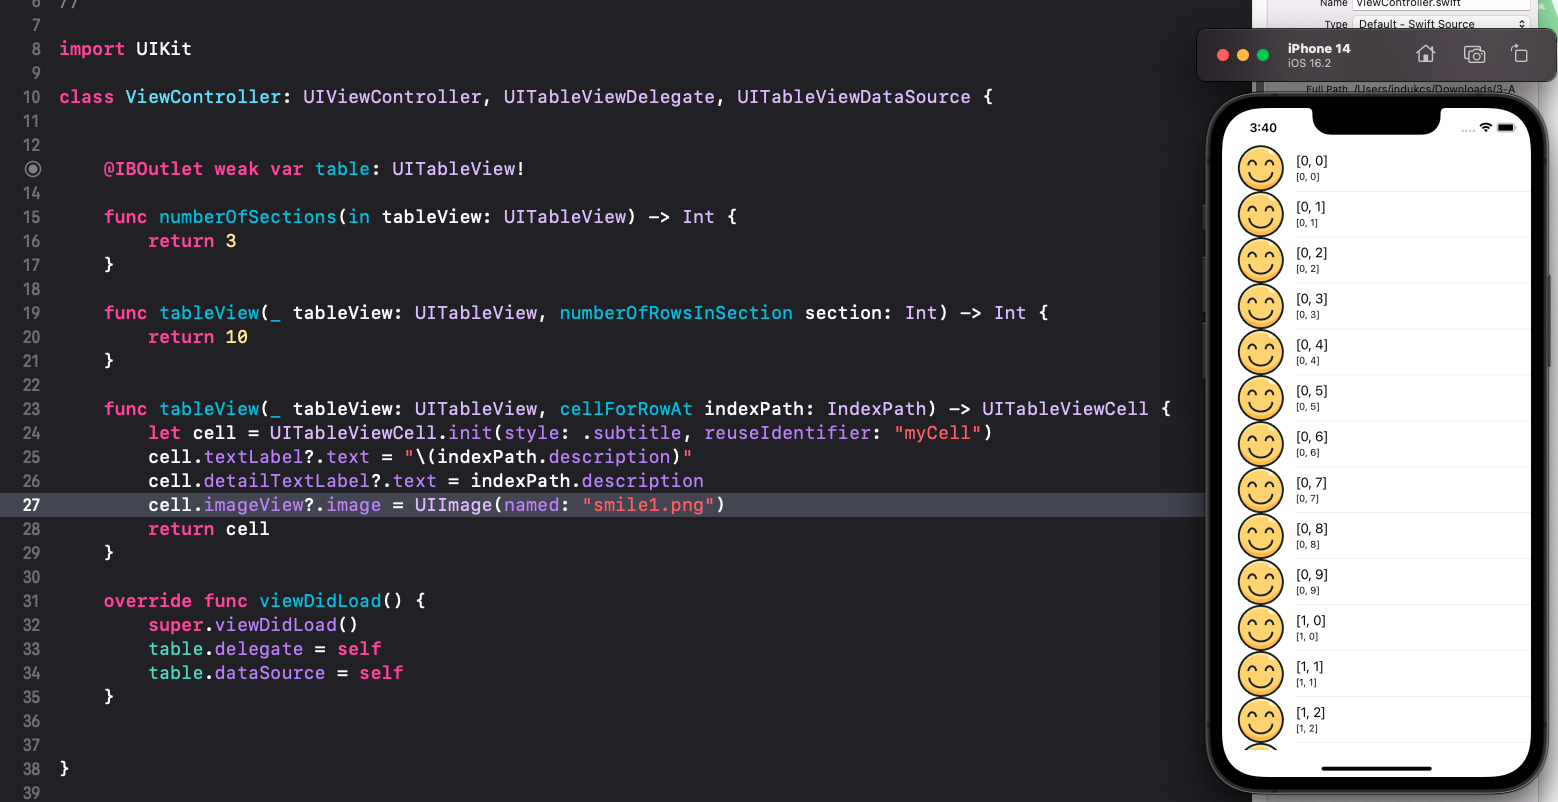
import UIKit

class ViewController: UIViewController, UITableViewDelegate, UITableViewDataSource {


    @IBOutlet weak var table: UITableView!

    func numberOfSections(in tableView: UITableView) -> Int {
        return 3
    }

    func tableView(_ tableView: UITableView, numberOfRowsInSection section: Int) -> Int {
        return 10
    }

    func tableView(_ tableView: UITableView, cellForRowAt indexPath: IndexPath) -> UITableViewCell {
        let cell = UITableViewCell.init(style: .subtitle, reuseIdentifier: "myCell")
        cell.textLabel?.text = "\(indexPath.description)"
        cell.detailTextLabel?.text = indexPath.description
        cell.imageView?.image = UIImage(named: "smile1.png")
        return cell
    }

    override func viewDidLoad() {
        super.viewDidLoad()
        table.delegate = self
        table.dataSource = self
    }


}
indexPath.row
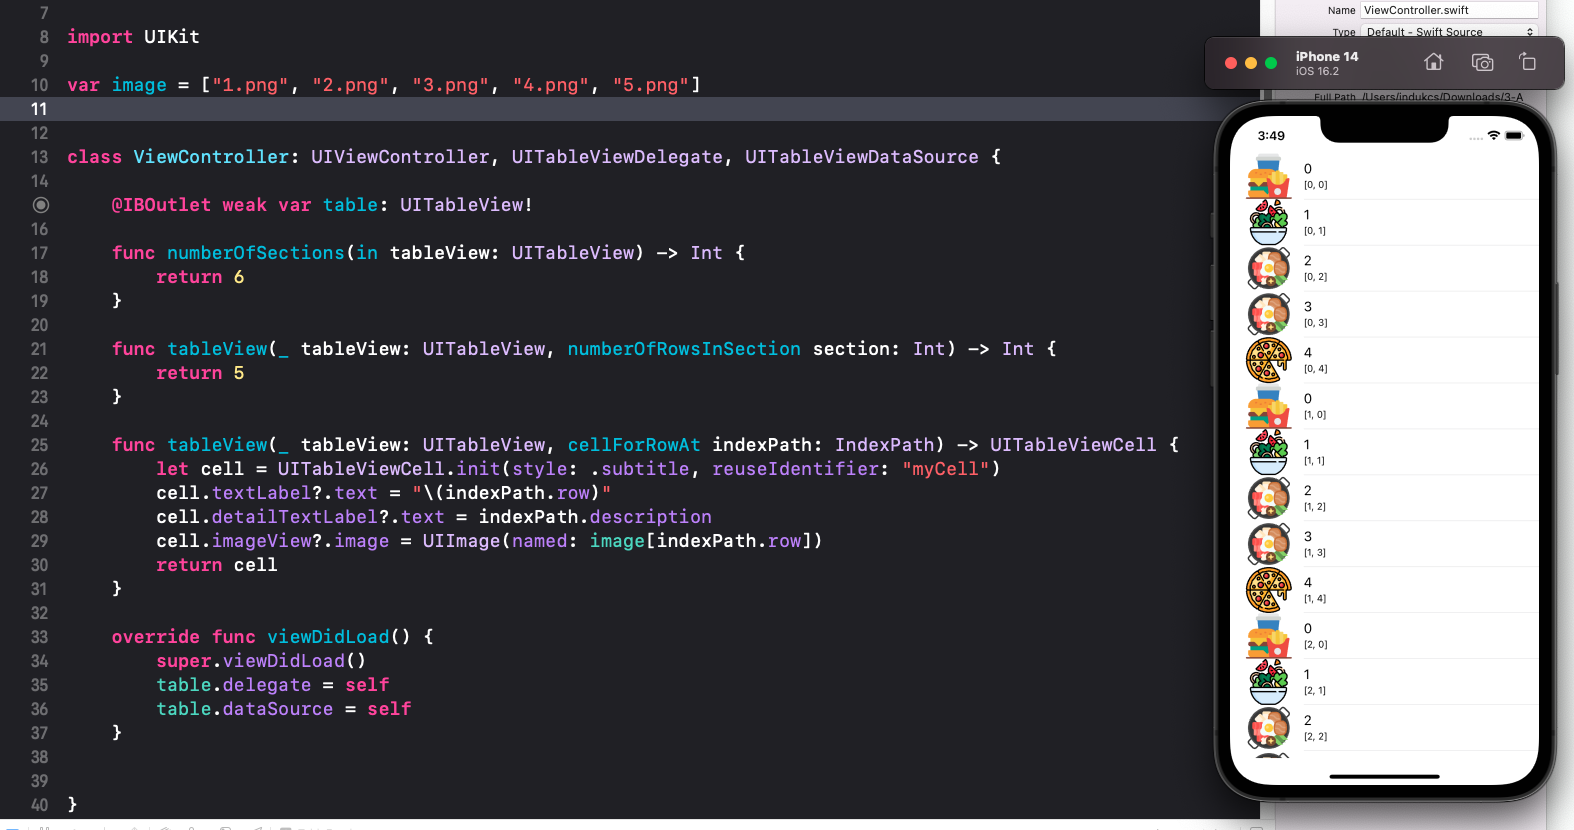
var image = ["1.png", "2.png", "3.png", "4.png", "5.png"]


class ViewController: UIViewController, UITableViewDelegate, UITableViewDataSource {

    @IBOutlet weak var table: UITableView!

    func numberOfSections(in tableView: UITableView) -> Int {
        return 6
    }

    func tableView(_ tableView: UITableView, numberOfRowsInSection section: Int) -> Int {
        return 5
    }

    func tableView(_ tableView: UITableView, cellForRowAt indexPath: IndexPath) -> UITableViewCell {
        let cell = UITableViewCell.init(style: .subtitle, reuseIdentifier: "myCell")
        cell.textLabel?.text = "\(indexPath.row)"
        cell.detailTextLabel?.text = indexPath.description
        cell.imageView?.image = UIImage(named: image[indexPath.row])
        return cell
    }

    override func viewDidLoad() {
        super.viewDidLoad()
        table.delegate = self
        table.dataSource = self
    }


}
image 배열에 저장된 "1.png"부터 "5.png"까지의 PNG 파일을 indexPath.row를 인덱스로 사용해 각 셀의 imageView에 표시
foodName이라는 배열 생성 후 적용하기

import UIKit

var image = ["1.png", "2.png", "3.png", "4.png", "5.png"]
var foodName = ["한식", "간식", "학식", "중식", "집밥"]

class ViewController: UIViewController, UITableViewDelegate, UITableViewDataSource {

    @IBOutlet weak var table: UITableView!

    func numberOfSections(in tableView: UITableView) -> Int {
        return 6
    }

    func tableView(_ tableView: UITableView, numberOfRowsInSection section: Int) -> Int {
        return 5
    }

    func tableView(_ tableView: UITableView, cellForRowAt indexPath: IndexPath) -> UITableViewCell {
        let cell = UITableViewCell.init(style: .subtitle, reuseIdentifier: "myCell")
        cell.textLabel?.text = foodName[indexPath.row]
        cell.detailTextLabel?.text = indexPath.description
        cell.imageView?.image = UIImage(named: image[indexPath.row])
        return cell
    }

    override func viewDidLoad() {
        super.viewDidLoad()
        table.delegate = self
        table.dataSource = self
    }


}
detailTextLabel? 추가
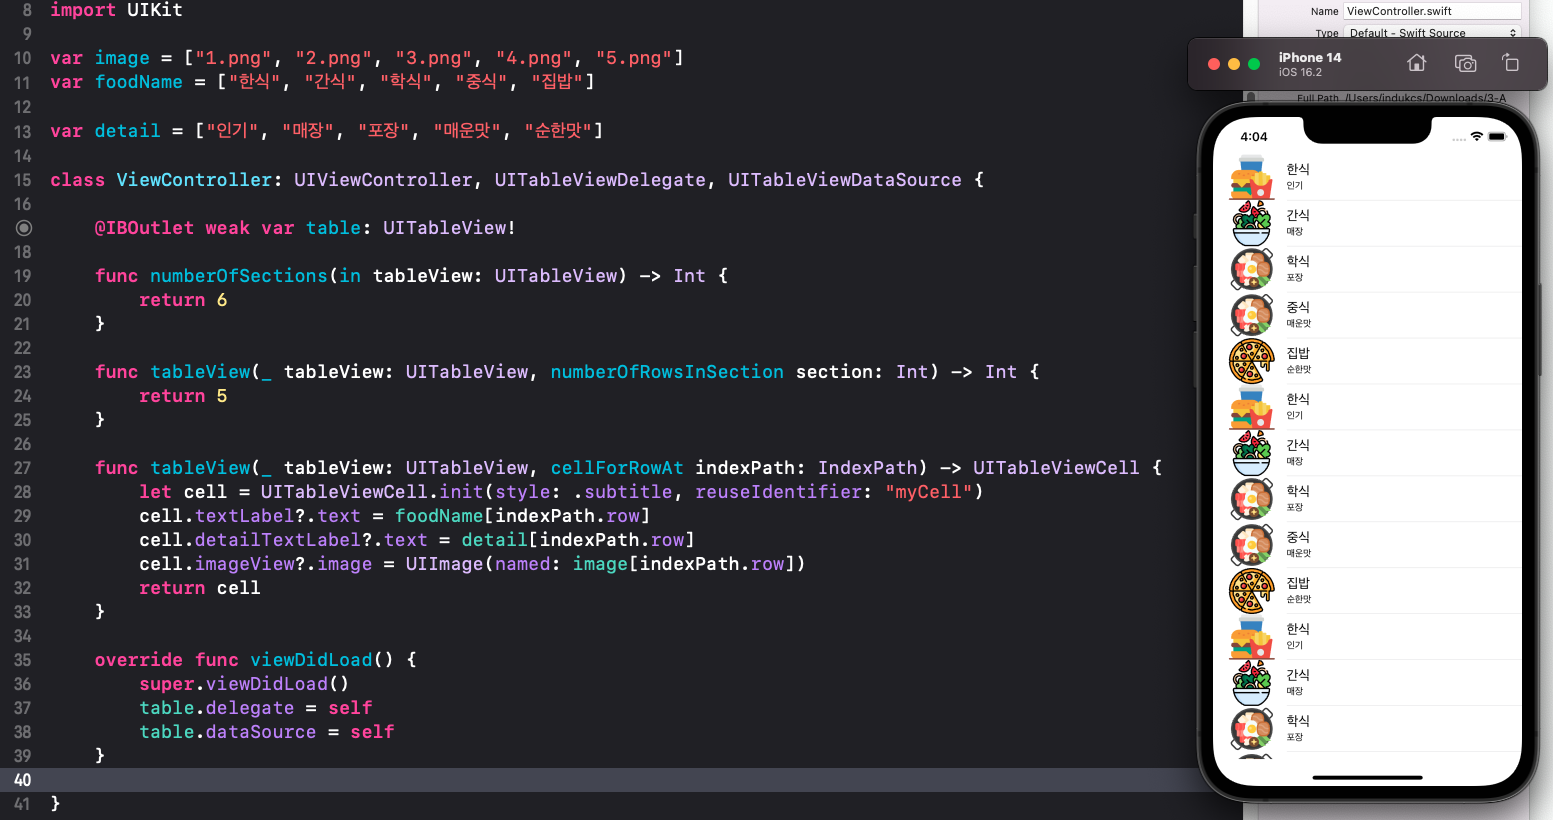
import UIKit

var image = ["1.png", "2.png", "3.png", "4.png", "5.png"]
var foodName = ["한식", "간식", "학식", "중식", "집밥"]

var detail = ["인기", "매장", "포장", "매운맛", "순한맛"]

class ViewController: UIViewController, UITableViewDelegate, UITableViewDataSource {

    @IBOutlet weak var table: UITableView!

    func numberOfSections(in tableView: UITableView) -> Int {
        return 6
    }

    func tableView(_ tableView: UITableView, numberOfRowsInSection section: Int) -> Int {
        return 5
    }

    func tableView(_ tableView: UITableView, cellForRowAt indexPath: IndexPath) -> UITableViewCell {
        let cell = UITableViewCell.init(style: .subtitle, reuseIdentifier: "myCell")
        cell.textLabel?.text = foodName[indexPath.row]
        cell.detailTextLabel?.text = detail[indexPath.row]
        cell.imageView?.image = UIImage(named: image[indexPath.row])
        return cell
    }

    override func viewDidLoad() {
        super.viewDidLoad()
        table.delegate = self
        table.dataSource = self
    }

}
모두 Optional 형으로 해줘야 된다
Table View Cell 추가
Constraints

Constraints를 설정하면 각각 해당하는 곳에 Constraints 설정값이 추가된다.
dequeueReusableCell
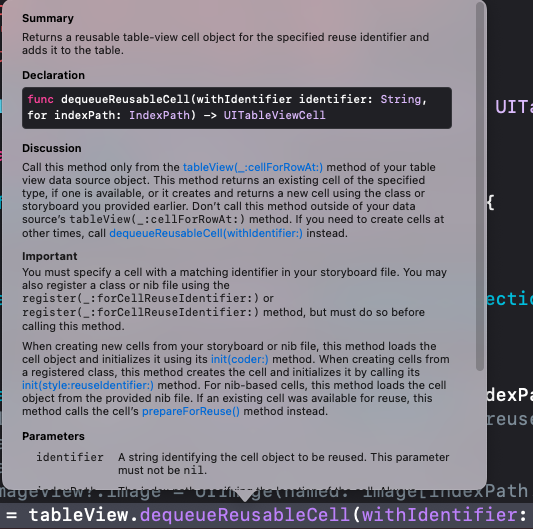
reuturn형이 UITableViewCell
import UIKit
var image = ["1.png", "2.png", "3.png", "4.png", "5.png"]
var foodName = ["한식", "간식", "학식", "중식", "집밥"]
var detail = ["인기", "매장", "포장", "매운맛", "순한맛"]
class ViewController: UIViewController, UITableViewDelegate, UITableViewDataSource {
@IBOutlet weak var table: UITableView!
func numberOfSections(in tableView: UITableView) -> Int {
return 6
}
func tableView(_ tableView: UITableView, numberOfRowsInSection section: Int) -> Int {
return 5
}
func tableView(_ tableView: UITableView, cellForRowAt indexPath: IndexPath) -> UITableViewCell {
// let cell = UITableViewCell.init(style: .subtitle, reuseIdentifier: "myCell")
// cell.textLabel?.text = foodName[indexPath.row]
// cell.detailTextLabel?.text = detail[indexPath.row]
// cell.imageView?.image = UIImage(named: image[indexPath.row])
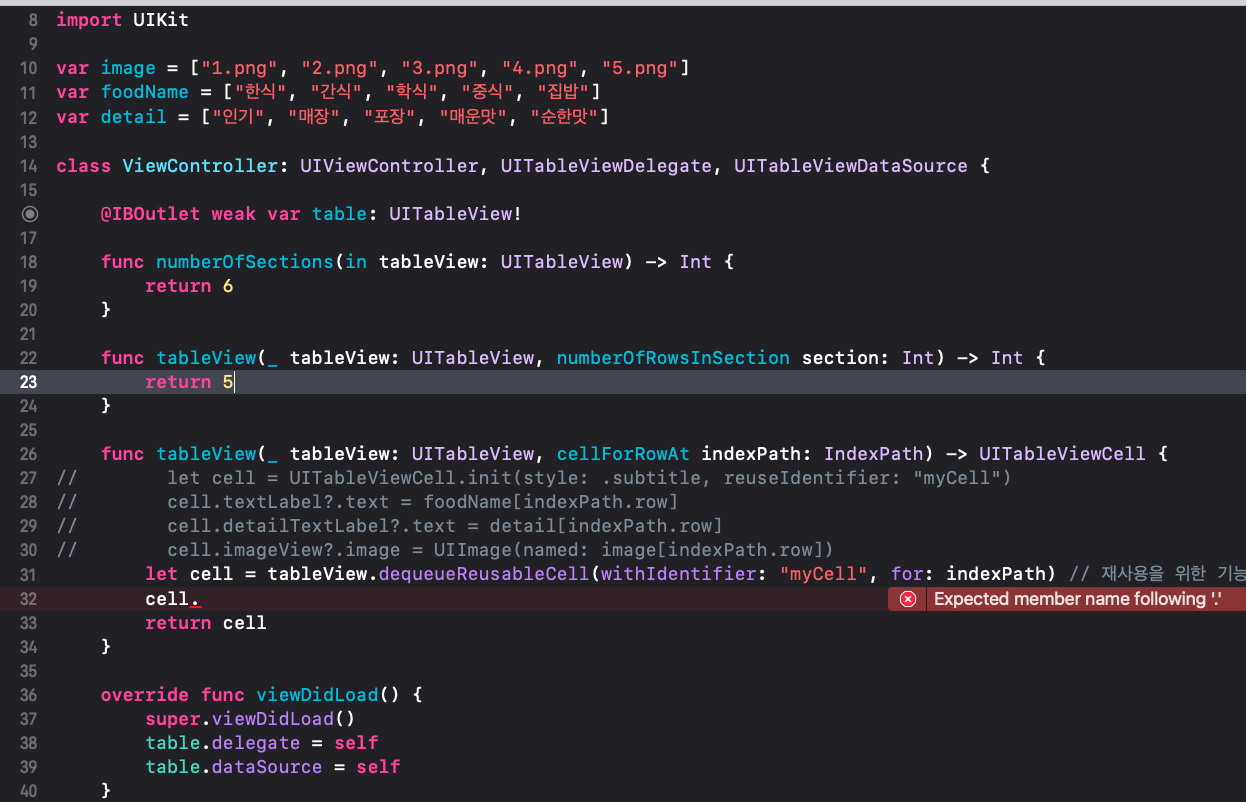
let cell = tableView.dequeueReusableCell(withIdentifier: "myCell", for: indexPath) // 재사용을 위한 기능
cell.
return cell
}
override func viewDidLoad() {
super.viewDidLoad()
table.delegate = self
table.dataSource = self
}dequeueReusableCell(withIdentifier: <>, for: <>)
import UIKit
var image = ["1.png", "2.png", "3.png", "4.png", "5.png"]
var foodName = ["한식", "간식", "학식", "중식", "집밥"]
var detail = ["인기", "매장", "포장", "매운맛", "순한맛"]
class ViewController: UIViewController, UITableViewDelegate, UITableViewDataSource {
@IBOutlet weak var table: UITableView!
func numberOfSections(in tableView: UITableView) -> Int {
return 6
}
func tableView(_ tableView: UITableView, numberOfRowsInSection section: Int) -> Int {
return 5
}
func tableView(_ tableView: UITableView, cellForRowAt indexPath: IndexPath) -> UITableViewCell {
// let cell = UITableViewCell.init(style: .subtitle, reuseIdentifier: "myCell")
// cell.textLabel?.text = foodName[indexPath.row]
// cell.detailTextLabel?.text = detail[indexPath.row]
// cell.imageView?.image = UIImage(named: image[indexPath.row])
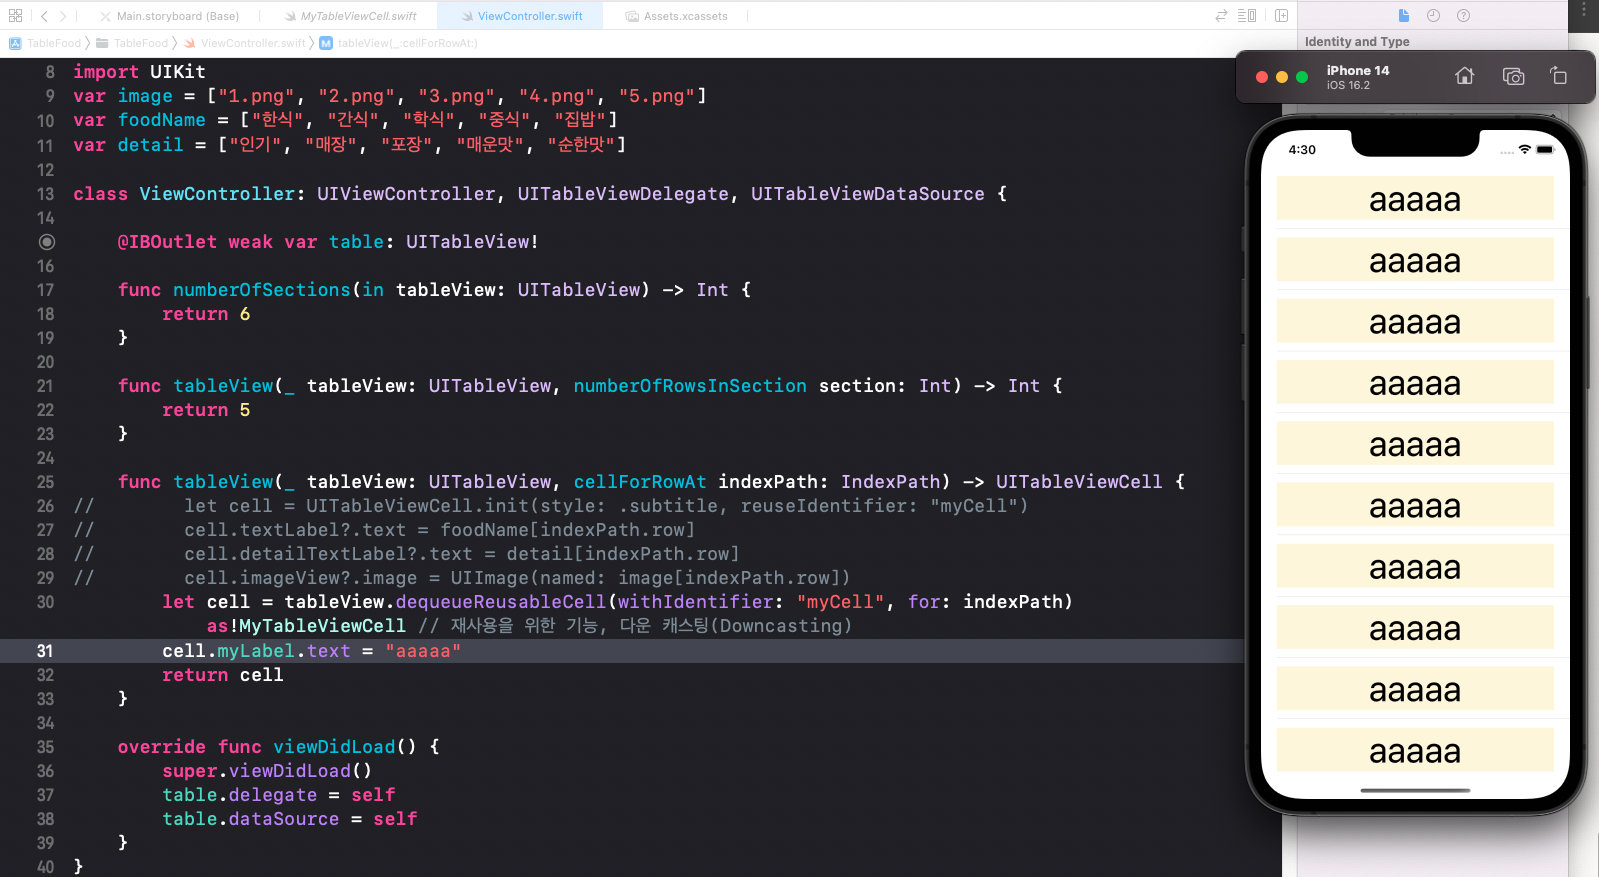
let cell = tableView.dequeueReusableCell(withIdentifier: "myCell", for: indexPath) as!MyTableViewCell // 재사용을 위한 기능, 다운 캐스팅(Downcasting)
cell.myLabel.text = "aaaaa"
return cell
}
override func viewDidLoad() {
super.viewDidLoad()
table.delegate = self
table.dataSource = self
}
}cellForRowAt
import UIKit
var image = ["1.png", "2.png", "3.png", "4.png", "5.png"]
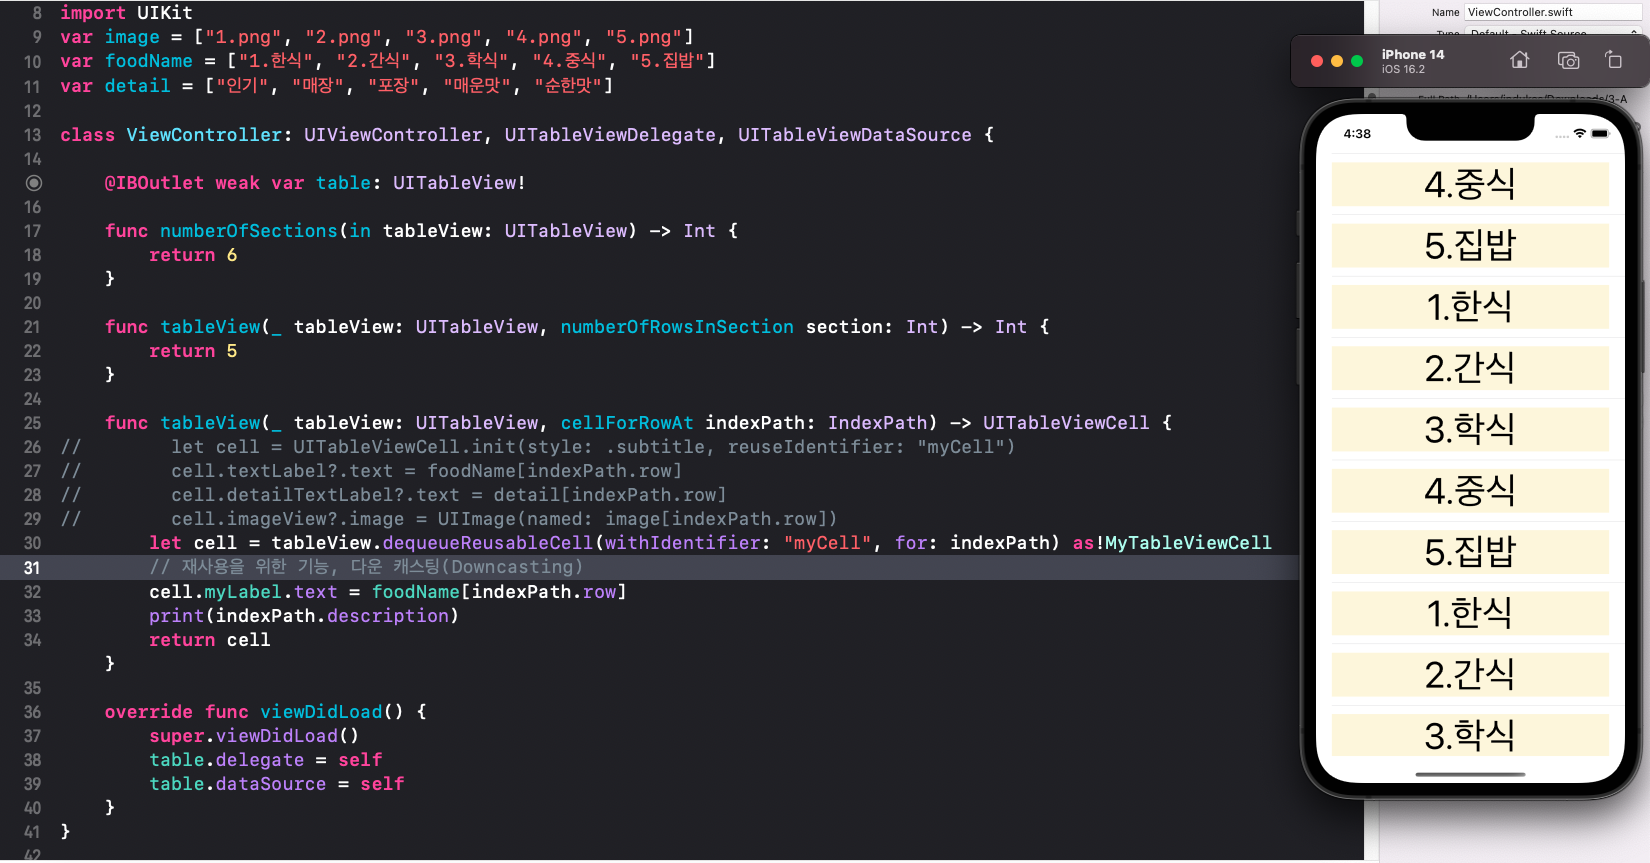
var foodName = ["1.한식", "2.간식", "3.학식", "4.중식", "5.집밥"]
var detail = ["인기", "매장", "포장", "매운맛", "순한맛"]
class ViewController: UIViewController, UITableViewDelegate, UITableViewDataSource {
@IBOutlet weak var table: UITableView!
func numberOfSections(in tableView: UITableView) -> Int {
return 6
}
func tableView(_ tableView: UITableView, numberOfRowsInSection section: Int) -> Int {
return 5
}
func tableView(_ tableView: UITableView, cellForRowAt indexPath: IndexPath) -> UITableViewCell {
// let cell = UITableViewCell.init(style: .subtitle, reuseIdentifier: "myCell")
// cell.textLabel?.text = foodName[indexPath.row]
// cell.detailTextLabel?.text = detail[indexPath.row]
// cell.imageView?.image = UIImage(named: image[indexPath.row])
let cell = tableView.dequeueReusableCell(withIdentifier: "myCell", for: indexPath) as!MyTableViewCell
// 재사용을 위한 기능, 다운 캐스팅(Downcasting)
cell.myLabel.text = foodName[indexPath.row]
print(indexPath.description)
return cell
}
override func viewDidLoad() {
super.viewDidLoad()
table.delegate = self
table.dataSource = self
}
}
각각 셀에 있는 정보들을 만드는데, 모든 셀을 만드는 것이 아닌 화면에 표시되는 데이터와, 그와 인접한 셀들을 표시한다.
AI 답변 : Swift에서 UITableView의 특정 행(row)을 표시할 때 호출되는 메서드입니다. 이 메서드는 각 셀을 재사용하거나 새로 생성하고 데이터를 설정하는 역할을 합니다.
didSelectRowAt

특정 row 에서 클릭(입력)된 값을 알고 싶을 때 사용하는 함수
import UIKit
var image = ["1.png", "2.png", "3.png", "4.png", "5.png"]
var foodName = ["1.한식", "2.간식", "3.학식", "4.중식", "5.집밥"]
var detail = ["인기", "매장", "포장", "매운맛", "순한맛"]

class ViewController: UIViewController, UITableViewDelegate, UITableViewDataSource {

    @IBOutlet weak var table: UITableView!

    func numberOfSections(in tableView: UITableView) -> Int {
        return 6
    }

    func tableView(_ tableView: UITableView, numberOfRowsInSection section: Int) -> Int {
        return 5
    }
    func tableView(_ tableView: UITableView, didSelectRowAt indexPath: IndexPath) {
        print(indexPath.description)
    }

    func tableView(_ tableView: UITableView, cellForRowAt indexPath: IndexPath) -> UITableViewCell {
//        let cell = UITableViewCell.init(style: .subtitle, reuseIdentifier: "myCell")
//        cell.textLabel?.text = foodName[indexPath.row]
//        cell.detailTextLabel?.text = detail[indexPath.row]
//        cell.imageView?.image = UIImage(named: image[indexPath.row])
        let cell = tableView.dequeueReusableCell(withIdentifier: "myCell", for: indexPath) as!MyTableViewCell
        // 재사용을 위한 기능, 다운 캐스팅(Downcasting)
        cell.myLabel.text = foodName[indexPath.row]
        print(indexPath.description)
        return cell
    }

    override func viewDidLoad() {
        super.viewDidLoad()
        table.delegate = self
        table.dataSource = self
    }
}
UIImage 추가
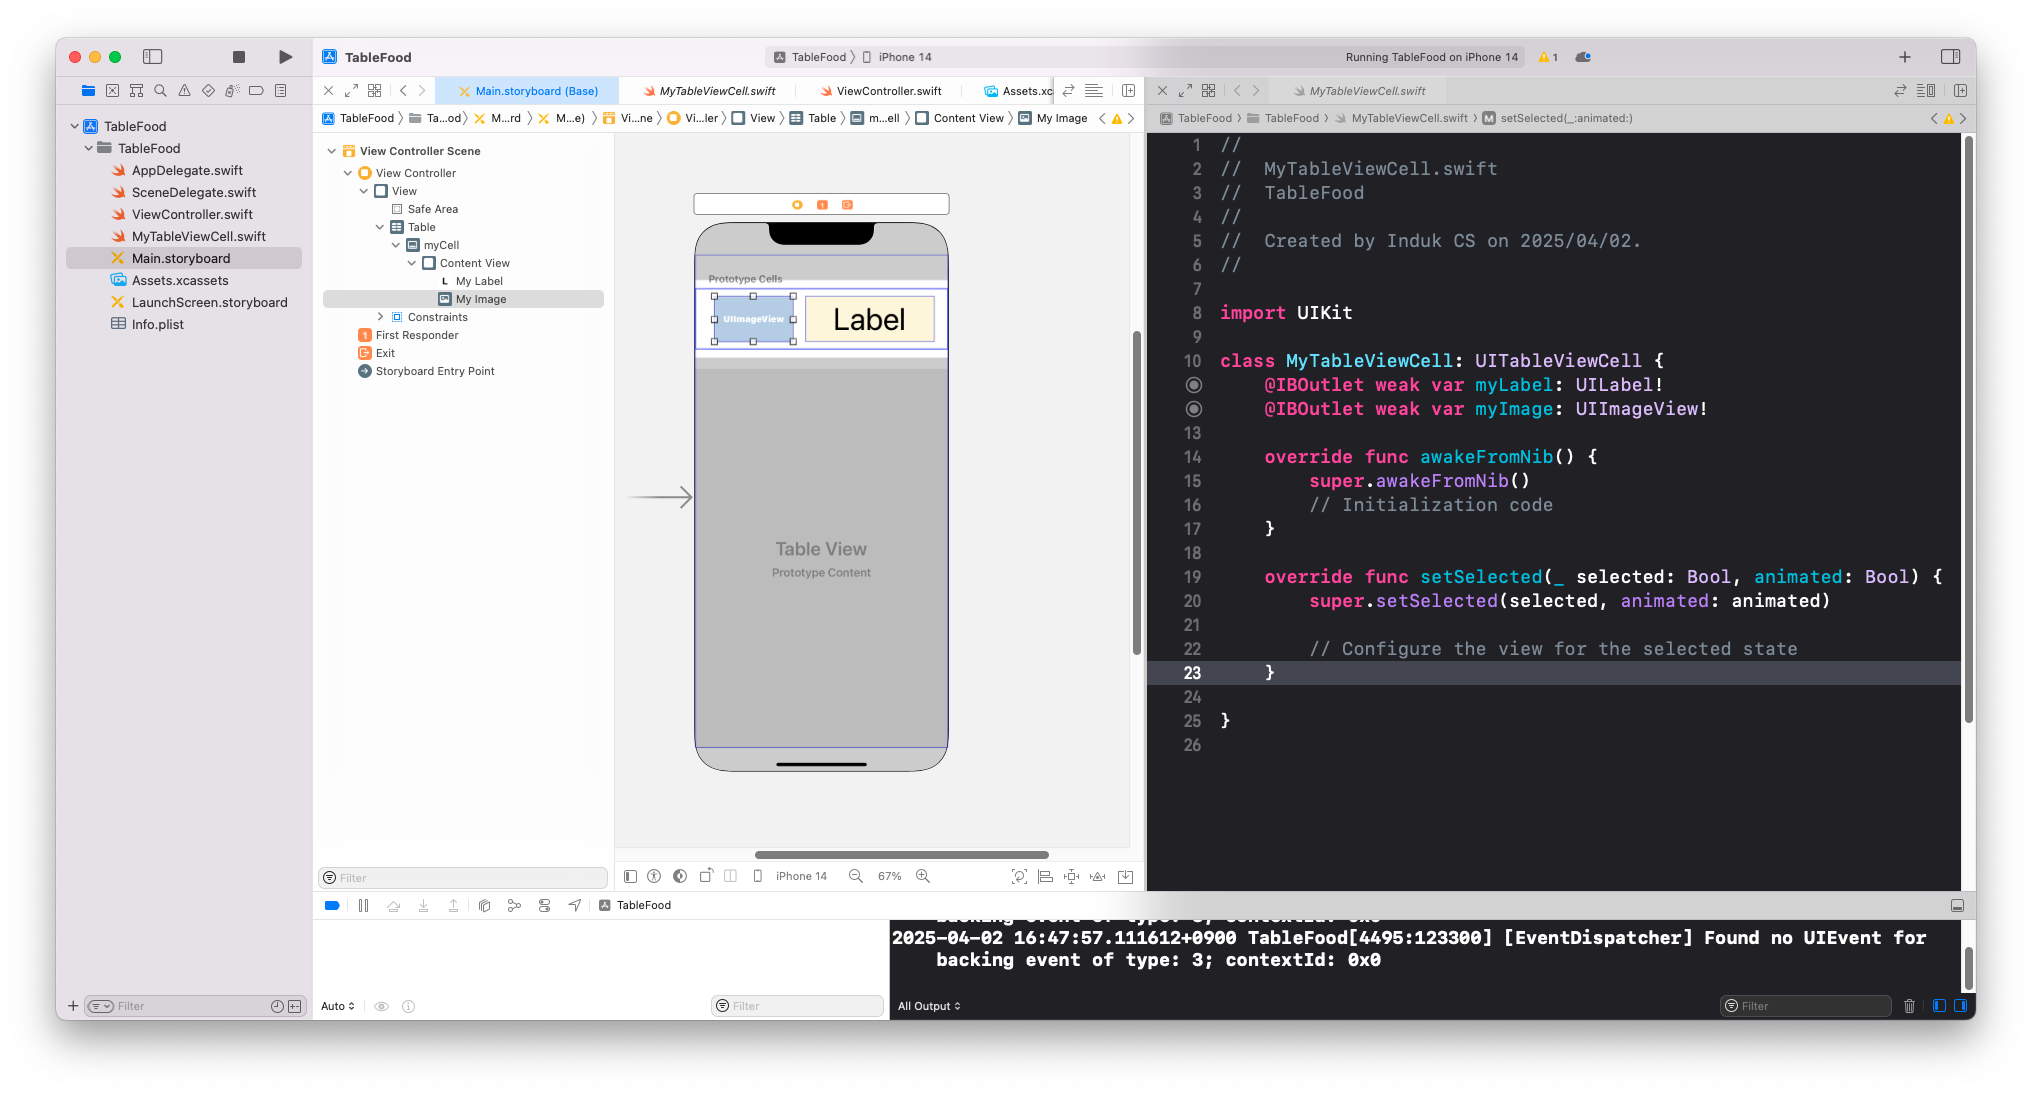
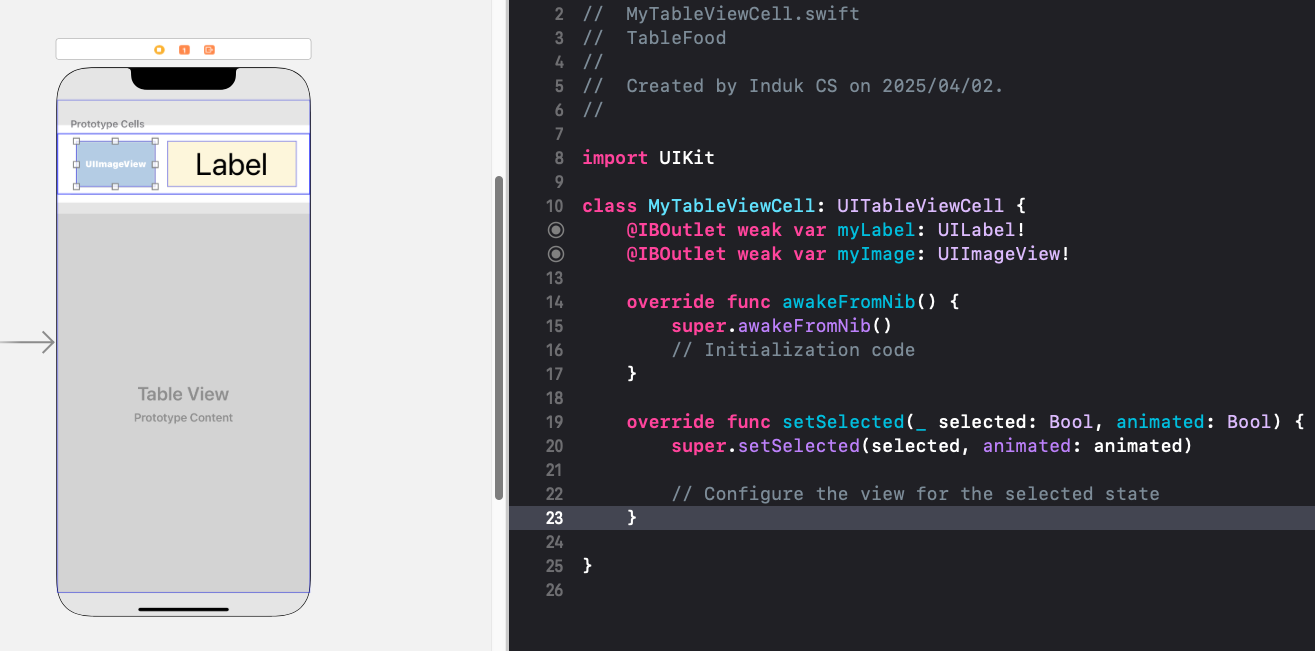
Main.storyboard 에서 UIImageVeiw 추가 후 Assistant editor 와 연결 (UITableViewCell)
import UIKit
var image = ["1.png", "2.png", "3.png", "4.png", "5.png"]
var foodName = ["1.한식", "2.간식", "3.학식", "4.중식", "5.집밥"]
var detail = ["인기", "매장", "포장", "매운맛", "순한맛"]
class ViewController: UIViewController, UITableViewDelegate, UITableViewDataSource {
@IBOutlet weak var table: UITableView!
func numberOfSections(in tableView: UITableView) -> Int {
return 6
}
func tableView(_ tableView: UITableView, numberOfRowsInSection section: Int) -> Int {
return 5
}
func tableView(_ tableView: UITableView, didSelectRowAt indexPath: IndexPath) {
print(indexPath.description)
}
func tableView(_ tableView: UITableView, cellForRowAt indexPath: IndexPath) -> UITableViewCell {
// let cell = UITableViewCell.init(style: .subtitle, reuseIdentifier: "myCell")
// cell.textLabel?.text = foodName[indexPath.row]
// cell.detailTextLabel?.text = detail[indexPath.row]
// cell.imageView?.image = UIImage(named: image[indexPath.row])
let cell = tableView.dequeueReusableCell(withIdentifier: "myCell", for: indexPath) as!MyTableViewCell
// 재사용을 위한 기능, 다운 캐스팅(Downcasting)
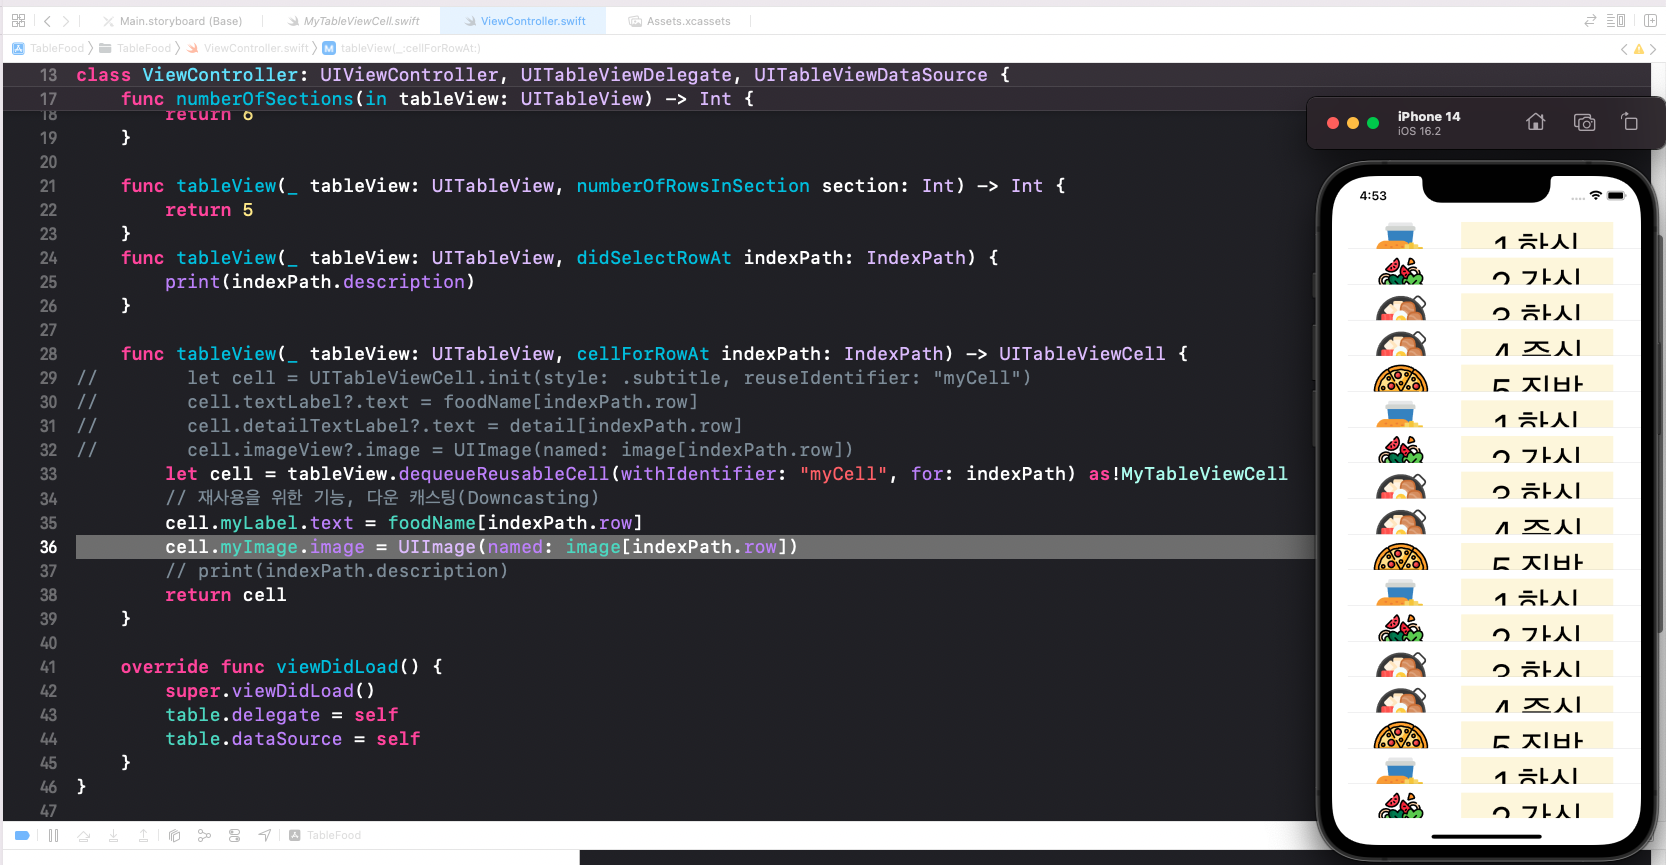
cell.myLabel.text = foodName[indexPath.row]
cell.myImage.image = UIImage(named: image[indexPath.row])
// print(indexPath.description)
return cell
}
override func viewDidLoad() {
super.viewDidLoad()
table.delegate = self
table.dataSource = self
}
}