없었는데 있었습니다.
이번에 유닛 테스트를 진행하면서 좋은 라이브러리를 하나 발견해 도입했다.
라이브러리의 이름은 @golevelup/ts-jest로 모킹 데이터를 쉽게 만들 수 있도록 도와주는 라이브러리이다.
해당 라이브러리에서 제공하는 함수 createMock이 바로 모킹을 쉽게 만들어주는 함수이다.
You ever just come across a type that you want to mock, but mocking the entire object seems daunting, and who knows how many sub properties the object has and if those sub properties have sub properties. The list goes on with possible problems. Enter @golevelup/ts-jest's createMock utility function.
This function will create a mock object for you with all sub properties mocked as jest.fn() unless otherwise provided, to allow for easy mocking later on, but more on that later.
라이브러리의 설명을 보면 createMock은 추가적으로 제공되는 정보가 없을 경우 모든 하위 속성을 jest.fn()으로 모의하는 모의 객체를 생성하여 더 쉽게 모킹할 수 있도록 도와줄 수 있는 함수라고 한다.
최초로 궁금했던 점은,
어떻게 모든 하위 객체를 모킹할 수 있는가?였다.
npm 라이브러리 홈페이지에서 제공하는 예시를 한 번 보자
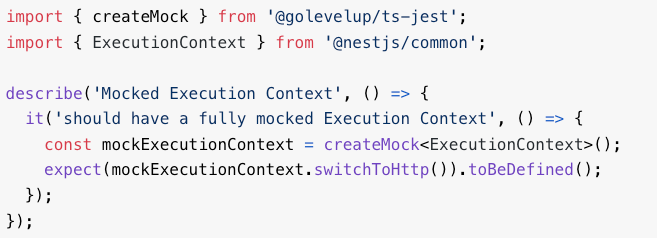
위 코드에서 가장 궁금했던 점은 바로 아래 코드였다.
describe('Mocked Execution Context', () => {
  it('should have a fully mocked Execution Context', () => {
    const mockExecutionContext = createMock<ExecutionContext>(); // 매개 변수 없음, 제네릭(타입 변수)만 존재
    expect(mockExecutionContext.switchToHttp()).toBeDefined(); // switchToHttp가 정의되어 있음
  });
});- createMock에 제네릭 매개변수 타입
ExecutionContext를 넘겼다.- 하지만, 함수를 호출하는 과정에서 매개 변수로 넘어가는 것은 하나도 없다.
- 하지만 결과를 보면
switchToHttp()가 정의되어 있다.
처음에 놀라며 생각했던 것은 아래와 같았다.
🙄?? 타입으로 오브젝트의 프로퍼티 모킹이 가능한가보다?!
하지만, 바로 정신을 차리고 라이브러리를 까보기 시작했다.
일단, 정답은 Proxy 내장 객체이다.
미리 스포일러를 해보자면 Javascript의 내장 객체 Proxy를 활용한 모킹이었다.
하나씩 가보자
아래 예시 테스트 코드는 성공한다.
it('entity는 id를 가진다.', async () => {
   const mock = createMock<entity>();
   console.log('mock', mock); // 1) mock 콘솔
   // arrange(준비)
   repository.createOne = jest.fn().mockReturnValue(mock);
   // act(실행)
   const result = await service.createOne(1);
   // assert(검증)
   expect(result).toHaveProperty('id');
   console.log('mock.id', mock.id); // 2) mock.id 콘솔
   console.log('jest.fn()', jest.fn()); // 3) jest.fn() 콘솔
});
📝 위의 예시 코드에서의 콘솔을 확인해보자

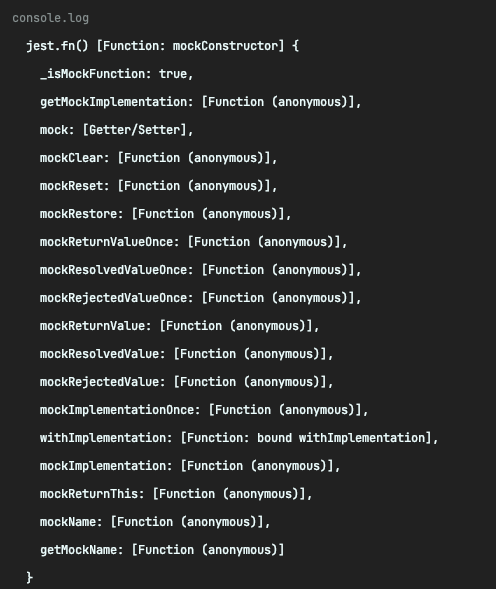
Mock의 객체는 {} 빈 오브젝트이고 mock.id는 mockConstructor함수로 jest.fn함수가 들어가 있는 것을 확인할 수 있다!
어떻게 jest 의 fn 코드가 들어갈 수 있었을까?
📢 드디어! 진짜 라이브러리 코드를 까보자
export const createMock = <T extends object>(
  partial: PartialFuncReturn<T> = {}, 							// ✅ 1
  options: MockOptions = {}
): DeepMocked<T> => {
  const cache = new Map<string | number | symbol, any>();
  const { name = 'mock' } = options;

  const proxy = new Proxy(partial, {							// ✅ 2
    get: (obj, prop) => {										// ✅ 3
      if (
        prop === 'inspect' ||
        prop === 'then' ||
        prop === 'asymmetricMatch' ||
        (typeof prop === 'symbol' &&
          prop.toString() === 'Symbol(util.inspect.custom)')
      ) {
        return undefined;
      }

      if (cache.has(prop)) {
        return cache.get(prop);
      }

      const checkProp = obj[prop];

      let mockedProp: any;

      if (prop in obj) {
        mockedProp =
          typeof checkProp === 'function' ? jest.fn(checkProp) : checkProp;
      } else if (prop === 'constructor') {
        mockedProp = () => undefined;
      } else {											         // ✅ 4
        mockedProp = createRecursiveMockProxy(`${name}.${prop.toString()}`); // ✅ 5
      }

      cache.set(prop, mockedProp);
      return mockedProp; // ✅ 6
    },
  });

  return proxy as DeepMocked<T>;
};createMock에 매개변수를 넘겨주지 않기 때문에 파라미터는 Default 값{} 빈오브젝트로 할당된다.- Proxy를 생성한다.
- Proxy의 첫 번째 매개변수는 위의
{}빈 오브젝트이다. - Proxy는 두 번째 매개변수에는
get메서드가 포함된 오브젝트인데 이는 해당 프로퍼티에 접근할 때 실행되는 메서드이다. << 프록시에 대한 설명은 다음 블로그에서 다뤄볼 수 있도록 하겠다.
- Proxy의 첫 번째 매개변수는 위의
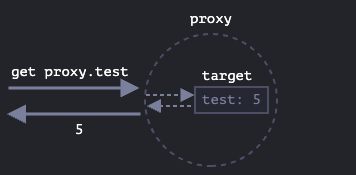
- get 메서드의 첫 번째 파라미터
obj는 프록시가 타겟하는 값으로 위에서는{}빈 오브젝트이다.
두 번째 파라미터prop은 객체에 접근하는 프로퍼티 값이다.- 예를 들어
proxy.property로 접근할 때 get 메서드의obj는 proxy이고prop은 property가 되는 것이다.
- 예를 들어
- 우리의 프록시는 아무 프로퍼티도 없으므로 ✅ 4번의 else문을 타게 된다.
createRecursiveMockProxy호출하여mockProp에 할당- 5번의
mockProp반환
- 그럼 우리는
createRecursiveMockProxy함수에서 반환하는mockProp을 알면 된다!- 그것이
mock.id가 반환하는 값이 될 것이기 때문이다.
- 그것이
createRecursiveMockProxy 함수는 다음과 같다
const createRecursiveMockProxy = (name: string) => {
  const cache = new Map<string | number | symbol, any>();

  const t = jest.fn();									// ✅ 1
  return new Proxy(t, {									// ✅ 2.
    apply: (target, thisArg, argsArray) => {
      const result = Reflect.apply(target, thisArg, argsArray);
      if (result) {
        return result;
      } else {
        if (!cache.has('__apply')) {
          cache.set('__apply', createRecursiveMockProxy('bla'));
        }
        return cache.get('__apply');
      }
    },
    get: (obj, prop, receiver) => {
      const propName = prop.toString();

      if (
        [
          '_isMockFunction',
          'mock',
          'mockClear',
          'mockImplementation',
          'mockImplementationOnce',
          'mockName',
          'getMockName',
          'getMockImplementation',
          'mockRejectedValue',
          'mockRejectedValueOnce',
          'mockReset',
          'mockResolvedValue',
          'mockResolvedValueOnce',
          'mockRestore',
          'mockReturnThis',
          'mockReturnValue',
          'mockReturnValueOnce',
          'withImplementation',
          'calls',
        ].includes(propName)
      ) {
        return Reflect.get(obj, prop, receiver);
      }

      if (cache.has(prop)) {
        return cache.get(prop);
      }

      const checkProp = obj[prop];

      const mockedProp =
        prop in obj
          ? typeof checkProp === 'function'
            ? jest.fn()
            : checkProp
          : propName === 'then'
          ? undefined
          : createRecursiveMockProxy(propName);

      cache.set(prop, mockedProp);

      return mockedProp;
    },
  });
};jest.fn()을 만들어t에 할당한다.t를 감싸는Proxy를 만들어 반환한다.
📝 즉 반환 값은 t => jest.fn()의 값이 되는 것이다.
createMock이 반환하는{}빈 객체는 사실 빈 객체가 아니라 한 단계 감싸진프록시였다!즉, 우리가 이 프록시내 무작위 프로퍼티로 접근하게 되면 프록시
gethandler를 호출하게 되고
-> 핸들러가 정상적으로 진행되고 나면 빈객체에 접근한 무작위 프로퍼티에jest.fn()의 결과가 매핑되는 것이다.이로 인해
toBeDefined,toHaveProperty가 성공으로 호출되는 결과로 귀결된 것이었다.
조금씩 활용해보면서 무조건 통과하는 목데이터가 아니라 더 유의미한 테스트를 구현할 수 있도록 유용하게 사용해 보아야 겠다 😀
Proxy
Proxy는 대리(인), 위임(권)이라는 뜻을 가진다.
Proxy는 객체를 감싼 Wrapper 형식의 객체로 자바스크립트에서 객체를 더 유연하게 활용하고 싶을 때 사용하는 객체이다.
추후에 ECMAScript를 까며 객체의 내부 슬롯과 내부 메소드를 함께 다뤄보면 재미있을 것 같다.
)
P.S
추가로 프로퍼티에 실제 값을 넣어주려면 아래의 @golevelup/ts-jest mock.spec.ts 파일에 구현된 테스트 코드 처럼 사용하면 된다!
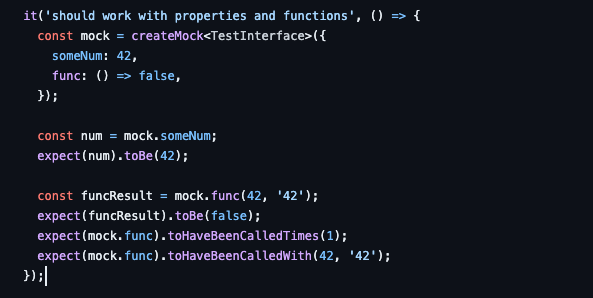
createMock({첫번째 매개 변수에 원하는 오브젝트를 넣기})