To Do
1. Upload "Profile_Videos" into AWS Server
2. Put "Video" links into DB
Pb: pushing url into Array of MongoDB
connection.db.collection("users", function(err, collection){
            collection.updateOne({'token':x_auth},{$push : {'profile_videos':req.file.location} },{new:true});
            if(err)
            {
                console.log("Error happened")
                console.log(err)
                res.status(404)
            }
            console.log("Video Push success")

            res.redirect(req.originalUrl)
    })
Focus at "$push", instead of $set, which I used to upload image and save it into mongoDB
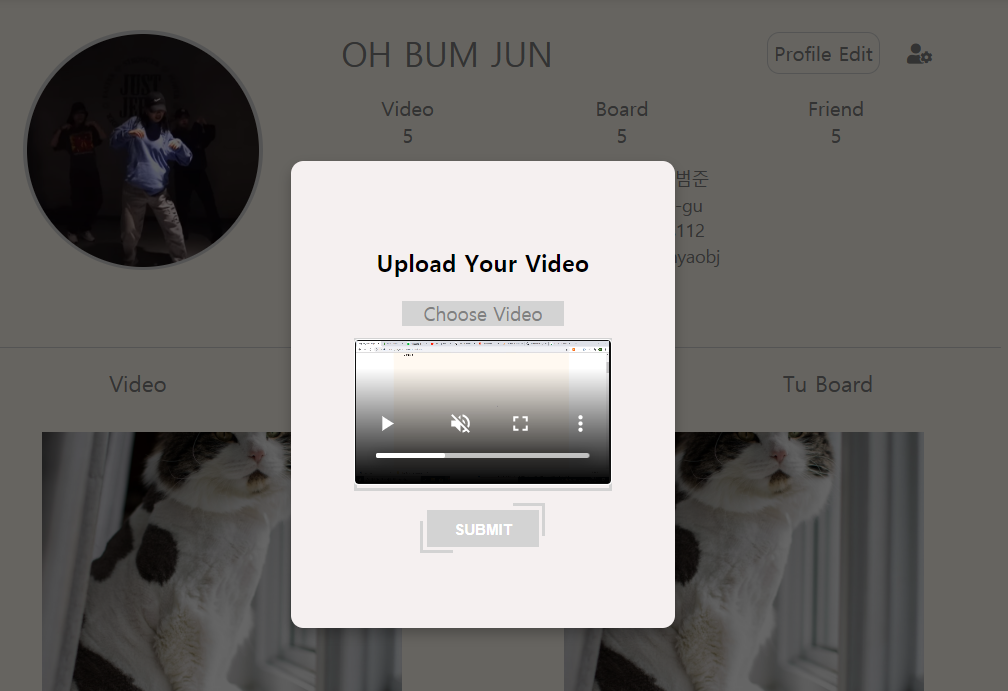
3. Add Upload Video html
Pb1 : Use Modal
https://www.youtube.com/watch?v=V08wXKHF_Xw
JS
// Title : modal
const openButton = document.getElementById("open")
const modal = document.querySelector(".modal")

// X 버튼 누르면 닫히게 하기
const overlay = modal.querySelector(".modal__overlay")
const closeBtn = modal.querySelector("button");

const openModal = () =>{
    modal.classList.remove("hidden")
}
const closeModal = () =>{
    modal.classList.add("hidden")
}

overlay.addEventListener("click",closeModal)

closeBtn.addEventListener("click",closeModal)

openButton.addEventListener("click",openModal)
Scss
// modal
    .modal{
        position: absolute;
        top:0;
        left:0;
        width:100%;
        height:100%;
        display: flex;
        justify-content: center;
        align-items: center;

    }
    .modal__overlay{
        background-color: rgba(0, 0, 0, 0.6);
        width:100%;
        height:100%;
        position: absolute;
    }
    .modal__content{
        position: relative;
        padding: 50px 10px;
        text-align: center;
        width: 30%;
        border-radius: 10px;
        box-shadow: 0px 5px 10px 0px rgba(0,0,0,.25);
        -o-box-shadow: 0px 5px 10px 0px rgba(0,0,0,.25);
        -ms-box-shadow: 0px 5px 10px 0px rgba(0,0,0,.25);
        -moz-box-shadow: 0px 5px 10px 0px rgba(0,0,0,.25);
        background-color: rgb(245, 240, 240);
        .form{
            margin: 0 auto;
            width:80%;
            height:90%;
            display: flex;
            flex-direction: column;
            align-items: center;
            justify-content: center;
        }
    }

    .hidden{
        display: none;
    }
Html
<div class="modal hidden">
            <div class="modal__overlay"></div>
            <div class="modal__content">
                <form class = "form" action="/api/users/mySpace" method="POST" enctype="multipart/form-data">
                    <h3>Upload Your Video</h3>
                    <input type="file" name = "video" id="upload" onChange="handleImageUpload()" class="btn-deactive"/>
                    <button type="submit" id="submit-btn" class='btn-deactive'>Submit</button>
                </form>
            </div>
        </div>
Pb3 : Video Redirect > If No Video is Selected, Then send error and redirect
router.post('/api/users/mySpace' !!!


if( req.file == undefined ){
            res.send('<script type="text/javascript">alert("동영상을 선택하세요");</script>');
		    res.redirect( '/api/users/mypage' );
        }
Then the Error Occured
_http_outgoing.js:526
    throw new ERR_HTTP_HEADERS_SENT('set');
    ^

Error [ERR_HTTP_HEADERS_SENT]: Cannot set headers after they are sent to the
client
https://www.youtube.com/watch?v=rKTlakY8j2M
The Point is, I've got the response from the server
and after, server sent the response, It crashed by sending above error...
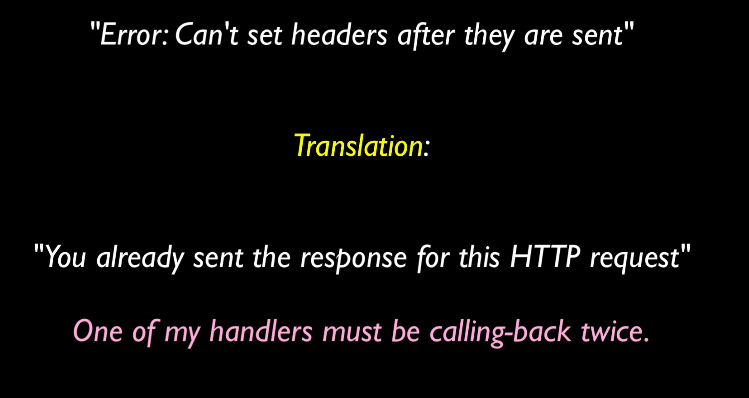
What does this mean
I am trying to response in two warys
1) send javascript aler error
2) and then redirect
as you debug, you will see that 1st response is working, because alert will appear in the client
but 2nd response is not working.
As we are using the 'auth' middleware,
you can understand that 1st request and 1st response is setting the header, and it ended,
but as 2nd response is coming next, you cannot set headers again, as you already used it
solution 1.

But, It cannot be the solution to my case,
that is because I still have to send 2 responses
1) alert
2) redirect
solution 2. : Send alert if you didn't upload Your video before you send the video
I had to use AJAX with pure Vanilla JS
Why?
1. check whether client uploaded the video to server, if they didn't choose any kind of video, then send alert and let them put actual video file before sending the info to server
and then. redirect to original server
const button = document.getElementById('submit-btn')

// 버튼을 누르는 순간 아래의 작업이 시작된다
button.addEventListener('click', () => {

    console.log(inpFile.files[0])

    console.log("Do you have video?")

    // video를 입력하지 않으면 alert 띄우고  redirect
    if( inpFile.files[0] == undefined ){
        console.log("no video")
        alert("Put in your video")
        location.href = "/api/users/mySpace"
    }

    const xhr = new XMLHttpRequest();

    xhr.onload = () => {

        if( this.status == 200){
            let responseObject = null;

            try{
                // server에서 온 response를 json object 형태로 바꿔준다
                responseObject = JSON.parse(xhr.responseText)

            } catch(e){

                console.error('could not parse JSON')
            }

            if(responseObject){
                handleResponse(responseObject)
            }

        }else{

        }
    }

    // api/users/mySpace 에 post 형식으로 날린다
    xhr.open('POST', '/api/users/mySpace');

    // server will not expect to see requested body which is formatted in the form of a key value peered string
    xhr.setRequestHeader('Content-type', 'application/x-www-from-urlencoded')

    console.log("sending the info to server")

    // actual send
    xhr.send(inpFile.files[0])

})

// 적절한 response가 왔을 때 대처하기
function handleResponse(responseObject){
    if( responseObject.ok  ){
        location.href = '~.html'
    }else{

    }
}
< Reference Link >
http://igstan.ro/posts/2009-01-11-ajax-file-upload-with-pure-javascript.html
Okay. I succeeded using Ajax Vanilla JS to send a "file" to server which was my actual purpose....
Pb 4. TypeError: Cannot read property 'location' of undefined
This means, The form of sent data to server is different between
1. sending through "form" tag
2. sending through AJAX.
It seems like the data I sent to the server does not contain "aws" link....
Solution : have to conver the data into Form setting.
- Use formData , when sending data to server in POST method
var formData = new FormData(inpFile.files[0]);
- change div > form
( That is, in the very beginning,
1) there was only form tag, which was impossible for me to check whether the ideo is empty or not, I wanted to alert when the video is empty before sending the info to server
2) I changed form tag > div tag, and applied AJAX , to make an alert, but at this time, the video or image file that I sent was not sent into appropriate form
3) I found that, in any way, I had to send img file to server in "form" setting,
Answer
1) use form tag
2) use AJAX and send img file by "formData" code
< Reference Link>
https://www.zerocho.com/category/HTML&DOM/post/59465380f2c7fb0018a1a263
https://thoughtbot.com/blog/ridiculously-simple-ajax-uploads-with-formdata
Pb2 : Video Upload
The purpose is, I want to show client the preview image of "video"

but as you see, the preview image of video is not shown.
Solution : Get rid of showing the thumbnail, Instead, decided to just upload the video
// 4. video------

// Image Preview 창
const previewContainer = document.getElementById("image-preview");

// image 업로드 되면 나타나는 창
const previewImage = previewContainer.querySelector(".image-preview__image")

// image 업로드 전에 나타나는 기본 text
const previewDefaultText = previewContainer.querySelector(".image-preview__default-text")

// Video Preview 창
const VideoContainer = document.querySelector(".video-preview");


inpFile.addEventListener("change", function(){

    if(['video/mp4'].indexOf(inpFile.files[0].type) == -1){
            alert("Error: Only Mp4 format allowed")
            return;
        }

    // upload 된 구체적 data type
    const file = this.files[0];
    const fileReader = new FileReader();

    if( file ){

        fileReader.readAsDataURL(file)
        fileReader.onload = function(){

            var _VIDEO = document.querySelector('#video-element');
            _VIDEO.src = fileReader.result

            previewContainer.style.display = "none"
            VideoContainer.style.display = "block"

        }

        // // 2. video
        // var _CANVAS = document.querySelector('#canvas-element');
        // var _CTX = Canvas.getContext('2d')

        // // validate wheter MP4
        // if(['video/mp4'].indexOf(document.querySelector("#video_upload").files[0].type) == -1){
        //     alert("Error: Only Mp4 format allowed")
        //     return;
        // }

        // // object url as the video source
        // document.querySelector("#video-element source")
        //             .setAttribute('src', URL.createObjectURL(inpFile.files[0]));

        // // Load the Video and show
        // _VIDEO.load();
        // _VIDEO.style.display = "inline"
        // _VIDEO.play();


              /*
            The dimensions (width / height) of the generated thumbnail will depend on the dimensions of the <canvas> element. The dimensions of the <canvas> element will in turn depend on the dimensions of the video.

            Please note that dimensions of video refers to the actual video, and not the CSS dimensions of the <video> element.

            To get the dimensions of the video, you need to wait for the video metadata to load. This can be done through the loadedmetadata event.
              */

        }else{
            // null을 함으로써 css 설정 default값을 따르도록 할 것이다
            previewDefaultText.style.display = null;
            previewImage.style.display = null;
            previewImage.setAttribute("src","")
        }
    })