기존에는...
이 블로그에서 작성하였던 것처럼
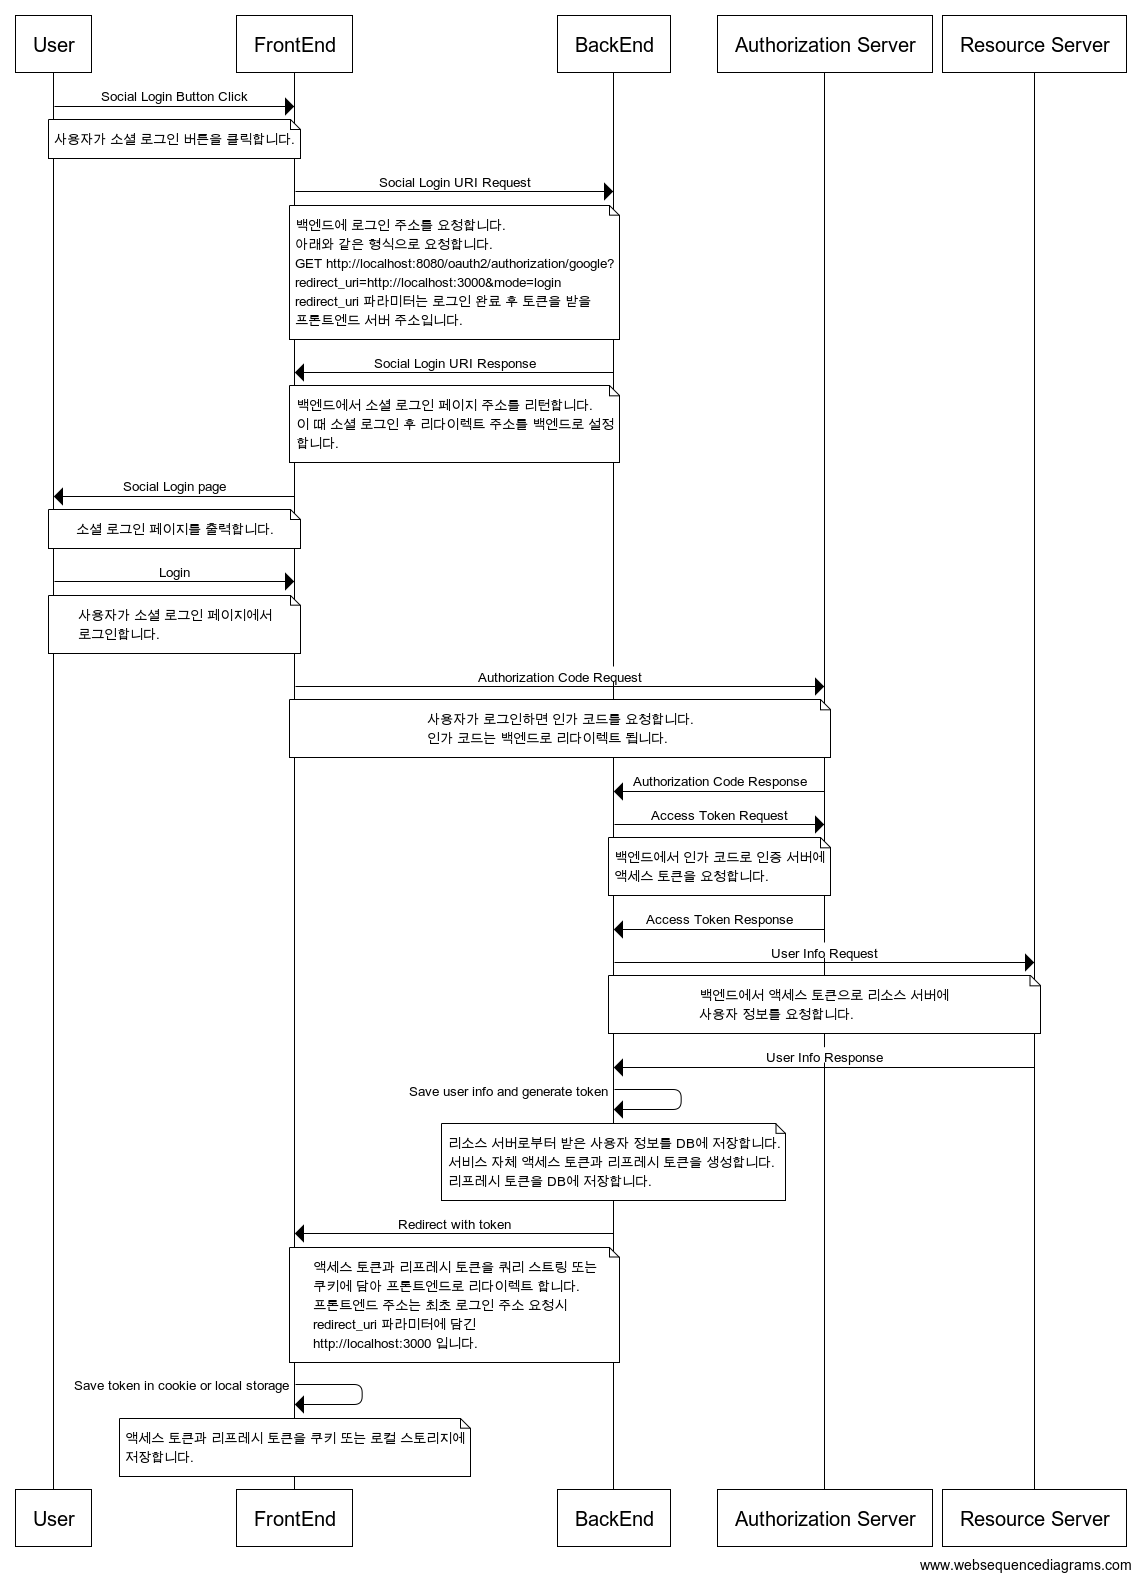
위 흐름에서
프론트에서 http://localhost:8080/oauth2/authorization/naver?redirect_uri=http://localhost:3000/ 와 같은 형태의 주소를 호출하면
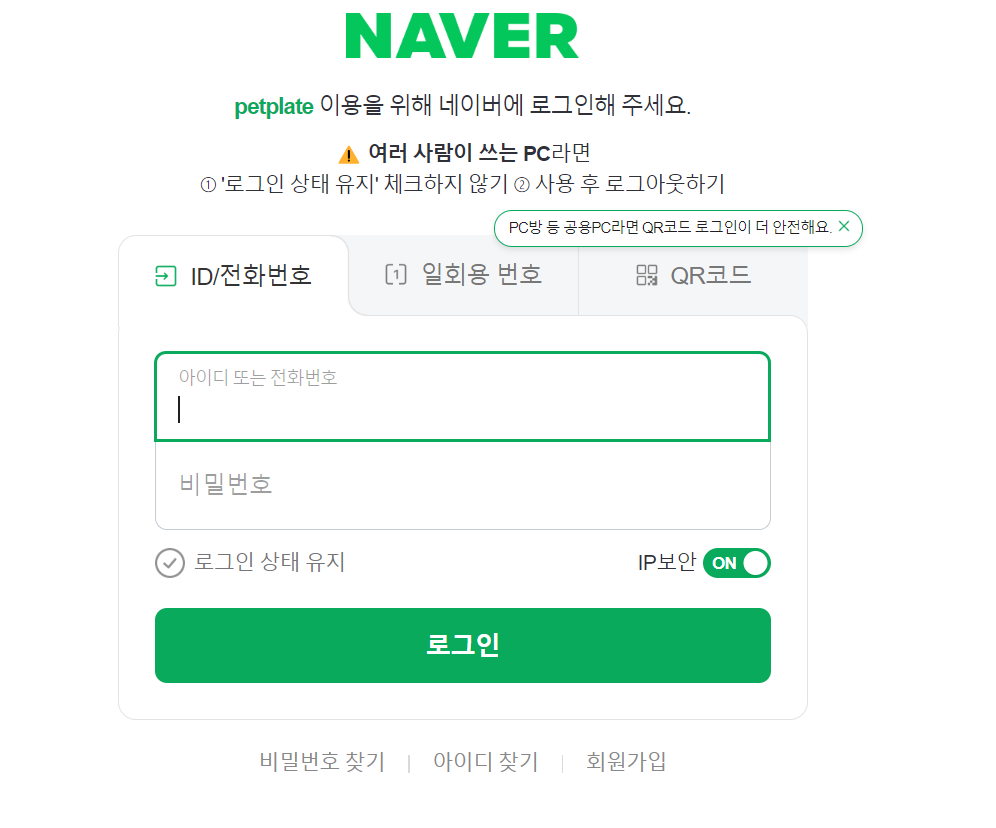
위와 같은 화면이 나오면서 만약 사용자가 로그인을 성공적으로 호출하였을 경우

yml 파일에 명시한 redirect url 에 code 를 전송하고 그 code 를 기반으로 자체 소셜 로그인 access Token 을 발급 받고 또 이를 기반으로 사용자의 프로필 정보를 요청할 수 있었다.
이후 백앤드는 사용자의 정보를 조회한 이후 필요한 경우 DB에 저장하고 우리가 만든 로그인을 위한 자체 토큰 값을 전달하는 흐름을 가질 수 있었다.
위 방식의 장점
프론트 분들에게 부담 안주기
사실 위의 이유 때문에 이번 petplate 프로젝트에서 이 방법으로 미리 소셜 로그인을 구현해 놓았었다.
이를 통해 프론트 분들에게 위 사진의 OAuth 흐름을 설명 안해도
http://IP 주소:8080/oauth2/authorization/naver?redirect_uri=http://localhost:3000/
이 url 만 호출하면 됩니다~
라고 하며 프론트 분들의 부담을 줄일 수 있었다.
실제로 프론트 분들이 이 url 을 호출하면
그 다음에 프론트로 오는 것은 사용자의 로그인을 위한 accessToken 과 refreshToken 뿐이므로 부담을 훨씬 줄여줄 수 있다고 생각했다. (소셜 로그인의 흐름을 학습하지 않아도 되므로!)
위 방식의 단점
1. Redirect 에 대한 부담감
위 방식을 사용한 것은 스프링의 내부적인 필터를 상속 받아 자유롭게 custom 하여서 사용하겠다는 것을 의미합니다.
소셜 로그인 성공시 맨 마지막에 호출되는 것은 AuthenticationSuccessHandler 의 onAuthenticationSuccess 메서드 입니다. 따라서 이 부분에서 소셜 로그인을 성공하였고 프론트로 필요 정보를 반환하기 전에 할 일을 해주게 하며 custom 하게 꾸밀 수 있습니다 .
@Override
    public void onAuthenticationSuccess(HttpServletRequest request, HttpServletResponse response, Authentication authentication) throws IOException, ServletException {

        try{

            CustomOAuth2User oAuth2User=((CustomOAuth2User) authentication.getPrincipal());

            TokenDto tokenDto=tokenProvider.createTokenByOAuth(oAuth2User);//OAuth2로 새로운 access,refreshToken 생성


            redisTemplate.opsForValue().set(oAuth2User.getUsername(),tokenDto.getRefreshToken(),tokenDto.getRefreshTokenValidationTime(), TimeUnit.MILLISECONDS);
            // Dto 객체를 JSON으로 변환하여 응답으로 전송


            boolean enrollPet = petRepository.existsByOwnerUsername(oAuth2User.getUsername());


            response.setHeader(authorization,tokenDto.getAccessToken());
            response.setHeader(refreshToken,tokenDto.getRefreshToken());

            String redirectUrl = generateBaseUrl(request, response)+getSubUrl(
                    oAuth2User.getUsername(),tokenDto.getAccessToken(),tokenDto.getRefreshToken(),enrollPet);
            System.out.println(redirectUrl);

            response.sendRedirect(redirectUrl);


        }catch (Exception e){
            throw e;
        }


    }

    private String generateBaseUrl(HttpServletRequest request, HttpServletResponse response) {

        String targetUrl = CookieUtils.getCookie(request, REDIRECT_URI_PARAM_COOKIE_NAME)
                .map(Cookie::getValue).orElse("");
        clearAuthenticationAttributes(request, response);

        return targetUrl;

    }
하지만 우리가 프론트에게 주고 싶은 정보(위에서는 access Token ,refresh Token , 펫 등록 여부) 를 redirect 를 통해서 전달해야 하나 이 과정에서 어떤 url 로 보내는지 협의, 혹은 이에 대한 추가적인 작업이 필요합니다.( 저는 이 과정을 프론트로부터 직접 oauth2 요청시 redirect_uri 를 명시하게 하여 이 문제를 해결하였습니다.ex:http://IP 주소:8080/oauth2/authorization/naver?redirect_uri=http://localhost:3000/ 에서 redirect_uri 부분) 어쨌거나 이는 클라이언트와 서버가 서로 독립적이지 않아 rest 원칙을 준수하지 않는다고 생각하였습니다.
2. Access Token 및 Refresh Token 전달 방식
위 코드와 같이 response 의 헤더에 Access Token, Refresh Token 을 담아서
respnse.sendRedirect() 를 진행 할 떄 그 헤더의 값이 성공적으로 전달되지 못했습니다.
프론트가 redirect 를 받고 그 정보를 기반으로 페이지를 옮길 때 그 헤더값이 같이 전달되지 않았던 것으로 기억하는데
이 문제는 더 알아봐야 할 것 같습니다.
하여튼 많은 분들이 이 문제에 직면하여 AccessToken 과 RefreshToken 을 URL에 넣어서 보내는 방식으로 로그인을 구현한 것을 볼 수 있었습니다.
하지만 이렇게 상대적으로 노출도가 심한 URL 에 token 을 전달할 시에는 보안적으로 안좋다고 느꼈습니다.
3. 소셜 로그인 unlink(연결 해제) 를 위한 토큰 관리
네이버에서 소셜 로그인을 구현할 떄 소셜 로그인용 refreshToken 을 전달받으면 이를 통해 새로운 accessToken 으로 발급 받을 수 있습니다.
하지만 위 과정처럼 필터를 이용할 때 기존에 사용했던 것처럼
@Override
    public OAuth2User loadUser(OAuth2UserRequest userRequest) throws OAuth2AuthenticationException {


        OAuth2UserService<OAuth2UserRequest,OAuth2User> delegate=new DefaultOAuth2UserService();
        OAuth2User oAuth2User=delegate.loadUser(userRequest);

        //1
        String registrationId=userRequest.getClientRegistration().getRegistrationId();//Naver or google
        SocialType socialType=getSocialType(registrationId);
위 과정부터 시작할 때는 refreshToken 에 접근할 수단이 없으므로
결국 디버깅을 통해서
위 메서드인 loadUser 를 호출하는 클래스인 AuthenticationProvider 를 implements 한
CustomOAuth2LoginAuthenticationProvider 를 만들어 이를 처리해야 하므로 더 복잡한 과정을 거쳐야 했습니다.
ex)
@RequiredArgsConstructor
@Component
public class CustomOAuth2LoginAuthenticationProvider implements AuthenticationProvider {

    private final OAuth2AuthorizationCodeAuthenticationProvider authorizationCodeAuthenticationProvider;

    private final OAuth2UserService<OAuth2UserRequest, OAuth2User> userService;

    private final SocialLoginTokenUtil socialLoginTokenUtil;

    private static final String SOCIAL_LOGIN_REFRESH_TOKEN = "SocialLoginRefreshToken";

    private GrantedAuthoritiesMapper authoritiesMapper = ((authorities) -> authorities);
    ...
    @Override
    public Authentication authenticate(Authentication authentication) throws AuthenticationException {
        OAuth2LoginAuthenticationToken loginAuthenticationToken = (OAuth2LoginAuthenticationToken) authentication;
        // Section 3.1.2.1 Authentication Request -
        // https://openid.net/specs/openid-connect-core-1_0.html#AuthRequest scope
        // REQUIRED. OpenID Connect requests MUST contain the "openid" scope value.
        if (loginAuthenticationToken.getAuthorizationExchange()
                .getAuthorizationRequest()
                .getScopes()
                .contains("openid")) {
            // This is an OpenID Connect Authentication Request so return null
            // and let OidcAuthorizationCodeAuthenticationProvider handle it instead
            return null;
        }
        OAuth2AuthorizationCodeAuthenticationToken authorizationCodeAuthenticationToken;
        try {
            authorizationCodeAuthenticationToken = (OAuth2AuthorizationCodeAuthenticationToken) this.authorizationCodeAuthenticationProvider
                    .authenticate(
                            new OAuth2AuthorizationCodeAuthenticationToken(loginAuthenticationToken.getClientRegistration(),
                                    loginAuthenticationToken.getAuthorizationExchange()));
        }
        catch (OAuth2AuthorizationException ex) {
            OAuth2Error oauth2Error = ex.getError();
            throw new OAuth2AuthenticationException(oauth2Error, oauth2Error.toString(), ex);
        }
        OAuth2AccessToken accessToken = authorizationCodeAuthenticationToken.getAccessToken();
        Map<String, Object> additionalParameters = authorizationCodeAuthenticationToken.getAdditionalParameters();
        CustomOAuth2User customOAuth2User = (CustomOAuth2User) this.userService.loadUser(new OAuth2UserRequest(
                loginAuthenticationToken.getClientRegistration(), accessToken, additionalParameters));//추가된 부분

      //  System.out.println(authorizationCodeAuthenticationToken.getRefreshToken().getTokenValue());

        socialLoginTokenUtil.saveSocialLoginRefreshToken(customOAuth2User.getUsername(), authorizationCodeAuthenticationToken.getRefreshToken().getTokenValue());//추가된 부분


        Collection<? extends GrantedAuthority> mappedAuthorities = this.authoritiesMapper
                .mapAuthorities(customOAuth2User.getAuthorities());
        OAuth2LoginAuthenticationToken authenticationResult = new OAuth2LoginAuthenticationToken(
                loginAuthenticationToken.getClientRegistration(), loginAuthenticationToken.getAuthorizationExchange(),
                customOAuth2User, mappedAuthorities, accessToken, authorizationCodeAuthenticationToken.getRefreshToken());
        authenticationResult.setDetails(loginAuthenticationToken.getDetails());
        return authenticationResult;
    }
스프링에서 oauth2 구현 시 기본으로 사용되는 AuthenticationProvider 의 구현체인 OAuth2LoginAuthenticationProvider 를 복붙하고 필요 부분만 추가한 식입니다.
코드 변경
이러한 토큰을 url 로 전달해야 하는 문제, redirect 문제 해결 , 소셜 로그인 용 refreshToken 에 접근하기 어려워 추가적으로 해야 할 작업 등등의 문제점으로 인해 새롭게 코드를 변경해 보았습니다.
변경점
기존에는 이 위 사진처럼 인가 코드를 요청 시에 인가 코드가 백앤드로 리다이렉트 되었고 이후 필터를 사용해서 다음 과정을 자동으로 진행하였지만
이제는 인가 코드를 프론트가 받은 후에 그 인가 코드를 백앤드에 넘기면 그 값을 바탕으로 외부 소셜 로그인관련 api 를 호출하여서 직접 소셜 로그인 access Token 을 가지고 오고 그 accessToken 을 통해 유저 프로필 등을 저장 , 이후 펫 등록 여부를 프론트에 넘기고 토큰값은 기존에 구현했던 로그인 방식처럼 헤더를 통해서 전달할 수 있습니다.
외부 api 호출 위한 코드
외부 api 호출을 통해 소셜 로그인 용 access Token , refresh Token , 사용자 정보, 연동 해제를 구현 한다.
WebClientConfig
첫 번쨰로 api 호출 클라이언트인 WebClient 를 사용하기 위한 config 클래스를 작성한다.
@Configuration
public class WebClientConfig {

    private String baseUrl="https://nid.naver.com/oauth2.0/token";

    @Bean
    public WebClient webClient(){
        HttpClient httpClient = HttpClient.create()
                .option(ChannelOption.CONNECT_TIMEOUT_MILLIS, 5000)
                .responseTimeout(Duration.ofMillis(5000))
                .doOnConnected(conn ->
                        conn.addHandlerLast(new ReadTimeoutHandler(5000, TimeUnit.MILLISECONDS))
                                .addHandlerLast(new WriteTimeoutHandler(5000, TimeUnit.MILLISECONDS)));

        return WebClient.builder()
                .baseUrl(baseUrl)
                .clientConnector(new ReactorClientHttpConnector(httpClient))
                .defaultHeader(HttpHeaders.CONTENT_TYPE, MediaType.APPLICATION_JSON_VALUE)
                .build();
    }

}
SocialLoginTokenUtil
소셜 로그인 토큰을 집중적으로 관리하고 , 외부 api 요청을 처리하는 클래스
@Service
@RequiredArgsConstructor
@Slf4j
public class SocialLoginTokenUtil {


    private final WebClient webClient;

    @Value("${spring.security.oauth2.client.registration.naver.client-id}")
    private String naverClientId;

    @Value("${spring.security.oauth2.client.registration.naver.client-secret}")
    private String naverClientSecret;

    private final UserRepository userRepository;

    private final TokenProvider tokenProvider;

    private final RedisTemplate redisTemplate;

    private final static String success= "success";

    private final static String SOCIAL_LOGIN_AT_POST_FIX= ":SOCIAL_AT";


    @Transactional
    public void saveSocialLoginRefreshToken(String username,String socialLoginRefreshToken){

        User findUser = findUserByUsername(username);

        findUser.changeSocialLoginRefreshToken(socialLoginRefreshToken);
    }

    public void saveSocialLoginAccessToken(String username,String socialLoginAccessToken){
        redisTemplate.opsForValue().set(username+SOCIAL_LOGIN_AT_POST_FIX,socialLoginAccessToken);
    }


    public SocialInfoWithTokenDto getSocialInfoAndTokenByCode(final String code){

        SocialLoginTokenRequestResponseDto socialLoginTokenRequestResponseDto = getSocialLoginTokenIssue(code);

        SocialLoginProfileResponseDto socialLoginProfileResponseDto =
                getSocialLoginProfile(socialLoginTokenRequestResponseDto.getAccess_token());

        SocialInfoWithTokenDto socialInfoWithTokenDto = SocialInfoWithTokenDto.builder()
                .socialLoginAccessToken(socialLoginTokenRequestResponseDto.getAccess_token())
                .socialLoginRefreshToken(socialLoginTokenRequestResponseDto.getRefresh_token())
                .email(socialLoginProfileResponseDto.getResponse().getEmail())
                .name(socialLoginProfileResponseDto.getResponse().getName())
                .id(socialLoginProfileResponseDto.getResponse().getId())
                .build();

        return socialInfoWithTokenDto;
    }


    private SocialLoginReIssueResponseDto getNewSocialLoginAccessToken(String refreshToken){
        return webClient.get()
                .uri("?grant_type=refresh_token&client_id="+naverClientId+"&client_secret="+naverClientSecret+"&refresh_token="+refreshToken)
                .retrieve()
                .bodyToMono(SocialLoginReIssueResponseDto.class)
                .block();
    }

    public SocialLoginTokenRequestResponseDto getSocialLoginTokenIssue(String code){

        SocialLoginTokenRequestResponseDto socialLoginTokenRequestResponseDto= webClient.get()
                .uri("?grant_type=authorization_code&client_id="+naverClientId+"&client_secret="+naverClientSecret+"&code="+code)
                .retrieve()
                .bodyToMono(SocialLoginTokenRequestResponseDto.class)
                .block();

        if(socialLoginTokenRequestResponseDto.getError()!=null){
            throw new BadRequestException(ErrorCode.SOCIAL_LOGIN_CODE);
        }

        return socialLoginTokenRequestResponseDto;
    }

    private SocialLoginProfileResponseDto getSocialLoginProfile(String accessToken) {

        SocialLoginProfileResponseDto socialLoginProfileResponseDto =  webClient.get()
                .uri("https://openapi.naver.com/v1/nid/me")
                .header("Authorization", "Bearer " + accessToken)
                .retrieve()
                .bodyToMono(SocialLoginProfileResponseDto.class)
                .block();

        if(!socialLoginProfileResponseDto.getMessage().equals(success)){
            throw new InternalServerErrorException(ErrorCode.SOCIAL_LOGIN_CODE);
        }


        return socialLoginProfileResponseDto;
    }


    public void unlinkNaver(String username){

        User findUser = findUserByUsername(username);

        String oldAccessToken = (String) redisTemplate.opsForValue().get(username+SOCIAL_LOGIN_AT_POST_FIX);

        String sendToken = null;

        if(oldAccessToken !=null && checkValidateAccessToken(oldAccessToken)){
            sendToken = oldAccessToken;
        }
        else{
            SocialLoginReIssueResponseDto tokenReIssueResponseDto = getNewSocialLoginAccessToken(
                    findUser.getSocialLoginRefreshToken());

            if(!checkValidateAccessToken(tokenReIssueResponseDto.getAccess_token())){
                throw new InternalServerErrorException(ErrorCode.SOCIAL_REFRESH_TOKEN_ERROR);
            }

            sendToken = tokenReIssueResponseDto.getAccess_token();
        }


        SocialLoginCheckDeleteResponseDto socialLoginCheckDeleteResponseDto = webClient.get()
                .uri("?grant_type=delete&client_id="+naverClientId+"&client_secret="+naverClientSecret+"&access_token="+sendToken)
                .retrieve()
                .bodyToMono(SocialLoginCheckDeleteResponseDto.class)
                .block();

        log.info("checkDelete {} {}",socialLoginCheckDeleteResponseDto.getAccess_token(),socialLoginCheckDeleteResponseDto.getResult());

        if(!socialLoginCheckDeleteResponseDto.getResult().equals(success)){
            throw new InternalServerErrorException(ErrorCode.SOCIAL_UNLINK_FAIL);
        }


    }

    private boolean checkValidateAccessToken(String accessToken){

        SocialLoginCheckValidateAccessToken socialLoginCheckValidateAccessToken = webClient.get()
                .uri("https://openapi.naver.com/v1/nid/verify")
                .header("Authorization","Bearer "+accessToken)
                .retrieve()
                .bodyToMono(SocialLoginCheckValidateAccessToken.class)
                .block();

        log.info("new AccessToken {}",accessToken);
        log.info("check message {}",socialLoginCheckValidateAccessToken.getMessage());

        if(!socialLoginCheckValidateAccessToken.getMessage().equals(success)){
            return false;
        }

        return true;

    }

    private User findUserByUsername(String username){
        return userRepository.findByUsername(username).orElseThrow(()->new NotFoundException(ErrorCode.USER_NOT_FOUND));
    }


}
AuthService.class
인증 관련 비즈니스 로직 처리
@Service
@RequiredArgsConstructor
@Transactional(readOnly = true)
public class AuthService {
private final TokenProvider tokenProvider;
private final RedisTemplate redisTemplate;
private final SocialLoginTokenUtil socialLoginTokenUtil;
private final UserRepository userRepository;
private final PetRepository petRepository;
....
@Transactional
public AuthResponseWithTokenAndRedirectUserInfo getTokenByCode(final String code){
SocialInfoWithTokenDto socialInfoWithTokenDto = socialLoginTokenUtil.getSocialInfoAndTokenByCode(code);
//반환 받은 이메일을 기반으로 기존 DB에 사용자 존재 유무 확인 후 존재하는 경우
// 조회한 유저를 반환하고 그렇지 않은 경우 생성하여 반환
User createdMember = userRepository.findBySocialTypeAndUsername(SocialType.NAVER,socialInfoWithTokenDto.getEmail())
.orElseGet(()->{
User savedUser = User.builder()
.name(socialInfoWithTokenDto.getName())
.role(Role.GENERAL)
.socialType(SocialType.NAVER)
.email(socialInfoWithTokenDto.getEmail())
.socialLoginId(socialInfoWithTokenDto.getId())
.activated(false)
.isReceiveAd(false)
.password(UUID.randomUUID()+"password")
.phoneNumber(null)
.build();
return userRepository.save(savedUser);
});
//데이터베이스- member 엔티티의 칼럼에 social login 용 refreshToken 저장
createdMember.changeSocialLoginRefreshToken(socialInfoWithTokenDto.getSocialLoginRefreshToken());
// email 이 변한 경우 변경감지 통해서 수정
createdMember.changeEmailBySocialLogin(socialInfoWithTokenDto.getEmail());
//redis 에 소셜 로그인용 accessToken 저장
socialLoginTokenUtil.saveSocialLoginAccessToken(createdMember.getUsername(),socialInfoWithTokenDto.getSocialLoginAccessToken());
// 사용자에게 반환할 우리가 만드는 accessToken, refreshToken 생성
TokenDto tokenDto = tokenProvider.createTokenByUserProperty(createdMember.getUsername(),createdMember.getRole().name());
saveRefreshTokenAtRedis(createdMember.getUsername(),tokenDto);
return AuthResponseWithTokenAndRedirectUserInfo.builder()
.tokenDto(tokenDto)
.userEnrollResponseDto(getBasicUserInfoForRedirect(createdMember.getUsername()))
.build();
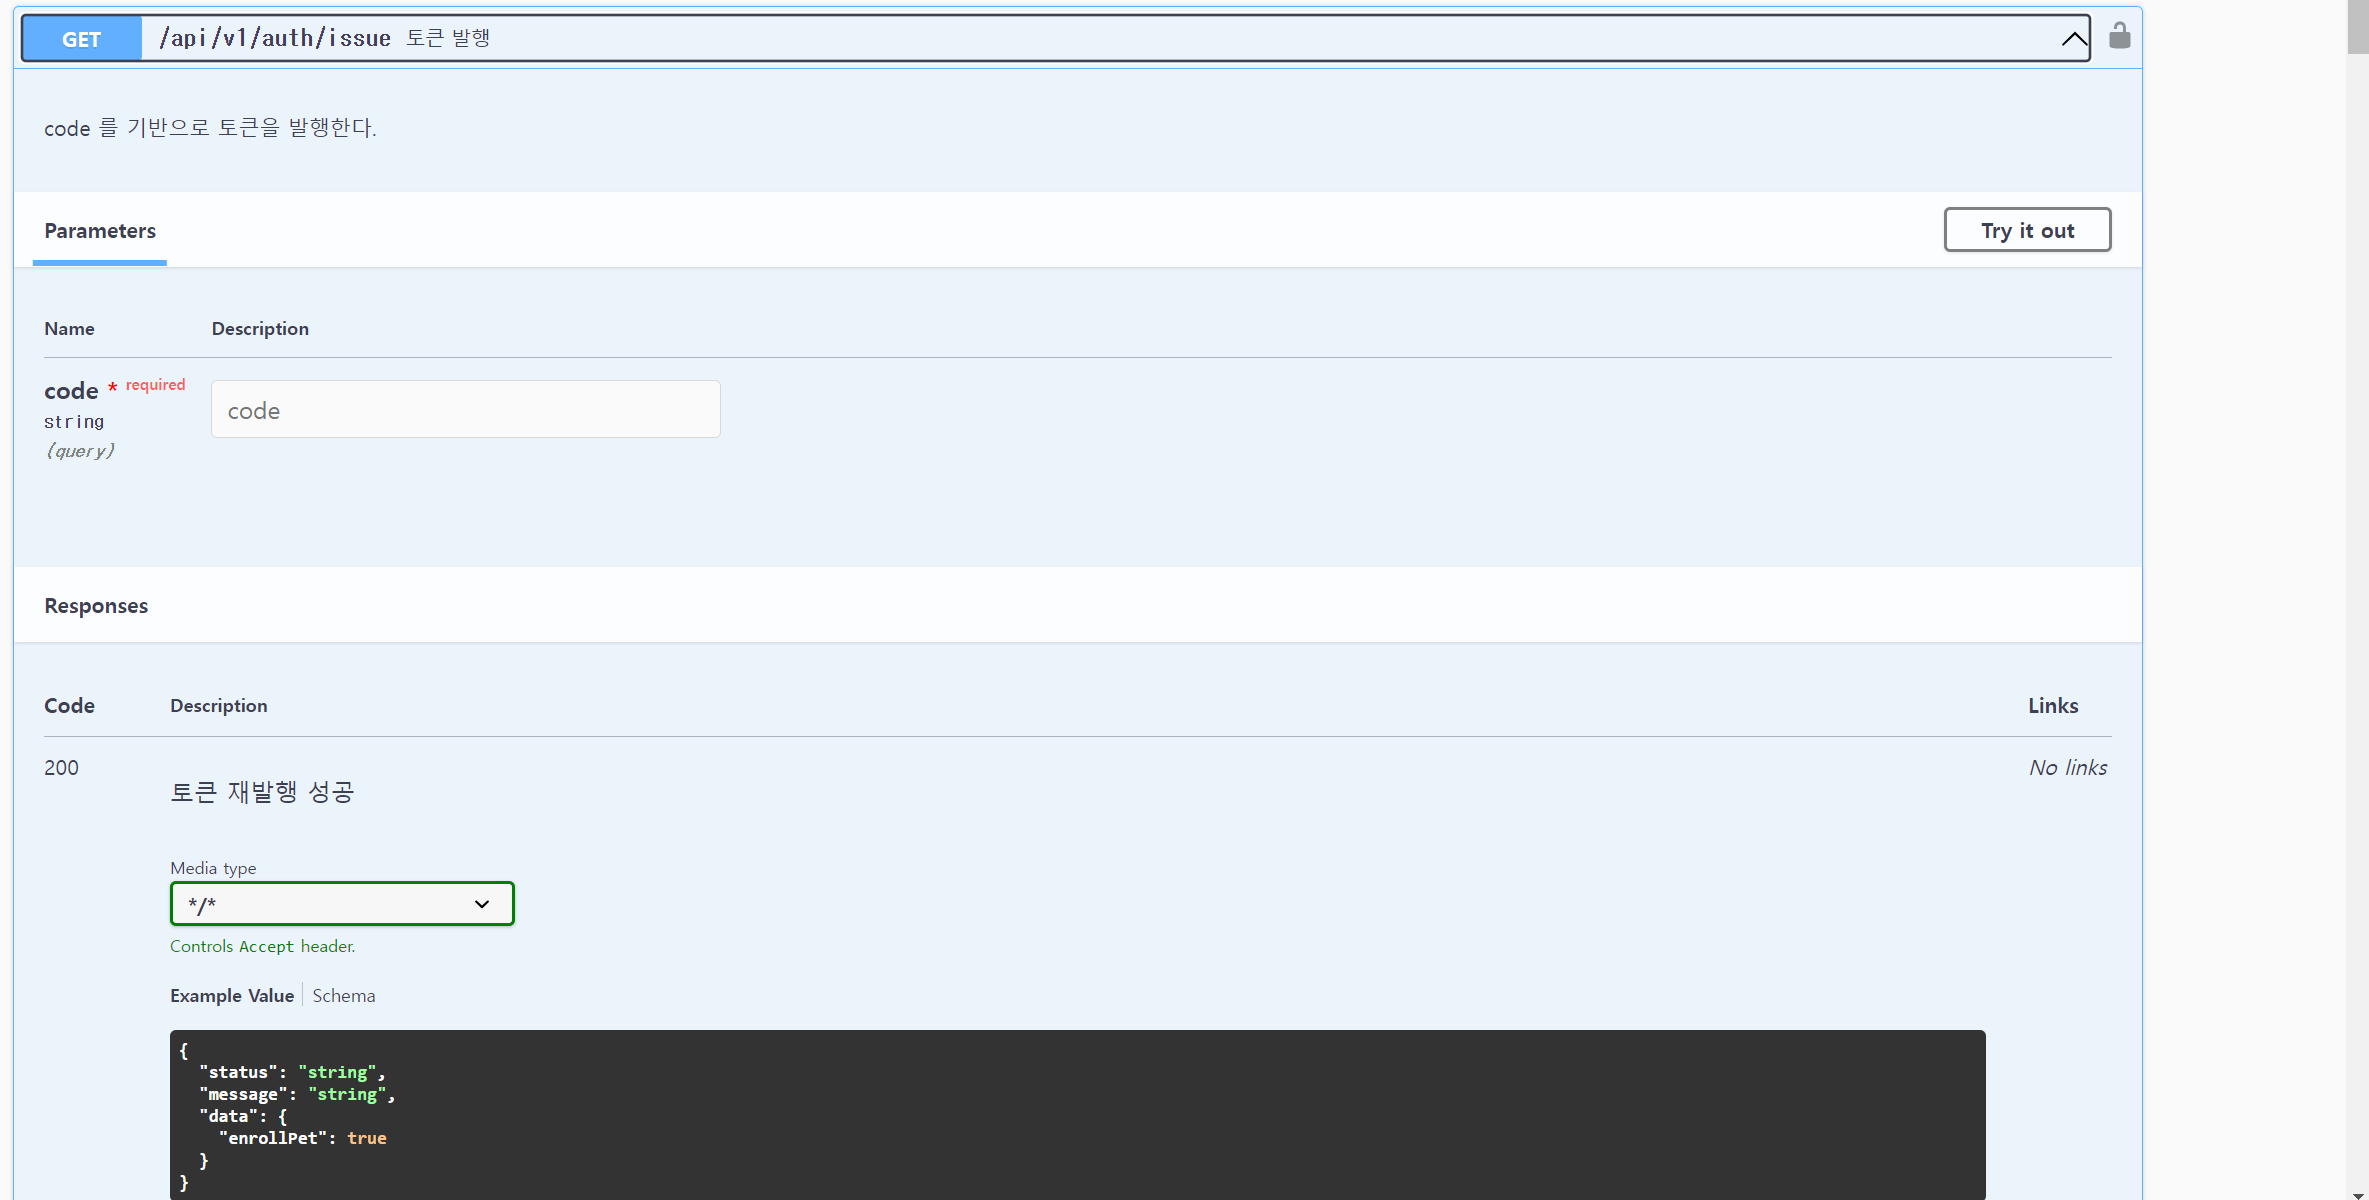
}컨트롤러
소셜 로그인 code 를 받을 시 백앤드는 로그인용 accessToken 과 refreshToken 반환
@GetMapping("/issue")
    @Operation(summary = "토큰 발행",description = "code 를 기반으로 토큰을 발행한다.")
    @ApiResponses(value = {
            @ApiResponse(responseCode = "200",description = "토큰 재발행 성공")
    })
    public ResponseEntity<BaseResponse<UserEnrollResponseDto>> getToken(@RequestParam("code") final String code){

        AuthResponseWithTokenAndRedirectUserInfo authResponseWithTokenAndRedirectUserInfo  = authService.getTokenByCode(code);

        return ResponseEntity.status(HttpStatus.OK)
                .header(accessTokenHeader,authResponseWithTokenAndRedirectUserInfo.getTokenDto().getAccessToken())
                .header(refreshTokenHeader,authResponseWithTokenAndRedirectUserInfo.getTokenDto().getRefreshToken())
                .body(BaseResponse.createSuccess(authResponseWithTokenAndRedirectUserInfo.getUserEnrollResponseDto()));

    }
느낀 점
비록 소셜 로그인 과정을 프론트와 분할해서 접근했던 측면에서 아쉬운 부분이 있지만
위와 같이 다른 api 와 마찬가지로 swagger 를 사용하여 access Token 과 refresh Token 전달 과정을 보여줄 수 있다는 것도 장점이여서 앞으로 소셜 로그인을 구현할 때는 위 방법처럼 할 것 같다!