들어가기 전에
저번 포스팅에서
저번 포스팅에서 JWT 를 왜 써야 하는지 , 세션에 비해서는 무엇이 좋은지 , 구조는 어떻게 되는지 알아보았다.
인증VS 인가
인증(Authentication)
인증이란 사용자나 시스템이 자신을 주장한 대상이 누구인지 확인하는 프로세스이다.
짧게 설명하면 우리가 네이버에 아이디,비번을 쳐서 로그인을 하고 내가 나라는 것이 인증이 되는 과정이라고 생각하면 된다.
인가(Authorization)
인가는 인증된 사용자나 애플리케이션이 특정 자원 또는 서비스에 액세스할 수 있는 권한을 부여하는 프로세스 이다.
쉽게 말하면 네이버에 접속한 내가 관리자를 위한 페이지에 접근할 수는 없다. 또한
결제 기능을 사용하지 않은 나는 VIP를 위한 기능을 사용할 수 없다. 그럴 권한이 없기 떄문이다. 이러한 과정이 인가이다.
어떤 Filter를 거치는지 구조이해 및 기능 구현 예정 소개
Filter가 필요한 이유는 명백하다. 위의 경우에서 처럼 네이버에 접속한 내가 관리자를 위한 페이지를 들어가고 싶을 때 그것을 거르는 역할이 Filter이다. 그렇다면 어떤 구조를 가지고 어떤 Filter를 거치는지 부터 파악해보자.
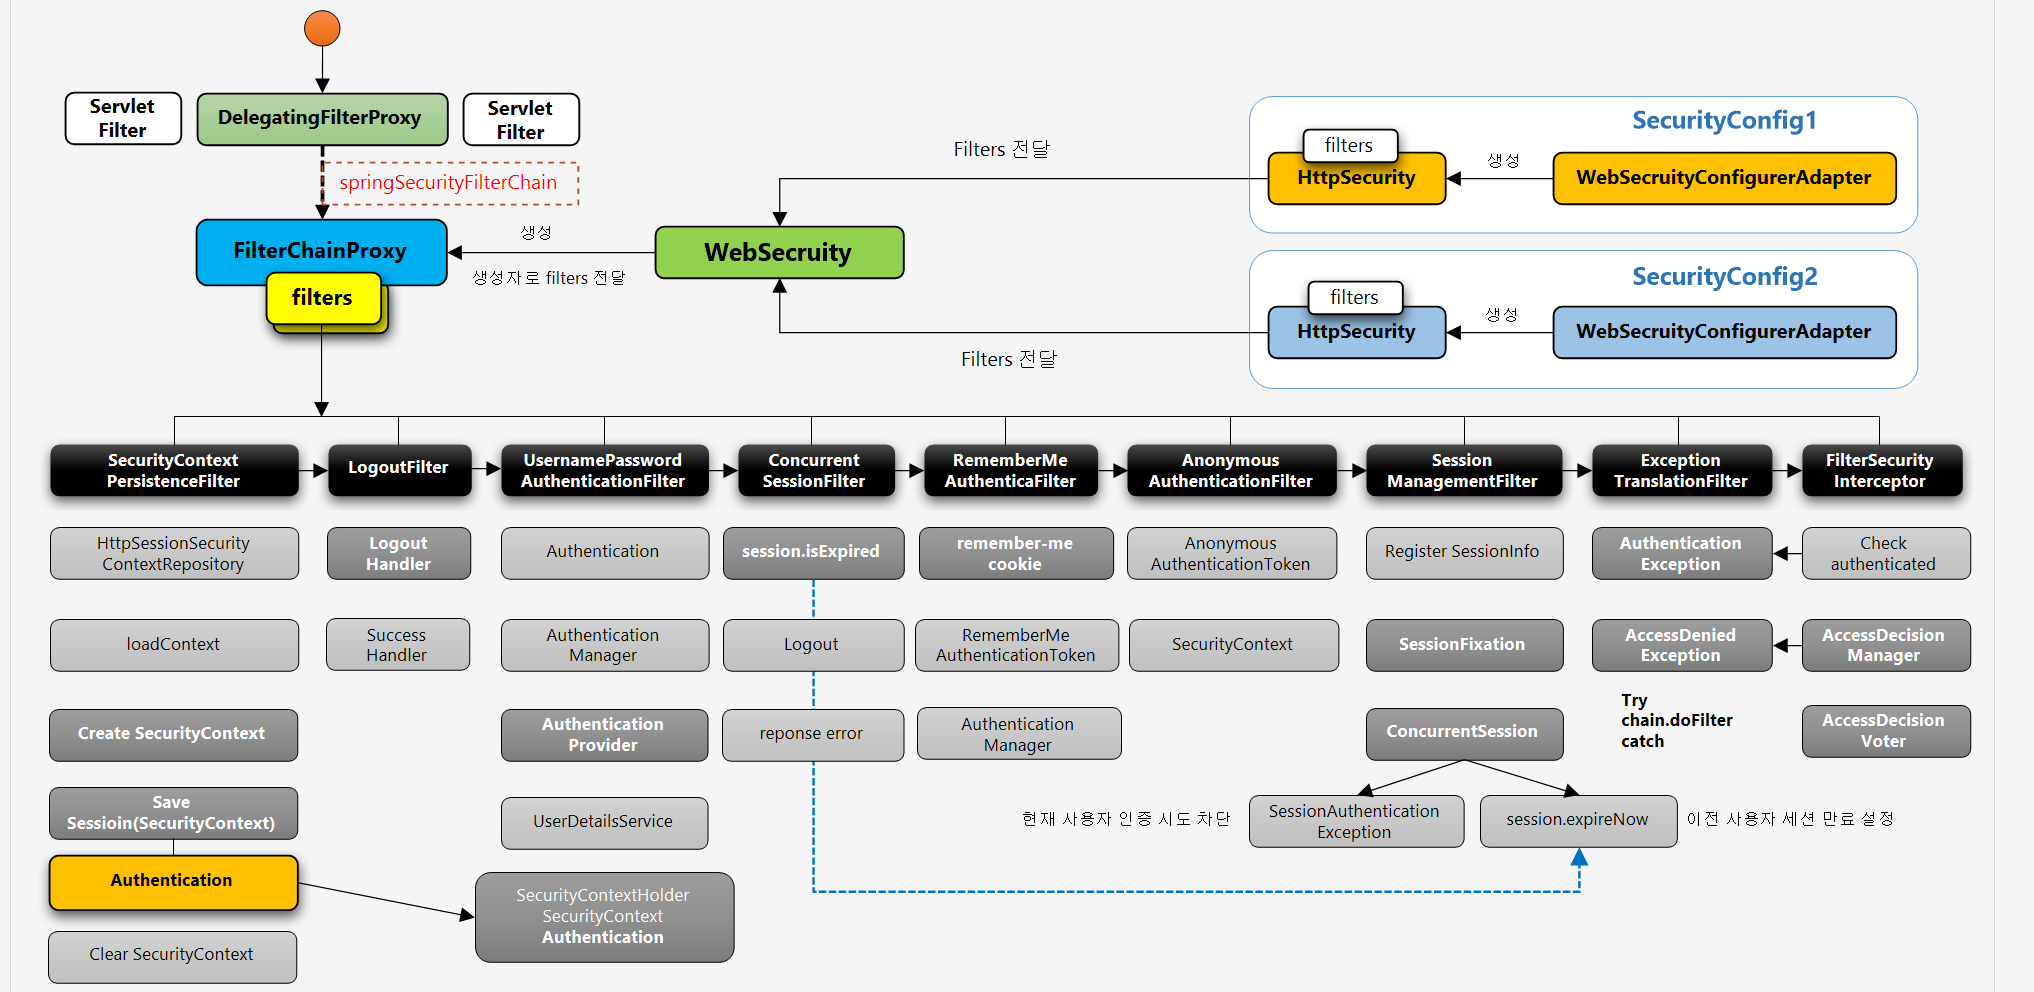
이는 Form 인증 방식으로 스프링 시큐리티가 Form 인증 방식을 사용할 때 어떤 filter를 거치는지 볼 수 있다. 이를 통해서 우리가 어떤 것을 구현할지 알 수 있을 것이다.
1)FilterChainProxy에는 SecurityFilterChains 라는 SecurityFilterChain을 여러 개 가질 수 있다. 각각의 SecurityFilterChain은 특정 URL에 맞는 Filter를 설정할 수 있다.
그러면 우리는 인증 및 인가를 위해 우리의 입맛에 맞는 SecurityFilterChain을 빈으로 등록한다.
2)아래 그림을 보자.
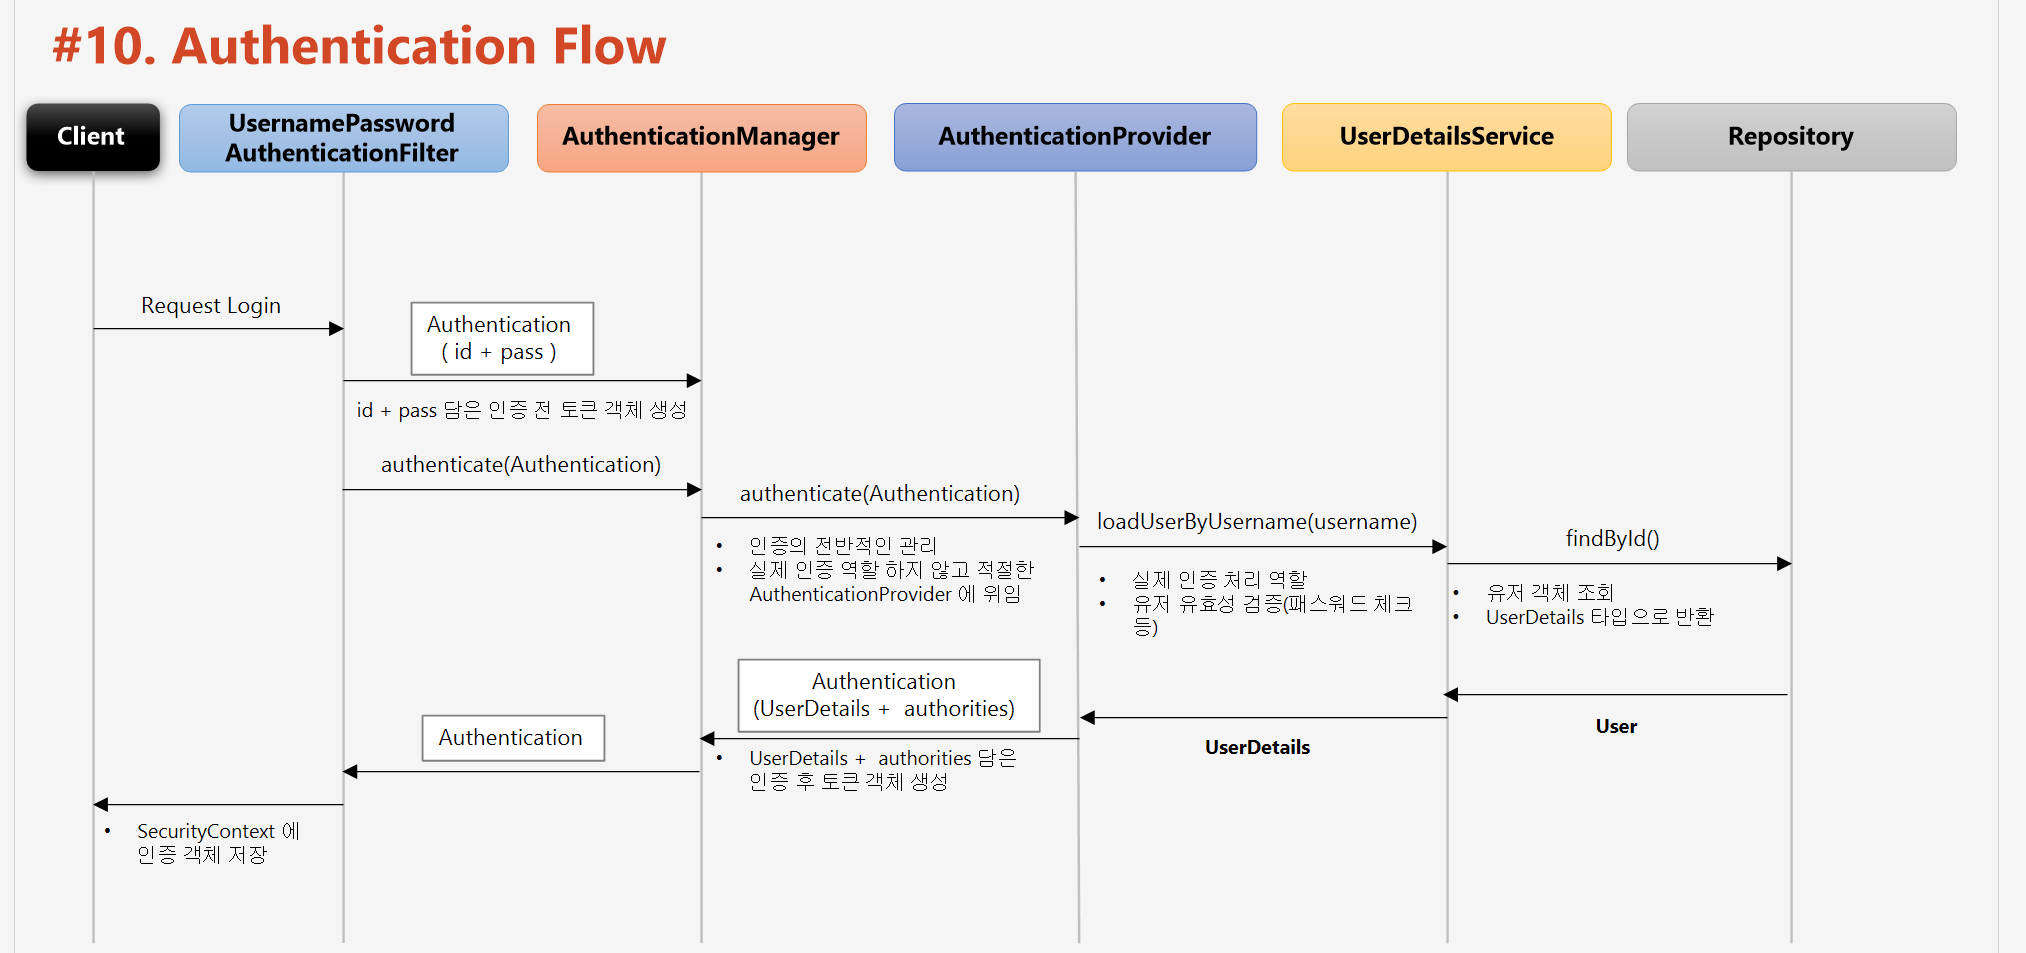
이 그림 역시 Form Login기반으로 사용된 AuthenticationFlow이다 . 우리는 JWT 토큰을 이용할 것이므로 안타깝게도 이 과정을 사용하지는 못한다. 그러나 이 과정으로 부터 우리가 어떤 기능을 구현해야 하는지 알 수 있다.
2-1)가장 먼저 이거는 Form 기반 인증방식이므로 이 Filter 전에 우리가 만든 새로운 인증Filter를 적용시키는 식으로 할 것이다.
위에서 첫번째 Authentication을 아이디와 password로 생성하고 그 값을 AuthenticationManaer에 전달하면 AuthenticationProvider가 UserDetails의 loadUserByUsername을 호출해서 실제 그 아이디를 가진 객체를 가져와서 새로운 Authentication 을 만든다.
위 과정에서 모든 부분을 구현할 수도 있다.
2-2)하지만 AuthenticationProvider의 구현체 DaoAuthenticationProvider가 JWT기반으로 만든 로그인 또한 userDetailsService에 넘겨준다. 그렇기 때문에 JwtAuthenticationProvider를 생성하지 않고 UserDetailsService만 따로 만들어보는 식으로 할 것이다.
3)인증 및 인가에 대한 예외 처리를 위해 따로 인증 실패시 Handler 와 인가 실패시 Handler 를 구현하여 본다. 이또한 위 그림에서 Filter에 걸러지게 된다.
참고
1)Authentication 객체는
principal : 사용자 아이디 혹은 User 객체를 저장
credentials : 사용자 비밀번호
authorities : 인증된 사용자의 권한 목록
details : 인증 부가 정보
Authenticated : 인증 여부
이런 속성을 갖고 있으며 위의 그림의 첫번 째 Authentication 객체의 경우 principal에는 사용자 ID,credential에는 사용자 비밀번호, Authenticated는 false,autorities는 빈칸의 값을 갖고 있지만 두번쨰 Authentication 객체의 경우 principal에는 User 객체,credential에는 빈칸값,Authenticated에는 true의 값,authorities는 멤버의 권한(따로 설정)을 가지고 있다.
더 나은 이해를 위해서 사진 및 결과를 추가한다.
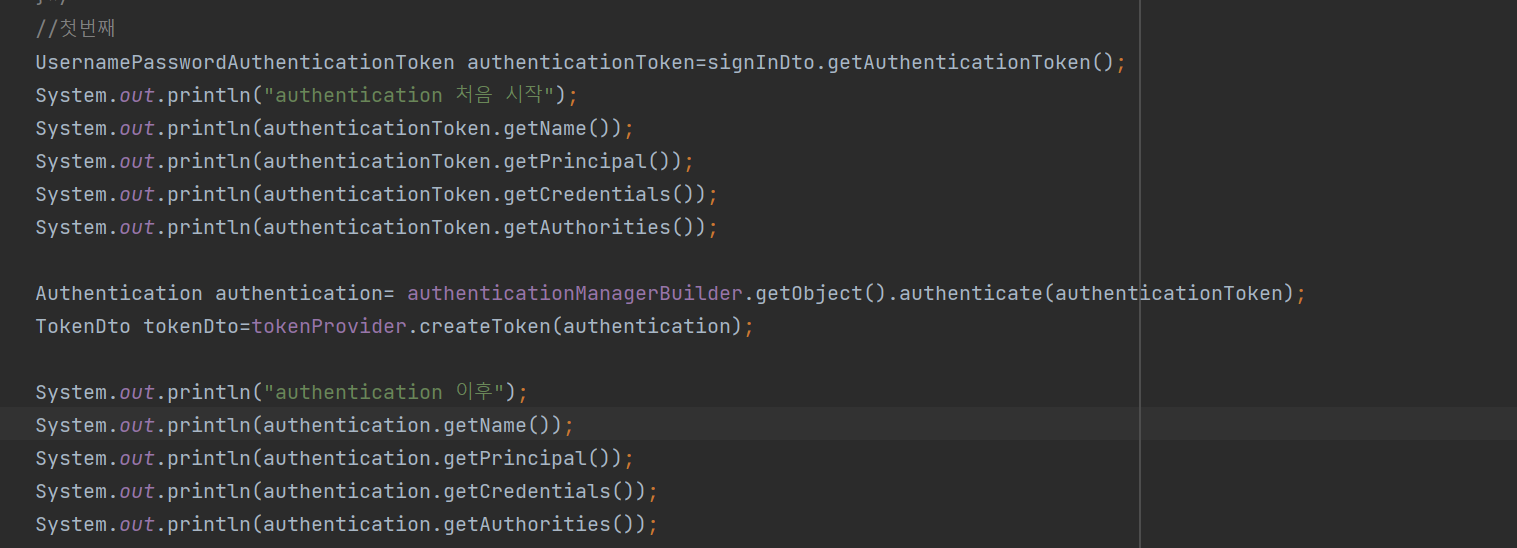
위 사진은 Authentication Flow에서 해주었던 역할인 id + pass 담은 인증 전 토큰 객체를 생성해서 authenticate(Authentication)을 수동으로 해준 코드이다. (UsernamePasswordAuthenticationToken은 Authentication 의 자식이다)
그 후 authenticate를 완료하고 나면 새로운 Authentication 으로 바뀌는데 그 값을 보자.
authentication 처음 시작
dionisos198
dionisos198
mypassword
[]
-------------------
authentication 이후
dionisos198
org.springframework.security.core.userdetails.User [Username=dionisos198, Password=[PROTECTED], Enabled=true, AccountNonExpired=true, credentialsNonExpired=true, AccountNonLocked=true, Granted Authorities=[ROLE_NORMAL]]
null
[ROLE_NORMAL]
위 흐름을 그림으로 정리하면
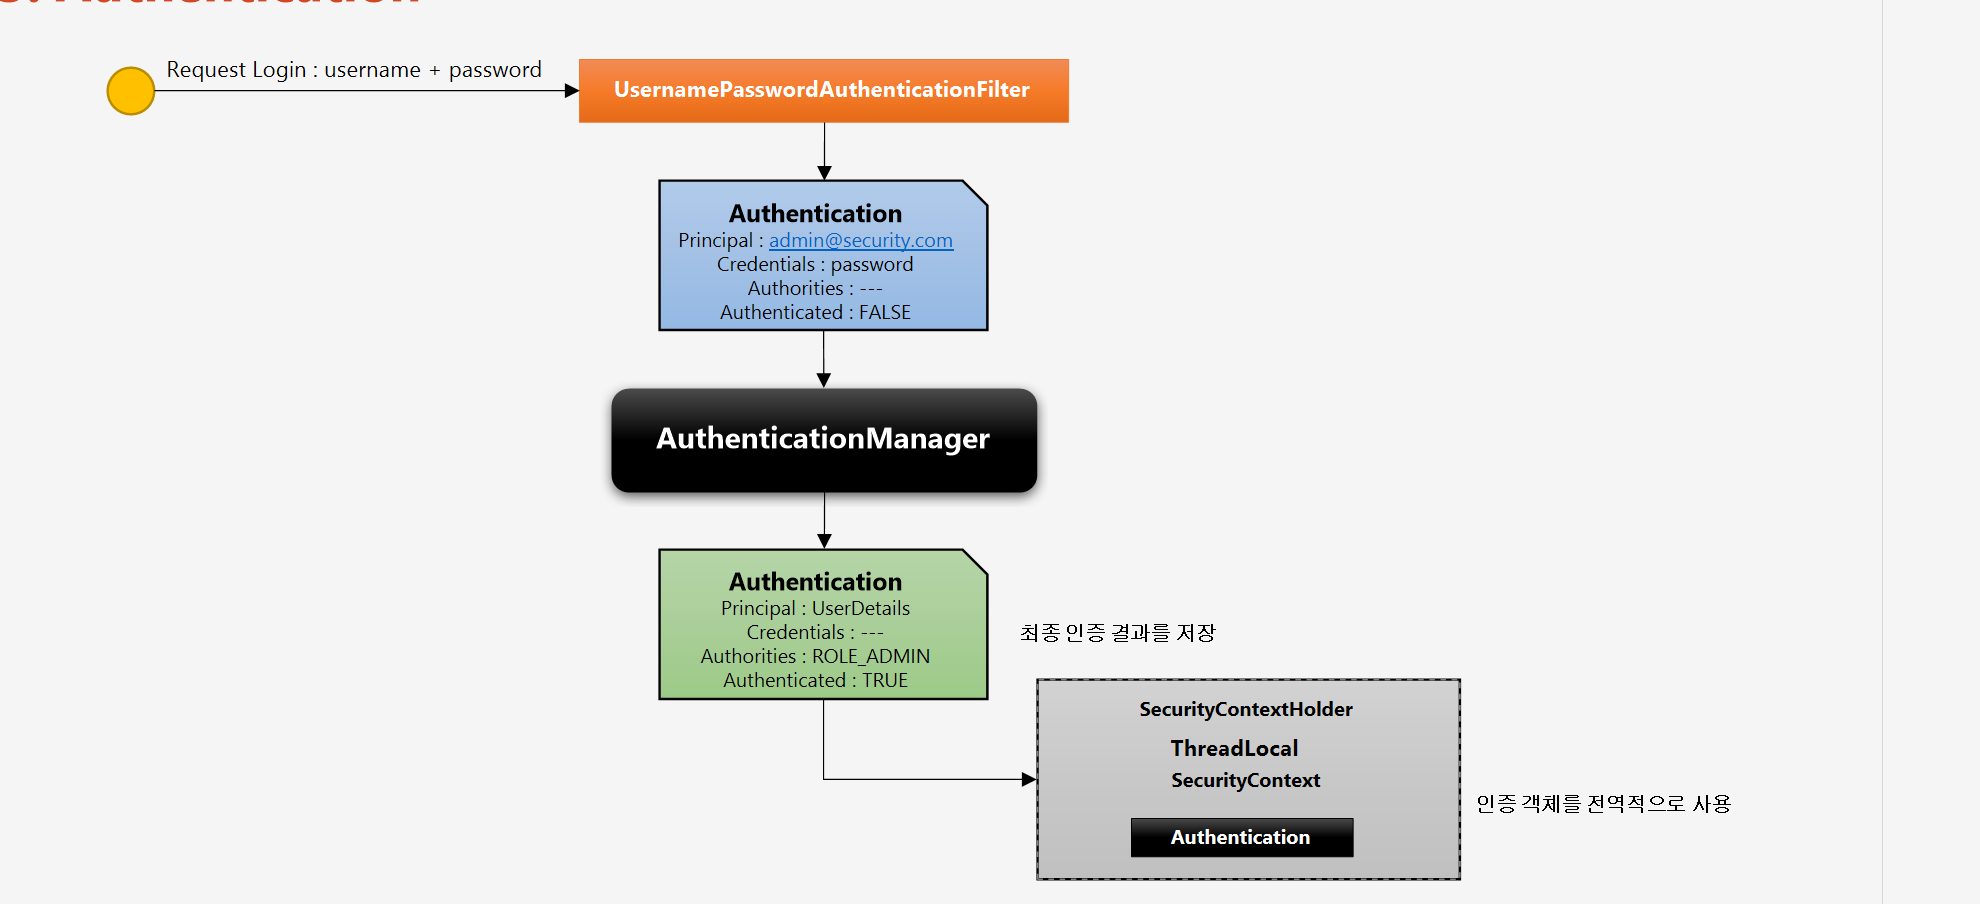
와 같고 이에 따라
UsernamePasswordAuthenticationToken (Authentication 의 자식)은 생성자를 2개 가지고 있는데
1)(Object principal, Object credentials),setAuthenticated(false): 인증 Filter (우리는 직접 만들 것이다)에서 ID,password 담을 때 사용
2)(Object Principal, Object credentials,Collection<>authorities),setAuthentication(true):
최종 성공한 인증결과를 담을 때 사용
이렇게 가지고 있다.
2)토큰을 기반으로 인증 객체를 생성하고 그 인증 객체를 SecurityContext에 담음으로 쓰레드 별로 인증 객체를 마음껏 꺼내서 사용할 수 있다. 이 또한 기능을 구현할 것이다.
정리
이렇게 알아본 JWT를 바탕으로 스프링에서 로그인 + 로그아웃 +JWT 토큰이 털릴 때를 대비한 refreshToken 으로 로그인을 구현하여 보겠다.
로그인 구현
Configuration 계층
권한이 없을때 특정한 에러 메시지를 출력할 수도 있게 할수 있다.
사실 AccessDeniedHandler가 알아서 해주므로 구현을 안해도 상관이 없다.
JwtAccessDeniedHandler.java
@Component
public class JwtAccessDeniedHandler implements AccessDeniedHandler {
    @Override
    public void handle(HttpServletRequest request, HttpServletResponse response, AccessDeniedException accessDeniedException) throws IOException, ServletException {
      response.sendError(HttpServletResponse.SC_FORBIDDEN);
    }
}
JwtAuthenticationEntryPointHandler.java
이것은 인증이 되지 않았을때 특정 메시지를 출력할 수도 있게 구현하였다. 마찬가지로 딱히 구현을 안해 주어도 된다. @Component
public class JwtAuthenticationEntryPointHandler implements AuthenticationEntryPoint {
@Override
public void commence(HttpServletRequest request, HttpServletResponse response, AuthenticationException authException) throws IOException, ServletException {
response.sendError(HttpServletResponse.SC_UNAUTHORIZED);
}
}TokenProvider.java
우리는 기본적으로 JWT 토큰을 사용하기 때문에 JWT 토큰을 생성하기 위한 클래스가 필요하다.@Component
@Slf4j
public class TokenProvider implements InitializingBean {
private final static String AUTHORIZATION_KEY = "auth";
private final Long validationTime;
private final Long refreshTokenValidationTime;
private final String secret;
private Key key;
public TokenProvider(@Value("${jwt.secret}") String secret,
@Value("${jwt.validationTime}") Long validationTime) {
this.secret = secret;
this.validationTime = validationTime * 1000;
this.refreshTokenValidationTime = validationTime * 2 * 1000;
}
@Override
public void afterPropertiesSet() {
byte[] key_set = Decoders.BASE64.decode(secret);
this.key = Keys.hmacShaKeyFor(key_set);
}
// Authentication 객체를 통하여 토큰 생성
public TokenDto createToken(Authentication authentication) {
String authorities = authentication.getAuthorities()
.stream().map(GrantedAuthority::getAuthority)
.collect(Collectors.joining(","));
long now = (new Date()).getTime();
String accessToken = Jwts.builder()
.setExpiration(new Date(now + validationTime))
.setSubject(authentication.getName())
.claim(AUTHORIZATION_KEY, authorities)
.signWith(this.key, SignatureAlgorithm.HS512)
.compact();
String refreshToken = Jwts.builder()
.setExpiration(new Date(now + refreshTokenValidationTime))
.signWith(this.key, SignatureAlgorithm.HS512)
.compact();
return TokenDto.builder()
.accessToken(accessToken)
.refreshToken(refreshToken)
.accessTokenValidationTime(validationTime)
.refreshTokenValidationTime(refreshTokenValidationTime)
.type("Bearer ")
.build();
}
// 토큰을 통하여 Authentication 객체 생성
public Authentication getAuthentication(String token) {
Claims claims = parseData(token);
List<SimpleGrantedAuthority> authorities = Arrays
.stream(claims.get(AUTHORIZATION_KEY).toString().split(","))
.map(SimpleGrantedAuthority::new)
.collect(Collectors.toList());
User principal = new User(claims.getSubject(), "", authorities);
return new UsernamePasswordAuthenticationToken(principal, "", authorities);
}
// 토큰 유효성 검사
public boolean validateToken(String token) {
try {
Jwts.parserBuilder().setSigningKey(key).build().parseClaimsJws(token);
return true;
} catch(MalformedJwtException | SecurityException e) {
log.info("잘못된 형식의 토큰입니다.");
} catch(ExpiredJwtException e) {
log.info("만료된 토큰입니다.");
} catch(UnsupportedJwtException e) {
log.info("지원하지 않는 형식의 토큰입니다.");
} catch(IllegalArgumentException e) {
log.info("잘못된 토큰입니다.");
}
return false;
}
public Claims parseData(String token) {
try{
return Jwts.parserBuilder()
.setSigningKey(this.key)
.build().parseClaimsJws(token).getBody();
}
catch (ExpiredJwtException e){
return e.getClaims();
}
}
public Long getExpiration(String accessToken) {
// accessToken 남은 유효시간
Date expiration = Jwts.parserBuilder().setSigningKey(key).build().parseClaimsJws(accessToken).getBody().getExpiration();
// 현재 시간
Long now = new Date().getTime();
return (expiration.getTime() - now);
}
}위에서 application.properties에는 secret값과 validation 키 값을 적절히 잡아두어야 한다.
SecurityConfig.java
@EnableWebSecurity
@RequiredArgsConstructor
public class SecurityConfig {
   private final JwtAuthenticationEntryPointHandler authenticationEntryPointHandler;
   private final JwtAccessDeniedHandler accessDeniedHandler;
   private final TokenProvider tokenProvider;
   private final RedisTemplate<String,String> redisTemplate;


   @Bean
   public BCryptPasswordEncoder passwordEncoder(){
      return new BCryptPasswordEncoder();
   }

   @Bean
   public SecurityFilterChain configure(HttpSecurity http) throws Exception {
      return http.formLogin().disable()
              .csrf().disable()
              .sessionManagement()
              .sessionCreationPolicy(SessionCreationPolicy.STATELESS)
              .and()
              .exceptionHandling()
              .authenticationEntryPoint(authenticationEntryPointHandler)
              .accessDeniedHandler(accessDeniedHandler)
              .and()
              .authorizeRequests()
              .antMatchers("/auth/**").permitAll()
              .antMatchers("/normal").access("hasRole('VIP') or hasRole('NORMAL')")
              .antMatchers("/vip").hasRole("VIP")
              .anyRequest().authenticated()
              .and()

              .apply(new JwtSecurityConfig(tokenProvider,redisTemplate))
              .and().build();

   }

}http.formLogin().disable()
.csrf().disable()
.sessionManagement()
.sessionCreationPolicy(SessionCreationPolicy.STATELESS)form login방식이 아닌 jwt 로그인 방식을 이용하므로 form login 방식을 끄고 세션 기반의 보안 설정을 도와주는 csrf를 끈다. 또한 세션 또한 사용안할 것이므로 STATELESS 방식으로 하면 세션 방식을 아예 사용하지 않는다.
.exceptionHandling()
            .authenticationEntryPoint(authenticationEntryPointHandler)
            .accessDeniedHandler(accessDeniedHandler)
우리가 만든 것을 적용한다. 딱히 부연할 것이 없다.
 .antMatchers("/auth/**").permitAll()
            .antMatchers("/normal").access("hasRole('VIP') or hasRole('NORMAL')")
            .antMatchers("/vip").hasRole("VIP")
            .anyRequest().authenticated()
            .and()

            .apply(new JwtSecurityConfig(tokenProvider,redisTemplate))
            .and().build();
이를 해석하면 auth로 시작하는 url 은 어떤 권한이든 다 접근이 가능하고 /normal 로 시작하는 자원은 VIP 랑 normal 권한 모두 접근 할 수 있으나 vip 리소스는 오직 vip 권한 만이 접근이 가능하다. 또한 JWTSecurityConfig를 이 filterchain에 적용한다.
JwtSecurityConfig.java
@RequiredArgsConstructor
public class JwtSecurityConfig extends SecurityConfigurerAdapter<DefaultSecurityFilterChain, HttpSecurity> {
 private final TokenProvider tokenProvider;
 private final RedisTemplate<String,String> redisTemplate;
  @Override
  public void configure(HttpSecurity http) throws Exception {
      http.addFilterBefore(new JwtFilter(tokenProvider,redisTemplate), UsernamePasswordAuthenticationFilter.class);
  }
}
우리가 만들 JwtFiler를 UsernamePassword 전에 등록을 해주어야 한다.
JwtFilter.java
우리가 로그아웃을 눌렀을 때 그 accessToken을 기반으로 걸러주고 , 인증 예외가 발생하는지 검사하여 주고, 인증이 성공하면 token을 기반으로 인증 객체를 가져와서 SecurityContextHolder 에 담아주는 역할을 한다.@RequiredArgsConstructor
public class JwtFilter extends OncePerRequestFilter {
private final String AUTHORIZATION_KEY = "Authorization";
private final TokenProvider tokenProvider;
private final RedisTemplate<String,String> redisTemplate;
@Override
protected void doFilterInternal(HttpServletRequest request,
HttpServletResponse response,
FilterChain filterChain) throws ServletException, IOException {
String tokenValue = parseHeader(request);
if(StringUtils.hasText(tokenValue) && tokenProvider.validateToken(tokenValue)) {
String logOut=(String) redisTemplate.opsForValue().get(tokenValue);
if(ObjectUtils.isEmpty(logOut)){
Authentication authentication = tokenProvider.getAuthentication(tokenValue);
SecurityContextHolder.getContext().setAuthentication(authentication);
}
}
filterChain.doFilter(request, response);
}
public String parseHeader(HttpServletRequest request) {
String token = request.getHeader(AUTHORIZATION_KEY);
if(StringUtils.hasText(token) && token.startsWith("Bearer ")) {
return token.substring(7);
}
return null;
}
}JwtUserDetailsService.java
@Service
@RequiredArgsConstructor
public class JwtUserDetailsService implements UserDetailsService {
 private final MemberRepository memberRepository;


@Override
 public UserDetails loadUserByUsername(String username) throws UsernameNotFoundException {
     return memberRepository.findMemberByUserID(username)
             .map(this::getUserDetails)
             .orElseThrow(MemberNotFoundException::new);
 }

 public UserDetails getUserDetails(Member member) {
     SimpleGrantedAuthority authority = new SimpleGrantedAuthority(member.getAuthority().toString());

     return new User(member.getUserID(), member.getPassword(), Collections.singleton(authority));
 }
}
앞으로 AuthService에서 볼 것이지만 AuthenticationManager에 authenticate에 초기 인증 객체를 넣는데 그러면 결국 DaoAuthenticationProvider에 의해서 빈에 등록된(@Service가 그래서 필요하다) UserDetailsService를 사용하는데 이 loadUserByUsername은 결국 우리가 db에 저장한 Member를 이용해서 User객체를 만들고 , 이 User객체를 그 인터페이스인 UserDetails로 바꾸어서 리턴하는 역할을 한다.
Service 계층
AuthService.java
@Service
@RequiredArgsConstructor
public class AuthService {

  private final MemberRepository memberRepository;
  private final BCryptPasswordEncoder passwordEncoder;
  private final RedisTemplate<String,String> redisTemplate;
  @Transactional
  public void normalMemberSignUp(SignUpDto signUpDto) {
    NormalMember member=getNormalMember(signUpDto);
    memberRepository.save(member);

  }
  private NormalMember getNormalMember(SignUpDto signUpDto){
    if(memberRepository.existsByUserID(signUpDto.getUserID())){
        throw new RuntimeException("중복 됩니다");
    }
    return new NormalMember(signUpDto.getName(), signUpDto.getPhone(), signUpDto.getUserID(), passwordEncoder.encode(signUpDto.getPassword()));
  }

  @Transactional
  public void VIPMemberSignUp(SignUpDto signUpDto) {
      VIPMember member=getVIPMember(signUpDto);
      memberRepository.save(member);

  }
  private VIPMember getVIPMember(SignUpDto signUpDto){
      if(memberRepository.existsByUserID(signUpDto.getUserID())){
          throw new RuntimeException("중복 됩니다");
      }
      return new VIPMember(signUpDto.getName(), signUpDto.getPhone(), signUpDto.getUserID(), passwordEncoder.encode(signUpDto.getPassword()));
  }
  //여기서 부터는 로그인입니다.


  private final TokenProvider tokenProvider;
  private final AuthenticationManagerBuilder authenticationManagerBuilder;
  @Transactional
  public TokenResponseDto MemberSingIn(SignInDto signInDto){
      Member findMember=memberRepository.findMemberByUserID(signInDto.getUserID()).orElseThrow(MemberNotFoundException::new);
      if(!passwordEncoder.matches(signInDto.getPassword(),findMember.getPassword())){
          throw new MemberLoginFailureException();
      }
      UsernamePasswordAuthenticationToken authenticationToken=signInDto.getAuthenticationToken();
      Authentication authentication= authenticationManagerBuilder.getObject().authenticate(authenticationToken);
      TokenDto tokenDto=tokenProvider.createToken(authentication);

      redisTemplate.opsForValue().set(authentication.getName(),tokenDto.getRefreshToken(),tokenDto.getRefreshTokenValidationTime(), TimeUnit.MILLISECONDS);
      return new TokenResponseDto(tokenDto.getType(),tokenDto.getAccessToken(),tokenDto.getRefreshToken(),tokenDto.getAccessTokenValidationTime());
  }

  @Transactional
  public TokenResponseDto reIssue(TokenRequestDto tokenRequestDto){
     String accessToken=tokenRequestDto.getAccessToken();
     String refreshToken=tokenRequestDto.getRefreshToken();
     Authentication authentication= tokenProvider.getAuthentication(accessToken);

     if(!redisTemplate.opsForValue().get(authentication.getName()).equals(refreshToken)){
         throw new TokenNotCorrectException();
     }
     TokenDto tokenDto=tokenProvider.createToken(authentication);
     redisTemplate.opsForValue().set(authentication.getName(),tokenDto.getRefreshToken(),tokenDto.getRefreshTokenValidationTime(), TimeUnit.MILLISECONDS);

     return new TokenResponseDto(tokenDto.getType(),tokenDto.getAccessToken(),tokenDto.getRefreshToken(),tokenDto.getAccessTokenValidationTime());
  }

  @Transactional
  public void logout(TokenRequestDto tokenRequestDto){
      if (!tokenProvider.validateToken(tokenRequestDto.getAccessToken())){
          throw new IllegalArgumentException("로그아웃 : 유효하지 않은 토큰입니다.");
      }

      Authentication authentication = tokenProvider.getAuthentication(tokenRequestDto.getAccessToken());

      if (redisTemplate.opsForValue().get(authentication.getName())!=null){
          redisTemplate.delete(authentication.getName());
      }


      Long expiration = tokenProvider.getExpiration(tokenRequestDto.getAccessToken());
      redisTemplate.opsForValue().set(tokenRequestDto.getAccessToken(),"logout",expiration,TimeUnit.MILLISECONDS);
  }
}
위에 "여기서 부터는 로그인 입니다" 가 보이는가? 그선을 기점으로 위는 회원을 단순히 등록하는 역할이다.
controller 계층
AuthController.java
말 그대로 인증 컨트롤러를 담당한다. service를 그대로 호출하는 형식이므로 부연설명은 하지 않겠다.@RestController
@RequiredArgsConstructor
@RequestMapping("/auth")
public class AuthController {
private final AuthService authService;
@PostMapping("/save/normal")
@ResponseStatus(HttpStatus.CREATED)
public void memberSignUp(@RequestBody SignUpDto signUpDto){
authService.normalMemberSignUp(signUpDto);
}
@PostMapping("/save/vip")
@ResponseStatus(HttpStatus.CREATED)
public void nonMemberSignUp(@RequestBody SignUpDto signUpDto){
authService.VIPMemberSignUp(signUpDto);
}
@PostMapping("/login")
@ResponseStatus(HttpStatus.ACCEPTED)
public TokenResponseDto login(@RequestBody SignInDto signInDto){
return authService.MemberSingIn(signInDto);
}
@PostMapping("/reIssue")
@ResponseStatus(HttpStatus.OK)
public TokenResponseDto reIssue(@RequestBody TokenRequestDto tokenRequestDto){
return authService.reIssue(tokenRequestDto);
}
@PostMapping("/logout")
@ResponseStatus(HttpStatus.OK)
public void logout(@RequestBody TokenRequestDto tokenRequestDto){
authService.logout(tokenRequestDto);
}
}
MemberController.java
인가가 잘 작동되는지 확인할수있는 controller 를 만들었다.@RestController
@RequiredArgsConstructor
public class MemberController {
@GetMapping("/normal")
@ResponseStatus(HttpStatus.OK)
public String normal(){
return "normal";
}
@GetMapping("/vip")
@ResponseStatus(HttpStatus.OK)
public String vip(){
return "vip";
}
}domain,Repository,exception,dto 계층
위 계층은 따로 적지는 않았다. 우리가 흔히 사용하는 것이기도 하고 깃허브 리포지토리를 참조하는 것이 좋을 것같다.Postman을 통한 테스트
normal 회원 등록 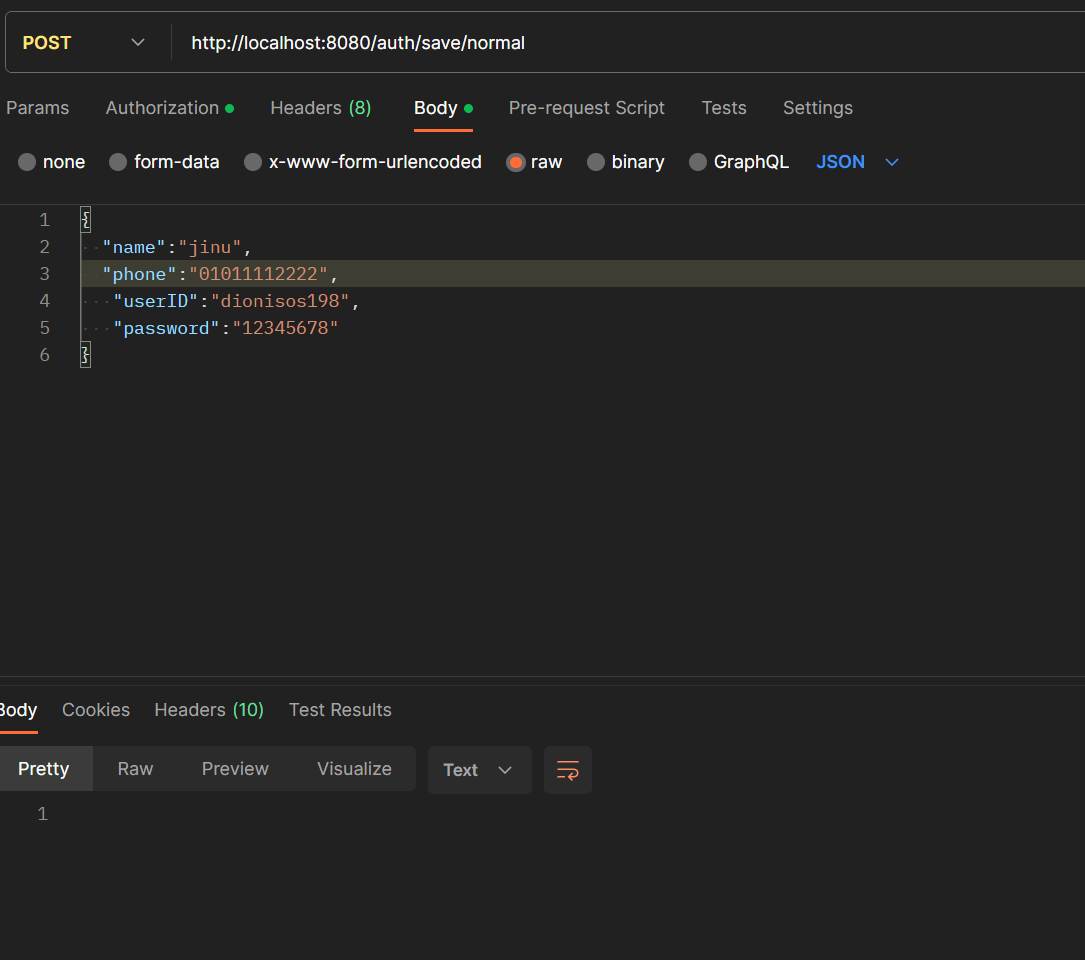
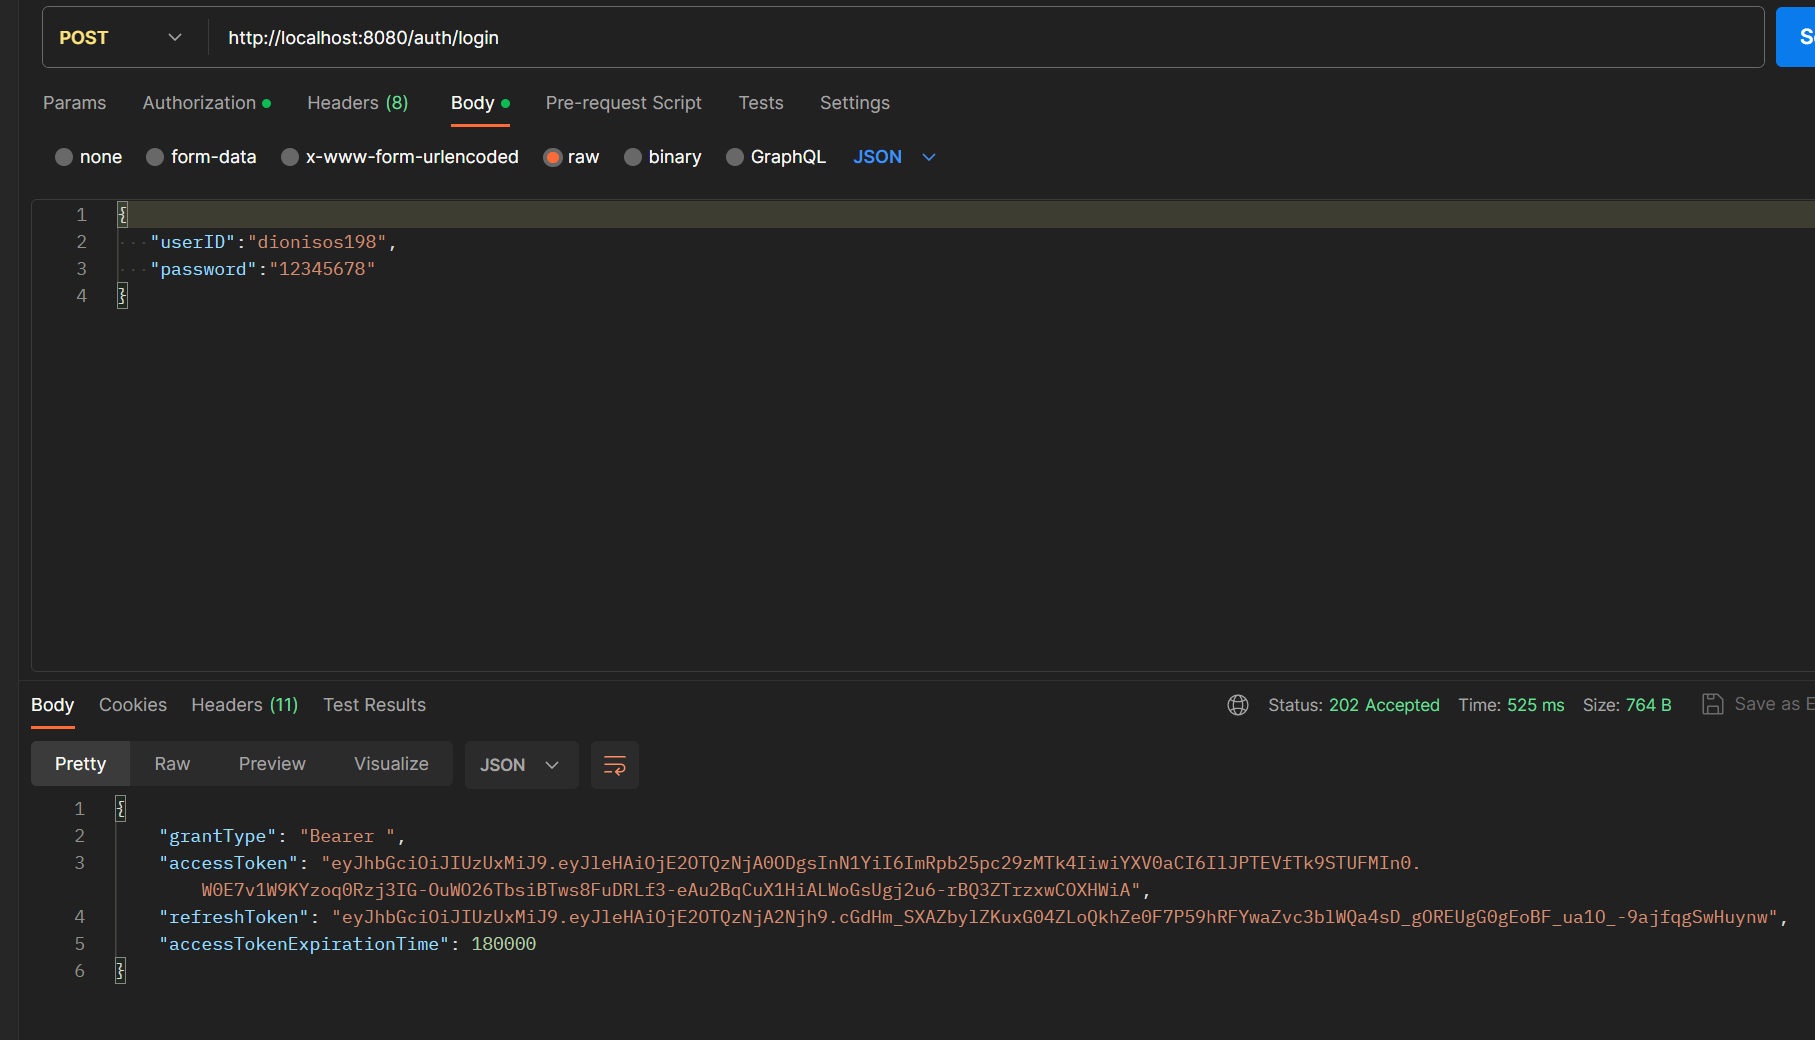
로그인
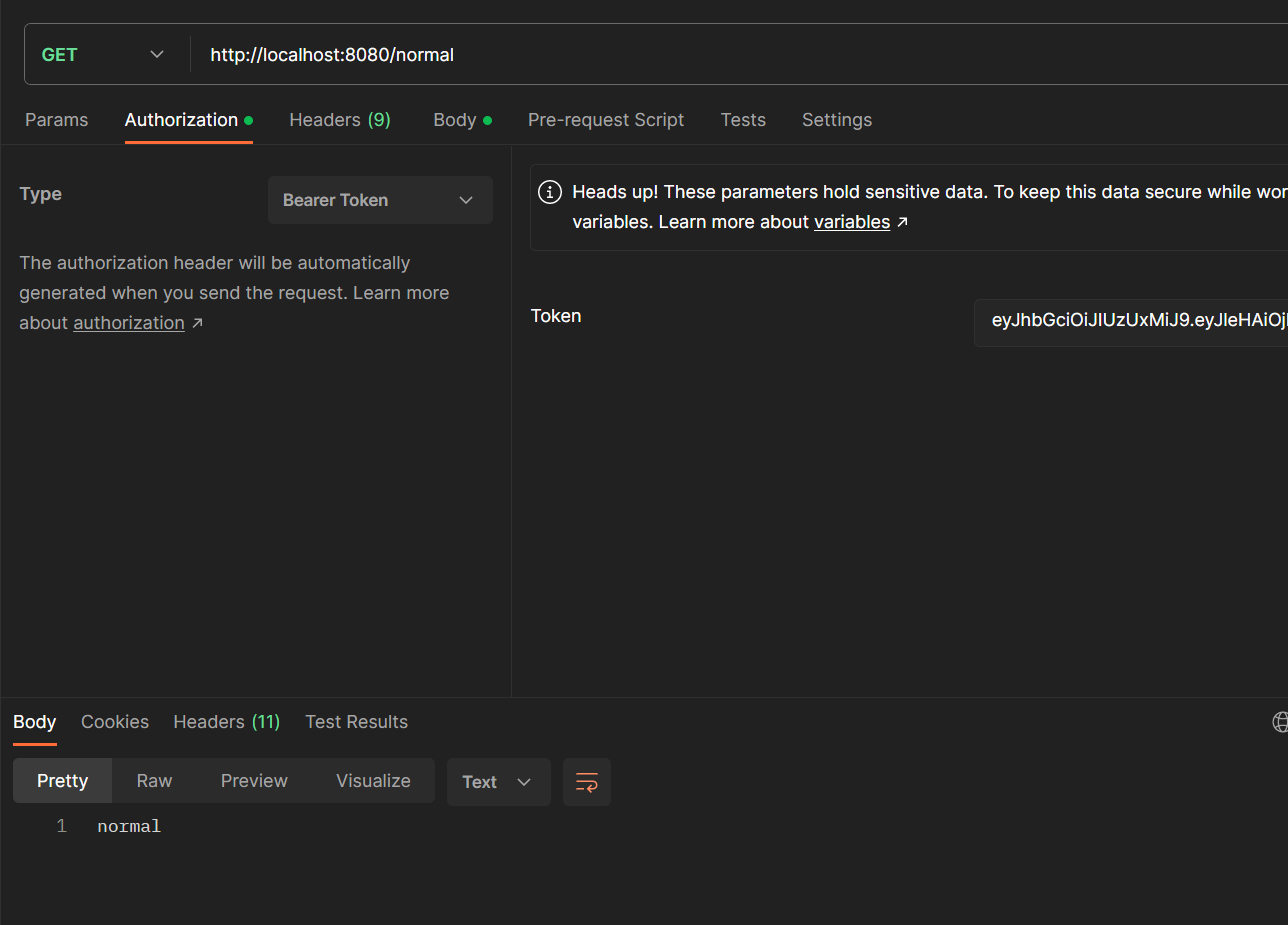
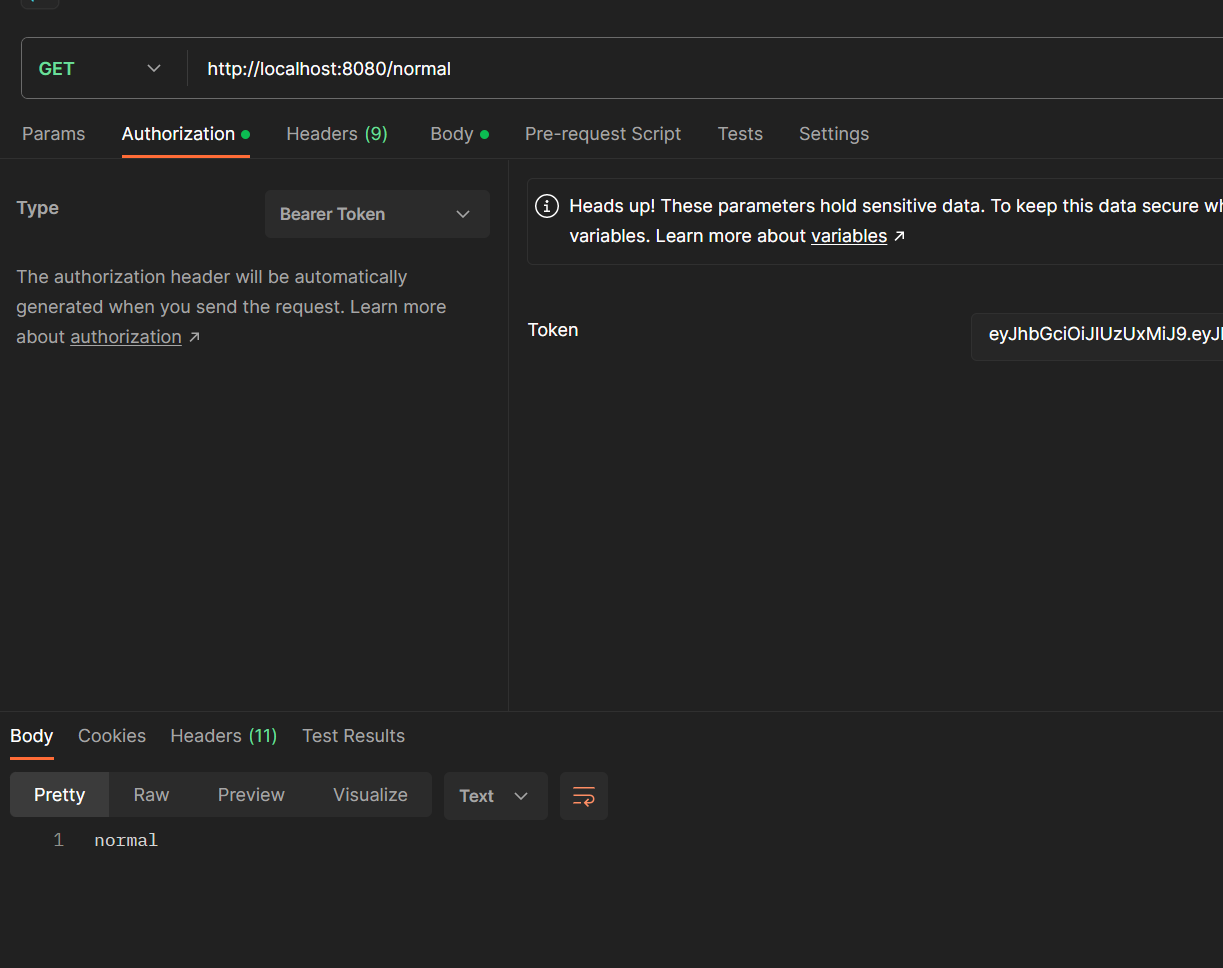
normal 에는 접근 가능하나
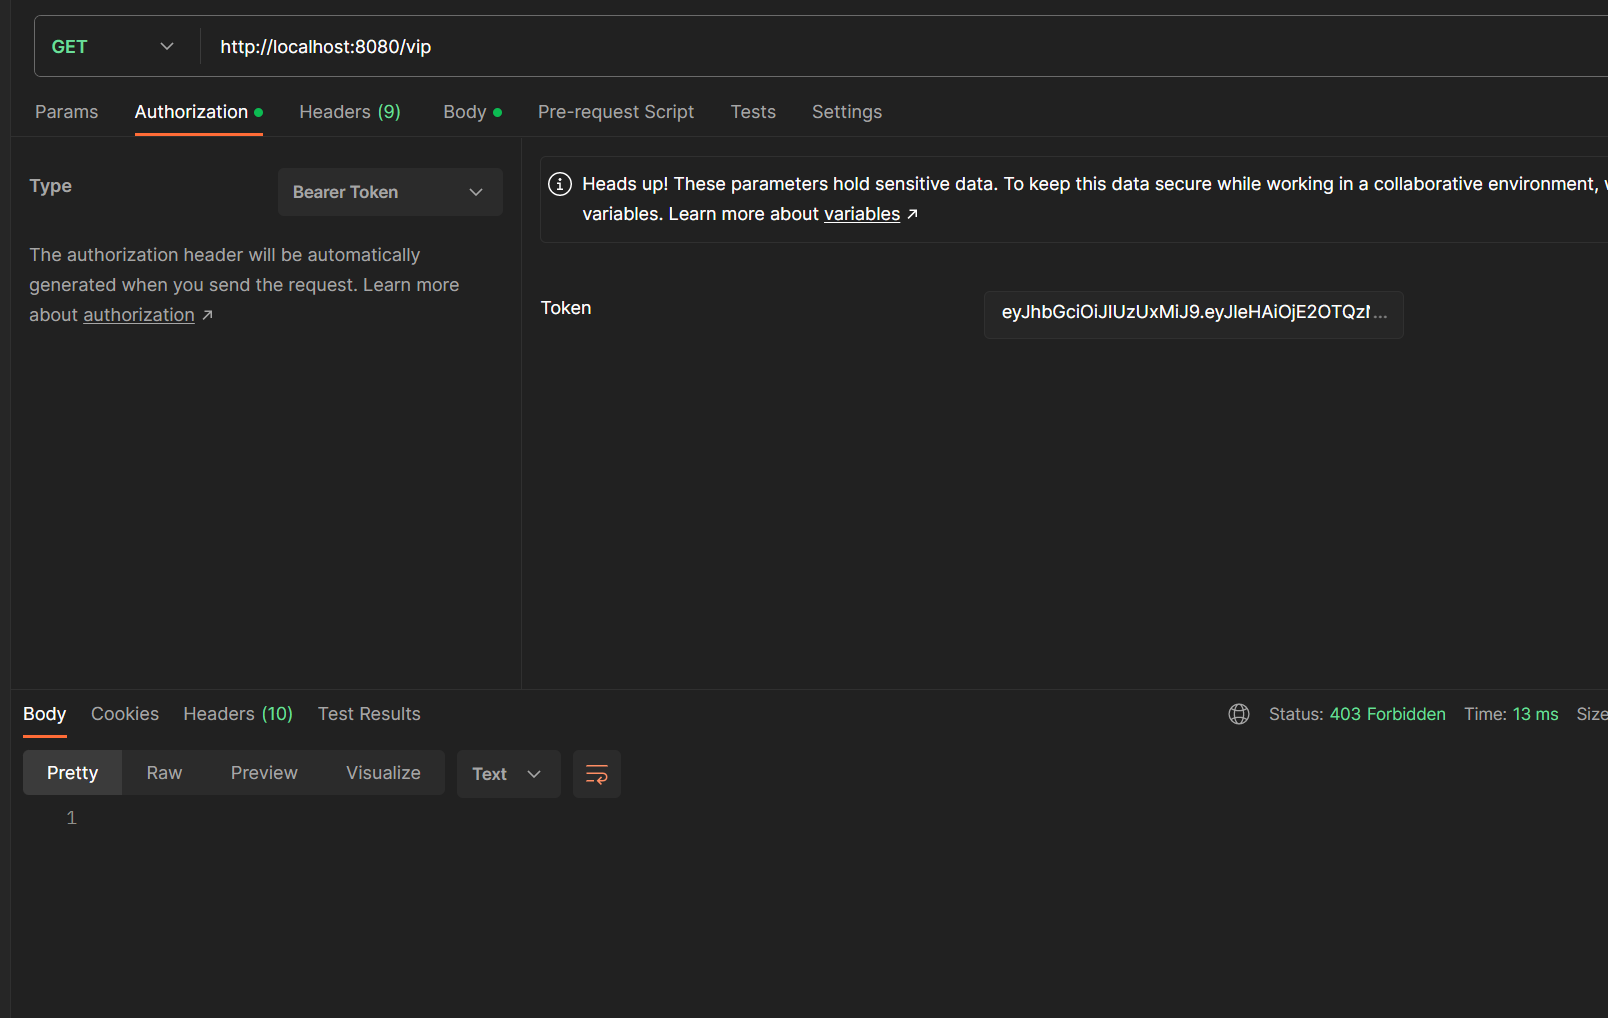
vip 에는 접근 불가능 (Forbidden)
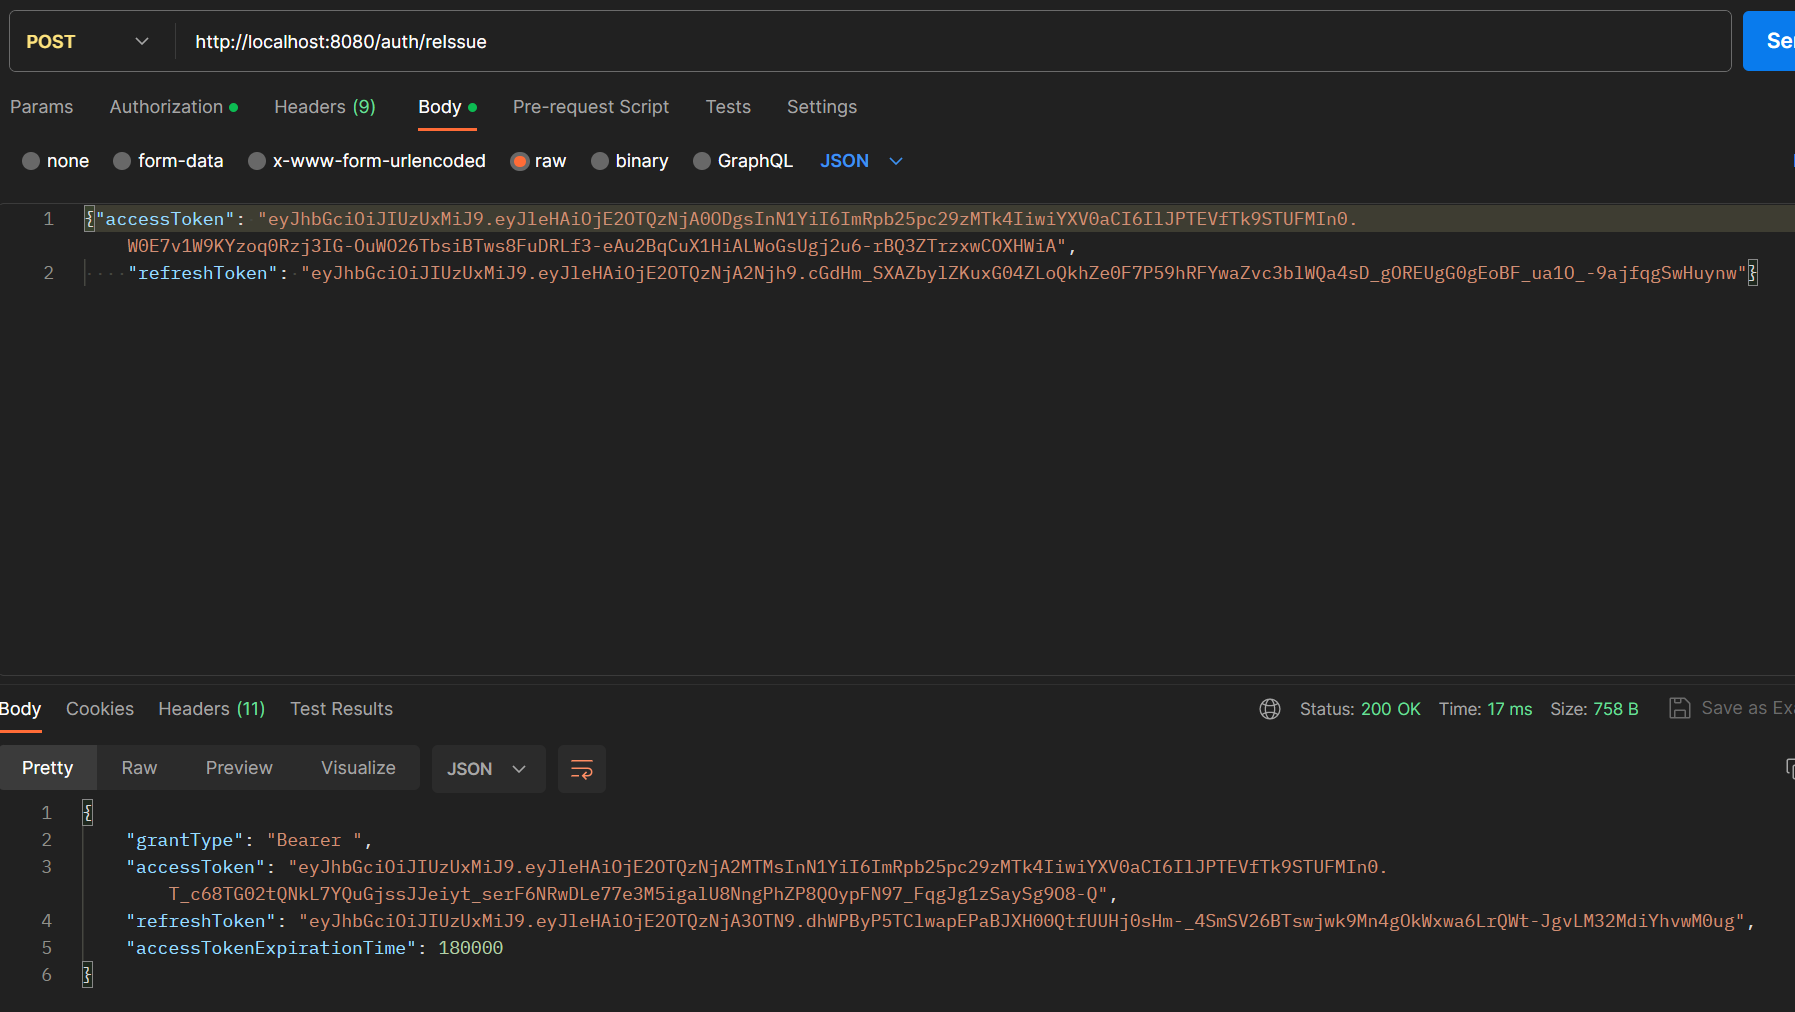
accessToken과 refreshToken으로 reIssue
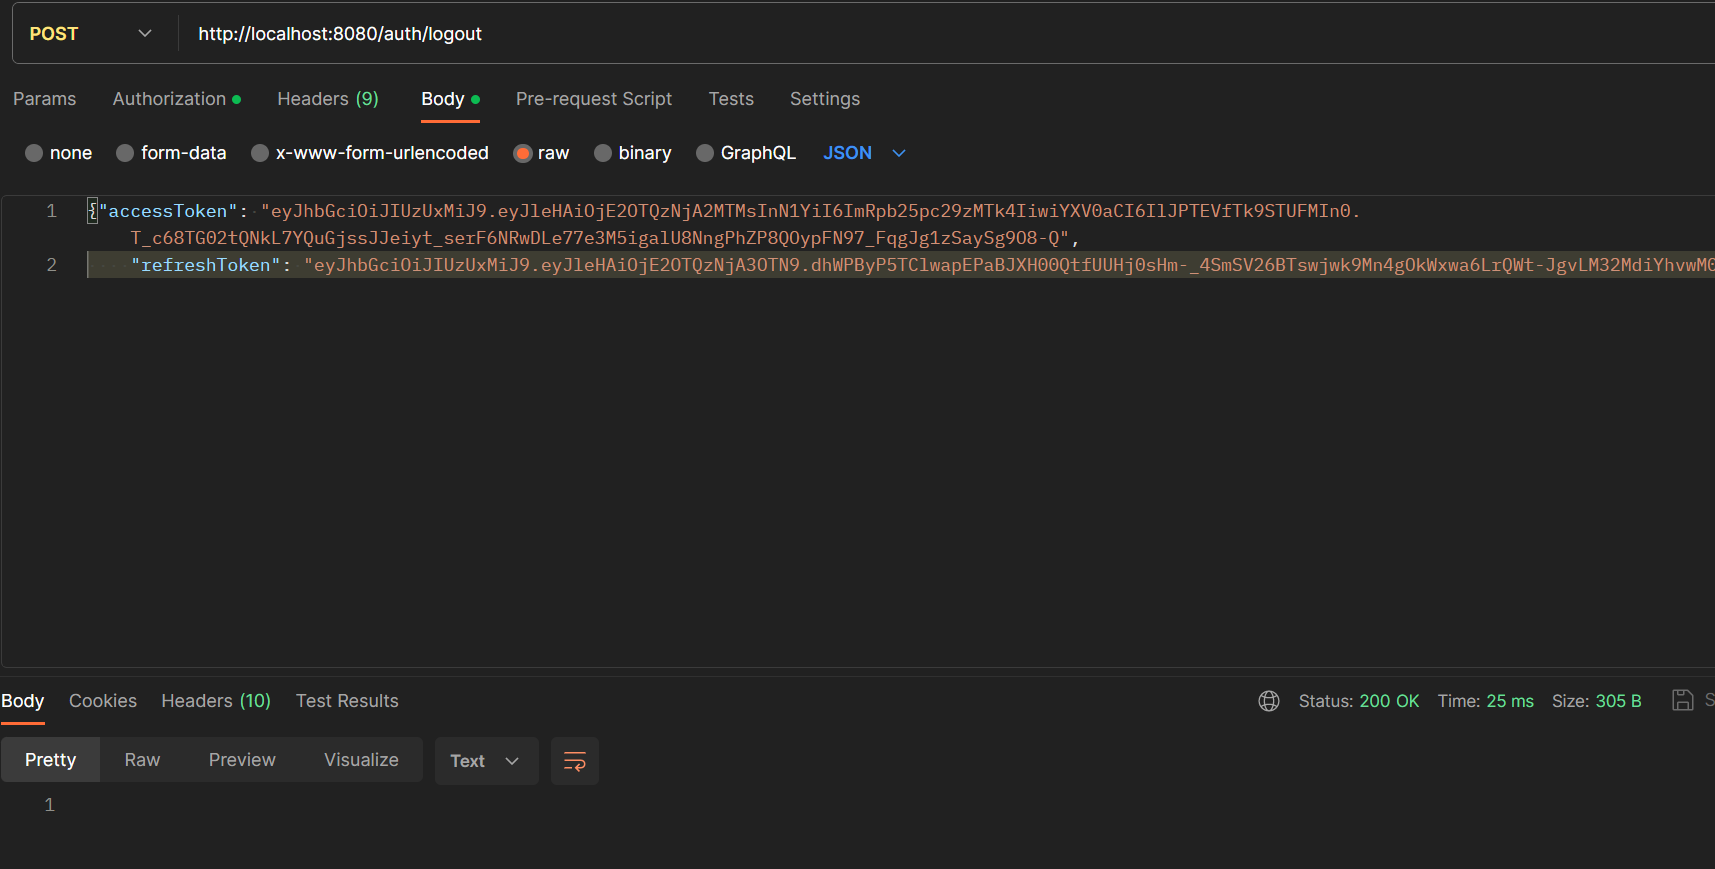
로그아웃 하기 전
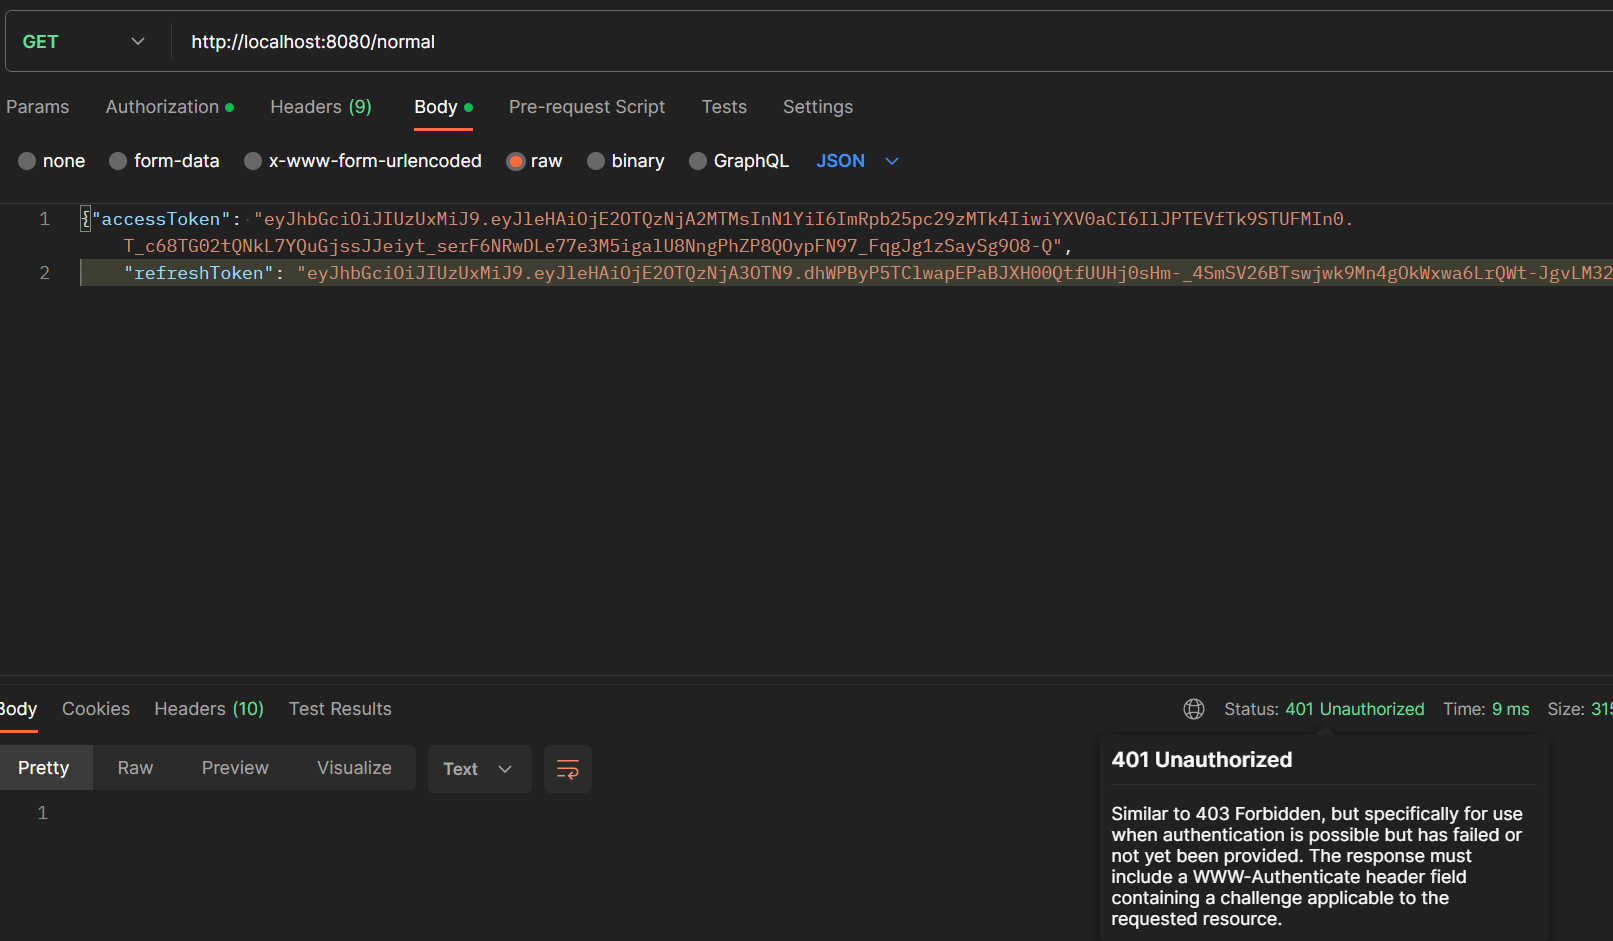
로그 아웃 한 이후
깃허브 링크
https://github.com/dionisos198/JwtLogin/tree/66a14955d3c23664b006ad92903c7db36b4ab177