
DI ( 의존성 주입 )
의존성을 주입한다.......참 뭔가 애매한 단어인거 같다
내가 처음 DI를 듣고 생각한 말이다
누가 누구에게 의존성을 주입하며 어디서부터 어디까지 이양하는지 헷갈렸다
DI 따라하기
- 새로운 프로젝트를 IntellJ에서 오픈하는 경우 Maven으로 오픈해야 한다.
ex) 변경 사항이 발생했을 때 . 다형성(조상타입)을 이용해 변경에 유리하게 대응할 수 있다. (생산성 증가)
Properties 자료형
<String Key:String Value >으로 타입 고정된 자료형
데이터를 읽기,저장에 편리해 사용
타입 제한 이에는 Map이랑 동일
OOP의 분리
변하는 것과 변하지 않는 것의 분리
관심사의 분리
중복코드의 분리
여기서 변동성의 분리를 하기 위해 DI를 사용한다
중복코드는 AOP를 활용
항상 분리를 생각하며 코드를 작성해라.
인텔리제이 오토임폴트 설정
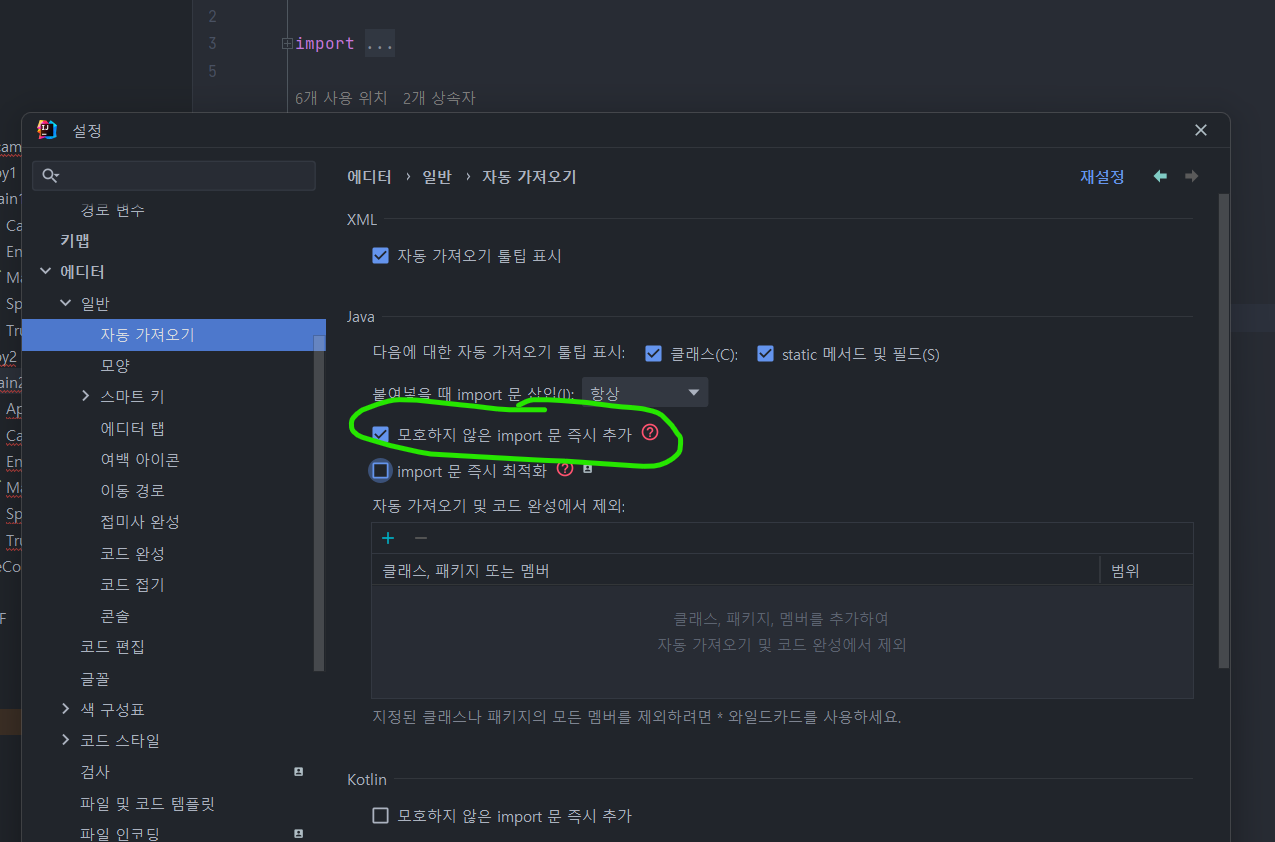
-@Componet가 붙으면 자동으로 찾아서 매핑해준다
여러명이 개발하게 되면 각자 작성한 메서드에 @Componet를 붙여 공유하며 사용한다 ( 컴포넌트 스캐닝을 활용)
diCopy1
class Car{}
class SportsCar extends Car{}
class Truck extends Car{}
class Engine{}


public class Main1 {

    public static void main(String[] args)throws Exception {
        Car car = (Car)getObject("car");
        Engine engine = (Engine)getObject("engine");
    }

    static Car getCar()throws Exception{
        Properties p = new Properties();
        p.load(new FileReader("config.txt"));
        Class clazz = Class.forName(p.getProperty("car"));

        return (Car)clazz.newInstance(); //Object가 예외 발생
    }

    static Object getObject(String key)throws Exception{
        Properties p = new Properties();
        p.load(new FileReader("config.txt"));

        Class clazz = Class.forName(p.getProperty(key));
        return clazz.newInstance();
    }
}
다형성을 이용해 객체 지향성을 살린 코드
iCopy2
class Car{}
class SportsCar extends Car{}
class Truck extends Car{}
class Engine{}
class AppContext{
    Map map;
    AppContext() {
        try {
            Properties p = new Properties();
            p.load(new FileReader("config.txt"));

            //properties에 있는 내용 map에 저장
            // 클래스 이름을 이용해 객체로 저장
            map = new HashMap(p); // 객체를 저장 변수로 p를 넣어 줬어야 한다.

            for(Object key : map.keySet()){
                Class clazz = Class.forName((String)map.get(key));
                map.put(key,clazz.newInstance());
            }
        }catch (Exception e){
            e.printStackTrace();
        }
    }

    Object getBean(String key){
        return map.get(key);
    }
}

public class Main2 {

    public static void main(String[] args)throws Exception {
        //Car car =  getCar();
        AppContext ac = new AppContext();

        Car car = (Car)ac.getBean("car");
        Engine engine = (Engine)ac.getBean("engine");

        System.out.println("car"+car);
        System.out.println("engine"+engine);
    }

    static Car getCar()throws Exception{
        Properties p = new Properties();
        p.load(new FileReader("config.txt"));
        Class clazz = Class.forName(p.getProperty("car"));

        return (Car)clazz.newInstance(); //Object가 예외 발생
    }

    static Object getObject(String key)throws Exception{
        Properties p = new Properties();
        p.load(new FileReader("config.txt"));

        Class clazz = Class.forName(p.getProperty(key));
        return clazz.newInstance();
    }
}
map과 다형성을 이용해 생산성을 향상 시킨 코드
매개변수를 활용해 config.xml의 파일을 효과적으로 가져온 후 반복하며 접근한다
diCopy3
@Component
class Car {
}

@Component
class SportsCar extends Car {
}

@Component
class Truck extends Car {
}

@Component
class Engine {
}

class AppContext {
    Map map;

    AppContext() {
        doComponet();
    }

    private void doComponet() {
        try {
            map = new HashMap();
            // 1. 패키지내의 클래스목록을 가져온다
            // 2. 반복문으로 클래스를 하나씩 읽어와서 @Componet 어노테이션을 확인
            // 3. 붙어있을 경우 객체를 map에 저장

            ClassLoader classLodder = AppContext.class.getClassLoader();
            ClassPath classPath = ClassPath.from(classLodder);

            Set<ClassPath.ClassInfo> set = classPath.getTopLevelClasses("com.fastcampus.ch3.diCopy3");

            for (ClassPath.ClassInfo classInfo : set) {
                Class clazz = classInfo.load();
                Component componet = (Component) clazz.getAnnotation(Component.class);
                if (componet != null) {
                    String id = StringUtils.uncapitalize(classInfo.getSimpleName());//클래스 이름만 가져오기
                    map.put(id, clazz.newInstance());
                }
            }
        } catch (Exception e) {
            throw new RuntimeException(e);
        }

    }


    Object getBean(String key) {
        return map.get(key);
    }
}

public class Main3 {

    public static void main(String[] args) throws Exception {
        AppContext ac = new AppContext();

        Car car = (Car) ac.getBean("car");
        Engine engine = (Engine) ac.getBean("engine");

        System.out.println("car" + car);
        System.out.println("engine" + engine);
    }

}
사실상 젤 핵심인거 @Commponet를 활용해 오가든 라이브러리를 활용해 컴포넌트만 읽어와 반복 접근한다. 컴포넌트로 의존성을 주입했다(이렇게 말하는건가 ?)